Page 183 of 504

WARNING!
In an accident, there is a greater risk of being thrown
from a vehicle with an open sunroof. You could also
be seriously injured or killed. Always fasten your
seat belt properly and make sure all passengers are
properly secured too.
Do not allow small children to operate the sunroof.
Never allow fingers or other body parts, or any
object to project through the sunroof opening. Injury
may result.
Wind Buffeting
Wind buffeting can be described as the perception of
pressure on the ears or a helicopter type sound in the
ears. Your vehicle may exhibit wind buffeting with the
windows down, or the sunroof (if equipped) in certain
open or partially open positions. This is a normal occur-
rence and can be minimized. If the buffeting occurs withthe rear windows open, open the front and rear windows
together to minimize the buffeting. If the buffeting occurs
with the sunroof open, adjust the sunroof opening to
minimize the buffeting or open any window.
Sunroof Maintenance
Use only a non-abrasive cleaner and a soft cloth to clean
the glass panel.
ELECTRICAL POWER OUTLETS — IF EQUIPPED
To the left of the instrument panel cup holder are two 12
volt power outlets. The upper outlet is controlled by the
ignition switch and the lower outlet is connected directly
to the battery. The upper outlet will also operate a
conventional cigar lighter unit (if equipped with an
optional Smoker’s Package).
A third outlet is located on the driver’s side, just to the
rear of the sliding door and is also controlled by the
ignition switch. The lower and rear outlets will not
accommodate a conventional cigar lighter unit.
UNDERSTANDING THE FEATURES OF YOUR VEHICLE 183
3
Page 185 of 504

Electrical Outlet Use With Engine Off
CAUTION!
•Many accessories that can be plugged in draw power from
the vehicle’s battery, even when not in use (i.e. cellular
phones, etc.). Eventually, if plugged in long enough, the
vehicle’s battery will discharge sufficiently to degrade
battery life and/or prevent engine starting.
•Accessories that draw higher power (i.e. coolers, vacuum
cleaners, lights, etc.), will degrade the battery even more
quickly. Only use these intermittently and with greater
caution.
•After the use of high power draw accessories, or long
periods of the vehicle not being started (with accessories
still plugged in), the vehicle must be driven a sufficient
length of time to allow the alternator to recharge the
vehicle’s battery.
•Power outlets are designed for accessory plugs only. Do not
hang any type of accessory or accessory bracket from the
plug. Improper use of the power outlet can cause damage.
CONVENIENCE TRAY DRAWER AND CUP
HOLDERS
Instrument Panel Cup Holders
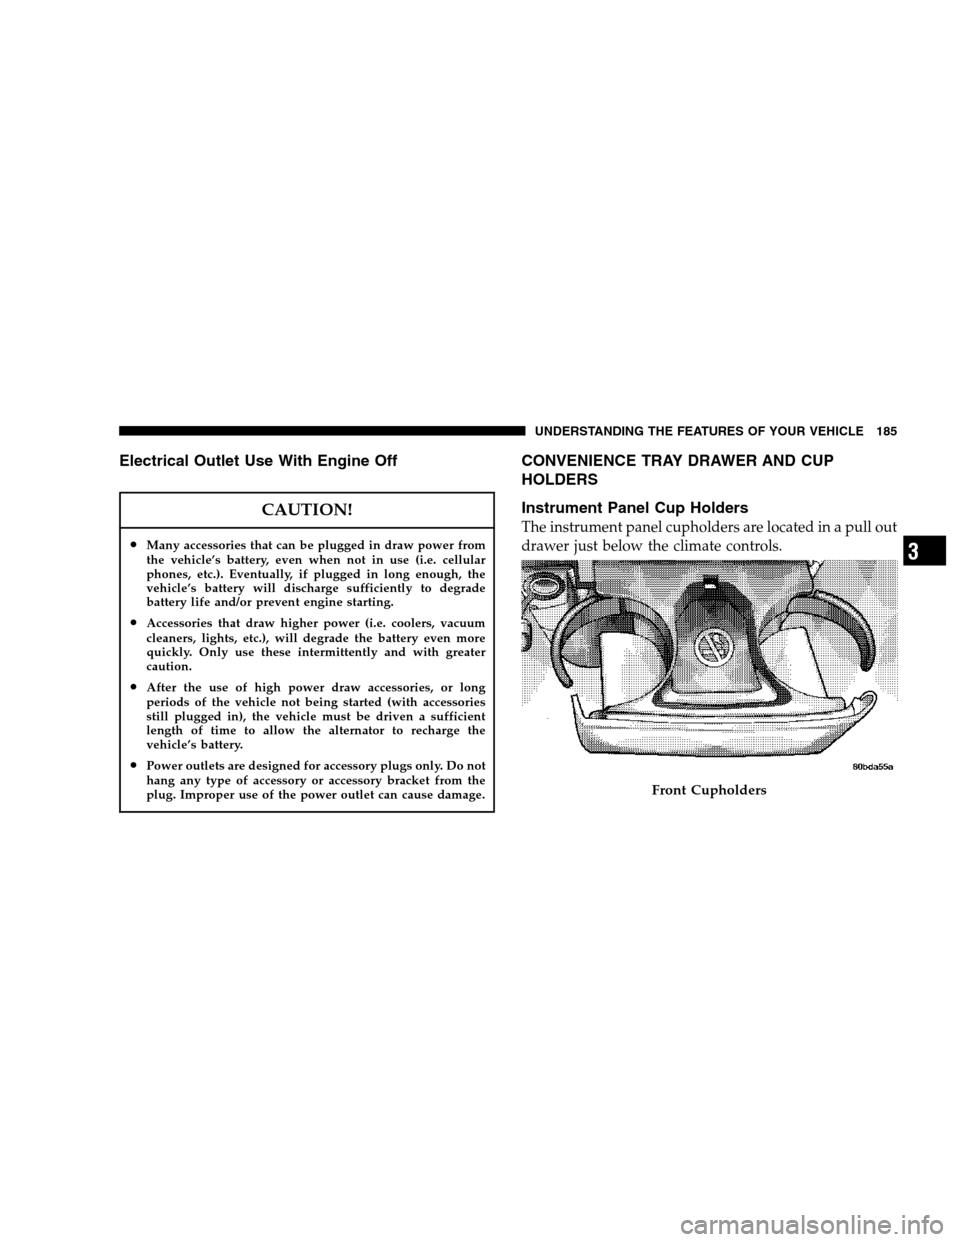
The instrument panel cupholders are located in a pull out
drawer just below the climate controls.
Front Cupholders
UNDERSTANDING THE FEATURES OF YOUR VEHICLE 185
3
Page 186 of 504

When the drawer is pulled out firmly, the arms of the
cupholders will spring out. Place the container to be held
into one of the cupholders and then push the arm toward
the container until the container is held stable. There are
adjustable positions for the arm so the cupholder can
accommodate a wide variety of container types and sizes,
including those with handles. The arms of the cupholder
can be adjusted in or out without damaging the detent
mechanism.
NOTE:Be sure the drawer is pulled out completely,
otherwise the adjustable arm detents will not engage and
the container will not be held stable.
Convenience Tray And Optional Smoker’s
Package Kit
Located between the instrument panel cupholders is a
convenience tray that has been designed to hold miscel-
laneous small items.NOTE:The convenience tray should never be used for
ashes without the optional ash receiver in place. Perma-
nent burn marks may result.
With the optional dealer installed Smoker’s package, a
removable ash receiver is inserted into the convenience
tray location. To install the ash receiver, slide the forward
edge into the convenience tray opening and push down
to lock it into position. For cleaning of the ash receiver, its
removal is accomplished by inserting the end of a key in
the pry slot that is molded into the rear edge of the ash
receiver and then twisting the key slightly.
186 UNDERSTANDING THE FEATURES OF YOUR VEHICLE
Page 191 of 504
3. Remove the storage bin.
NOTE:Make sure the latch handle pops out before
removing the storage bin.
To reinstall the storage bins, place the bin in the desired
location on the overhead rail, push firmly upward on the
bin with one hand, while pushing in on the latch handle,twist a
1�4turn to attach the bin to the rail. Push the latch
handle down to lock the storage bin in place.
WARNING!
In a collision, you or others in your vehicle could be
injured if the storage bins are not properly latched to
the Overhead Rail System. Always be sure the
storage bins are fully latched.
Removable Floor Console With Stow ’n Go
Seating — If Equipped
The removable floor console has a two power outlets,
storage tray, light, removable cell phone holder, tissue
holder, pen holder and a map holder. It can be removed
from the vehicle by pulling the release handle inside the
floor console.
To remove the console use the following procedure:
UNDERSTANDING THE FEATURES OF YOUR VEHICLE 191
3
Page 193 of 504

2. Squeeze the legs together to disengage the holder from
the floor console and remove the cell phone holder.
To reinstall the cell phone holder, align the pivot legs into
the guides and push forward to snap the legs into place.
Removable Floor Console Without Stow ’n Go
Seating — If Equipped
The removable floor console has a power outlet, storage
tray, light, cell phone holder, tissue holder, and a map
holder. It can be placed between either the front seats or
middle seats.
NOTE:When the console is located between the front
seats the outlet is protected by an automatic circuit
breaker and is powered directly from the battery, items
plugged into this outlet may discharge the battery
and/or prevent engine starting.To remove the console use the following procedure:
1. Open the rear lid and remove the storage tray.
2. Pull up on the release handle located inside the floor
console to disengage the floor console, reinstall the
storage tray and close the rear lid.
Removable Floor Console
UNDERSTANDING THE FEATURES OF YOUR VEHICLE 193
3
Page 196 of 504

CAUTION!
•Many accessories that can be plugged in draw
power from the vehicle’s battery, even when not
in use (i.e. cellular phones, etc.). Eventually, if
plugged in long enough, the vehicle’s battery will
discharge sufficiently to degrade battery life
and/or prevent engine starting.
•Accessories that draw higher power (i.e. coolers,
vacuum cleaners, lights, etc.), will degrade the
battery even more quickly. Only use these inter-
mittently and with greater caution.
•After the use of high power draw accessories, or
long periods of the vehicle not being started (with
accessories still plugged in), the vehicle must be
driven a sufficient length of time to allow the
generator to recharge the vehicle’s battery.
Rear Compartment Storage Bins
Your vehicle may be equipped with open storage bins
located in each rear trim panel.
Cargo/Tub Nets
Two cargo/tub nets are available on vehicles equipped
with Stow ’n Go Seating. The cargo nets fit in the second
row storage bin and the third row tub. The nets are
supported by hooks located in these areas. Refer to
instructions provided in the net kit.
Coat Hooks
Coat hooks are located along the headliner for the second
and third row seating positions. The coat hook load limit
is 10 lbs (4.5 kg). Exceeding the recommended load limit
can cause the coat hooks to break or disengage from the
vehicle.
196 UNDERSTANDING THE FEATURES OF YOUR VEHICLE
Page 197 of 504

Cargo Area Storage
The seats in your vehicle are in-line which enables you to
stow long objects, such as lumber or skis, on the floor
without moving the seats.
NOTE:With all rear seat backs folded,a4x8foot sheet
of building material may be stored in the long-wheelbase
body style on top of the folded seats with the liftgate
closed. The front seats must be moved slightly forward of
the rearmost position. If the rear seats are removed no
front seat adjustment is needed and more than one4x8
sheet of building material may be stored.
The liftgate sill plate has a raised line with the statement
“Load To This Line”. This line indicates how far rearward
cargo can be placed without interfering with liftgate
closing.
ROOF LUGGAGE RACK — IF EQUIPPED
The crossbars and siderails are designed to carry the
weight on vehicles equipped with a luggage rack. The
load must not exceed 68 kg (150 lbs), and should be
uniformly distributed over the luggage rack crossbars.
Rear Cargo Area Loading Limit
UNDERSTANDING THE FEATURES OF YOUR VEHICLE 197
3
Page 211 of 504

when a system fault is detected. The flash cycle will
repeat every ten minutes or until the fault condition is
removed and reset.
CAUTION!
The Tire Pressure Monitoring System (TPMS) has
been optimized for the original equipment tires and
wheels. TPMS pressures and warning have been
established for the tire size equipped on your ve-
hicle. Undesirable system operation or sensor dam-
age may result when using replacement equipment
that is not of the same size, type, and / or style.
Aftermarket wheels can cause sensor damage. Do
not use tire sealant from a can, or balance beads if
your vehicle is equipped with a TPMS, as damage to
the sensors may result.
3. Low Fuel Light
When the fuel level reaches approximately 3.0
gallons (11.0 liters) this light will turn on and
remain on until fuel is added.
4. Turn Signal Indicators
The arrow will flash with the exterior turn signal
when the turn signal lever is operated.
If the vehicle electronics sense that the vehicle has
traveled about one mile with the turn signals on, a chime
will sound to alert you to turn the signals off. If either
indicator flashes at a rapid rate, check for a defective
outside light bulb.
5. Liftgate Ajar
This light turns on if the liftgate is not com-
pletely closed.
UNDERSTANDING YOUR INSTRUMENT PANEL 211
4