2007 CHEVROLET TAHOE steering wheel
[x] Cancel search: steering wheelPage 215 of 634

Exterior Lamps
The exterior lamps
control is located on the
instrument panel to
the left of the steering
wheel.
It controls the following systems:
Headlamps
Taillamps
Parking Lamps
License Plate Lamps
Instrument Panel Lights
The exterior lamps control has four positions:
9(Off):Turn the control to this position to turn
off the automatic headlamps and daytime
running lamps (DRL). Turning the headlamp
control to the off position again will turn the
automatic headlamps or DRL back on.
For vehicles �rst sold in Canada, the off position
will only work for vehicles that are shifted into
the PARK (P) position.AUTO (Automatic):Turn the control to this
position to automatically turn on the headlamps at
normal brightness, together with the following:
Parking Lamps
Instrument Panel Lights
Taillamps
License Plate Lamps
;(Parking Lamps):Turn the control to this
position to turn on the parking lamps together with
the following:
Instrument Panel Lights
Taillamps
License Plate Lamps
2(Headlamps):Turn the control to this position
to turn on the headlamps together with the
following lamps listed below.
When the headlamps are turned on while the
vehicle is on, the headlamps will turn off
automatically 10 minutes after the ignition is
turned off. When the headlamps are turned on
while the vehicle is off, the headlamps will continue
to stay on. Turn the control to the off position to
turn the headlamps off or the battery will be
drained.
215
Page 261 of 634

If your vehicle does not have DIC buttons, see
“DIC Operation and Displays (Without DIC
Buttons)” later in this section for the displays
available.
DIC Operation and Displays (With
DIC Buttons)
If your vehicle has DIC buttons, the information
below explains the operation of this system.
The DIC has different displays which can be
accessed by pressing the DIC buttons located on
the instrument panel, next to the steering
wheel.
The DIC displays trip, fuel, and vehicle system
information, and warning messages if a system
problem is detected.
The DIC also allows some features to be
customized. SeeDIC Vehicle Customization (With
DIC Buttons) on page 280for more information.
If your vehicle has DIC buttons, you can also use
the trip odometer reset stem to view some of
the DIC displays. See “DIC Operation and Displays
(Without DIC Buttons)” later in this section.
DIC Buttons
The buttons are the
trip/fuel, vehicle
information,
customization, and
set/reset buttons. The
button functions
are detailed in the
following pages.
3(Trip/Fuel):Press this button to display the
odometer, trip odometer, fuel range, average
economy, fuel used, timer, and transmission
temperature. Some vehicles also display
instantaneous economy and an Active Fuel
Management™ indicator.
261
Page 290 of 634

Audio System(s)
Determine which radio your vehicle has and then
read the pages following to familiarize yourself
with its features.
Driving without distraction is a necessity for a
safer driving experience. SeeDefensive Driving on
page 356. By taking a few moments to read this
manual and get familiar with your vehicle’s
audio system, you can use it with less effort, as
well as take advantage of its features. While your
vehicle is parked, set up your audio system by
presetting your favorite radio stations, setting the
tone and adjusting the speakers. Then, when
driving conditions permit, you can tune to
your favorite stations using the presets and
steering wheel controls if the vehicle has them.{CAUTION:
This system provides you with a far greater
access to audio stations and song listings.
Giving extended attention to entertainment
tasks while driving can cause a crash and
you or others can be injured or killed.
Always keep your eyes on the road and
your mind on the drive — avoid engaging
in extended searching while driving.
Keeping your mind on the drive is important for
safe driving. Here are some ways in which you can
help avoid distraction while driving.
290
Page 291 of 634

While your vehicle is parked:
Familiarize yourself with all of its controls.
Familiarize yourself with its operation.
Set up your audio system by presetting your
favorite radio stations, setting the tone, and
adjusting the speakers. Then, when driving
conditions permit, you can tune to your favorite
radio stations using the presets and steering
wheel controls if the vehicle has them.
Notice:Before adding any sound equipment to
your vehicle, such as an audio system, CD
player, CB radio, mobile telephone, or two-way
radio, make sure that it can be added by
checking with your dealer/retailer. Also, check
federal rules covering mobile radio and
telephone units. If sound equipment can be
added, it is very important to do it properly.
Added sound equipment can interfere with the
operation of your vehicle’s engine, radio, or
other systems, and even damage them. Your
vehicle’s systems can interfere with the
operation of sound equipment that has been
added.Your vehicle has a feature called Retained
Accessory Power (RAP). With RAP, the audio
system can be played even after the ignition
is turned off. SeeRetained Accessory Power
(RAP) on page 141for more information.
Setting the Time (MP3 Radio with a
Single CD Player)
If your vehicle has a radio with a single CD, the
radio has a clock button for setting the time
and date.
To set the time and date, follow the instructions:
1. Press the clock button and the HR, MIN, MM,
DD, YYYY (hour, minute, month, day, and
year) displays.
2. Press the pushbutton located under any one
of the labels that you want to change. Every
time the pushbutton is pressed again, the time
or the date if selected, increases by one.
Another way to increase the time or date, is
to press the right SEEK arrow or the FWD
(forward) button.
291
Page 296 of 634

Finding a Station
BAND:Press this button to switch between AM,
FM, or XM™ (if equipped). The selection displays.
f(Tune):Turn this knob to select radio
stations.
©SEEK¨:Press the right or left SEEK arrow
to go to the next or to the previous station and
stay there.
To scan stations, press and hold either SEEK
arrow for a few seconds until a beep sounds. The
radio goes to a station, plays for a few seconds,
then goes to the next station. Press either
SEEK arrow again to stop scanning.
The radio seeks and scans stations only with a
strong signal that are in the selected band.
4(Information) (XM™ Satellite Radio Service,
MP3, and RDS Features):Press the information
button to display additional text information
related to the current FM-RDS or XM™ station, or
MP3 song. A choice of additional information
such as: Channel, Song, Artist, and CAT
(category) might appear. Continue pressing the
information button to highlight the desired label, or
press the pushbutton positioned under any one
of the labels and the information about that
label displays.
When information is not available, No Info
displays.
Storing a Radio Station as a Favorite
Drivers are encouraged to set up their radio station
favorites while the vehicle is parked. Tune to
your favorite stations using the presets, favorites
button, and steering wheel controls, if the
vehicle has this feature. SeeDefensive Driving on
page 356.
296
Page 307 of 634

Finding a Station
BAND:Press this button to switch between AM,
FM, or XM™ (if equipped). The display shows
the selection.
f(Tune):Turn this knob to select radio stations.
©SEEK¨:Press the left or right SEEK
arrow to go to the next or to the previous station
and stay there.
To scan stations, press and hold either SEEK
arrow for a few seconds until a beep sounds. The
radio goes to a station, plays for a few seconds,
then goes to the next station. Press either
SEEK arrow again to stop scanning.
The radio seeks and scans stations only with a
strong signal that are in the selected band.
4(Information) (XM™ Satellite Radio Service,
MP3, and RDS Features):Press the information
button to display additional text information related
to the current FM-RDS or XM™ station, or MP3
song. A choice of additional information such as:
Channel, Song, Artist, and CAT (category) could
appear. Continue pressing the information button to
highlight the desired label, or press the pushbutton
positioned under any one of the labels and the
information about that label is displayed.
When information is not available, No Info displays.
Storing a Radio Station as a Favorite
Drivers are encouraged to set up their radio station
favorites while the vehicle is parked. Tune to your
favorite stations using the presets, favorites button,
and steering wheel controls, if the vehicle has them.
SeeDefensive Driving on page 356.
FAV (Favorites):A maximum of 36 stations can
be programmed as favorites using the
six pushbuttons positioned below the radio station
frequency labels and by using the radio favorites
page button (FAV button). Press the FAV button to
go through up to six pages of favorites, each
having six favorite stations available per page.
307
Page 351 of 634

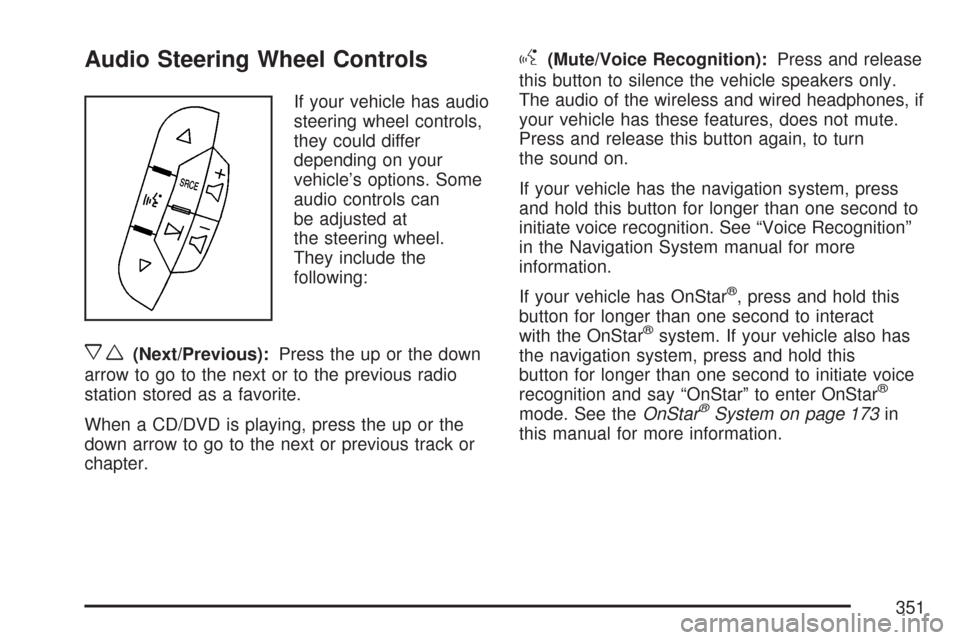
Audio Steering Wheel Controls
If your vehicle has audio
steering wheel controls,
they could differ
depending on your
vehicle’s options. Some
audio controls can
be adjusted at
the steering wheel.
They include the
following:
xw(Next/Previous):Press the up or the down
arrow to go to the next or to the previous radio
station stored as a favorite.
When a CD/DVD is playing, press the up or the
down arrow to go to the next or previous track or
chapter.
g(Mute/Voice Recognition):Press and release
this button to silence the vehicle speakers only.
The audio of the wireless and wired headphones, if
your vehicle has these features, does not mute.
Press and release this button again, to turn
the sound on.
If your vehicle has the navigation system, press
and hold this button for longer than one second to
initiate voice recognition. See “Voice Recognition”
in the Navigation System manual for more
information.
If your vehicle has OnStar
®, press and hold this
button for longer than one second to interact
with the OnStar
®system. If your vehicle also has
the navigation system, press and hold this
button for longer than one second to initiate voice
recognition and say “OnStar” to enter OnStar
®
mode. See theOnStar®System on page 173in
this manual for more information.
351
Page 363 of 634

Remember: ABS does not change the time you
need to get your foot up to the brake pedal or
always decrease stopping distance. If you get too
close to the vehicle in front of you, you will not have
time to apply your brakes if that vehicle suddenly
slows or stops. Always leave enough room up
ahead to stop, even though you have ABS.
Using ABS
Do not pump the brakes. Just hold the brake
pedal down �rmly and let anti-lock work for you.
You may feel the brakes vibrate, or you may notice
some noise, but this is normal.
Braking in Emergencies
With ABS, you can steer and brake at the same
time. In many emergencies, steering can help you
more than even the very best braking.
Locking Rear Axle
If your vehicle has this feature, your locking rear
axle can give you additional traction on snow, mud,
ice, sand or gravel. It works like a standard axle
most of the time, but when one of the rear wheels
has no traction and the other does, this feature will
allow the wheel with traction to move the vehicle.
StabiliTrak®System
Your vehicle may be equipped with the
StabiliTrak®system which combines antilock
brake, traction and stability control systems and
helps the driver maintain directional control of the
vehicle in most driving conditions.
When you �rst start your vehicle and begin to drive
away, the system performs several diagnostic
checks to ensure there are no problems. You may
hear or feel the system working. This is normal and
does not mean there is a problem with your vehicle.
The system should initialize before the vehicle
reaches 20 mph (32 km/h). In some cases, it may
take approximately two miles of driving before the
system initializes.
363