2007 CHEVROLET SUBURBAN wheel torque
[x] Cancel search: wheel torquePage 148 of 634
SECOND (2):This position reduces vehicle speed
even more than THIRD (3) without using your
brakes. You can use SECOND (2) on hills. It can
help control your speed as you go down steep
mountain roads, but then you would also want to
use your brakes off and on.
If you select SECOND (2) and the Tow/Haul has
not been selected, the transmission will drive
in SECOND (2) gear. You may use this feature for
reducing the speed of the rear wheels when
you are trying to start your vehicle from a stop on
slippery road surfaces.
If you select SECOND (2) and the Tow/Haul has
also been selected, the transmission operation will
be limited to FIRST (1) and SECOND (2) gears.
You may use this feature for reducing the speed of
the rear wheels when you are trying to start
your vehicle from a stop on slippery road surfaces.
FIRST (1):This position reduces vehicle speed
even more than SECOND (2) without using
your brakes. You can use it on very steep hills, or
in deep snow or mud. If the shift lever is put in
FIRST (1) while the vehicle is moving forward, the
transmission will not shift into �rst gear until the
vehicle is going slowly enough.Notice:Spinning the tires or holding the
vehicle in one place on a hill using only the
accelerator pedal may damage the
transmission. The repair will not be covered by
your warranty. If you are stuck, do not spin
the tires. When stopping on a hill, use the
brakes to hold the vehicle in place.
When temperatures are very cold, the
Hydra-Matic
®Automatic Transmission’s gear
shifting may be delayed providing more stable
shifts until the engine warms up. Shifts may
be more noticeable with a cold transmission. This
difference in shifting is normal.
The transmission torque converter clutch operation
is restricted during cold operation. When the
startup transmission temperature is approximately
64°F (18°C) your torque converter clutch will
temporarily not operate. Once the transmission
temperature rises above 68°F (20°C), normal
operation will resume.
148
Page 152 of 634
4n(Four-Wheel Drive Low):This setting also
engages your front axle and delivers extra
torque. You may never need this setting. It sends
maximum power to all four wheels. You might
choose Four-Wheel Drive Low if you are driving
off-road in deep sand, deep mud, deep snow, and
while climbing or descending steep hills.
StabiliTrak
®will not engage in this mode. See
StabiliTrak®System on page 363for more
information.
{CAUTION:
Shifting the transfer case to NEUTRAL
can cause your vehicle to roll even if the
transmission is in PARK (P). You or
someone else could be seriously injured.
Be sure to set the parking brake before
placing the transfer case in NEUTRAL.
SeeParking Brake on page 156.NEUTRAL (N):Shift the vehicle’s transfer case to
NEUTRAL only when towing your vehicle. See
Recreational Vehicle Towing on page 418or
Towing Your Vehicle on page 417for more
information.
If the SERVICE 4 WHEEL DRIVE message stays
on, you should take your vehicle to your dealer
for service. See “SERVICE 4 WHEEL DRIVE
message” underDIC Warnings and Messages on
page 270.
Shifting Into Four-Wheel Drive High or
AUTO (Automatic Four-Wheel Drive)
Turn the knob to the Four-Wheel High or AUTO
position. This can be done at any speed,
except when shifting from Four-Wheel Drive Low.
The indicator light will �ash while shifting. It will
remain on when the shift is completed.
152
Page 158 of 634

Leaving Your Vehicle With the Engine
Running
{CAUTION:
It can be dangerous to leave your vehicle
with the engine running. Your vehicle
could move suddenly if the shift lever is
not fully in PARK (P) with the parking
brake �rmly set.
If you have four-wheel drive and your
transfer case is in NEUTRAL, your vehicle
will be free to roll, even if your shift lever
is in PARK (P). So be sure the transfer
case is in a drive gear — not in NEUTRAL.
And, if you leave the vehicle with the
engine running, it could overheat and
even catch �re. You or others could be
injured. Do not leave your vehicle with the
engine running unless you have to.If you have to leave your vehicle with the engine
running, be sure your vehicle is in PARK (P)
and the parking brake is �rmly set before
you leave it. After you move the shift lever into
PARK (P), hold the regular brake pedal down.
Then, see if you can move the shift lever away
from PARK (P) without �rst pulling it toward you. If
you can, it means that the shift lever was not
fully locked into PARK (P).
Torque Lock
If you are parking on a hill and you do not shift
your transmission into PARK (P) properly,
the weight of the vehicle may put too much force
on the parking pawl in the transmission. You
may �nd it difficult to pull the shift lever out
of PARK (P). This is called torque lock. To prevent
torque lock, set the parking brake and then shift
into PARK (P) properly before you leave the
driver’s seat. To �nd out how, seeShifting Into
Park (P) on page 157.
When you are ready to drive, move the shift lever
out of PARK (P) before you release the parking
brake.
158
Page 489 of 634

Brake Wear
Your vehicle has four-wheel disc brakes.
Disc brake pads have built-in wear indicators that
make a high-pitched warning sound when the
brake pads are worn and new pads are needed.
The sound may come and go or be heard all
the time your vehicle is moving, except when you
are pushing on the brake pedal �rmly.
{CAUTION:
The brake wear warning sound means that
soon the brakes will not work well. That
could lead to an accident. When you hear
the brake wear warning sound, have your
vehicle serviced.
Notice:Continuing to drive with worn-out
brake pads could result in costly brake repair.Some driving conditions or climates may cause a
brake squeal when the brakes are �rst applied
or lightly applied. This does not mean something
is wrong with your brakes.
Properly torqued wheel nuts are necessary to help
prevent brake pulsation. When tires are rotated,
inspect brake pads for wear and evenly tighten
wheel nuts in the proper sequence to GM torque
speci�cations.
Brake linings should always be replaced as
complete axle sets.
Brake Pedal Travel
See your dealer if the brake pedal does not return
to normal height, or if there is a rapid increase
in pedal travel. This could be a sign of brake
trouble.
Brake Adjustment
Every time you make a brake stop, your disc
brakes adjust for wear.
489
Page 522 of 634
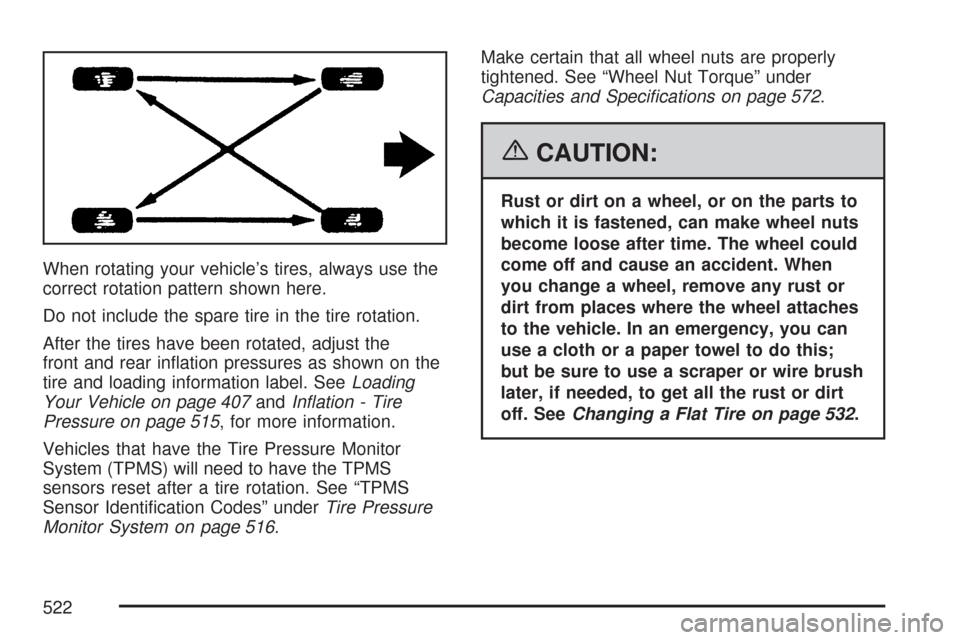
When rotating your vehicle’s tires, always use the
correct rotation pattern shown here.
Do not include the spare tire in the tire rotation.
After the tires have been rotated, adjust the
front and rear in�ation pressures as shown on the
tire and loading information label. SeeLoading
Your Vehicle on page 407andIn�ation - Tire
Pressure on page 515, for more information.
Vehicles that have the Tire Pressure Monitor
System (TPMS) will need to have the TPMS
sensors reset after a tire rotation. See “TPMS
Sensor Identi�cation Codes” underTire Pressure
Monitor System on page 516.Make certain that all wheel nuts are properly
tightened. See “Wheel Nut Torque” under
Capacities and Speci�cations on page 572.
{CAUTION:
Rust or dirt on a wheel, or on the parts to
which it is fastened, can make wheel nuts
become loose after time. The wheel could
come off and cause an accident. When
you change a wheel, remove any rust or
dirt from places where the wheel attaches
to the vehicle. In an emergency, you can
use a cloth or a paper towel to do this;
but be sure to use a scraper or wire brush
later, if needed, to get all the rust or dirt
off. SeeChanging a Flat Tire on page 532.
522
Page 542 of 634
8. Tighten each wheel nut by hand. Then use
the wheel wrench to tighten the nuts until the
wheel is held against the hub.
9. Turn the wheel wrench counterclockwise to
lower the vehicle. Lower the jack completely.
{CAUTION:
Incorrect wheel nuts or improperly
tightened wheel nuts can cause the wheel
to come loose and even come off. This
could lead to an accident. Be sure to use
the correct wheel nuts. If you have to
replace them, be sure to get new GM
original equipment wheel nuts. Stop
somewhere as soon as you can and have
the nuts tightened with a torque wrench to
the proper torque speci�cation. See
Capacities and Specifications on page 572
for wheel nut torque speci�cation.Notice:Improperly tightened wheel nuts can
lead to brake pulsation and rotor damage.
To avoid expensive brake repairs, evenly
tighten the wheel nuts in the proper sequence
and to the proper torque speci�cation. See
Capacities and Specifications on page 572for
the wheel nut torque speci�cation.
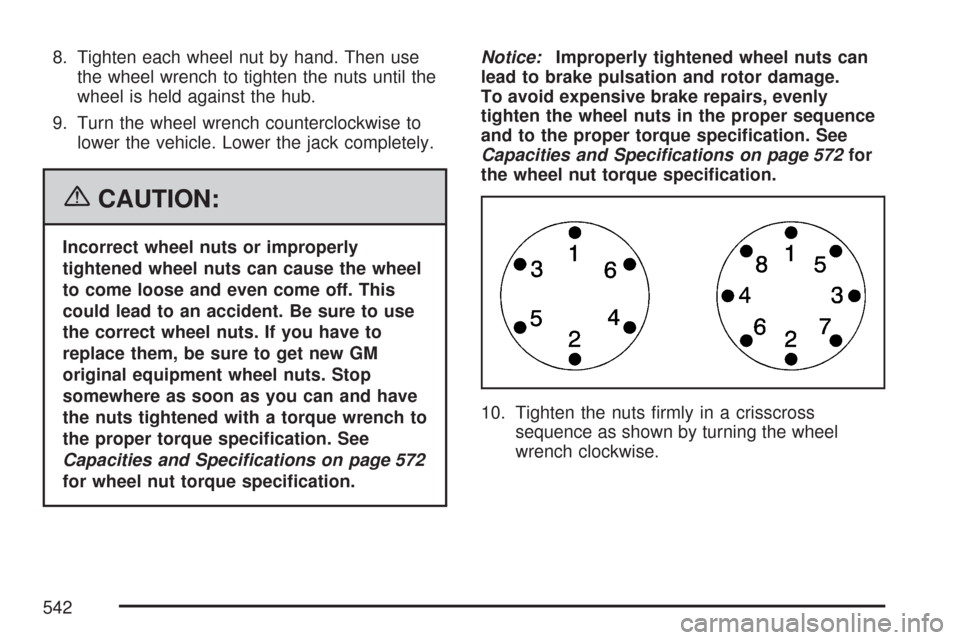
10. Tighten the nuts �rmly in a crisscross
sequence as shown by turning the wheel
wrench clockwise.
542
Page 573 of 634
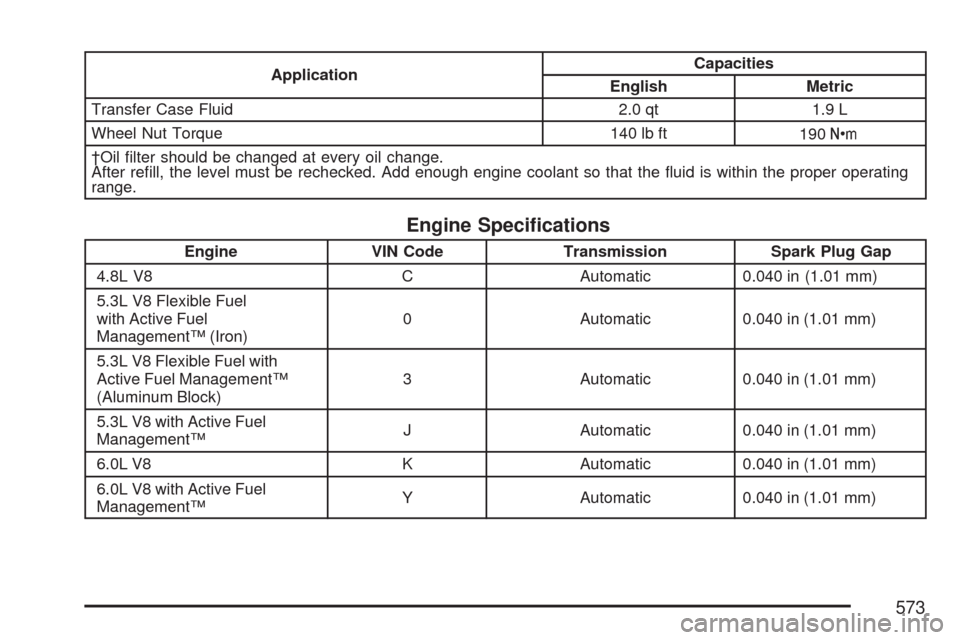
ApplicationCapacities
English Metric
Transfer Case Fluid 2.0 qt 1.9 L
Wheel Nut Torque 140 lb ft
190Y
†Oil �lter should be changed at every oil change.
After re�ll, the level must be rechecked. Add enough engine coolant so that the �uid is within the proper operating
range.
Engine Speci�cations
Engine VIN Code Transmission Spark Plug Gap
4.8L V8 C Automatic 0.040 in (1.01 mm)
5.3L V8 Flexible Fuel
with Active Fuel
Management™ (Iron)0 Automatic 0.040 in (1.01 mm)
5.3L V8 Flexible Fuel with
Active Fuel Management™
(Aluminum Block)3 Automatic 0.040 in (1.01 mm)
5.3L V8 with Active Fuel
Management™J Automatic 0.040 in (1.01 mm)
6.0L V8 K Automatic 0.040 in (1.01 mm)
6.0L V8 with Active Fuel
Management™Y Automatic 0.040 in (1.01 mm)
573