2007 CHEVROLET SUBURBAN auxiliary battery
[x] Cancel search: auxiliary batteryPage 199 of 634

Instrument Panel Overview........................ 202
Hazard Warning Flashers.......................... 204
Other Warning Devices............................. 204
Horn.......................................................... 204
Tilt Wheel.................................................. 204
Turn Signal/Multifunction Lever.................. 205
Turn and Lane-Change Signals................. 206
Headlamp High/Low-Beam Changer.......... 207
Flash-to-Pass............................................ 207
Windshield Wipers..................................... 207
Rainsense™ II Wipers............................... 208
Windshield Washer.................................... 209
Rear Window Wiper/Washer...................... 210
Cruise Control........................................... 211
Exterior Lamps.......................................... 215
Headlamps on Reminder........................... 216
Daytime Running Lamps (DRL)................. 216
Automatic Headlamp System..................... 217
Fog Lamps................................................ 218
Auxiliary Roof Mounted Lamp.................... 218Instrument Panel Brightness...................... 219
Dome Lamps............................................. 219
Dome Lamp Override................................ 219
Entry Lighting............................................ 220
Exit Lighting.............................................. 220
Reading Lamps......................................... 220
Electric Power Management...................... 220
Battery Run-Down Protection..................... 221
Ultrasonic Rear Parking
Assist (URPA)........................................ 222
Accessory Power Outlet(s)........................ 225
Ashtray(s) and Cigarette Lighter................ 227
Climate Controls......................................... 227
Climate Control System............................. 227
Dual Automatic Climate Control System.... 231
Outlet Adjustment...................................... 238
Rear Air Conditioning and Heating
System.................................................. 239
Rear Air Conditioning and Heating System
and Electronic Climate Controls............... 240
Section 3 Instrument Panel
199
Page 340 of 634

Battery Replacement
To change the batteries on the headphones, do
the following:
1. Turn the screw with a coin or screw driver
to loosen the battery door located on the left
side of the headphones. Slide the battery
door open.
2. Replace the two batteries in the compartment.
Make sure that they are installed correctly,
using the diagram on the inside of the battery
compartment.
3. Replace the battery door and tighten the door
screw.
If the headphones are to be stored for a long
period of time, remove the batteries and keep them
in a cool, dry place.
Audio/Video (A/V) Jacks
The A/V jacks, located on the rear of the �oor
console, allow audio or video signals to be
connected from an auxiliary device such as a
camcorder or a video game unit to the RSE system.
Adapter connectors or cables may be required to
connect the auxiliary device to the A/V jacks. Refer
to the manufacturer’s instructions for proper usage.
The A/V jacks are color coded to match typical
home entertainment system equipment. The yellow
jack (A) is for the video input. The white jack (B) is
for the left audio input. The red jack (C) is for the
right audio input.
Power for auxiliary devices is not supplied by the
radio system.
340
Page 346 of 634

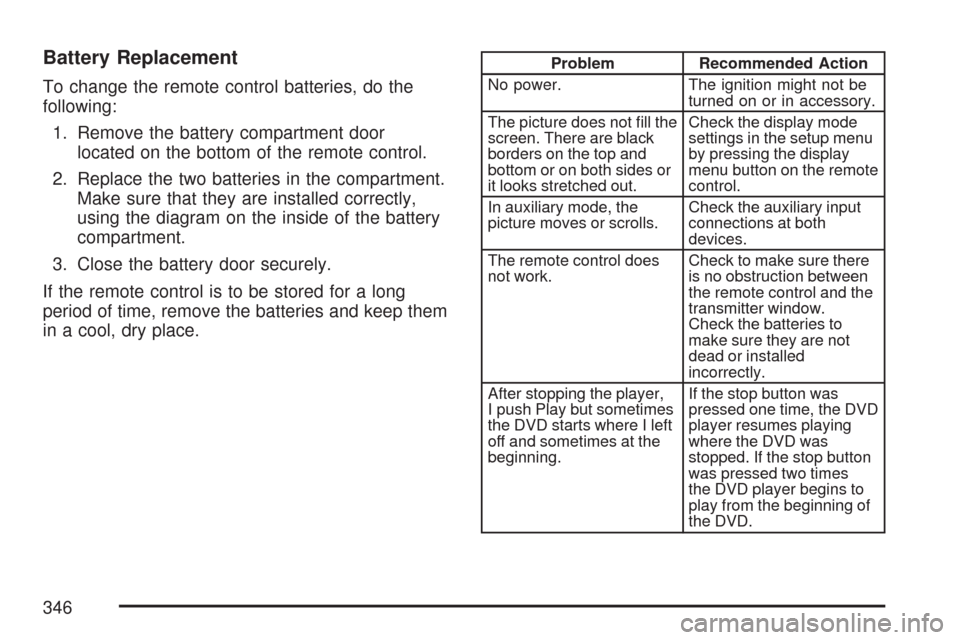
Battery Replacement
To change the remote control batteries, do the
following:
1. Remove the battery compartment door
located on the bottom of the remote control.
2. Replace the two batteries in the compartment.
Make sure that they are installed correctly,
using the diagram on the inside of the battery
compartment.
3. Close the battery door securely.
If the remote control is to be stored for a long
period of time, remove the batteries and keep them
in a cool, dry place.
Problem Recommended Action
No power. The ignition might not be
turned on or in accessory.
The picture does not �ll the
screen. There are black
borders on the top and
bottom or on both sides or
it looks stretched out.Check the display mode
settings in the setup menu
by pressing the display
menu button on the remote
control.
In auxiliary mode, the
picture moves or scrolls.Check the auxiliary input
connections at both
devices.
The remote control does
not work.Check to make sure there
is no obstruction between
the remote control and the
transmitter window.
Check the batteries to
make sure they are not
dead or installed
incorrectly.
After stopping the player,
I push Play but sometimes
the DVD starts where I left
off and sometimes at the
beginning.If the stop button was
pressed one time, the DVD
player resumes playing
where the DVD was
stopped. If the stop button
was pressed two times
the DVD player begins to
play from the beginning of
the DVD.
346
Page 570 of 634

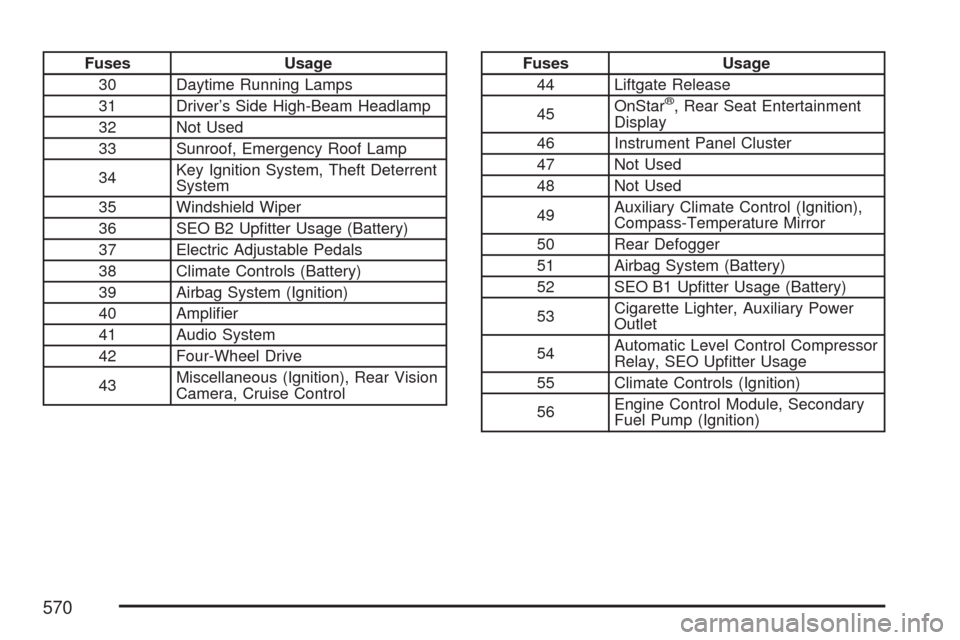
Fuses Usage
30 Daytime Running Lamps
31 Driver’s Side High-Beam Headlamp
32 Not Used
33 Sunroof, Emergency Roof Lamp
34Key Ignition System, Theft Deterrent
System
35 Windshield Wiper
36 SEO B2 Up�tter Usage (Battery)
37 Electric Adjustable Pedals
38 Climate Controls (Battery)
39 Airbag System (Ignition)
40 Ampli�er
41 Audio System
42 Four-Wheel Drive
43Miscellaneous (Ignition), Rear Vision
Camera, Cruise ControlFuses Usage
44 Liftgate Release
45OnStar
®, Rear Seat Entertainment
Display
46 Instrument Panel Cluster
47 Not Used
48 Not Used
49Auxiliary Climate Control (Ignition),
Compass-Temperature Mirror
50 Rear Defogger
51 Airbag System (Battery)
52 SEO B1 Up�tter Usage (Battery)
53Cigarette Lighter, Auxiliary Power
Outlet
54Automatic Level Control Compressor
Relay, SEO Up�tter Usage
55 Climate Controls (Ignition)
56Engine Control Module, Secondary
Fuel Pump (Ignition)
570
Page 620 of 634

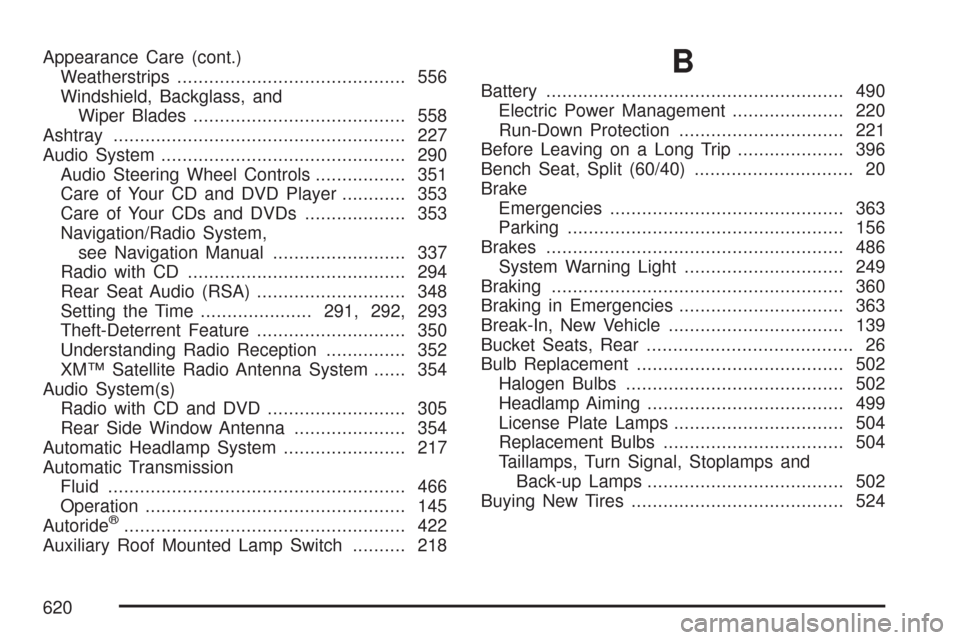
Appearance Care (cont.)
Weatherstrips........................................... 556
Windshield, Backglass, and
Wiper Blades........................................ 558
Ashtray....................................................... 227
Audio System.............................................. 290
Audio Steering Wheel Controls................. 351
Care of Your CD and DVD Player............ 353
Care of Your CDs and DVDs................... 353
Navigation/Radio System,
see Navigation Manual......................... 337
Radio with CD......................................... 294
Rear Seat Audio (RSA)............................ 348
Setting the Time.....................291, 292, 293
Theft-Deterrent Feature............................ 350
Understanding Radio Reception............... 352
XM™ Satellite Radio Antenna System...... 354
Audio System(s)
Radio with CD and DVD.......................... 305
Rear Side Window Antenna..................... 354
Automatic Headlamp System....................... 217
Automatic Transmission
Fluid........................................................ 466
Operation................................................. 145
Autoride
®..................................................... 422
Auxiliary Roof Mounted Lamp Switch.......... 218
B
Battery........................................................ 490
Electric Power Management..................... 220
Run-Down Protection............................... 221
Before Leaving on a Long Trip.................... 396
Bench Seat, Split (60/40).............................. 20
Brake
Emergencies............................................ 363
Parking.................................................... 156
Brakes........................................................ 486
System Warning Light.............................. 249
Braking....................................................... 360
Braking in Emergencies............................... 363
Break-In, New Vehicle................................. 139
Bucket Seats, Rear....................................... 26
Bulb Replacement....................................... 502
Halogen Bulbs......................................... 502
Headlamp Aiming..................................... 499
License Plate Lamps................................ 504
Replacement Bulbs.................................. 504
Taillamps, Turn Signal, Stoplamps and
Back-up Lamps..................................... 502
Buying New Tires........................................ 524
620