2007 CHEVROLET SILVERADO fuel cap
[x] Cancel search: fuel capPage 263 of 684
This light should come on, as a check to show
you it is working, when the ignition is on and the
engine is not running. If the light does not
come on, have it repaired. This light will also
come on during a malfunction in one of two ways:
Light Flashing— A mis�re condition has
been detected. A mis�re increases vehicle
emissions and may damage the emission
control system on your vehicle. Diagnosis and
service may be required.
Light On Steady— An emission control
system malfunction has been detected on your
vehicle. Diagnosis and service may be
required.
If the Light is Flashing
The following may prevent more serious damage
to your vehicle:
Reducing vehicle speed
Avoiding hard accelerations
Avoiding steep uphill grades
If you are towing a trailer, reduce the amount
of cargo being hauled as soon as it is
possibleIf the light stops �ashing and remains on steady,
see “If the Light Is On Steady” following.
If the light continues to �ash, when it is safe to do
so, stop the vehicle. Find a safe place to park
your vehicle. Turn the key off, wait at least
10 seconds and restart the engine. If the light
remains on steady, see “If the Light Is On Steady”
following. If the light is still �ashing, follow the
previous steps, and see your dealer for service as
soon as possible.
If the Light Is On Steady
You may be able to correct the emission system
malfunction by considering the following:
Did you recently put fuel into your vehicle?
If so, reinstall the fuel cap, making sure to fully
install the cap. SeeFilling the Tank on page 494.
The diagnostic system can determine if the
fuel cap has been left off or improperly installed. A
loose or missing fuel cap will allow fuel to
evaporate into the atmosphere. A few driving trips
with the cap properly installed should turn the
light off.
263
Page 268 of 684
Tow/Haul Mode Light
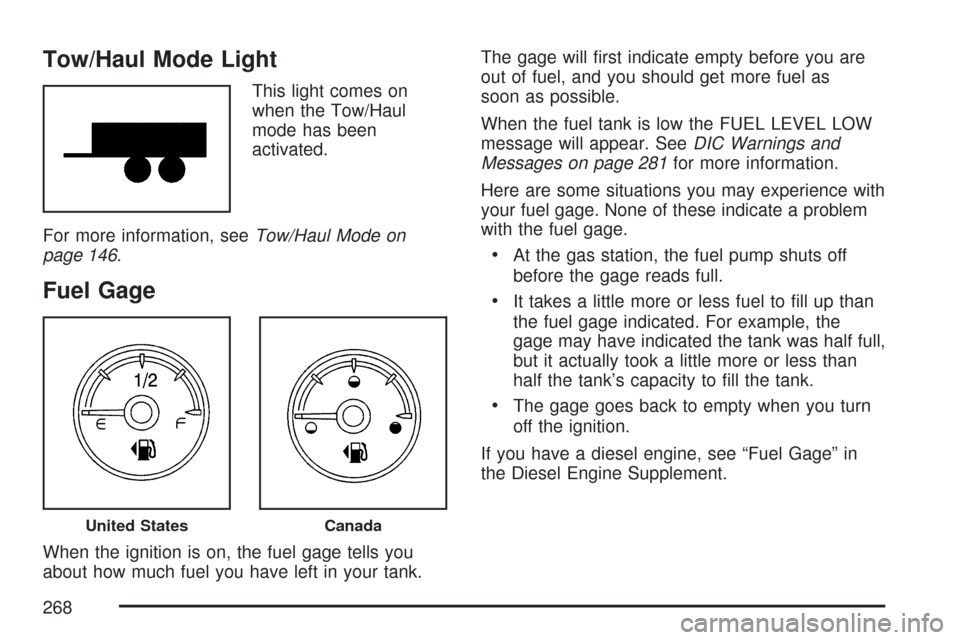
This light comes on
when the Tow/Haul
mode has been
activated.
For more information, seeTow/Haul Mode on
page 146.
Fuel Gage
When the ignition is on, the fuel gage tells you
about how much fuel you have left in your tank.The gage will �rst indicate empty before you are
out of fuel, and you should get more fuel as
soon as possible.
When the fuel tank is low the FUEL LEVEL LOW
message will appear. SeeDIC Warnings and
Messages on page 281for more information.
Here are some situations you may experience with
your fuel gage. None of these indicate a problem
with the fuel gage.
At the gas station, the fuel pump shuts off
before the gage reads full.
It takes a little more or less fuel to �ll up than
the fuel gage indicated. For example, the
gage may have indicated the tank was half full,
but it actually took a little more or less than
half the tank’s capacity to �ll the tank.
The gage goes back to empty when you turn
off the ignition.
If you have a diesel engine, see “Fuel Gage” in
the Diesel Engine Supplement.
United StatesCanada
268
Page 290 of 684
TIGHTEN GAS CAP
This message may display along with the check
engine light on the instrument panel cluster if
the vehicle’s fuel cap is not tightened properly. See
Malfunction Indicator Lamp on page 262.
Reinstall the fuel cap fully. SeeFilling the Tank on
page 494. The diagnostic system can determine
if the fuel cap has been left off or improperly
installed. A loose or missing fuel cap allows fuel to
evaporate into the atmosphere. A few driving
trips with the cap properly installed should turn this
light and message off.
TIRE LEARNING ACTIVE
If your vehicle has a Tire Pressure Monitor (TPM)
system, this message displays when the system
is re-learning the tire positions on your vehicle.
SeeDIC Operation and Displays (With DIC
Buttons) on page 270orDIC Operation and
Displays (Without DIC Buttons) on page 277for
more information. The tire positions must be
re-learned after rotating the tires or after replacing
a tire or sensor. SeeTire Inspection and
Rotation on page 568,Tire Pressure Monitor
System on page 563, andIn�ation - Tire Pressure
on page 561for more information.
TRACTION CONTROL OFF
If your vehicle has StabiliTrak®, this message
displays when the Traction Control System (TCS)
is turned off. Adjust your driving accordingly.
SeeStabiliTrak
®System on page 384for more
information.
TRAILER CONNECTED
On vehicles with the Integrated Trailer Brake
Control (ITBC) system, this message displays
brie�y when a trailer with electric brakes is
�rst connected to the vehicle.
This message clears itself after several seconds.
This message also clears if you acknowledge
it. After this message clears, the TRAILER
GAIN/OUTPUT display appears in the DIC.
See “TRAILER GAIN/OUTPUT” underDIC
Operation and Displays (With DIC Buttons) on
page 270orDIC Operation and Displays (Without
DIC Buttons) on page 277and “Integrated
Trailer Brake Control System” underTowing a
Trailer on page 447for more information.
290
Page 430 of 684
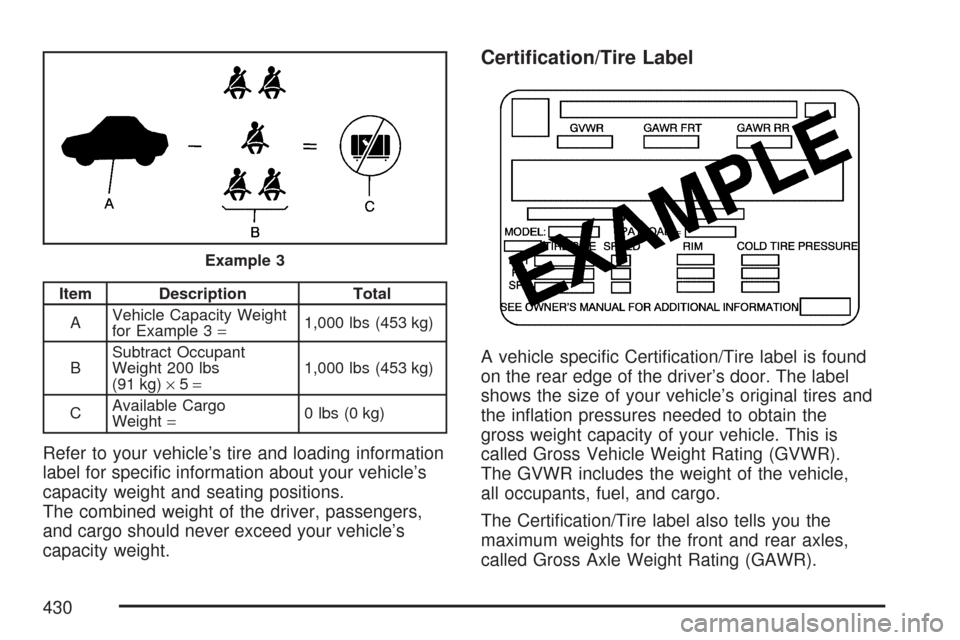
Item Description Total
AVehicle Capacity Weight
for Example 3=1,000 lbs (453 kg)
BSubtract Occupant
Weight 200 lbs
(91 kg)×5=1,000 lbs (453 kg)
CAvailable Cargo
Weight=0 lbs (0 kg)
Refer to your vehicle’s tire and loading information
label for speci�c information about your vehicle’s
capacity weight and seating positions.
The combined weight of the driver, passengers,
and cargo should never exceed your vehicle’s
capacity weight.
Certi�cation/Tire Label
A vehicle speci�c Certi�cation/Tire label is found
on the rear edge of the driver’s door. The label
shows the size of your vehicle’s original tires and
the in�ation pressures needed to obtain the
gross weight capacity of your vehicle. This is
called Gross Vehicle Weight Rating (GVWR).
The GVWR includes the weight of the vehicle,
all occupants, fuel, and cargo.
The Certi�cation/Tire label also tells you the
maximum weights for the front and rear axles,
called Gross Axle Weight Rating (GAWR).
Example 3
430
Page 436 of 684
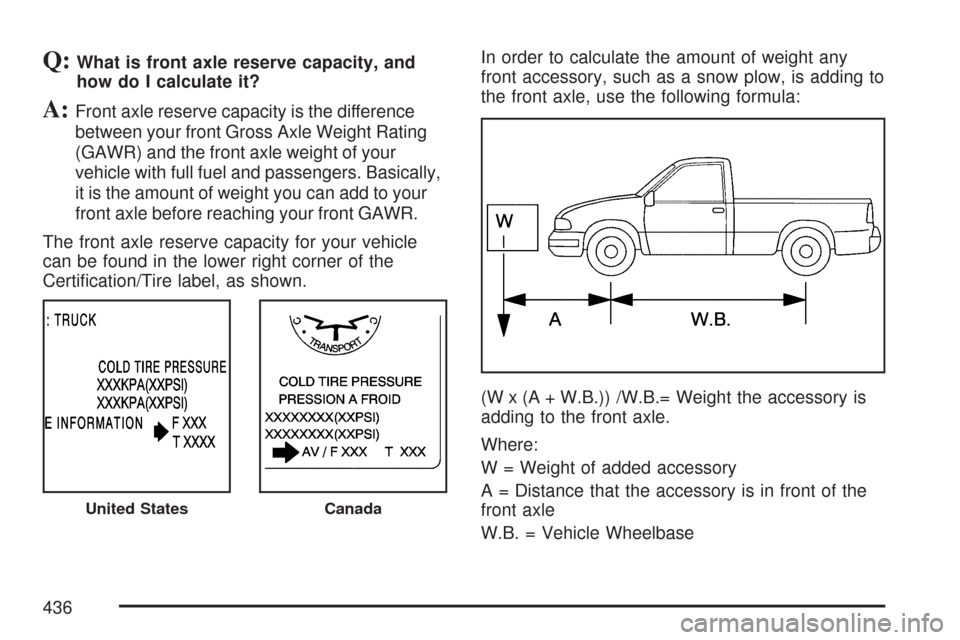
Q:What is front axle reserve capacity, and
how do I calculate it?
A:Front axle reserve capacity is the difference
between your front Gross Axle Weight Rating
(GAWR) and the front axle weight of your
vehicle with full fuel and passengers. Basically,
it is the amount of weight you can add to your
front axle before reaching your front GAWR.
The front axle reserve capacity for your vehicle
can be found in the lower right corner of the
Certi�cation/Tire label, as shown.In order to calculate the amount of weight any
front accessory, such as a snow plow, is adding to
the front axle, use the following formula:
(W x (A + W.B.)) /W.B.= Weight the accessory is
adding to the front axle.
Where:
W = Weight of added accessory
A = Distance that the accessory is in front of the
front axle
W.B. = Vehicle Wheelbase
United StatesCanada
436
Page 438 of 684
Q:What is total vehicle reserve capacity?
A:This is the difference between your GVWR and
the weight of your truck with full fuel and
passengers. It is the amount of weight you can
add to your vehicle before reaching your
GVWR. Keep in mind that reserve capacity
numbers are intended as a guide when
selecting the amount of equipment or cargo
your truck can carry. If you are unsure of your
vehicle’s front, rear, or total weight, go to a
weigh station and weigh your vehicle.
Your dealer can also help you with this.
The total vehicle reserve capacity for your
vehicle can be found in the lower right corner
of the Certi�cation/Tire label as shown
previously.
See your dealer for additional advice and
information about using a snow plow on your
vehicle. Also, seeLoading Your Vehicle on
page 427.
Emergency Roof Lamp Provisions
Vehicles with the RPO VYU snow plow prep
package also have an emergency roof lamp
provision package, RPO TRW. Wiring for the
emergency roof lamp is provided above the
overhead console. SeeAuxiliary Roof Mounted
Lamp on page 227for switch location.
Truck-Camper Loading Information
Notice:Installing a truck-camper to a
vehicle that is equipped with the SS trim
package could damage the vehicle. Do not
install a truck-camper on a vehicle equipped
with the SS trim package.
A vehicle speci�c Truck-Camper Loading
information label is attached to the inside of your
vehicle’s glove box. This label will tell you if
your vehicle can carry a slide-in camper, how
much of a load your vehicle can carry, and how to
correctly spread out the load. Also, it will help
you match the right slide-in camper to your vehicle.
438
Page 447 of 684
Towing a Trailer
If your vehicle has a diesel engine, see the
DURAMAX®Diesel manual for more information.
Do not tow a trailer during break-in. SeeNew
Vehicle Break-In on page 134for more information.
{CAUTION:
If you do not use the correct equipment
and drive properly, you can lose control
when you pull a trailer. For example, if the
trailer is too heavy, the brakes may not
work well — or even at all. You and your
passengers could be seriously injured.
Pull a trailer only if you have followed all
the steps in this section. Ask your dealer
for advice and information about towing a
trailer with your vehicle.Notice:Pulling a trailer improperly can
damage your vehicle and result in costly
repairs not covered by your warranty. To pull
a trailer correctly, follow the advice in this
part, and see your dealer for important
information about towing a trailer with your
vehicle.
To identify the trailering capacity of your vehicle,
you should read the information in “Weight of
the Trailer” that appears later in this section.
Trailering is different than just driving your vehicle
by itself. Trailering means changes in acceleration,
braking, handling, durability and fuel economy.
Successful, safe trailering takes correct equipment,
and it has to be used properly.
That’s the reason for this part. In it are many
time-tested, important trailering tips and safety
rules. Many of these are important for your safety
and that of your passengers. So please read
this section carefully before you pull a trailer.
447
Page 485 of 684
Service........................................................ 488
Accessories and Modi�cations................... 488
California Proposition 65 Warning.............. 489
Doing Your Own Service Work.................. 489
Adding Equipment to the Outside of
Your Vehicle.......................................... 490
Fuel............................................................. 490
Gasoline Octane........................................ 491
Gasoline Speci�cations.............................. 491
California Fuel........................................... 491
Additives................................................... 492
Fuel E85 (85% Ethanol)............................ 493
Fuels in Foreign Countries........................ 494
Filling the Tank......................................... 494
Filling a Portable Fuel Container............... 497
Checking Things Under the Hood.............. 498
Hood Release........................................... 498
Engine Compartment Overview.................. 500
Engine Oil (Gasoline Engine).................... 502
Engine Oil Life System.............................. 505Engine Air Cleaner/Filter
(Gasoline Engines)................................. 507
Automatic Transmission Fluid.................... 510
Engine Coolant.......................................... 514
Coolant Surge Tank Pressure Cap............ 517
Engine Overheating................................... 517
Overheated Engine Protection
Operating Mode (V8 Engines Only)........ 520
Cooling System......................................... 521
Engine Fan Noise..................................... 526
Power Steering Fluid................................. 526
Windshield Washer Fluid........................... 527
Brakes...................................................... 529
Battery...................................................... 533
Jump Starting............................................ 534
Rear Axle.................................................... 540
Four-Wheel Drive........................................ 541
Front Axle................................................... 543
Section 5 Service and Appearance Care
485