2007 CHEVROLET SILVERADO turn signal
[x] Cancel search: turn signalPage 296 of 684
DELAY DOOR LOCK
On vehicles with a crew cab, this feature allows
you to select whether or not the locking of
the vehicle’s doors will be delayed. When locking
the doors with the power door lock switch or
the Remote Keyless Entry (RKE) transmitter and a
door is open, this feature will delay locking the
doors until �ve seconds after the last door
is closed. You will hear three chimes to signal that
the delayed locking feature is in use. The key
must be out of the ignition for this feature to work.
You can temporarily override delayed locking
by pressing the power door lock switch or the lock
button on the RKE transmitter a second time.
SeeDelayed Locking on page 121for more
information.
Press the customization button until DELAY
DOOR LOCK appears on the DIC display. Press
the set/reset button once to access the settings
for this feature. Then press the customization
button to scroll through the following settings:
OFF:There will be no delayed locking of
the vehicle’s doors.
ON (default):The doors will not lock until �ve
seconds after the last door is closed.NO CHANGE:No change will be made to this
feature. The current setting will remain.
Choose one of the available settings and press
the set/reset button while it is displayed on the DIC
to select it.
EXIT LIGHTING
This feature allows you to select the amount of
time you want the exterior lamps to remain
on when it is dark enough outside. This happens
after the key is turned from RUN to LOCK.
Press the customization button until EXIT
LIGHTING appears on the DIC display. Press the
set/reset button once to access the settings for
this feature. Then press the customization button
to scroll through the following settings:
OFF:The exterior lamps will not turn on.
30 SECONDS (default):The exterior lamps will
stay on for 30 seconds.
1 MINUTE:The exterior lamps will stay on for
one minute.
2 MINUTES:The exterior lamps will stay on for
two minutes.
296
Page 307 of 684
The radio seeks and scans stations only with a
strong signal that are in the selected band.
To scan presets within the current selected band,
press and hold either seek arrow for four seconds
until a double beep sounds. The radio goes to a
stored preset, plays for a few seconds if a strong
signal is present, then goes to the next stored
preset. The station frequency �ashes while the
radio is in the scan mode.
Setting Preset Stations
Up to 18 stations (six FM1, six FM2, and six AM),
can be programmed on the six numbered
pushbuttons, by performing the following steps:
1. Turn the radio on.
2. Press BAND to select FM1, FM2, or AM.
3. Tune in the desired station.
4. Press and hold one of the six numbered
pushbuttons for three seconds until a beep
sounds. Whenever that pushbutton is pressed
and released, the station that was set, returns.
5. Repeat the Steps 2-4 for each pushbutton.
Setting the Tone (Bass/Treble)
Bass/Treble:To adjust the bass or treble, press
the tune knob or the EQ button until the desired
tone control label displays. Turn the tune
knob clockwise or counterclockwise to increase or
decrease the setting. The display shows the
current bass or treble level. If a station’s frequency
is weak, or if there is static, decrease the treble.
Adjusting the Speakers (Balance/Fade)
`
(Balance/Fade):To adjust the balance or
fade, press this button or the tune knob until the
desired speaker control label displays. Turn
the tune knob clockwise or counterclockwise to
adjust the setting.
The setting can also be adjusted by pressing the
seek arrows.
Radio Messages
Loc (Locked):This message displays while the
THEFTLOCK®system has locked up the radio.
Take the vehicle to your dealer for service.
If any error occurs repeatedly or if an error cannot
be corrected, contact your dealer.
307
Page 308 of 684
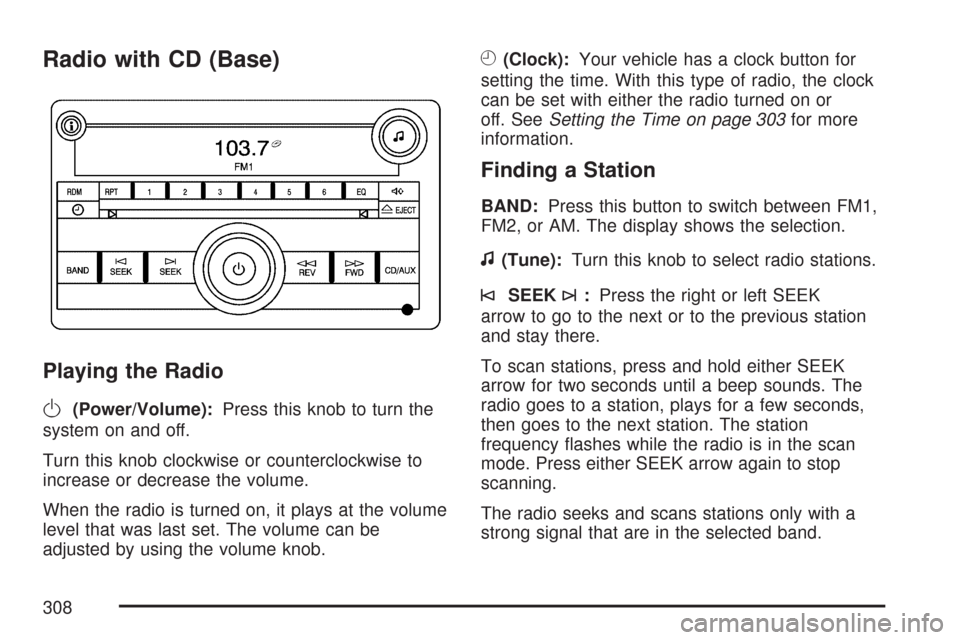
Radio with CD (Base)
Playing the Radio
O
(Power/Volume):Press this knob to turn the
system on and off.
Turn this knob clockwise or counterclockwise to
increase or decrease the volume.
When the radio is turned on, it plays at the volume
level that was last set. The volume can be
adjusted by using the volume knob.
H(Clock):Your vehicle has a clock button for
setting the time. With this type of radio, the clock
can be set with either the radio turned on or
off. SeeSetting the Time on page 303for more
information.
Finding a Station
BAND:Press this button to switch between FM1,
FM2, or AM. The display shows the selection.
f(Tune):Turn this knob to select radio stations.
©SEEK¨:Press the right or left SEEK
arrow to go to the next or to the previous station
and stay there.
To scan stations, press and hold either SEEK
arrow for two seconds until a beep sounds. The
radio goes to a station, plays for a few seconds,
then goes to the next station. The station
frequency �ashes while the radio is in the scan
mode. Press either SEEK arrow again to stop
scanning.
The radio seeks and scans stations only with a
strong signal that are in the selected band.
308
Page 309 of 684
To scan presets within the current selected band,
press and hold either seek arrow for four seconds
until a double beep sounds. The radio goes to
a stored preset, plays for a few seconds if a strong
signal is present, then goes to the next stored
preset. The station frequency �ashes while
the radio is in the scan mode.
4(Information):Press this button to switch the
display between the radio station frequency
and the time. While the ignition is off, press this
button to display the time.
Setting Preset Stations
Up to 18 stations (six FM1, six FM2, and six AM),
can be programmed on the six numbered
pushbuttons, by performing the following steps:
1. Turn the radio on.
2. Press BAND to select FM1, FM2, or AM.
3. Tune in the desired station.
4. Press and hold one of the six numbered
pushbuttons for three seconds until a beep
sounds. Whenever that pushbutton is pressed
and released, the station that was set, returns.
5. Repeat the Steps 2 through 4 for each
pushbutton.
Setting the Tone (Bass/Treble)
BASS/TREB (Bass/Treble):To adjust the bass
or treble, press the tune knob button or the
EQ pushbutton until the desired tone control label
displays. Turn the tune knob clockwise or
counterclockwise to increase or decrease the
setting. The display shows the current bass
or treble level. If a station’s frequency is weak, or
if there is static, decrease the treble.
Unique BASS/TREB settings can be saved for
each source.
Adjusting the Speakers (Balance/Fade)
`
BAL/FADE (Balance/Fade):To adjust the
balance or fade, press this button or the tune knob
until the desired speaker control label displays.
Turn the tune knob clockwise or counterclockwise
to adjust the setting. The setting can also be
adjusted by pressing either the SEEK, FWD
(forward), or REV (reverse) buttons.
309
Page 315 of 684
Playing the Radio
O
(Power/Volume):Press this knob to turn the
system on and off.
Turn this knob clockwise or counterclockwise to
increase or decrease the volume.
Speed Compensated Volume (SCV):The radio
has Speed Compensated Volume (SCV). While
SCV is on, the radio volume automatically adjusts
to compensate for road and wind noise as
driving speed changes. That way, the volume level
should sound about the same as you drive.
To activate SCV:
1. Set the radio volume to the desired level.
2. Press the MENU button to display the radio
setup menu.
3. Press the pushbutton under the AUTO
VOLUM (volume) label on the radio display.
4. Press the pushbutton under the desired Speed
Compensated Volume setting (OFF, Low, Med
(medium), or High) to select the level of radio
volume compensation. The display times out
after approximately 10 seconds. Each higher
setting allows for more radio volume
compensation at faster vehicle speeds.
Finding a Station
BAND:Press this button to switch between AM,
FM, or XM™ (if equipped). The selection
displays.
f(Tune):Turn this knob to select radio stations.
©SEEK¨:Press the right or left SEEK
arrow to go to the next or to the previous station
and stay there.
To scan stations, press and hold either SEEK
arrow for a few seconds until a beep sounds. The
radio goes to a station, plays for a few seconds,
then goes to the next station. Press either
SEEK arrow again to stop scanning.
The radio seeks and scans stations only with a
strong signal that are in the selected band.
315
Page 326 of 684
Finding a Station
BAND:Press this button to switch between AM,
FM, or XM™ (if equipped). The display shows
the selection.
f(Tune):Turn this knob to select radio stations.
©SEEK¨:Press the left or right SEEK
arrow to go to the next or to the previous station
and stay there.
To scan stations, press and hold either SEEK
arrow for a few seconds until a beep sounds. The
radio goes to a station, plays for a few seconds,
then goes to the next station. Press either
SEEK arrow again to stop scanning.
The radio seeks and scans stations only with a
strong signal that are in the selected band.
4(Information) (XM™ Satellite Radio Service,
MP3, and RDS Features):Press the information
button to display additional text information related
to the current FM-RDS or XM™ station, or MP3
song. A choice of additional information such as:
Channel, Song, Artist, and CAT (category) could
appear. Continue pressing the information button to
highlight the desired label, or press the pushbutton
positioned under any one of the labels and the
information about that label is displayed.
When information is not available, No Info displays.
Storing a Radio Station as a Favorite
Drivers are encouraged to set up their radio station
favorites while the vehicle is parked. Tune to your
favorite stations using the presets, favorites button,
and steering wheel controls, if the vehicle has them.
SeeDefensive Driving on page 376.
326
Page 355 of 684
XM Radio Messages
Radio Display Message Condition Action Required
XL (Explicit Language
Channels)XL on the radio display,
after the channel name,
indicates content with
explicit language.These channels, or any others, can be blocked at a
customer’s request, by calling 1-800-852-XMXM (9696).
XM Updating Updating encryption code The encryption code in the receiver is being updated, and
no action is required. This process should take no longer
than 30 seconds.
No XM Signal Loss of signal The system is functioning correctly, but the vehicle is in a
location that is blocking the XM™ signal. When you move
into an open area, the signal should return.
Loading XM Acquiring channel audio
(after four second delay)The audio system is acquiring and processing audio and
text data. No action is needed. This message should
disappear shortly.
Channel Off Air Channel not in service This channel is not currently in service. Tune to another
channel.
Channel Unavail Channel no longer
availableThis previously assigned channel is no longer assigned.
Tune to another station. If this station was one of the
presets, choose another station for that preset button.
No Artist Info Artist Name/Feature not
availableNo artist information is available at this time on this channel.
The system is working properly.
No Title Info Song/Program Title not
availableNo song title information is available at this time on this
channel. The system is working properly.
355
Page 359 of 684
Push the power button to turn on the headphones.
An indicator light located on the headphones
comes on. If the light does not come on,
the batteries might need to be replaced. See
“Battery Replacement” later in this section for more
information. Switch the headphones to Off when
not in use. Channel 1 is dedicated to the video
screen, while Channel 2 is dedicated to RSA
selections.
Infrared transmitters are located at the rear of the
RSE overhead console. The headphones shut
off automatically to save the battery power if the
RSE system and RSA are shut off or if the
headphones are out of range of the transmitters
for more than three minutes. If you move too
far forward or step out of the vehicle, the
headphones lose the audio signal.
The headphones automatically turns off after
four hours of continuous use.
To adjust the volume on the headphones, use the
volume control located on the right side.For optimal audio performance, the headphones
must be worn correctly. The symbol L (Left)
appears on the upper left side, above the ear pad
and should be positioned on the left ear. The
symbol R (Right) appears on the upper right side,
above the ear pad and should be positioned on
the right ear.
Notice:Do not store the headphones in heat
or direct sunlight. This could damage the
headphones and repairs will not be covered by
your warranty. Keep the headphones stored
in a cool, dry place.
If the foam ear pads attached to the headphones
become worn or damaged, the pads can be
replaced separately from the headphone set. Refer
to your dealer for more information.
If the headphones are to be stored for a long
period of time, remove the batteries and keep them
in a cool, dry place.
359