2007 CHEVROLET SILVERADO phone
[x] Cancel search: phonePage 361 of 684
To use the auxiliary inputs of the RSE system,
connect an external auxiliary device to the
color-coded A/V jacks and turn both the auxiliary
device and the video screen power on. If the
video screen is in the DVD player mode, pressing
the AUX (auxiliary) button on the remote control
switches the video screen from the DVD
player mode to the auxiliary device. The radio can
listen to the audio of the connected auxiliary
device by sourcing to auxiliary. SeeRadio with CD
and DVD (MP3) on page 324for more information.
How to Change the RSE Video Screen
Settings
The screen display mode (normal, full, and zoom),
screen brightness, and setup menu language
can be changed from the on screen setup menu.
To change any feature, do the following:
1. Press the display menu button on the
remote control.
2. Use the remote control menu navigation
arrows and the enter button to use the
setup menu.
3. Press the display menu button again to
remove the setup menu from the screen.
Audio Output
Audio from the DVD player or auxiliary inputs may
be heard through the following possible sources:
Wireless Headphones
Vehicle Speakers
Vehicle wired headphone jacks on the rear
seat audio system, if your vehicle has this
feature.
The RSE system always transmits the audio
signal to the wireless headphones, if there is audio
available. See “Headphones” earlier in this
section for more information.
The DVD player is capable of outputting audio to
the wired headphone jacks on the RSA system,
if your vehicle has this feature. The DVD
player can be selected as an audio source on the
RSA system. SeeRear Seat Audio (RSA) on
page 368for more information.
361
Page 362 of 684
When a device is connected to the A/V jacks, or
the radio’s auxiliary input jack, if your vehicle
has this feature, the rear seat passengers are able
to hear audio from the auxiliary device through
the wireless or wired headphones. The front seat
passengers are able to listen to playback from
this device through the vehicle speakers by
selecting AUX as the source on the radio.
Video Screen
The video screen is located in the RSE overhead
console.
To use the video screen, do the following:
1. Push the release button located on the RSE
overhead console.
2. move the screen to the desired position.When the video screen is not in use, push it up
into its locked position.
If a DVD is playing and the screen is raised to its
locked position, the screen remains on, this is
normal, and the DVD continues to play through the
previous audio source. Use the remote control
power button or eject the disc to turn off the screen.
The RSE overhead console contains the infrared
receivers for the wireless headphones and
the infrared receivers for the remote control. They
are located at the rear of the console.
Notice:Avoid directly touching the video
screen, as damage may occur. See “Cleaning
the Video Screen” later in this section for
more information.
362
Page 367 of 684
Problem Recommended Action
The auxiliary source is
running but there is no
picture or sound.Check that the RSE video
screen is in the auxiliary
source mode.
Check the auxiliary input
connections at both
devices.
Sometimes the wireless
headphone audio cuts out
or buzzes.Check for obstructions,
low batteries, reception
range, and interference
from cellular telephone
towers or by using your
cellular telephone in the
vehicle.
Check that the
headphones are on
correctly using the L (left)
and R (right) on the
headphones.
I lost the remote and/or
the headphones.See your dealer for
assistance.
The DVD is playing, but
there is no picture or
sound.Check that the RSE video
screen is sourced to the
DVD player.DVD Display Error Messages
The DVD display error message depends on the
radio that is in the vehicle. The video screen
can display one of the following:
Disc Load/Eject Error:This message displays
when there are disc load or eject problems.
Disc Format Error:This message displays, if the
disc is inserted with the disc label wrong side
up, or if the disc is damaged.
Disc Region Error:This message displays, if the
disc is not from a correct region.
No Disc Inserted:This message displays, if no
disc is present when the EJECT button is pressed
on the radio.
367
Page 368 of 684
DVD Distortion
Video distortion can occur when operating cellular
phones, scanners, CB radios, Global Position
Systems (GPS)*, two-way radios, mobile fax, or
walkie talkies.
It might be necessary to turn off the DVD player
when operating one of these devices in or near the
vehicle.
*Excludes the OnStar
®System.
Cleaning the RSE Overhead Console
When cleaning the RSE overhead console surface,
use only a clean cloth dampened with clean
water.
Cleaning the Video Screen
When cleaning the video screen, use only a clean
cloth dampened with clean water. Use care
when directly touching or cleaning the screen, as
damage could result.
Rear Seat Audio (RSA)
This feature allows rear seat passengers to listen
to and control any of the music sources: radio,
CDs, DVDs, or other auxiliary sources. However,
the rear seat passengers can only control the
music sources the front seat passengers are not
listening to (except on some radios where
dual control is allowed). For example, rear seat
passengers can control a CD and listen to it
through the headphones, while the driver listens to
the radio through the front speakers. The rear
seat passengers have control of the volume
for each set of headphones.
The RSA functions can be used even while the
main radio is off.
Audio can be heard through wired headphones
(not included) plugged into the jacks on the RSA.
If your vehicle has this feature, audio can also
be heard on Channel 2 of the wireless
headphones.
Depending on the audio system, the rear speakers
may continue to play when the RSA audio is
active through the headphones.
368
Page 369 of 684
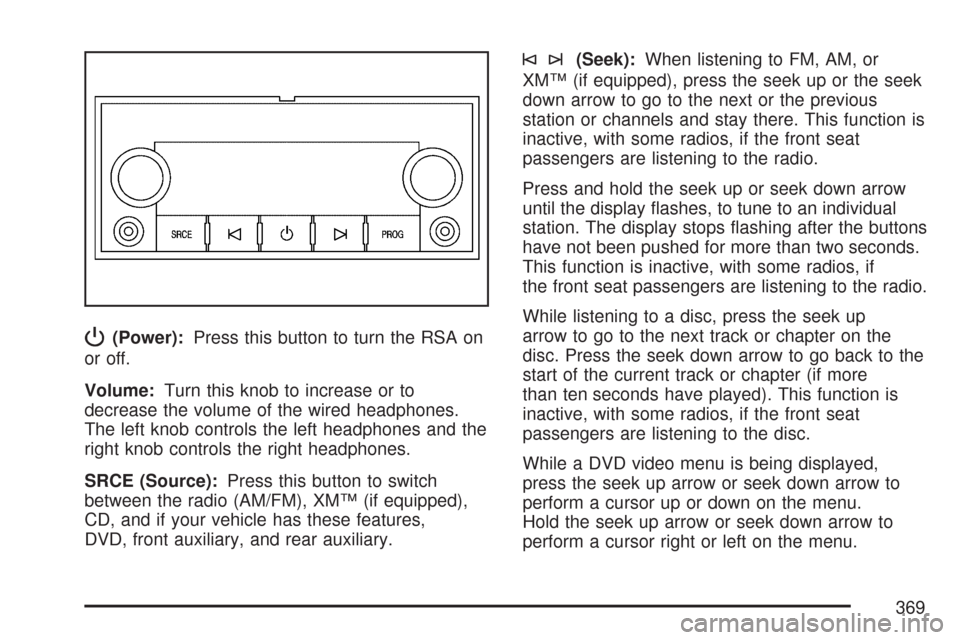
P(Power):Press this button to turn the RSA on
or off.
Volume:Turn this knob to increase or to
decrease the volume of the wired headphones.
The left knob controls the left headphones and the
right knob controls the right headphones.
SRCE (Source):Press this button to switch
between the radio (AM/FM), XM™ (if equipped),
CD, and if your vehicle has these features,
DVD, front auxiliary, and rear auxiliary.
©¨(Seek):When listening to FM, AM, or
XM™ (if equipped), press the seek up or the seek
down arrow to go to the next or the previous
station or channels and stay there. This function is
inactive, with some radios, if the front seat
passengers are listening to the radio.
Press and hold the seek up or seek down arrow
until the display �ashes, to tune to an individual
station. The display stops �ashing after the buttons
have not been pushed for more than two seconds.
This function is inactive, with some radios, if
the front seat passengers are listening to the radio.
While listening to a disc, press the seek up
arrow to go to the next track or chapter on the
disc. Press the seek down arrow to go back to the
start of the current track or chapter (if more
than ten seconds have played). This function is
inactive, with some radios, if the front seat
passengers are listening to the disc.
While a DVD video menu is being displayed,
press the seek up arrow or seek down arrow to
perform a cursor up or down on the menu.
Hold the seek up arrow or seek down arrow to
perform a cursor right or left on the menu.
369
Page 371 of 684
When a CD/DVD is playing, press the up or the
down arrow to go to the next or previous track or
chapter.
g(Mute/Voice Recognition):Press and release
this button to silence the vehicle speakers only.
The audio of the wireless and wired headphones, if
your vehicle has these features, does not mute.
Press and release this button again, to turn
the sound on.
If your vehicle has the navigation system, press
and hold this button for longer than one second to
initiate voice recognition. See “Voice Recognition”
in the Navigation System manual for more
information.
If your vehicle has OnStar
®, press and hold this
button for longer than one second to interact
with the OnStar
®system. If your vehicle also has
the navigation system, press and hold this
button for longer than one second to initiate voice
recognition and say “OnStar” to enter OnStar
®
mode. See theOnStar®System on page 182in
this manual for more information.SRCE (Source):Press this button to switch
between the radio (AM, FM), XM™ (if equipped),
CD, and if your vehicle has these features,
DVD, front auxiliary, and rear auxiliary.
+
e−e(Volume):Press the plus or minus
button to increase or to decrease the radio volume.
¨(Seek):Press the seek arrow to go to the
next radio station while in AM, FM, or XM™
(if equipped). Press this button to go to the next
track or chapter while sourced to the CD or
DVD slot.
Radio Reception
Frequency interference and static can occur
during normal radio reception if items such as cell
phone chargers, vehicle convenience accessories,
and external electronic devices are plugged
into the accessory power outlet. If there is
interference or static, unplug the item from the
accessory power outlet.
371
Page 412 of 684
Hydroplaning
Hydroplaning is dangerous. So much water can
build up under your tires that they can actually ride
on the water. This can happen if the road is wet
enough and you are going fast enough. When your
vehicle is hydroplaning, it has little or no contact
with the road.
Hydroplaning does not happen often. But it can if
your tires do not have much tread or if the pressure
in one or more is low. It can happen if a lot of water
is standing on the road. If you can see re�ections
from trees, telephone poles, or other vehicles, and
raindrops dimple the water’s surface, there could be
hydroplaning.
Hydroplaning usually happens at higher speeds.
There just is not a hard and fast rule about
hydroplaning. The best advice is to slow down
when it is raining.
Driving Through Deep Standing Water
Notice:If you drive too quickly through
deep puddles or standing water, water can
come in through the engine’s air intake
and badly damage the engine. Never drive
through water that is slightly lower than the
underbody of your vehicle. If you cannot
avoid deep puddles or standing water, drive
through them very slowly.
412
Page 494 of 684
E85 has less energy per gallon than gasoline, so
you will need to re�ll the fuel tank more often
when using E85 than when you are using gasoline.
SeeFilling the Tank on page 494.
Notice:Some additives are not compatible
with E85 fuel and can harm your vehicle’s fuel
system. Damage caused by additives would
not be covered by your new vehicle warranty.
Notice:Your vehicle was not designed for
fuel that contains methanol. Do not use
fuel containing methanol. It can corrode metal
parts in the fuel system and also damage
plastic and rubber parts. That damage would
not be covered under your warranty.
Fuels in Foreign Countries
If you plan on driving in another country outside the
United States or Canada, the proper fuel might be
hard to �nd. Never use leaded gasoline or any other
fuel not recommended in the previous text on fuel.
Costly repairs caused by use of improper fuel would
not be covered by your warranty.
To check the fuel availability, ask an auto club, or
contact a major oil company that does business
in the country where you will be driving.
Filling the Tank
If your vehicle has the DURAMAX®Diesel engine,
see the DURAMAX®Diesel manual for more
information.
{CAUTION:
Fuel vapor burns violently and a fuel �re
can cause bad injuries. To help avoid
injuries to you and others, read and follow
all the instructions on the pump island.
Turn off your engine when you are
refueling. Do not smoke if you are near
fuel or refueling your vehicle. Do not use
cellular phones. Keep sparks, �ames, and
smoking materials away from fuel. Do not
leave the fuel pump unattended when
refueling your vehicle. This is against the
law in some places. Do not re-enter the
vehicle while pumping fuel. Keep children
away from the fuel pump; never let
children pump fuel.
494