Page 12 of 684

Release the control when the lower seatback
reaches the desired level of lumbar support.
Your vehicle may have a memory function which
allows seat settings to be saved and recalled.
SeeMemory Seat, Mirrors, and Pedals on page 13
for more information.
Keep in mind that as your seating position changes,
as it may during long trips, so should the position of
your lumbar support. Adjust the seat as needed.
Heated Seats
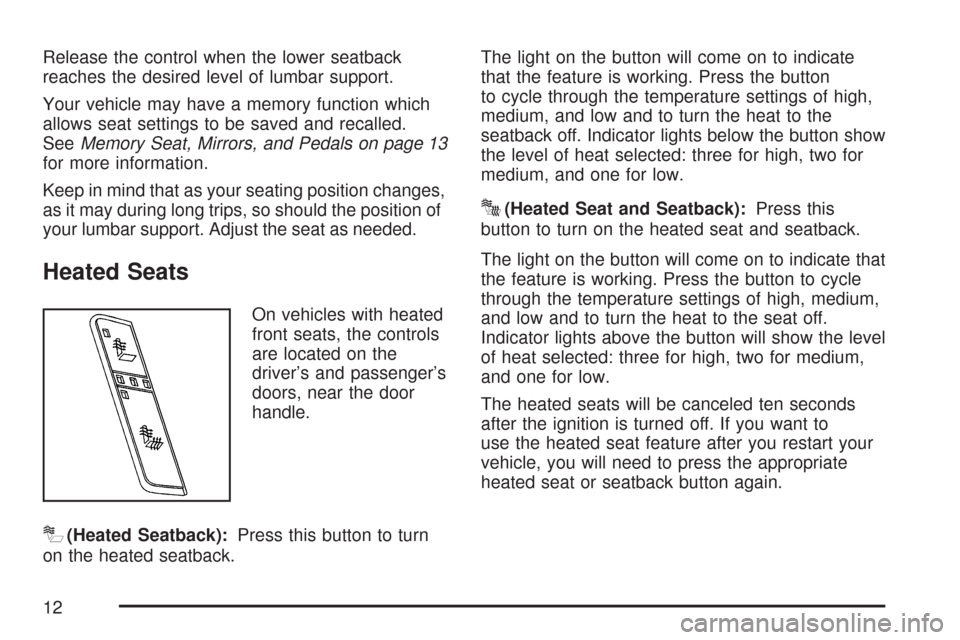
On vehicles with heated
front seats, the controls
are located on the
driver’s and passenger’s
doors, near the door
handle.
I(Heated Seatback):Press this button to turn
on the heated seatback.The light on the button will come on to indicate
that the feature is working. Press the button
to cycle through the temperature settings of high,
medium, and low and to turn the heat to the
seatback off. Indicator lights below the button show
the level of heat selected: three for high, two for
medium, and one for low.
J(Heated Seat and Seatback):Press this
button to turn on the heated seat and seatback.
The light on the button will come on to indicate that
the feature is working. Press the button to cycle
through the temperature settings of high, medium,
and low and to turn the heat to the seat off.
Indicator lights above the button will show the level
of heat selected: three for high, two for medium,
and one for low.
The heated seats will be canceled ten seconds
after the ignition is turned off. If you want to
use the heated seat feature after you restart your
vehicle, you will need to press the appropriate
heated seat or seatback button again.
12
Page 15 of 684
Reclining Seatbacks
Manual Reclining Seatbacks
{CAUTION:
You can lose control of the vehicle if you
try to adjust a manual driver’s seat while
the vehicle is moving. The sudden
movement could startle and confuse you,
or make you push a pedal when you do
not want to. Adjust the driver’s seat only
when the vehicle is not moving.
{CAUTION:
If the seatback is not locked, it could
move forward in a sudden stop or crash.
That could cause injury to the person
sitting there. Always push and pull on the
seatback to be sure it is locked.If the seats have manual reclining seatbacks, the
lever used to operate them is located on the
outboard side of the seat(s).
To recline the seatback, do the following:
1. Lift the recline lever.
2. Move the seatback to the desired position,
then release the lever to lock the seatback
in place.
3. Push and pull on the seatback to make sure it
is locked.
15
Page 16 of 684
To return the seatback to an upright position, do
the following:
1. Lift the lever fully without applying pressure to
the seatback and the seatback will return to
the upright position.
2. Push and pull on the seatback to make sure it
is locked.Power Reclining Seatbacks
If the seats have power reclining seatbacks, the
control used to recline them is located on the
outboard side of the seat behind the power seat
control.
To recline the seatback, tilt the top of the
control rearward.
To bring the seatback forward, tilt the top of
the control forward.
16
Page 18 of 684
Head Restraints
Adjust the head restraint so that the top of the
restraint is at the same height as the top of
the occupant’s head. This position reduces the
chance of a neck injury in a crash.Pull the head restraint
up to raise it. To lower
the head restraint,
press the release
button, located on the
top of the seatback,
while you push the head
restraint down.
The second row seats have head rests that can
be adjusted up and down.
18
Page 20 of 684
Rear Seats
Rear Seat Operation (Full Bench)
Folding the Rear Seat
To fold the seat up, do the following:
Notice:Folding a rear seat with the safety
belts still fastened may cause damage to the
seat or the safety belts. Always unbuckle
the safety belts and return them to their normal
stowed position before folding a rear seat.
1. Pull up on the front
of the seat cushion
while pulling down
on the release strap,
located under the
seat cushion.2. Pull the seat cushion up until it latches with
the seatback.
3. After latching the seat cushion up, pull
forward on it to make sure it is locked.
To fold the seat down, do the following:
1. Push the seat cushion rearward while pulling
the release strap, located under the seat
cushion. Pull the seat cushion down until it
latches.
2. After latching the seat cushion, pull up on it to
make sure it is locked.
20
Page 22 of 684

Safety Belts
Safety Belts: They Are for Everyone
This part of the manual tells you how to use
safety belts properly. It also tells you some things
you should not do with safety belts.
{CAUTION:
Do not let anyone ride where he or she
cannot wear a safety belt properly. If you
are in a crash and you are not wearing a
safety belt, your injuries can be much
worse. You can hit things inside the
vehicle or be ejected from it. You can be
seriously injured or killed. In the same
crash, you might not be, if you are
buckled up. Always fasten your safety
belt, and check that your passengers’
belts are fastened properly too.
{CAUTION:
It is extremely dangerous to ride in a
cargo area, inside or outside of a vehicle.
In a collision, people riding in these areas
are more likely to be seriously injured or
killed. Do not allow people to ride in any
area of your vehicle that is not equipped
with seats and safety belts. Be sure
everyone in your vehicle is in a seat and
using a safety belt properly.
Your vehicle has a light
that comes on as a
reminder to buckle up.
SeeSafety Belt
Reminder Light on
page 251.
In most states and in all Canadian provinces,
the law says to wear safety belts.
22
Page 28 of 684

Driver Position
Lap-Shoulder Belt
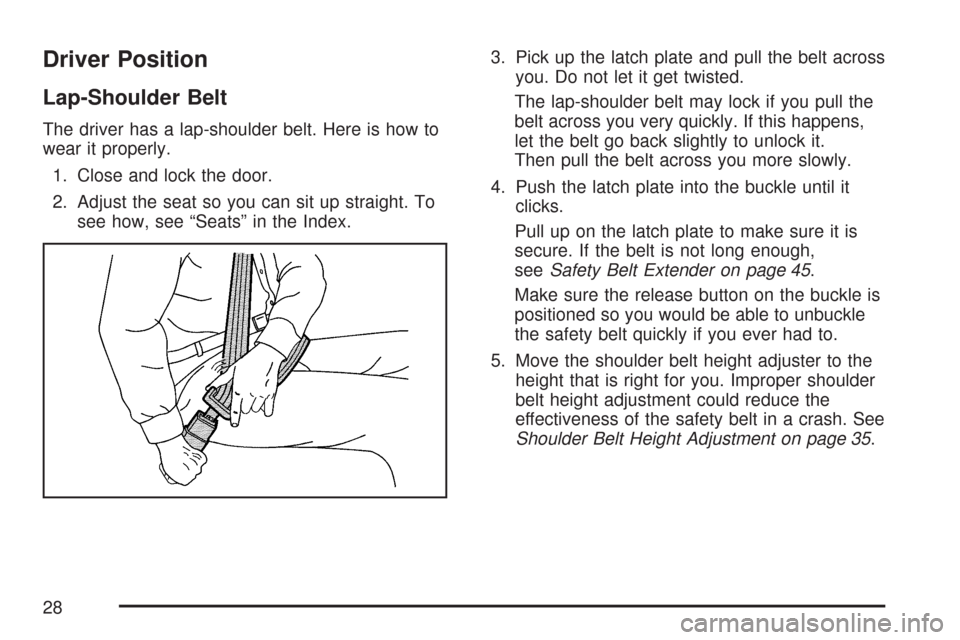
The driver has a lap-shoulder belt. Here is how to
wear it properly.
1. Close and lock the door.
2. Adjust the seat so you can sit up straight. To
see how, see “Seats” in the Index.3. Pick up the latch plate and pull the belt across
you. Do not let it get twisted.
The lap-shoulder belt may lock if you pull the
belt across you very quickly. If this happens,
let the belt go back slightly to unlock it.
Then pull the belt across you more slowly.
4. Push the latch plate into the buckle until it
clicks.
Pull up on the latch plate to make sure it is
secure. If the belt is not long enough,
seeSafety Belt Extender on page 45.
Make sure the release button on the buckle is
positioned so you would be able to unbuckle
the safety belt quickly if you ever had to.
5. Move the shoulder belt height adjuster to the
height that is right for you. Improper shoulder
belt height adjustment could reduce the
effectiveness of the safety belt in a crash. See
Shoulder Belt Height Adjustment on page 35.
28
Page 42 of 684
To unlatch the belt, push the button on the buckle.
Rear Safety Belt Comfort Guides
Rear shoulder belt comfort guides may provide
added safety belt comfort for older children
who have outgrown booster seats and for some
adults. When installed on a shoulder belt, the
comfort guide positions the belt away from
the neck and head.
There is one guide for each outboard passenger
position in the rear seat. Here is how to install
a comfort guide to the shoulder belt:
1. Remove the guide from its storage clip on the
interior body.
42