2007 CHEVROLET SILVERADO lock
[x] Cancel search: lockPage 296 of 684
DELAY DOOR LOCK
On vehicles with a crew cab, this feature allows
you to select whether or not the locking of
the vehicle’s doors will be delayed. When locking
the doors with the power door lock switch or
the Remote Keyless Entry (RKE) transmitter and a
door is open, this feature will delay locking the
doors until �ve seconds after the last door
is closed. You will hear three chimes to signal that
the delayed locking feature is in use. The key
must be out of the ignition for this feature to work.
You can temporarily override delayed locking
by pressing the power door lock switch or the lock
button on the RKE transmitter a second time.
SeeDelayed Locking on page 121for more
information.
Press the customization button until DELAY
DOOR LOCK appears on the DIC display. Press
the set/reset button once to access the settings
for this feature. Then press the customization
button to scroll through the following settings:
OFF:There will be no delayed locking of
the vehicle’s doors.
ON (default):The doors will not lock until �ve
seconds after the last door is closed.NO CHANGE:No change will be made to this
feature. The current setting will remain.
Choose one of the available settings and press
the set/reset button while it is displayed on the DIC
to select it.
EXIT LIGHTING
This feature allows you to select the amount of
time you want the exterior lamps to remain
on when it is dark enough outside. This happens
after the key is turned from RUN to LOCK.
Press the customization button until EXIT
LIGHTING appears on the DIC display. Press the
set/reset button once to access the settings for
this feature. Then press the customization button
to scroll through the following settings:
OFF:The exterior lamps will not turn on.
30 SECONDS (default):The exterior lamps will
stay on for 30 seconds.
1 MINUTE:The exterior lamps will stay on for
one minute.
2 MINUTES:The exterior lamps will stay on for
two minutes.
296
Page 297 of 684
NO CHANGE:No change will be made to this
feature. The current setting will remain.
Choose one of the available settings and press
the set/reset button while it is displayed on the DIC
to select it.
APPROACH LIGHTING
This feature allows you to select whether or not to
have the exterior lights turn on brie�y during
low light periods after unlocking the vehicle using
the Remote Keyless Entry (RKE) transmitter.
Press the customization button until APPROACH
LIGHTING appears on the DIC display. Press
the set/reset button once to access the settings for
this feature. Then press the customization
button to scroll through the following settings:
OFF:The exterior lights will not turn on when you
unlock the vehicle with the RKE transmitter.
ON (default):If it is dark enough outside, the
exterior lights will turn on brie�y when you unlock
the vehicle with the RKE transmitter.The lights will remain on for 20 seconds or until
the lock button on the RKE transmitter is pressed,
or the vehicle is no longer off. SeeRemote
Keyless Entry (RKE) System Operation on
page 113for more information.
NO CHANGE:No change will be made to this
feature. The current setting will remain.
Choose one of the available settings and press
the set/reset button while it is displayed on the DIC
to select it.
CHIME VOLUME
This feature allows you to select the volume level
of the chime.
Press the customization button until CHIME
VOLUME appears on the DIC display. Press the
set/reset button once to access the settings for this
feature. Then press the customization button to
scroll through the following settings:
NORMAL (default):The chime volume will be set
to a normal level.
297
Page 300 of 684
ON:The driver’s seat and, on some vehicles, the
outside mirrors will automatically move to the
stored driving position when the unlock button on
the Remote Keyless Entry (RKE) transmitter is
pressed. On some vehicles with the adjustable
throttle and brake pedal feature, the pedals
will also automatically move. See “Relearn Remote
Key” underDIC Operation and Displays (With
DIC Buttons) on page 270orDIC Operation and
Displays (Without DIC Buttons) on page 277
for more information on matching transmitters to
driver ID numbers.
NO CHANGE:No change will be made to this
feature. The current setting will remain.
Choose one of the available settings and press
the set/reset button while it is displayed on the
DIC to select it.REMOTE START
If your vehicle has this feature, it allows you to
turn the remote start off or on. The remote
start feature allows you to start the engine from
outside of the vehicle using your Remote Keyless
Entry (RKE) transmitter. See″Remote Vehicle
Start″underRemote Keyless Entry (RKE) System
Operation on page 113for more information.
Press the customization button until REMOTE
START appears on the DIC display. Press
the set/reset button once to access the settings for
this feature. Then press the customization
button to scroll through the following settings:
OFF:The remote start feature will be disabled.
ON (default):The remote start feature will
be enabled.
NO CHANGE:No change will be made to this
feature. The current setting will remain.
Choose one of the available settings and press
the set/reset button while it is displayed on the
DIC to select it.
300
Page 303 of 684
Set up your audio system by presetting your
favorite radio stations, setting the tone, and
adjusting the speakers. Then, when driving
conditions permit, you can tune to your favorite
radio stations using the presets and steering
wheel controls if the vehicle has them.
Notice:Before adding any sound equipment to
your vehicle, such as an audio system, CD
player, CB radio, mobile telephone, or two-way
radio, make sure that it can be added by
checking with your dealer/retailer. Also, check
federal rules covering mobile radio and
telephone units. If sound equipment can be
added, it is very important to do it properly.
Added sound equipment can interfere with the
operation of your vehicle’s engine, radio, or
other systems, and even damage them. Your
vehicle’s systems can interfere with the
operation of sound equipment that has
been added.
Your vehicle has a feature called Retained
Accessory Power (RAP). With RAP, the audio
system can be played even after the ignition
is turned off. SeeRetained Accessory Power
(RAP) on page 136for more information.Setting the Time
AM-FM Radio with Optional CD Player
If your vehicle has an AM/FM radio with an
optional CD player, it has a clock button for setting
the time. With these types of radios, the clock
can be set with either the radio turned on or off.
Set the time by following these steps:
1. Press the clock button until the hour numbers
begin �ashing on the display. Press the clock
button a second time and the minute
numbers begin �ashing on the display. Press
the clock button a third time and the 12HR
or 24HR time format begins �ashing.
2. While either the hour or the minute numbers
are �ashing, turn the tune knob, located on
the upper right side of the radio faceplate,
clockwise or counterclockwise to increase or
decrease the time. While the 12HR or
24HR time format is �ashing, turn the tune
knob clockwise or counterclockwise to select
the default time settings.
3. Press the clock button again until the clock
display stops �ashing to set the currently
displayed time; otherwise, the �ashing stops
after �ve seconds and the current time
displayed will be automatically set.
303
Page 304 of 684
MP3 Radios with a Single CD or a
Single CD and DVD Player
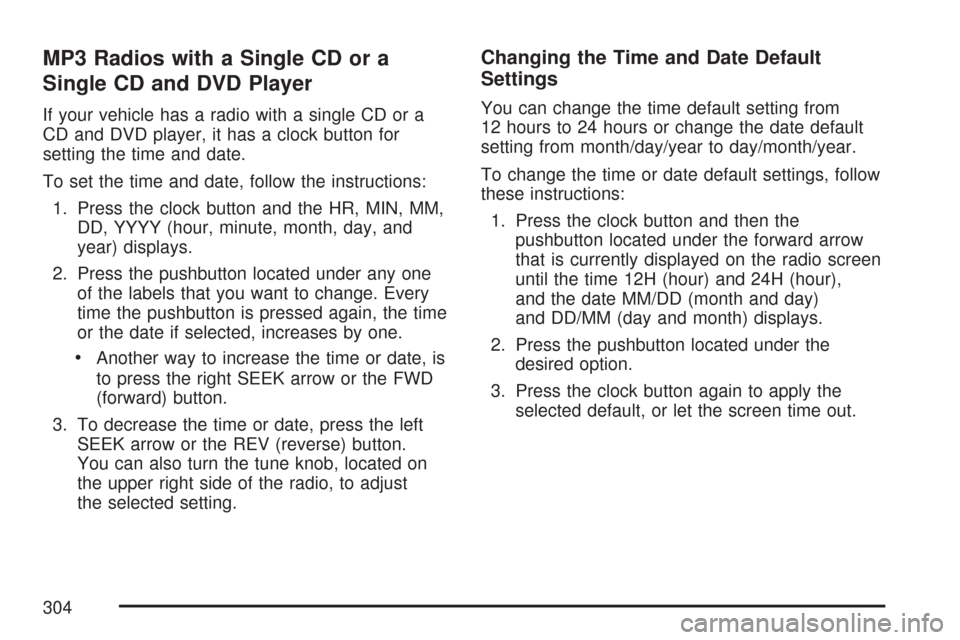
If your vehicle has a radio with a single CD or a
CD and DVD player, it has a clock button for
setting the time and date.
To set the time and date, follow the instructions:
1. Press the clock button and the HR, MIN, MM,
DD, YYYY (hour, minute, month, day, and
year) displays.
2. Press the pushbutton located under any one
of the labels that you want to change. Every
time the pushbutton is pressed again, the time
or the date if selected, increases by one.
Another way to increase the time or date, is
to press the right SEEK arrow or the FWD
(forward) button.
3. To decrease the time or date, press the left
SEEK arrow or the REV (reverse) button.
You can also turn the tune knob, located on
the upper right side of the radio, to adjust
the selected setting.
Changing the Time and Date Default
Settings
You can change the time default setting from
12 hours to 24 hours or change the date default
setting from month/day/year to day/month/year.
To change the time or date default settings, follow
these instructions:
1. Press the clock button and then the
pushbutton located under the forward arrow
that is currently displayed on the radio screen
until the time 12H (hour) and 24H (hour),
and the date MM/DD (month and day)
and DD/MM (day and month) displays.
2. Press the pushbutton located under the
desired option.
3. Press the clock button again to apply the
selected default, or let the screen time out.
304
Page 305 of 684
MP3 Radio with a Six-Disc CD Player
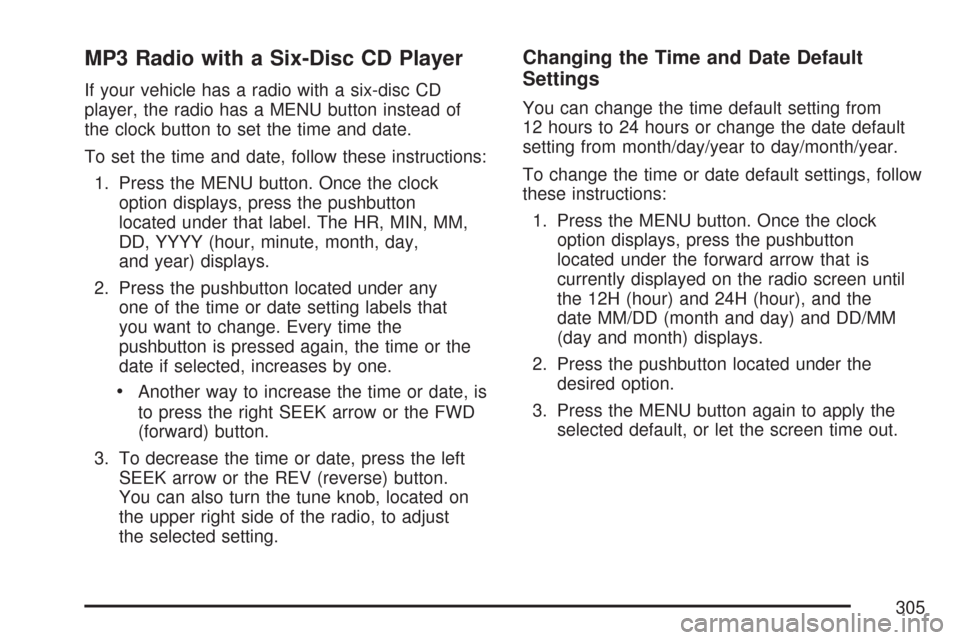
If your vehicle has a radio with a six-disc CD
player, the radio has a MENU button instead of
the clock button to set the time and date.
To set the time and date, follow these instructions:
1. Press the MENU button. Once the clock
option displays, press the pushbutton
located under that label. The HR, MIN, MM,
DD, YYYY (hour, minute, month, day,
and year) displays.
2. Press the pushbutton located under any
one of the time or date setting labels that
you want to change. Every time the
pushbutton is pressed again, the time or the
date if selected, increases by one.
Another way to increase the time or date, is
to press the right SEEK arrow or the FWD
(forward) button.
3. To decrease the time or date, press the left
SEEK arrow or the REV (reverse) button.
You can also turn the tune knob, located on
the upper right side of the radio, to adjust
the selected setting.
Changing the Time and Date Default
Settings
You can change the time default setting from
12 hours to 24 hours or change the date default
setting from month/day/year to day/month/year.
To change the time or date default settings, follow
these instructions:
1. Press the MENU button. Once the clock
option displays, press the pushbutton
located under the forward arrow that is
currently displayed on the radio screen until
the 12H (hour) and 24H (hour), and the
date MM/DD (month and day) and DD/MM
(day and month) displays.
2. Press the pushbutton located under the
desired option.
3. Press the MENU button again to apply the
selected default, or let the screen time out.
305
Page 306 of 684
AM-FM Radio
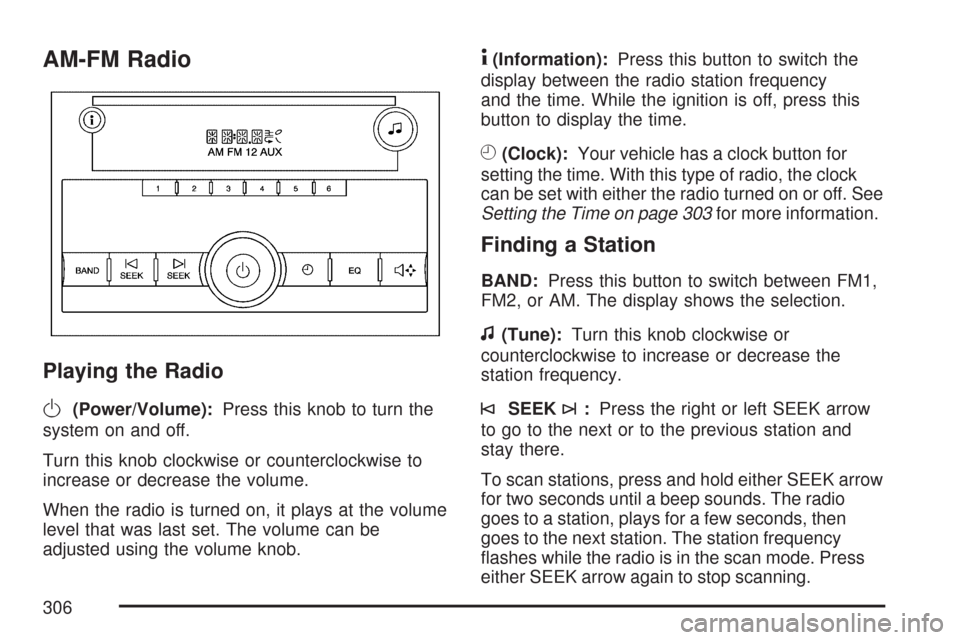
Playing the Radio
O
(Power/Volume):Press this knob to turn the
system on and off.
Turn this knob clockwise or counterclockwise to
increase or decrease the volume.
When the radio is turned on, it plays at the volume
level that was last set. The volume can be
adjusted using the volume knob.
4(Information):Press this button to switch the
display between the radio station frequency
and the time. While the ignition is off, press this
button to display the time.
H(Clock):Your vehicle has a clock button for
setting the time. With this type of radio, the clock
can be set with either the radio turned on or off. See
Setting the Time on page 303for more information.
Finding a Station
BAND:Press this button to switch between FM1,
FM2, or AM. The display shows the selection.
f(Tune):Turn this knob clockwise or
counterclockwise to increase or decrease the
station frequency.
©SEEK¨:Press the right or left SEEK arrow
to go to the next or to the previous station and
stay there.
To scan stations, press and hold either SEEK arrow
for two seconds until a beep sounds. The radio
goes to a station, plays for a few seconds, then
goes to the next station. The station frequency
�ashes while the radio is in the scan mode. Press
either SEEK arrow again to stop scanning.
306
Page 307 of 684
The radio seeks and scans stations only with a
strong signal that are in the selected band.
To scan presets within the current selected band,
press and hold either seek arrow for four seconds
until a double beep sounds. The radio goes to a
stored preset, plays for a few seconds if a strong
signal is present, then goes to the next stored
preset. The station frequency �ashes while the
radio is in the scan mode.
Setting Preset Stations
Up to 18 stations (six FM1, six FM2, and six AM),
can be programmed on the six numbered
pushbuttons, by performing the following steps:
1. Turn the radio on.
2. Press BAND to select FM1, FM2, or AM.
3. Tune in the desired station.
4. Press and hold one of the six numbered
pushbuttons for three seconds until a beep
sounds. Whenever that pushbutton is pressed
and released, the station that was set, returns.
5. Repeat the Steps 2-4 for each pushbutton.
Setting the Tone (Bass/Treble)
Bass/Treble:To adjust the bass or treble, press
the tune knob or the EQ button until the desired
tone control label displays. Turn the tune
knob clockwise or counterclockwise to increase or
decrease the setting. The display shows the
current bass or treble level. If a station’s frequency
is weak, or if there is static, decrease the treble.
Adjusting the Speakers (Balance/Fade)
`
(Balance/Fade):To adjust the balance or
fade, press this button or the tune knob until the
desired speaker control label displays. Turn
the tune knob clockwise or counterclockwise to
adjust the setting.
The setting can also be adjusted by pressing the
seek arrows.
Radio Messages
Loc (Locked):This message displays while the
THEFTLOCK®system has locked up the radio.
Take the vehicle to your dealer for service.
If any error occurs repeatedly or if an error cannot
be corrected, contact your dealer.
307