Page 262 of 510

To adjust the volume on the wireless headphones,
use the volume control on the headphones.
Make sure that the headphones are worn correctly,
left to right, to ensure the signal is received
properly.
Notice:Do not store the headphones in heat
or direct sunlight. This could damage the
headphones and repairs will not be covered
by your warranty. Keep the headphones
stored in a cool, dry place.
MAXX vehicles with the RSE system may have
a rear seat storage compartment. Store the
headphones and the remote control in this
compartment when not in use.
The MAXX vehicles may also include two sets of
wireless headphones with foam ear pads that
can be replaced.
Foam ear pads on the rear seat headphones
can become worn or damaged. The headphone
foam ear pads can become damaged if they
are not handled or stored properly. If the
headphone foam ear pads do become damaged
or worn out, the foam pads can be replaced
separately from the headphone set. It is not
necessary to replace the complete headphone set.The headphone replacement foam ear pads can
be ordered in pairs. See your dealer/retailer
for more information.
If there is a decreased audio signal during CD
or DVD play, there could be a low hissing
noise through the speakers and/or headphones.
If the hissing sound in the wireless headphones
seems excessive, make sure that the headphone
batteries are fully charged. Some amount of
hissing is normal.
Battery Replacement
To change the batteries, do the following:
1. Loosen the screw on the battery compartment
door located on the left side of the headphone
earpiece.
2. Replace the two AAA batteries in the
compartment. Make sure that they are
installed correctly using the diagram on
the inside of the battery compartment.
3. Replace the battery compartment door and
tighten the screw.
If the headphones are to be stored for a long
period of time, remove the batteries, and keep
them in a cool, dry place.
262
Page 273 of 510

Title:Move between DVD titles by using the
remote control arrow buttons.
Chapter:Move between DVD chapters by
using the remote control arrow buttons.
Time Search:The user can jump to different
areas of a DVD by using the remote control
arrow and
r(enter) buttons to select a
speci�c time position.
Favorite Track Selection (FTS):You can
program the unit to play only your favorite track
selections from a DVD or Audio CD. For a
DVD, FTS is accessed from the Menu bar.
For a CD, the FTS screen displays immediately
when the CD is inserted. From the screen, choose
the tracks on the CD that you wish to store,
using the remote control right and left arrows and
the
rbutton to select. The player remembers
the selections and each time the CD is inserted
in the player, only those tracks are played, if FTS
is turned on. The player can remember selections
for up to 50 discs. To remove FTS for a disc,
the disc must be in the player and the highlighted
tracks must be de-selected. Use the right and
left arrow buttons and the
rbutton or select
CLEAR ALL on the display.Not all DVDs support all of the feature defaults
in the setup menus. In the event a feature is
not supported, defaults are provided by the
DVD media.
Exit the setup menu by pressing the
q(return)
button on the remote control. If changes are made
to the setup menu, the DVD resumes play from
the beginning.
Battery Replacement
To change the remote control batteries, do the
following:
1. Unclip the battery door located on the back
of the remote control.
2. Replace the two AA batteries. Make sure that
they are installed correctly, using the diagram
on the inside of the battery compartment.
3. Close the battery door.
If the remote control is to be stored for a long
period of time, remove the batteries and keep
them in a cool, dry place.
273
Page 429 of 510
3. Place the tire (D) in the compartment, valve
stem up, with the bolt (E) extending through
the wheel center hole.
4. Place the jack and wheel wrench (D) over the
bolt (E), inside the wheel.
5. Secure by tightening the larger wing nut (B)
onto the bolt (E).
6. Reinstall the tire cover (A).
Storing the Compact Spare Tire
The compact spare tire is for temporary use only.
Store the compact spare tire and tools as
shown in the following diagram.
A. Cover
B. Retainer
C. Spare Tire
D. Wing NutE.
Jack and Wheel
Wrench
F. Bolt
The compact spare is for temporary use only.
Replace the compact spare tire with a full-size tire
as soon as you can. SeeCompact Spare Tire
on page 434.
429
Page 431 of 510
8. Remove the yellow cap.
9. Secure the tire and wheel with the retainer.
10. Re-install the cover.
A. Cover
B. Retainer
C. Flat Tire
D. Wing NutE. Bolt Extension
F. Jack and Wheel
Wrench
G. BoltStoring the Compact Spare Tire
The compact spare tire is for temporary use only.
Store the compact spare tire and tools as
shown in the following diagram.
A. Cover
B. Retainer
C. Flat Tire
D. Wing NutE. Jack, Wheel Wrench
and Bolt Extension
F. Bolt
The compact spare is for temporary use only.
Replace the compact spare tire with a full-size tire
as soon as you can. SeeCompact Spare Tire
on page 434.
431
Page 434 of 510

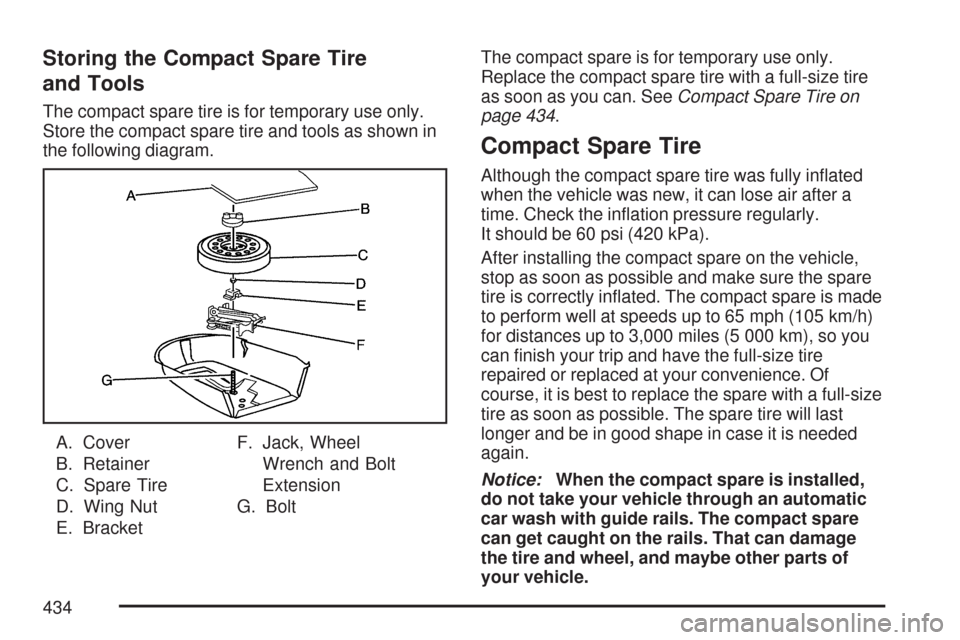
Storing the Compact Spare Tire
and Tools
The compact spare tire is for temporary use only.
Store the compact spare tire and tools as shown in
the following diagram.
A. Cover
B. Retainer
C. Spare Tire
D. Wing Nut
E. BracketF. Jack, Wheel
Wrench and Bolt
Extension
G. BoltThe compact spare is for temporary use only.
Replace the compact spare tire with a full-size tire
as soon as you can. SeeCompact Spare Tire on
page 434.
Compact Spare Tire
Although the compact spare tire was fully in�ated
when the vehicle was new, it can lose air after a
time. Check the in�ation pressure regularly.
It should be 60 psi (420 kPa).
After installing the compact spare on the vehicle,
stop as soon as possible and make sure the spare
tire is correctly in�ated. The compact spare is made
to perform well at speeds up to 65 mph (105 km/h)
for distances up to 3,000 miles (5 000 km), so you
can �nish your trip and have the full-size tire
repaired or replaced at your convenience. Of
course, it is best to replace the spare with a full-size
tire as soon as possible. The spare tire will last
longer and be in good shape in case it is needed
again.
Notice:When the compact spare is installed,
do not take your vehicle through an automatic
car wash with guide rails. The compact spare
can get caught on the rails. That can damage
the tire and wheel, and maybe other parts of
your vehicle.
434