Page 332 of 510
Notice:Towing your vehicle from the rear
could damage it. Also, repairs would not
be covered by the warranty. Never have
your vehicle towed from the rear.
Dolly Towing
To tow your vehicle with a dolly and two wheels
on the ground, follow these steps:
1. Put the front wheels on a dolly.
2. Put the vehicle in PARK (P).
3. Set the parking brake and then remove the key.
4. Clamp the steering wheel in a straight-ahead
position with a clamping device designed
for towing.
5. Release the parking brake.
332
Page 333 of 510
Towing a Trailer
{CAUTION:
If you do not use the correct equipment
and drive properly, you can lose control
when you pull a trailer. For example, if the
trailer is too heavy, the brakes may not
work well — or even at all. You and your
passengers could be seriously injured.
You may also damage your vehicle; the
resulting repairs would not be covered by
your warranty. Pull a trailer only if you
have followed all the steps in this section.
Ask your dealer/retailer for advice and
information about towing a trailer with
your vehicle.
If you have a Malibu Sedan SS or a Maxx SS,
trailer towing is not recommended. Your vehicle
was neither designed nor intended to tow a trailer.Your vehicle can tow a trailer if it is equipped with
a 3.5L V6 engine and the proper trailer towing
equipment.
To identify the trailering capacity of your vehicle,
you should read the information in “Weight of
the Trailer” that appears later in this section.
Trailering is different than just driving your vehicle
by itself. Trailering means changes in handling,
durability and fuel economy. Successful, safe
trailering takes correct equipment, and it has to
be used properly.
That’s the reason for this part. In it are many
time-tested, important trailering tips and safety
rules. Many of these are important for your safety
and that of your passengers. So please read
this section carefully before you pull a trailer.
Load-pulling components such as the engine,
transmission, wheel assemblies and tires
are forced to work harder against the drag of the
added weight. The engine is required to operate
at relatively higher speeds and under greater
loads, generating extra heat. What’s more,
the trailer adds considerably to wind resistance,
increasing the pulling requirements.
333
Page 334 of 510
If You Do Decide To Pull A Trailer
If you do, here are some important points:
There are many different laws, including speed
limit restrictions, having to do with trailering.
Make sure your rig will be legal, not only
where you live but also where you’ll be driving.
A good source for this information can be
state or provincial police.
Consider using a sway control. You can ask
a hitch dealer/retailer about sway controls.
Don’t tow a trailer at all during the �rst
1,000 miles (1 600 km) your new vehicle
is driven. Your engine, axle or other parts
could be damaged.
Then, during the �rst 500 miles (800 km) that
you tow a trailer, don’t drive over 50 mph
(80 km/h) and don’t make starts at full throttle.
This helps your engine and other parts of
your vehicle wear in at the heavier loads.
Obey speed limit restrictions when towing a
trailer. Don’t drive faster than the maximum
posted speed for trailers, or no more than
55 mph (90 km/h), to save wear on your
vehicle’s parts.Three important considerations have to do
with weight:
the weight of the trailer,
the weight of the trailer tongue
and the total weight on your vehicle’s tires.
Weight of the Trailer
How heavy can a trailer safely be?
It should never weigh more than 1,000 lbs (450 kg).
But even that can be too heavy.
It depends on how you plan to use your rig.
For example, speed, altitude, road grades, outside
temperature and how much your vehicle is used
to pull a trailer are all important. It can also depend
on any special equipment that you have on your
vehicle, and the amount of tongue weight the
vehicle can carry. See “Weight of the Trailer
Tongue” later in this section for more information.
Maximum trailer weight is calculated assuming
only the driver is in the tow vehicle and it has
all the required trailering equipment. The weight of
additional optional equipment, passengers and
cargo in the tow vehicle must be subtracted from
the maximum trailer weight.
334
Page 335 of 510
When towing a trailer on long uphill grades while
the outside temperature is above 85°F (29°C),
reduce your vehicle speed to 45 mph (72 km/h)
to avoid overheating the engine cooling system.
You can ask your dealer/retailer for our trailering
information or advice, or you can write us at
our Customer Assistance Offices. SeeCustomer
Assistance Offices on page 479for more
information.
Weight of the Trailer Tongue
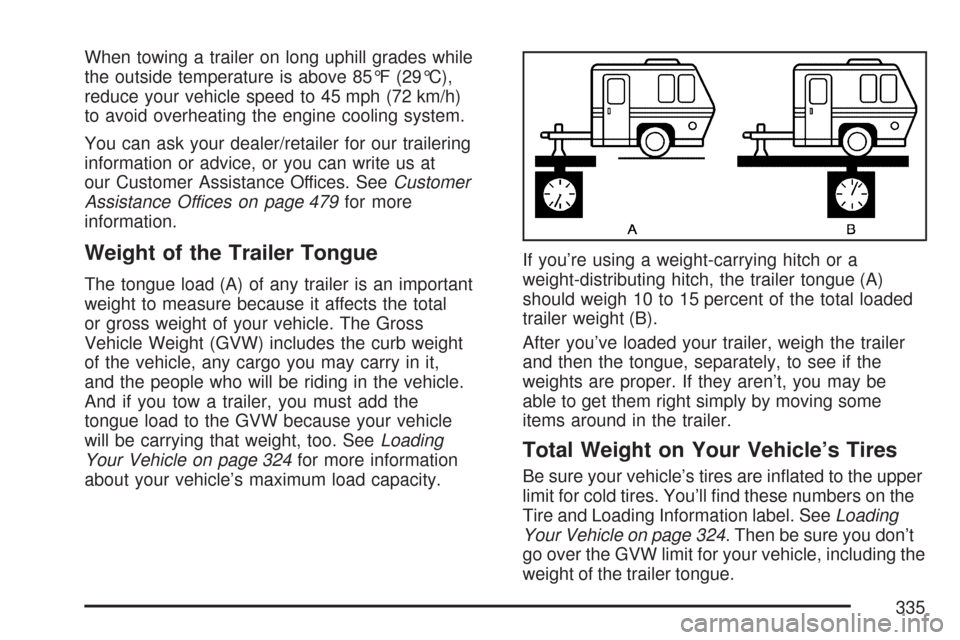
The tongue load (A) of any trailer is an important
weight to measure because it affects the total
or gross weight of your vehicle. The Gross
Vehicle Weight (GVW) includes the curb weight
of the vehicle, any cargo you may carry in it,
and the people who will be riding in the vehicle.
And if you tow a trailer, you must add the
tongue load to the GVW because your vehicle
will be carrying that weight, too. SeeLoading
Your Vehicle on page 324for more information
about your vehicle’s maximum load capacity.If you’re using a weight-carrying hitch or a
weight-distributing hitch, the trailer tongue (A)
should weigh 10 to 15 percent of the total loaded
trailer weight (B).
After you’ve loaded your trailer, weigh the trailer
and then the tongue, separately, to see if the
weights are proper. If they aren’t, you may be
able to get them right simply by moving some
items around in the trailer.
Total Weight on Your Vehicle’s Tires
Be sure your vehicle’s tires are in�ated to the upper
limit for cold tires. You’ll �nd these numbers on the
Tire and Loading Information label. SeeLoading
Your Vehicle on page 324. Then be sure you don’t
go over the GVW limit for your vehicle, including the
weight of the trailer tongue.
335
Page 337 of 510
Driving with a Trailer
Towing a trailer requires a certain amount of
experience. Before setting out for the open road,
you’ll want to get to know your rig. Acquaint
yourself with the feel of handling and braking
with the added weight of the trailer. And always
keep in mind that the vehicle you are driving
is now a good deal longer and not nearly
as responsive as your vehicle is by itself.
Before you start, check the trailer hitch and
platform (and attachments), safety chains,
electrical connector, lamps, tires and mirror
adjustment. If the trailer has electric brakes,
start your vehicle and trailer moving and then
apply the trailer brake controller by hand to be
sure the brakes are working. This lets you check
your electrical connection at the same time.
During your trip, check occasionally to be sure
that the load is secure, and that the lamps and
any trailer brakes are still working.
Following Distance
Stay at least twice as far behind the vehicle ahead
as you would when driving your vehicle without
a trailer. This can help you avoid situations
that require heavy braking and sudden turns.
Passing
You’ll need more passing distance up ahead
when you’re towing a trailer. And, because you’re
a good deal longer, you’ll need to go much
farther beyond the passed vehicle before you
can return to your lane.
Backing Up
Hold the bottom of the steering wheel with
one hand. Then, to move the trailer to the left,
just move that hand to the left. To move the
trailer to the right, move your hand to the right.
Always back up slowly and, if possible, have
someone guide you.
337
Page 338 of 510
Making Turns
Notice:Making very sharp turns while
trailering could cause the trailer to come in
contact with the vehicle. Your vehicle could
be damaged. Avoid making very sharp
turns while trailering.
When you’re turning with a trailer, make wider
turns than normal. Do this so your trailer
won’t strike soft shoulders, curbs, road signs,
trees or other objects. Avoid jerky or sudden
maneuvers. Signal well in advance.
Turn Signals When Towing a Trailer
When you tow a trailer, your vehicle may
need additional wiring. Check with your
dealer/retailer. The arrows on your instrument
panel will �ash whenever you signal a turn or
lane change. Properly hooked up, the trailer
lamps will also �ash, telling other drivers you’re
about to turn, change lanes or stop.When towing a trailer, the arrows on your
instrument panel will �ash for turns even if the
bulbs on the trailer are burned out. Thus, you
may think drivers behind you are seeing
your signal when they are not. It’s important to
check occasionally to be sure the trailer bulbs
are still working.
Driving On Grades
When towing a trailer on long uphill grades while
the outside temperature is above 85°F (29°C),
reduce your vehicle speed to 45 mph (72 km/h)
to avoid overheating the engine cooling system.
Reduce speed and shift to a lower gearbefore
you start down a long or steep downgrade.
If you don’t shift down, you might have to use
your brakes so much that they would get hot
and no longer work well.
Pay attention to the engine coolant gage.
If the indicator is in the red area, turn off the
air conditioning to reduce engine load. See
Engine Overheating on page 371.
338
Page 340 of 510
When You Are Ready to Leave After
Parking on a Hill
1. Apply your regular brakes and hold the
pedal down while you:
start your engine,
shift into a gear, and
release the parking brake.
2. Let up on the brake pedal.
3. Drive slowly until the trailer is clear
of the chocks.
4. Stop and have someone pick up and
store the chocks.
Maintenance When Trailer Towing
Your vehicle will need service more often when
you’re pulling a trailer. Things that are especially
important in trailer operation are automatic
transmission �uid (don’t over�ll), engine oil,
drive belt, cooling system and brake system.
Each of these is covered in this manual, and
the Index will help you �nd them quickly.
If you’re trailering, it’s a good idea to review
this information before you start your trip.
Check periodically to see that all hitch nuts
and bolts are tight.
Engine Cooling When Trailer Towing
Your cooling system may temporarily overheat
during severe operating conditions. See
Engine Overheating on page 371.
340
Page 353 of 510
2. Then go to the front of the vehicle and push
the secondary hood release handle toward
the driver’s side of the vehicle.
3. Lift the hood.
4. Release the hood prop rod from its retainer
and put the hood prop into the slot marked
with an arrow.Before closing the hood, be sure all the �ller caps
are on properly. Then lift the hood to relieve
pressure on the hood prop. Remove the hood prop
from the slot in the hood and return the prop to
its retainer. Lower the hood 8 to 12 inches
(20 to 30 cm) above the vehicle and release it
to latch fully. Check to make sure the hood
is closed and repeat the procedure if necessary.
353