2007 CHEVROLET HHR radio controls
[x] Cancel search: radio controlsPage 150 of 446
Brake System Warning Light..................... 185
Anti-Lock Brake System Warning Light........ 186
Enhanced Traction System Warning Light.... 187
Engine Coolant Temperature
Warning Light........................................ 187
Engine Coolant Temperature Gage............ 188
Malfunction Indicator Lamp........................ 188
Oil Pressure Light..................................... 192
Security Light............................................ 193
Fog Lamp Light......................................... 193
Highbeam On Light................................... 193
Fuel Gage................................................. 193
Driver Information Center (DIC).................. 194
DIC Operation and Displays...................... 195
DIC Warnings and Messages.................... 197
DIC Vehicle Personalization....................... 200Audio System(s)......................................... 206
Setting the Time (Without Date Display).... 207
Setting the Time (With Date Display)......... 208
Radio with CD (Base)............................... 210
Radio with CD (MP3)................................ 215
Using an MP3........................................... 226
XM Radio Messages................................. 232
Theft-Deterrent Feature............................. 233
Audio Steering Wheel Controls.................. 234
Radio Reception........................................ 234
Care of Your CDs..................................... 235
Care of the CD Player.............................. 235
Fixed Mast Antenna.................................. 236
XM™ Satellite Radio Antenna System....... 236
Section 3 Instrument Panel
150
Page 169 of 446
Accessory Power Outlet(s)
Accessory power outlets can be used to connect
electrical equipment such as a cellular phone
or CB radio.
The accessory power outlet is located on the
instrument panel below the climate controls and at
the rear of the center console.
To use the outlet, remove the cover. When not
in use, always cover the outlet with the
protective cap.
Notice:Leaving electrical equipment plugged
in for an extended period of time while the
vehicle is off will drain the battery. Power is
always supplied to the outlets. Always unplug
electrical equipment when not in use and
do not plug in equipment that exceeds
the maximum 20 ampere rating.
Certain electrical accessories may not be
compatible with the accessory power outlet and
could result in blown vehicle or adapter fuses. If you
experience a problem, see your dealer for
additional information on the accessory power
outlet.Notice:Adding any electrical equipment to
your vehicle may damage it or keep other
components from working as they should. The
repairs would not be covered by your
warranty. Do not use equipment exceeding
maximum amperage rating of 20 amperes.
Check with your dealer before adding electrical
equipment.
When adding electrical equipment, be sure to
follow the installation instructions included with the
equipment.
Notice:Improper use of the power outlet can
cause damage not covered by your warranty.
Do not hang any type of accessory or
accessory bracket from the plug because the
power outlets are designed for accessory
power plugs only.
169
Page 206 of 446
Exiting Personalization Menu
The personalization menu will be exited when any
of the following conditions occur:
A ten second time period has elapsed.
The ignition is turned off.
The end of the personalization menu list is
reached.
Audio System(s)
Determine which radio your vehicle has and then
read the pages following to familiarize yourself
with its features.
Driving without distraction is a necessity for a
safer driving experience. SeeDefensive Driving on
page 238. By taking a few moments to read this
manual and get familiar with your vehicle’s
audio system, you can use it with less effort, as
well as take advantage of its features. While your
vehicle is parked, set up your audio system by
presetting your favorite radio stations, setting the
tone and adjusting the speakers. Then, when
driving conditions permit, you can tune to
your favorite stations using the presets and
steering wheel controls if the vehicle has them.
{CAUTION:
This system provides you with a far greater
access to audio stations and song listings.
Giving extended attention to entertainment
tasks while driving can cause a crash and
you or others can be injured or killed.
Always keep your eyes on the road and
your mind on the drive — avoid engaging
in extended searching while driving.
Keeping your mind on the drive is important for
safe driving. For more information, seeDefensive
Driving on page 238.
Here are some ways in which you can help avoid
distraction while driving.
While your vehicle is parked:
Familiarize yourself with all of its controls.
Familiarize yourself with its operation.
206
Page 207 of 446
Set up your audio system by presetting your
favorite radio stations, setting the tone, and
adjusting the speakers. Then, when driving
conditions permit, you can tune to your favorite
radio stations using the presets and steering
wheel controls if the vehicle has them.
Notice:Before adding any sound equipment to
your vehicle, such as an audio system, CD
player, CB radio, mobile telephone, or two-way
radio, make sure that it can be added by
checking with your dealer. Also, check federal
rules covering mobile radio and telephone
units. If sound equipment can be added, it is
very important to do it properly. Added sound
equipment may interfere with the operation of
your vehicle’s engine, radio, or other systems,
and even damage them. Your vehicle’s systems
may interfere with the operation of sound
equipment that has been added.
Your vehicle has a feature called Retained
Accessory Power (RAP). With RAP, the audio
system can be played even after the ignition is
turned off. SeeRetained Accessory Power (RAP)
on page 119for more information.Setting the Time
(Without Date Display)
If your vehicle has an AM/FM base radio with a
single CD player and preset buttons numbered one
through six, the radio will have a clock button
for setting the time. You can set the time by
following these steps:
1. Turn the ignition key to ACC (accessory) or
RUN. Press the power knob, located in the
center of the radio, to turn the radio on.
2. Press the clock button until the hour numbers
begin �ashing on the display. Press the clock
button a second time and the minute
numbers will begin �ashing on the display.
3. While either the hour or the minute numbers
are �ashing, turn the tune knob, located on
the upper right side of the radio, clockwise or
counterclockwise to increase or decrease
the time.
4. Press the clock button again until the clock
display stops �ashing to set the currently
displayed time; otherwise, the �ashing will stop
after �ve seconds and the current time
displayed will be automatically set.
207
Page 217 of 446
Finding a Station
BAND:Press this button to switch between AM,
FM, or XM™ (if equipped). The selection displays.
f(Tune):Turn this knob to select radio
stations.
©SEEK¨:Press the right or left SEEK arrow
to go to the next or to the previous station and
stay there.
To scan stations, press and hold either SEEK
arrow for a few seconds until a beep sounds. The
radio goes to a station, plays for a few seconds,
then goes on to the next station. Press either
SEEK arrow again to stop scanning.
The radio only seeks and scans stations with a
strong signal that are in the selected band.
4(Information) (XM™ Satellite Radio Service,
MP3, and RDS Features):Press the information
button to display additional text information
related to the current FM-RDS or XM™ station, or
MP3 song. A choice of additional information
such as: Channel, Song, Artist, and CAT
(category) can display. Continue pressing the
information button to highlight the desired label, or
press the pushbutton positioned under any one
of the labels and the information about that
label displays.
While information is not available, No Info displays.
Storing a Radio Station as a Favorite
Drivers are encouraged to set up their radio station
favorites while the vehicle is parked. Tune to
your favorite stations using the presets, favorites
button, and steering wheel controls if the
vehicle has this feature. SeeDefensive Driving on
page 238.
217
Page 234 of 446
Audio Steering Wheel Controls
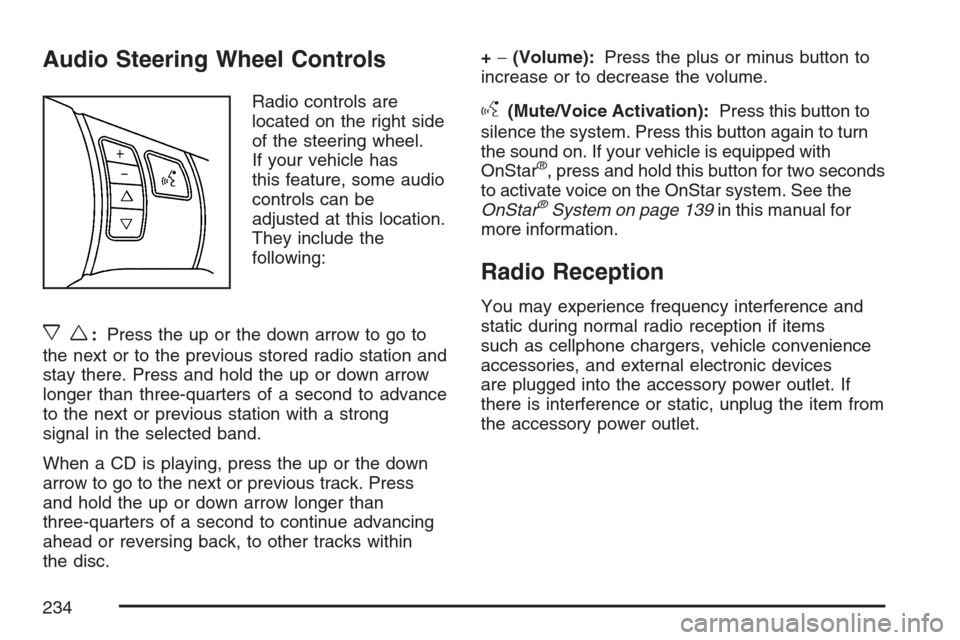
Radio controls are
located on the right side
of the steering wheel.
If your vehicle has
this feature, some audio
controls can be
adjusted at this location.
They include the
following:
xw:Press the up or the down arrow to go to
the next or to the previous stored radio station and
stay there. Press and hold the up or down arrow
longer than three-quarters of a second to advance
to the next or previous station with a strong
signal in the selected band.
When a CD is playing, press the up or the down
arrow to go to the next or previous track. Press
and hold the up or down arrow longer than
three-quarters of a second to continue advancing
ahead or reversing back, to other tracks within
the disc.+−(Volume):Press the plus or minus button to
increase or to decrease the volume.
g(Mute/Voice Activation):Press this button to
silence the system. Press this button again to turn
the sound on. If your vehicle is equipped with
OnStar
®, press and hold this button for two seconds
to activate voice on the OnStar system. See the
OnStar
®System on page 139in this manual for
more information.
Radio Reception
You may experience frequency interference and
static during normal radio reception if items
such as cellphone chargers, vehicle convenience
accessories, and external electronic devices
are plugged into the accessory power outlet. If
there is interference or static, unplug the item from
the accessory power outlet.
234
Page 433 of 446
A
Accessories and Modi�cations..................... 289
Accessory Power Outlet(s).......................... 169
Adding Equipment to Your Airbag-Equipped
Vehicle....................................................... 89
Additives, Fuel............................................ 292
Add-On Electrical Equipment....................... 380
Air Cleaner/Filter, Engine............................. 304
Air Conditioning........................................... 170
Airbag
Passenger Status Indicator....................... 182
Readiness Light....................................... 181
Airbag Sensing and Diagnostic
Module (SDM).......................................... 423
Airbag System............................................... 71
Adding Equipment to Your
Airbag-Equipped Vehicle......................... 89
How Does an Airbag Restrain?.................. 79
Passenger Sensing System....................... 82
Servicing Your Airbag-Equipped Vehicle..... 88
What Makes an Airbag In�ate?.................. 79
What Will You See After an Airbag
In�ates?................................................. 80
When Should an Airbag In�ate?................. 77
Where Are the Airbags?............................. 74
Antenna, Fixed Mast................................... 236Antenna, XM™ Satellite Radio Antenna
System.................................................... 236
Anti-Lock Brake System (ABS).................... 243
Anti-Lock Brake, System Warning Light....... 186
Appearance Care
Aluminum or Chrome-Plated Wheels........ 375
Care of Safety Belts................................ 373
Chemical Paint Spotting........................... 377
Cleaning Exterior Lamps/Lenses.............. 374
Cleaning the Inside of Your Vehicle.......... 370
Fabric/Carpet........................................... 371
Finish Care.............................................. 374
Finish Damage......................................... 377
Instrument Panel, Vinyl, and Other
Plastic Surfaces.................................... 372
Sheet Metal Damage............................... 376
Tires........................................................ 376
Underbody Maintenance........................... 377
Vehicle Care/Appearance Materials.......... 378
Washing Your Vehicle .............................. 373
Weatherstrips........................................... 373
Windshield and Wiper Blades................... 375
Ashtray(s).................................................... 170
Audio System(s).......................................... 206
Audio Steering Wheel Controls................. 234
Care of Your CD Player........................... 235
Care of Your CDs.................................... 235
433
Page 444 of 446
Spare Tire
Compact.................................................. 369
Installing.................................................. 359
Removing................................................ 356
Storing..................................................... 365
Speci�cations, Capacities............................ 386
Speedometer............................................... 179
Split Folding Rear Seat................................. 17
Starting Your Engine................................... 119
Steering...................................................... 248
Steering Wheel Controls, Audio................... 234
Steering Wheel, Tilt Wheel.......................... 155
Storage Areas
Convenience Net..................................... 147
Cupholder(s)............................................ 143
Floor Console Storage Area..................... 143
Glove Box................................................ 143
Instrument Panel Storage Area................. 143
Rear Compartment Storage
Panel/Cover.......................................... 144
Rear Storage Area................................... 143
Roof Rack System................................... 146
Stuck in Sand, Mud, Ice, or Snow............... 268
Sun Visors.................................................. 111
Sunroof....................................................... 147T
Tachometer................................................. 179
Taillamps
Turn Signal, Stoplamps and
Back-up Lamps..................................... 332
Theft-Deterrent, Radio................................. 233
Theft-Deterrent Systems.............................. 111
Content Theft-Deterrent............................ 111
PASS-Key
®III+........................................ 113
PASS-Key®III+ Operation........................ 114
Tilt Wheel.................................................... 155
Tires........................................................... 336
Aluminum or Chrome-Plated Wheels,
Cleaning............................................... 375
Buying New Tires..................................... 347
Chains..................................................... 353
Changing a Flat Tire................................ 355
Cleaning.................................................. 376
Compact Spare Tire................................. 369
Different Size........................................... 349
If a Tire Goes Flat................................... 354
In�ation - Tire Pressure............................ 344
Inspection and Rotation............................ 345
Installing the Spare Tire........................... 359
Removing the Flat Tire............................. 359
444