Page 339 of 458

These standards apply only to vehicles sold in
the United States.
Federal law prohibits the following acts or the
causing thereof:
1. The removal or rendering inoperative by
any person, other than for purposes of
maintenance, repair or replacement, of any
device or element of design incorporated into
any new vehicle for the purpose of noise
control, prior to its sale or delivery to
the ultimate purchaser or while it is in use; or
2. The use of the vehicle after such device or
element of design has been removed or
rendered inoperative by any person.
Among those acts presumed to constitute
tampering are the acts listed below.
Insulation:
•
Removal of the noise shields or any
underhood insulation.
Engine:
•
Removal or rendering engine speed governor,
if the vehicle has one, inoperative so as to
allow engine speed to exceed manufacturer
specifications.
Fan and Drive:
•
Removal of fan clutch, if the vehicle has one,
or rendering clutch inoperative.
•Removal of the fan shroud, if the vehicle
has one.
Air Intake:
•
Removal of the air cleaner silencer.
•Modification of the air cleaner.
Exhaust:
•
Removal of the muffler and/or resonator.
•Removal of the exhaust pipes and exhaust
pipe clamps.
Fuel Operated Heater (FOH) — Diesel
Engine:
•
Removal of the muffler.
339
Page 344 of 458
6. Remove the bulb socket by squeezing the
tab on the side of the socket while turning
it counterclockwise.
7. Turn the bulb counterclockwise to remove it.
8. Install a new bulb.
9. Reverse the steps to reinstall the taillamp
assembly.
Replacement Bulbs
Exterior Lamp Bulb Number
Back-up, Rear Parking, Stoplamp,
and Turn Signal Lamp3157
Center High Mounted Stop
Lamp (CHMSL)912
Front Parking and Turn
Signal Lamp3157KX
Front Sidemarker Lamp 194
Headlamps
Composite High-Beam
Headlamp9005
Composite Low-Beam
Headlamp9006GS
Sealed Beam Headlamp H6054
For replacement bulbs not listed here, contact
your dealer/retailer.
Windshield Wiper Blade
Replacement
Windshield wiper blades should be inspected for
wear and cracking. SeeScheduled Maintenance
(Gasoline Engine) on page 405for more
information on wiper blade inspection.
344
Page 350 of 458

Tire Size
The following examples show the different parts of
a tire size.
(A) Passenger (P-Metric) Tire:The United States
version of a metric tire sizing system. The letter P
as the first character in the tire size means a
passenger vehicle tire engineered to standards set
by the U.S. Tire and Rim Association.(A) Light Truck (LT-Metric) Tire:The
United States version of a metric tire sizing system.
The letters LT as the first two characters in the
tire size means a light truck tire engineered to
standards set by the U.S. Tire and Rim Association.
(B) Tire Width:The three-digit number indicates
the tire section width in millimeters from sidewall
to sidewall.
(C) Aspect Ratio:A two-digit number that
indicates the tire height-to-width measurements.
For example, if the tire size aspect ratio is 75, as
shown in item C of the light truck (LT-Metric) tire
illustration, it would mean that the tire’s sidewall is
75 percent as high as it is wide.
(D) Construction Code:A letter code is used to
indicate the type of ply construction in the tire. The
letter R means radial ply construction; the letter D
means diagonal or bias ply construction; and the
letter B means belted-bias ply construction.
(E) Rim Diameter:Diameter of the wheel
in inches.
(F) Service Description:The service description
indicates the load range and speed rating of a
tire. The load index can range from 1 to 279.
Speed ratings range from A to Z.
Passenger (P-Metric) Tire
Light Truck (LT-Metric) Tire
350
Page 355 of 458

Radial tires may look properly inflated even when
they’re underinflated. Check the tire’s inflation
pressure when the tires are cold. Cold means your
vehicle has been sitting for at least three hours
or driven no more than 1 mile (1.6 km).
Remove the valve cap from the tire valve stem.
Press the tire gage firmly onto the valve to
get a pressure measurement. If the cold tire
inflation pressure matches the recommended
pressure on the tire and loading information label,
no further adjustment is necessary. If the
pressure is low, add air until you reach the
recommended amount.
If you overfill the tire, release air by pushing on
the metal stem in the center of the tire valve.
Recheck the tire pressure with the tire gage.
Be sure to put the valve caps back on the valve
stems. They help prevent leaks by keeping out
dirt and moisture.
Dual Tire Operation
When the vehicle is new, or whenever a wheel,
wheel bolt or wheel nut is replaced, check
the wheel nut torque after 100, 1,000 and
6,000 miles (160, 1 600 and 10 000 km) of driving.For proper wheel nut tightening information, see
“Removing the Flat Tire and Installing the Spare
Tire” later in this section, underChanging a Flat
Tire on page 366. Also see “Wheel Nut Torque”
underCapacities and Speci�cations on page 398.
The outer tire on a dual wheel setup generally
wears faster than the inner tire. Your tires will wear
more evenly and last longer if you rotate the
tires periodically. SeeTire Inspection and Rotation
on page 356. Also seeScheduled Maintenance
(Gasoline Engine) on page 405.
{CAUTION:
If you operate your vehicle with a tire
that is badly underin�ated, the tire can
overheat. An overheated tire can lose
air suddenly or catch �re. You or
others could be injured. Be sure all tires
(including the spare) are properly in�ated.
SeeTires on page 346andIn�ation - Tire
Pressure on page 354for more information on
proper tire inflation.
355
Page 356 of 458

Tire Inspection and Rotation
Tires should be rotated every 5,000 to 8,000 miles
(8 000 to 13 000 km).
Any time you notice unusual wear, rotate your
tires as soon as possible and check wheel
alignment. Also check for damaged tires or wheels.
SeeWhen It Is Time for New Tires on page 358
andWheel Replacement on page 362for
more information.
Make sure the spare tire is stored securely. Push,
pull, and then try to rotate or turn the tire. If it
moves, use the ratchet/wheel wrench to tighten the
cable. SeeChanging a Flat Tire on page 366.
If your vehicle has dual rear wheels, also see
Dual Tire Operation on page 355.
The purpose of regular rotation is to achieve more
uniform wear for all tires on the vehicle. The
first rotation is the most important. SeeScheduled
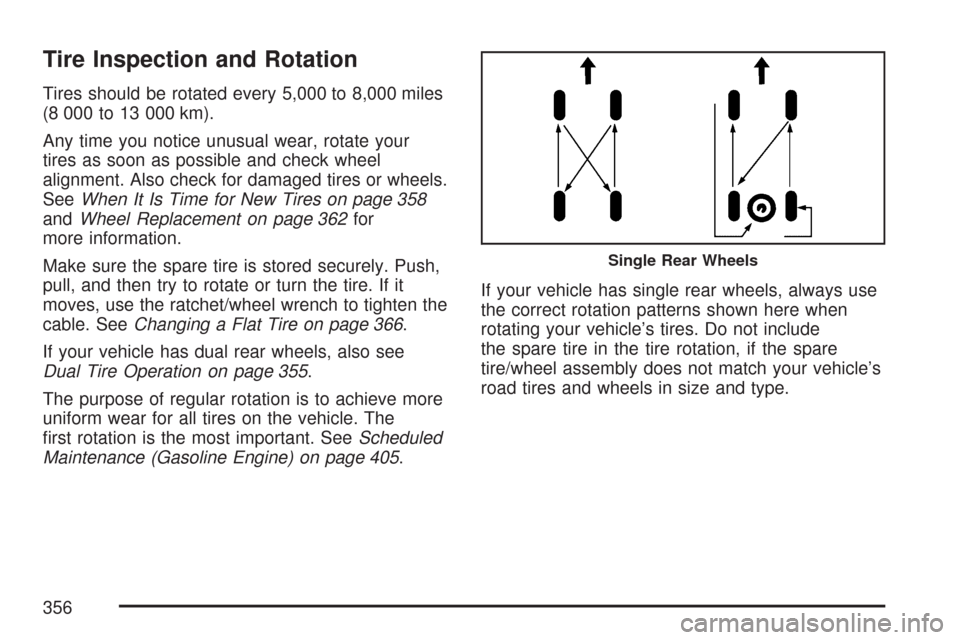
Maintenance (Gasoline Engine) on page 405.If your vehicle has single rear wheels, always use
the correct rotation patterns shown here when
rotating your vehicle’s tires. Do not include
the spare tire in the tire rotation, if the spare
tire/wheel assembly does not match your vehicle’s
road tires and wheels in size and type.
Single Rear Wheels
356
Page 366 of 458
Changing a Flat Tire
If a tire goes flat, avoid further tire and wheel
damage by driving slowly to a level place.
Turn on your vehicle’s hazard warning flashers.
SeeHazard Warning Flashers on page 146
for more information.
{CAUTION:
Changing a tire can be dangerous. The
vehicle can slip off the jack and roll over
or fall on you or other people. You and
they could be badly injured or even killed.
Find a level place to change your tire.
To help prevent the vehicle from moving:
1. Set the parking brake �rmly.
2. Put the shift lever in PARK (P).
CAUTION: (Continued)
CAUTION: (Continued)
3. Turn off the engine and do not restart
while the vehicle is raised.
4. Do not allow passengers to remain in
the vehicle.
To be even more certain the vehicle will
not move, you should put blocks at the
front and rear of the tire farthest away
from the one being changed. That would
be the tire, on the other side, at the
opposite end of the vehicle.
366
Page 392 of 458
Vehicle Identi�cation
Vehicle Identi�cation Number (VIN)
This is the legal identifier for your vehicle.
It appears on a plate in the front corner of the
instrument panel, on the driver side. You can
see it if you look through the windshield from
outside your vehicle. The VIN also appears on
the Certification/Tire and Service Parts labels
and the certificates of title and registration.
Engine Identi�cation
The eighth character in the VIN is the engine
code. This code helps you identify your vehicle’s
engine, specifications, and replacement parts.
Service Parts Identi�cation Label
This label is on the front passenger door frame.
It is very helpful if you ever need to order
parts. The label has the following information:
•Vehicle Identification Number (VIN)
•Model designation
•Paint information
•Production options and special equipment
Do not remove this label from the vehicle.
392
Page 393 of 458

Electrical System
Add-On Electrical Equipment
Notice:Do not add anything electrical to your
vehicle unless you check with your dealer
�rst. Some electrical equipment can damage
your vehicle and the damage would not
be covered by your warranty. Some add-on
electrical equipment can keep other
components from working as they should.
Your vehicle has an air bag system. Before
attempting to add anything electrical to your
vehicle, seeServicing Your Airbag-Equipped
Vehicle on page 96.
Headlamp Wiring
The headlamp wiring is protected by fuses in the
engine compartment fuse block. An electrical
overload will cause the lamps to flicker on and off,
or in some cases to remain off. If this happens,
have your headlamp wiring checked right away.
Windshield Wiper Fuses
The windshield wiper motor is protected by a
circuit breaker and a fuse. If the motor overheats
due to heavy snow, etc., the wiper will stop
until the motor cools. Although the circuit is
protected from electrical overload, overload due
to heavy snow, etc., may cause wiper linkage
damage. Always clear ice and heavy snow from
the windshield before using the windshield wipers.
If the overload is caused by some electrical
problem and not snow, etc., be sure to get it fixed.
Fuses and Circuit Breakers
The wiring circuits in your vehicle are protected
from short circuits by a combination of fuses
and circuit breakers. This greatly reduces
the chance of fires caused by electrical problems.
Look at the silver-colored band inside the fuse.
If the band is broken or melted, replace the fuse.
Be sure you replace a bad fuse with a new
one of the identical size and rating.
393