Page 245 of 436
But wet ice can be even more trouble because it
may offer the least traction of all. You can get
wet ice when it is about freezing, 32°F (0°C), and
freezing rain begins to fall. Try to avoid driving
on wet ice until salt and sand crews can get there.
Whatever the condition — smooth ice, packed,
blowing, or loose snow — drive with caution.
Accelerate gently. Try not to break the fragile
traction. If you accelerate too fast, the drive wheels
will spin and polish the surface under the tires
even more.
Unless you have the Anti-Lock Brake System
(ABS), you will want to brake very gently, too. If
you do have ABS, seeAnti-Lock Brake System
(ABS) on page 225. This system improves
your vehicle’s stability when you make a hard stop
on a slippery road. Whether you have ABS or
not, you will want to begin stopping sooner than
you would on dry pavement. Without ABS, if
you feel your vehicle begin to slide, let up on the
brakes a little. Push the brake pedal down
steadily to get the most traction you can.Remember, unless you have ABS, if you brake so
hard that your wheels stop rolling, you will just
slide. Brake so your wheels always keep rolling
and you can still steer.
•Whatever your braking system, allow greater
following distance on any slippery road.
•Watch for slippery spots. The road might be
fine until you hit a spot that is covered with
ice. On an otherwise clear road, ice patches
may appear in shaded areas where the
sun cannot reach, such as around clumps of
trees, behind buildings, or under bridges.
Sometimes the surface of a curve or an
overpass may remain icy when the
surrounding roads are clear. If you see a
patch of ice ahead of you, brake before you
are on it. Try not to brake while you are
actually on the ice, and avoid sudden steering
maneuvers.
245
Page 248 of 436
If Your Vehicle is Stuck in Sand,
Mud, Ice, or Snow
In order to free your vehicle when it is stuck, you
will need to spin the wheels, but you do not
want to spin your wheels too fast. The method
known as rocking can help you get out when you
are stuck, but you must use caution.
{CAUTION:
If you let your vehicle’s tires spin at high
speed, they can explode, and you or
others could be injured. And, the
transaxle or other parts of the vehicle can
overheat. That could cause an engine
compartment �re or other damage. When
you are stuck, spin the wheels as little as
possible. Do not spin the wheels above
35 mph (55 km/h) as shown on the
speedometer.
Notice:Spinning the wheels can destroy parts
of your vehicle as well as the tires. If you
spin the wheels too fast while shifting
the transaxle back and forth, you can destroy
the transaxle. SeeRocking Your Vehicle to
Get It Out on page 249.
For information about using tire chains on your
vehicle, seeTire Chains on page 335.
248
Page 250 of 436
Tire and Loading Information
Label - United States
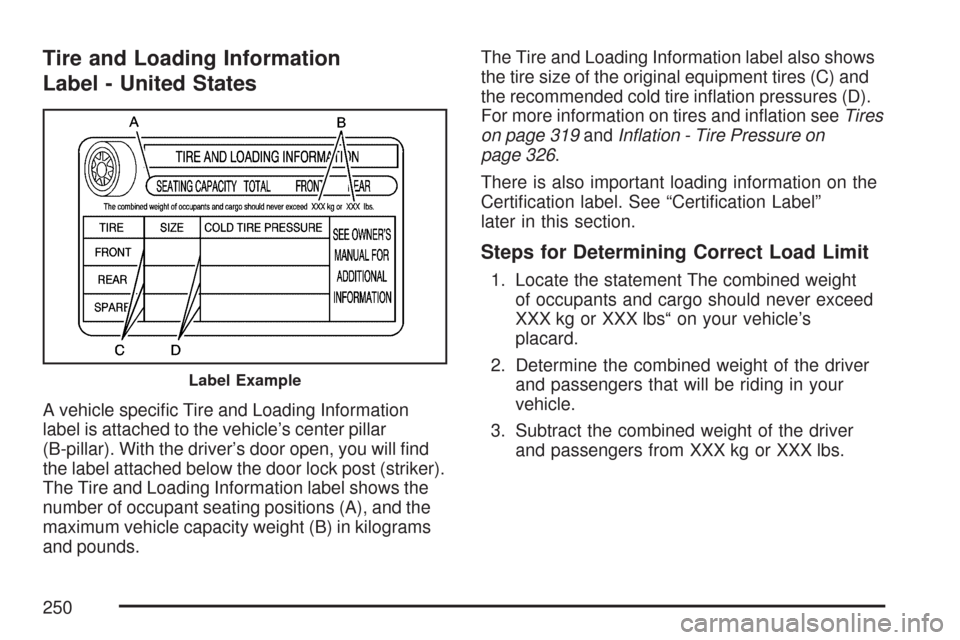
A vehicle specific Tire and Loading Information
label is attached to the vehicle’s center pillar
(B-pillar). With the driver’s door open, you will find
the label attached below the door lock post (striker).
The Tire and Loading Information label shows the
number of occupant seating positions (A), and the
maximum vehicle capacity weight (B) in kilograms
and pounds.The Tire and Loading Information label also shows
the tire size of the original equipment tires (C) and
the recommended cold tire inflation pressures (D).
For more information on tires and inflation seeTires
on page 319andInflation - Tire Pressure on
page 326.
There is also important loading information on the
Certification label. See “Certification Label”
later in this section.
Steps for Determining Correct Load Limit
1. Locate the statement The combined weight
of occupants and cargo should never exceed
XXX kg or XXX lbs“ on your vehicle’s
placard.
2. Determine the combined weight of the driver
and passengers that will be riding in your
vehicle.
3. Subtract the combined weight of the driver
and passengers from XXX kg or XXX lbs.
Label Example
250
Page 253 of 436
Tire and Loading Information
Label - Canada
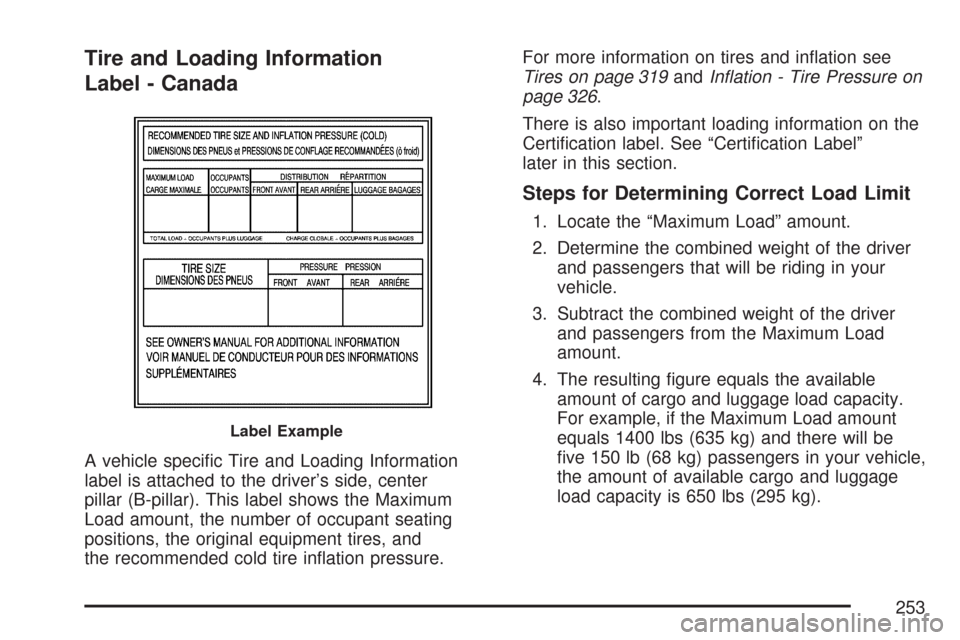
A vehicle specific Tire and Loading Information
label is attached to the driver’s side, center
pillar (B-pillar). This label shows the Maximum
Load amount, the number of occupant seating
positions, the original equipment tires, and
the recommended cold tire inflation pressure.For more information on tires and inflation see
Tires on page 319andInflation - Tire Pressure on
page 326.
There is also important loading information on the
Certification label. See “Certification Label”
later in this section.
Steps for Determining Correct Load Limit
1. Locate the “Maximum Load” amount.
2. Determine the combined weight of the driver
and passengers that will be riding in your
vehicle.
3. Subtract the combined weight of the driver
and passengers from the Maximum Load
amount.
4. The resulting figure equals the available
amount of cargo and luggage load capacity.
For example, if the Maximum Load amount
equals 1400 lbs (635 kg) and there will be
five 150 lb (68 kg) passengers in your vehicle,
the amount of available cargo and luggage
load capacity is 650 lbs (295 kg).
Label Example
253
Page 262 of 436
Turn Signal Lamps (Side).......................... 314
Center High-Mounted Stoplamp
(CHMSL) (Sedan).................................. 315
Taillamps, Turn Signal, Stoplamps
and Back-up Lamps............................... 316
License Plate Lamp................................... 317
Replacement Bulbs................................... 317
Windshield Wiper Blade Replacement....... 318
Tires............................................................ 319
Tire Sidewall Labeling............................... 320
Tire Terminology and Definitions............... 323
Inflation - Tire Pressure............................. 326
Tire Inspection and Rotation...................... 327
When It Is Time for New Tires.................. 329
Buying New Tires...................................... 330
Different Size Tires and Wheels................ 331
Uniform Tire Quality Grading..................... 332
Wheel Alignment and Tire Balance............ 333
Wheel Replacement.................................. 333
Tire Chains............................................... 335
If a Tire Goes Flat.................................... 335Changing a Flat Tire................................. 336
Removing the Spare Tire and Tools.......... 337
Removing the Flat Tire and Installing
the Spare Tire....................................... 339
Storing a Flat or Spare Tire and Tools...... 344
Compact Spare Tire.................................. 344
Appearance Care........................................ 345
Cleaning the Inside of Your Vehicle.......... 345
Fabric/Carpet............................................. 346
Leather...................................................... 347
Instrument Panel, Vinyl, and Other
Plastic Surfaces..................................... 348
Care of Safety Belts.................................. 348
Weatherstrips............................................ 348
Washing Your Vehicle............................... 349
Cleaning Exterior Lamps/Lenses................ 349
Finish Care............................................... 349
Windshield and Wiper Blades.................... 350
Aluminum Wheels...................................... 350
Tires......................................................... 351
Sheet Metal Damage................................. 351
Section 5 Service and Appearance Care
262
Page 302 of 436
Properly torqued wheel nuts are necessary to help
prevent brake pulsation. When tires are rotated,
inspect brake pads for wear and evenly tighten
wheel nuts in the proper sequence to torque
specifications inCapacities and Specifications on
page 368.
If you have rear drum brakes, they do not have
wear indicators, but if you ever hear a rear brake
rubbing noise, have the rear brake linings
inspected immediately. Also, the rear brake drums
should be removed and inspected each time
the tires are removed for rotation or changing.
When you have the front brake pads replaced,
have the rear brakes inspected, too.
Brake linings should always be replaced as
complete axle sets.
SeeBrake System Inspection on page 395.Brake Pedal Travel
See your dealer/retailer if the brake pedal does
not return to normal height, or if there is a
rapid increase in pedal travel. This could be a sign
that brake service might be required.
Brake Adjustment
Every time you make a moderate brake stop, the
disc brakes adjust for wear. If you rarely make
a moderate or heavier stop, then the brakes might
not adjust correctly. If you drive in that way,
then — very carefully — make a few moderate
brake stops about every 1,000 miles (1 600 km),
so the brakes will adjust properly.
If the brake pedal goes down farther than normal,
the rear drum brakes might need adjustment.
Adjust them by backing up and firmly applying the
brakes a few times.
302
Page 319 of 436
Tires
Your new vehicle comes with high-quality tires
made by a leading tire manufacturer. If you ever
have questions about your tire warranty and where
to obtain service, see your GM Warranty booklet for
details. For additional information refer to the tire
manufacturer’s booklet included with your vehicle.
{CAUTION:
Poorly maintained and improperly used
tires are dangerous.
Overloading your vehicle’s tires can
cause overheating as a result of too
much friction. You could have an
air-out and a serious accident. See
Loading Your Vehicle on page 249.
CAUTION: (Continued)
CAUTION: (Continued)
Underin�ated tires pose the same
danger as overloaded tires. The
resulting accident could cause serious
injury. Check all tires frequently to
maintain the recommended pressure.
Tire pressure should be checked when
your vehicle’s tires are cold. See
Inflation - Tire Pressure on page 326.
Overin�ated tires are more likely to be
cut, punctured, or broken by a sudden
impact — such as when you hit a
pothole. Keep tires at the
recommended pressure.
Worn, old tires can cause accidents. If
the tire’s tread is badly worn, or if
your vehicle’s tires have been
damaged, replace them.
319
Page 321 of 436
(D) Tire Ply Material:The type of cord and
number of plies in the sidewall and under
the tread.
(E) Uniform Tire Quality Grading (UTQG):Tire
manufacturers are required to grade tires
based on three performance factors: treadwear,
traction and temperature resistance. For more
information seeUniform Tire Quality Grading on
page 332.
(F) Maximum Cold In�ation Load Limit:
Maximum load that can be carried and the
maximum pressure needed to support that load.
For information on recommended tire pressure see
Inflation - Tire Pressure on page 326andLoading
Your Vehicle on page 249.
(A) Temporary Use Only:The compact spare
tire or temporary use tire has a tread life of
approximately 3,000 miles (5 000 km) and should
not be driven at speeds over 65 mph (105 km/h).
The compact spare tire is for emergency use when
a regular road tire has lost air and gone flat.
SeeCompact Spare Tire on page 344andIf a
Tire Goes Flat on page 335.
Compact Spare Tire Example
321