Page 103 of 436

Window Lockout
The window lockout
is located with the
driver’s power
window switches.
Press the lockout button to stop the front and rear
passengers from using their window switches.
The driver can still operate all the windows with the
lockout on. Press the lockout button again to
return to normal window operation.
Sun Visors
To block out glare you can swing down the visors.
You can also remove them from the center
mount and swing them to the side.
Visor Vanity Mirror
Your vehicle has vanity mirrors located on the
back of the sun visors. Swing down the sun visor
to expose the vanity mirror.
Theft-Deterrent Systems
Vehicle theft is big business, especially in some
cities. Although your vehicle has a number of
theft-deterrent features, we know that nothing we
put on it can make it impossible to steal.
Theft-Deterrent System
Your vehicle may have a theft-deterrent system.
The theft-deterrent system will not arm when
you lock the doors using the key or the manual
door lock. It arms only when you use the remote
keyless entry transmitter.
103
Page 104 of 436
Arming the System
To arm the system, do the following:
1. Close the doors, the windows, the hood, and
the trunk or liftgate.
Ensure that the windows are closed, as the
system can be armed even if the windows
are open.
2. Turn the key to LOCK and remove the key
from the ignition.
If the key is inserted in the ignition, the
transmitter will not arm the theft-deterrent
system.
3. Lock the doors by pressing the lock button on
the remote keyless entry transmitter.
•The LED light on the transmitter will
flash once.
•All of the doors will lock.
•The hazard warning lamps will flash once
and the horn will chirp.
•The security light will flash to indicate that
the theft-deterrent system is armed. For
hatchback models, the security light
is located on the secondary information
center (SIC) on the center of the instrument
panel. SeeSecondary Information Center
(SIC) (Hatchback Only) on page 174.
For sedan models, the security light is
located on the center of the instrument
panel near the clock. SeeInstrument Panel
Overview on page 132.
To avoid activating the alarm by accident, do one
of the following:
•Unlock the driver’s or passenger’s front door
using the key.
•Press the unlock button on the remote keyless
entry transmitter.
Unlocking a door any other way will activate the
alarm when a door or the trunk or liftgate is
opened.
If you do not want to arm the theft-deterrent
system, lock the vehicle using the key or the
manual door locks.
104
Page 105 of 436
Disarming the System
To disarm the system, do one of the following:
•Unlock the driver’s or passenger’s front
door using the key.
•Press the unlock button on the remote keyless
entry transmitter.
- The LED light on the transmitter will
flash once.
- All of the doors will unlock.
- The hazard warning lamps will
flash twice.
If the door is not opened or if the engine is not
started within 30 seconds after disarming the
system using the transmitter, all of the doors will
automatically lock and the theft-deterrent mode will
rearm.
How the System Alarm is Activated
If a door or the trunk or liftgate is opened without
using the key or the remote keyless entry
transmitter, the horn will sound and the lamps will
flash for up to 30 seconds.
How to Turn Off the System Alarm
If the system alarm is active, it can be deactivated
using one of the following methods:
•Press the lock or unlock buttons on the
remote keyless entry transmitter.
•Unlock the driver’s or passenger’s front door
using the key.
Otherwise, the alarm will automatically stop after
30 seconds. The system will then lock the
doors and rearm the theft-deterrent system.
How to Detect a Tamper Condition
If the hazard warning lamps flash once when you
press the lock or unlock buttons on the remote
keyless entry transmitter, the theft-deterrent
system alarm was activated while you were away.
105
Page 130 of 436
Cruise Control Light.................................. 171
Highbeam On Light................................... 171
Daytime Running Lamps (DRL)
Indicator Light........................................ 171
Door Ajar Light.......................................... 172
Fuel Gage................................................. 172
Low Fuel Warning Light............................ 173
Secondary Information Center (SIC).......... 174
Secondary Information Center (SIC)
(Hatchback Only)................................... 174
Clock (Hatchback Only)............................. 175
Safety Belt Reminder Light........................ 175
Airbag Readiness Light............................. 176
Passenger Airbag Status Indicator
(Hatchback)............................................ 177
Charging System Light.............................. 179
Anti-Lock Brake System Warning Light...... 179
Hold Mode Light........................................ 180
Malfunction Indicator Lamp........................ 180Oil Pressure Light..................................... 184
Fog Lamp Light......................................... 185
Door Ajar Light.......................................... 185
Audio System(s)......................................... 186
AM-FM Radio (Single Display,
Base Level)........................................... 187
AM-FM Radio (Double Display,
Base Level)........................................... 189
Radio with CD (MP3/WMA)....................... 193
Radio with Six-Disc CD (MP3/WMA)......... 200
Using an MP3 (Radio with CD Player)...... 207
Using an MP3 (Radio with Six-Disc
Player)................................................... 211
Audio Steering Wheel Controls.................. 215
Radio Reception........................................ 216
Care of Your CDs..................................... 216
Care of the CD Player.............................. 216
Fixed Mast Antenna (Hatchback)............... 217
Backglass Antenna (Sedan)....................... 217
Section 3 Instrument Panel
130
Page 145 of 436
The headlamps will automatically turn off when the
ignition key is turned to LOCK or ACC.
;(Parking Lamps):Turn the band to this
position to turn on the parking lamps, together with
the taillamps, license plate lamp, and instrument
panel lights.
OFF:Turn the band to this position to turn
all lamps off, except the Daytime Running
Lamps (DRL).
Headlamps on Reminder
If you open the driver’s door with the ignition
turned to LOCK or ACC while leaving the lamps
on, you will hear a warning chime.
Daytime Running Lamps (DRL)
Daytime Running Lamps (DRL) can make it easier
for others to see the front of your vehicle during
the day. DRL can be helpful in many different
driving conditions, but they can be especially
helpful in the short periods after dawn and before
sunset. Fully functional daytime running lamps
are required on all vehicles first sold in Canada.The DRL system will make your low-beam
headlamps come on when the following conditions
are met:
•The ignition is on.
•The exterior lamp band is in OFF or in the
parking lamp position.
•The parking brake is released.
An indicator light on instrument panel cluster will
come on when the DRL system is on.
When the DRL system is on, the taillamps,
sidemarker lamps, parking lamps and instrument
panel lights will not be illuminated unless you
have turned the exterior lamps control to
the parking lamp or headlamp position.
The DRL system will turn off when one of the
following conditions are met:
•The ignition is off.
•The parking brake is on.
•The high-beam headlamps are on.
•The low-beam headlamps are on.
•The flash-to-pass feature is used.
As with any vehicle, you should turn on the
regular headlamp system when you need it.
145
Page 250 of 436
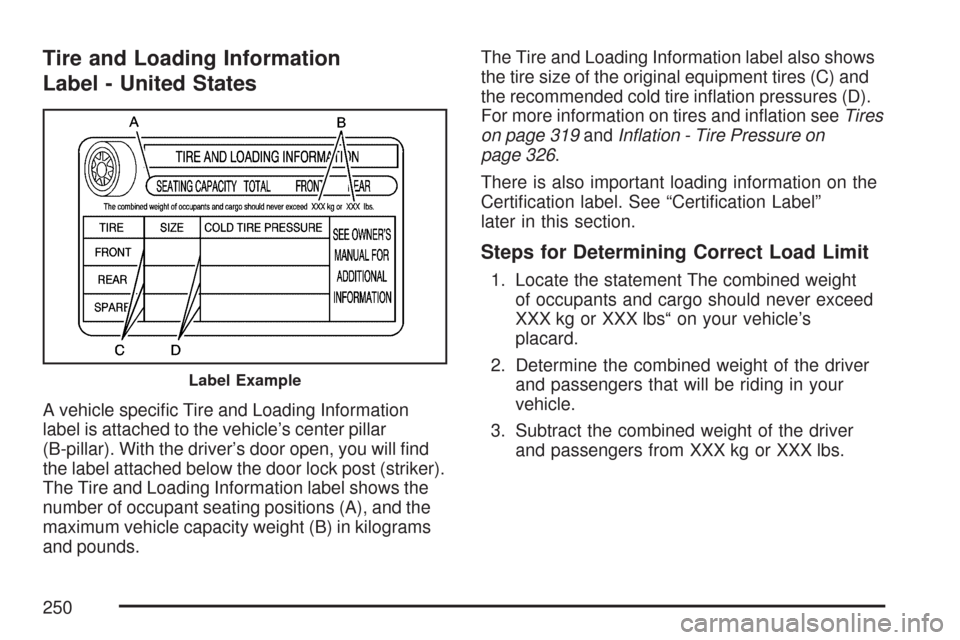
Tire and Loading Information
Label - United States
A vehicle specific Tire and Loading Information
label is attached to the vehicle’s center pillar
(B-pillar). With the driver’s door open, you will find
the label attached below the door lock post (striker).
The Tire and Loading Information label shows the
number of occupant seating positions (A), and the
maximum vehicle capacity weight (B) in kilograms
and pounds.The Tire and Loading Information label also shows
the tire size of the original equipment tires (C) and
the recommended cold tire inflation pressures (D).
For more information on tires and inflation seeTires
on page 319andInflation - Tire Pressure on
page 326.
There is also important loading information on the
Certification label. See “Certification Label”
later in this section.
Steps for Determining Correct Load Limit
1. Locate the statement The combined weight
of occupants and cargo should never exceed
XXX kg or XXX lbs“ on your vehicle’s
placard.
2. Determine the combined weight of the driver
and passengers that will be riding in your
vehicle.
3. Subtract the combined weight of the driver
and passengers from XXX kg or XXX lbs.
Label Example
250
Page 270 of 436
The tethered fuel cap is located behind a hinged
fuel door on the passenger’s side of the vehicle.To remove the fuel cap, turn it slowly
counterclockwise. The fuel cap has a spring
in it; if the cap is released too soon, it will spring
back to the right.
{CAUTION:
Fuel can spray out on you if you open the
fuel cap too quickly. If you spill fuel and
then something ignites it, you could be
badly burned. This spray can happen if
your tank is nearly full, and is more likely
in hot weather. Open the fuel cap slowly
and wait for any hiss noise to stop. Then
unscrew the cap all the way.
Hatchback shown. Sedan similar
270
Page 357 of 436
Instrument Panel Fuse Block
The instrument panel fuse block is located on the
end of the instrument panel on the driver’s
side of the vehicle.
To access the fuses, open the fuse panel door by
pulling the door out.
To reinstall the door, first insert the rear edge of
the fuse panel door, then push the front of the door
into the end of the instrument panel to secure it.
Hatchback
Sedan
357