Page 184 of 436
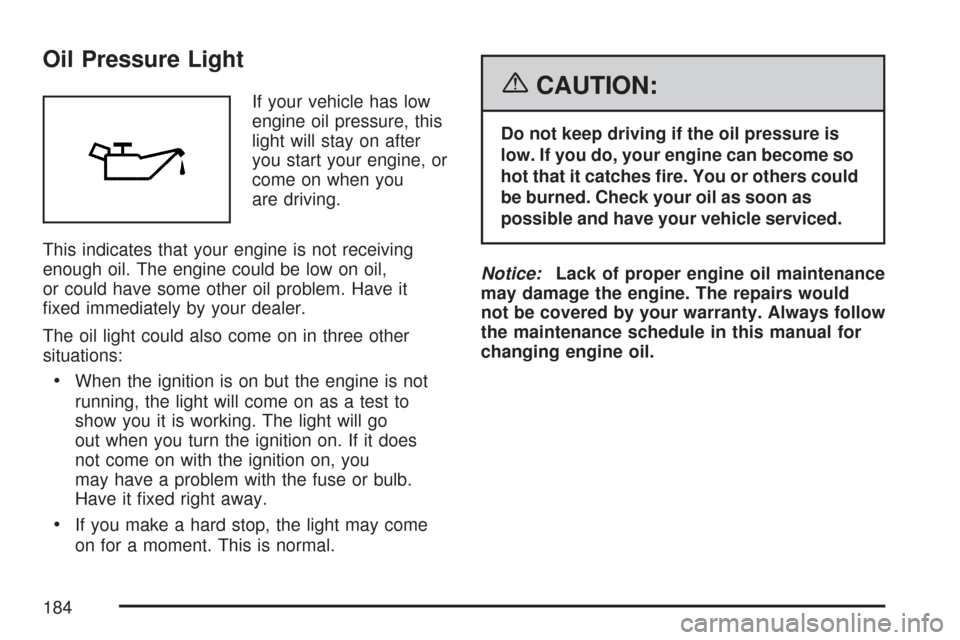
Oil Pressure Light
If your vehicle has low
engine oil pressure, this
light will stay on after
you start your engine, or
come on when you
are driving.
This indicates that your engine is not receiving
enough oil. The engine could be low on oil,
or could have some other oil problem. Have it
fixed immediately by your dealer.
The oil light could also come on in three other
situations:
•When the ignition is on but the engine is not
running, the light will come on as a test to
show you it is working. The light will go
out when you turn the ignition on. If it does
not come on with the ignition on, you
may have a problem with the fuse or bulb.
Have it fixed right away.
•If you make a hard stop, the light may come
on for a moment. This is normal.
{CAUTION:
Do not keep driving if the oil pressure is
low. If you do, your engine can become so
hot that it catches �re. You or others could
be burned. Check your oil as soon as
possible and have your vehicle serviced.
Notice:Lack of proper engine oil maintenance
may damage the engine. The repairs would
not be covered by your warranty. Always follow
the maintenance schedule in this manual for
changing engine oil.
184
Page 263 of 436
Finish Damage.......................................... 352
Underbody Maintenance............................ 352
Chemical Paint Spotting............................ 352
Vehicle Care/Appearance Materials............ 353
Vehicle Identi�cation.................................. 354
Vehicle Identification Number (VIN)........... 354
Service Parts Identification Label............... 354
Electrical System........................................ 355
Add-On Electrical Equipment..................... 355
Headlamp Wiring....................................... 355Windshield Wiper Fuses............................ 355
Power Windows and Other Power
Options.................................................. 356
Fuses and Circuit Breakers....................... 356
Instrument Panel Fuse Block..................... 357
Engine Compartment Fuse Block............... 361
Capacities and Speci�cations.................... 368
Normal Maintenance Replacement Parts..... 369
Engine Drive Belt Routing......................... 370
Section 5 Service and Appearance Care
263
Page 265 of 436
California Proposition 65 Warning
Most motor vehicles, including this one, contain
and/or emit chemicals known to the State of
California to cause cancer and birth defects or other
reproductive harm. Engine exhaust, many parts and
systems (including some inside the vehicle), many
fluids, and some component wear by-products
contain and/or emit these chemicals.
Doing Your Own Service Work
{CAUTION:
You can be injured and your vehicle could
be damaged if you try to do service work
on a vehicle without knowing enough
about it.
Be sure you have sufficient knowledge,
experience, the proper replacement
parts, and tools before you attempt any
vehicle maintenance task.
CAUTION: (Continued)
CAUTION: (Continued)
Be sure to use the proper nuts, bolts,
and other fasteners. English and
metric fasteners can be easily
confused. If you use the wrong
fasteners, parts can later break or fall
off. You could be hurt.
If you want to do some of your own service work,
you will want to use the proper service manual.
It tells you much more about how to service your
vehicle than this manual can. To order the
proper service manual, seeService Publications
Ordering Information on page 420.
Your vehicle has an airbag system. Before
attempting to do your own service work, see
Servicing Your Airbag-Equipped Vehicle on
page 82.
You should keep a record with all parts receipts
and list the mileage and the date of any service
work you perform. SeePart E: Maintenance
Record on page 398.
265
Page 266 of 436
Adding Equipment to the Outside of
Your Vehicle
Things you might add to the outside of your
vehicle can affect the airflow around it. This may
cause wind noise and affect windshield washer
performance. Check with your dealer before
adding equipment to the outside of your vehicle.
Fuel
Use of the recommended fuel is an important part
of the proper maintenance of your vehicle. To
help keep the engine clean and maintain optimum
vehicle performance, GM recommends the use
of gasoline advertised as TOP TIER Detergent
Gasoline.
Gasoline Octane
Use regular unleaded gasoline with a posted
octane rating of 87 or higher. If the octane rating
is less than 87, you might notice an audible
knocking noise when you drive, commonly referred
to as spark knock. If this occurs, use a gasoline
rated at 87 octane or higher as soon as possible. If
you are using gasoline rated at 87 octane or
higher and you hear heavy knocking, the engine
needs service.
Gasoline Speci�cations
At a minimum, gasoline should meet ASTM
specification D 4814 in the United States or
CAN/CGSB-3.5 in Canada. Some gasolines
may contain an octane-enhancing additive
called methylcyclopentadienyl manganese
tricarbonyl (MMT). General Motors recommends
against the use of gasolines containing MMT. See
Additives on page 267for additional information.
266
Page 280 of 436
If you are in an area of extreme cold, where the
temperature falls below−20°F (−29°C), it is
recommended that you use either an SAE 5W-30
synthetic oil or an SAE 0W-30 oil. Both provide
easier cold starting and better protection for
the engine at extremely low temperatures.
Engine Oil Additives
Do not add anything to the oil. The recommended
oils with the starburst symbol that meet GM
Standard GM6094M are all you need for good
performance and engine protection.
When to Change Engine Oil
If any one of these is true for you, use the short
trip/city maintenance schedule:
•Most trips are less than 5 miles (8 km). This is
particularly important when outside
temperatures are below freezing.
•Most trips include extensive idling, such as
frequent driving in stop-and-go traffic.
•You frequently use a carrier on top of
your vehicle.
•The vehicle is used for delivery service,
police, taxi, or other commercial application.
Driving under these conditions causes engine oil
to break down sooner. If any one of these is
true for your vehicle, you need to change the oil
and filter every 3,000 miles (5 000 km) or
3 months, whichever occurs first.
If none of them is true, use the long trip/highway
maintenance schedule. Change the oil and
filter every 7,500 miles (12 500 km) or 12 months,
whichever occurs first. Driving a vehicle with a
fully warmed engine under highway conditions will
cause engine oil to break down slower.
280
Page 282 of 436
When to Inspect the Engine Air
Cleaner/Filter
Inspect the engine air cleaner/filter every
15,000 miles (25 000 km) and replace it every
30,000 miles (50 000 km). If you are driving
in dusty/dirty conditions, inspect the filter at each
engine oil change.
How to Inspect the Engine Air
Cleaner/Filter
To inspect the engine air cleaner/filter remove the
filter from the vehicle and lightly shake the filter
to release loose dust and dirt. If the filter remains
caked with dirt, a new filter is required.
To inspect or replace the filter, do the following:
1. Remove the screws and lift off the cover.
2. Inspect or replace the engine air cleaner/filter.
3. Put the cover back on tightly and tighten
the screws.
SeePart A: Scheduled Maintenance Services on
page 374for replacement intervals.
{CAUTION:
Operating the engine with the air
cleaner/�lter off can cause you or others
to be burned. The air cleaner not only
cleans the air; it helps to stop �ames if
the engine back�res. If it is not there and
the engine back�res, you could be
burned. Do not drive with it off, and be
careful working on the engine with the air
cleaner/�lter off.
Notice:If the air cleaner/�lter is off, a back�re
can cause a damaging engine �re. And, dirt
can easily get into your engine, which will
damage it. Always have the air cleaner/�lter in
place when you are driving.
282
Page 285 of 436
How to Add Automatic Transaxle Fluid
Refer to the Maintenance Schedule to determine
what kind of transaxle fluid to use. SeePart D:
Recommended Fluids and Lubricants on page 396.
If the fluid level is low, add only enough of the
proper fluid to bring the level into the area between
the two dimples in the hot range on the dipstick.
1. Pull out the dipstick.
2. Using a long-neck funnel, add enough fluid at
the dipstick hole to bring it to the proper level.
It does not take much fluid, generally less
than one pint (0.5 L). Do not overfill.Notice:Use of the incorrect automatic
transaxle �uid may damage your vehicle, and
the damages may not be covered by your
warranty. Always use the automatic transaxle
�uid listed inPart D: Recommended Fluids
and Lubricants on page 396.
3. After adding fluid, recheck the fluid level as
described under “How to Check Automatic
Transaxle Fluid,” earlier in this section.
4. When the correct fluid level is obtained, push
the dipstick back in all the way.
Manual Transaxle Fluid
It is not necessary to check the transaxle fluid level.
A transaxle fluid leak is the only reason for fluid
loss. If a leak occurs, take the vehicle to the
dealership service department and have it repaired
as soon as possible. SeePart D: Recommended
Fluids and Lubricants on page 396for the proper
fluid to use.
285
Page 286 of 436
Hydraulic Clutch
There is one reservoir for both the brake and the
hydraulic clutch fluid. SeeBrakes on page 299
for more information.
The hydraulic clutch linkage in your vehicle is
self-adjusting. The master cylinder reservoir
is filled with hydraulic fluid.
A fluid loss in this system could indicate a
problem. Have the system inspected and repaired.
When to Check and What to Use
Refer to the Maintenance Schedule to determine
how often you should check the fluid level in
your master cylinder reservoir and for the proper
fluid. SeePart B: Owner Checks and Services
on page 389andPart D: Recommended Fluids
and Lubricants on page 396.
How to Check and Add Fluid
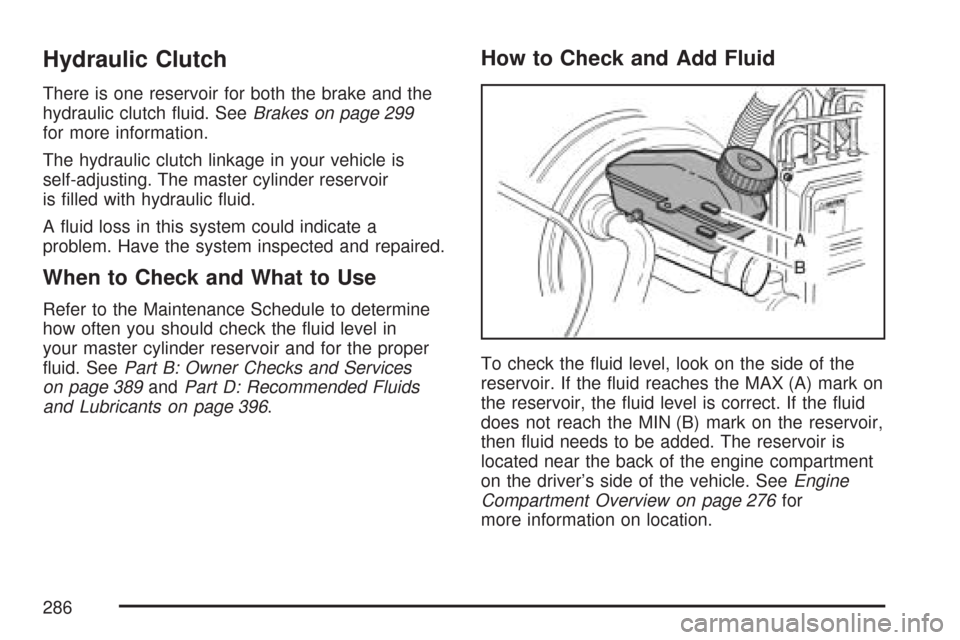
To check the fluid level, look on the side of the
reservoir. If the fluid reaches the MAX (A) mark on
the reservoir, the fluid level is correct. If the fluid
does not reach the MIN (B) mark on the reservoir,
then fluid needs to be added. The reservoir is
located near the back of the engine compartment
on the driver’s side of the vehicle. SeeEngine
Compartment Overview on page 276for
more information on location.
286