2007 CHEVROLET AVALANCHE transmission
[x] Cancel search: transmissionPage 205 of 618
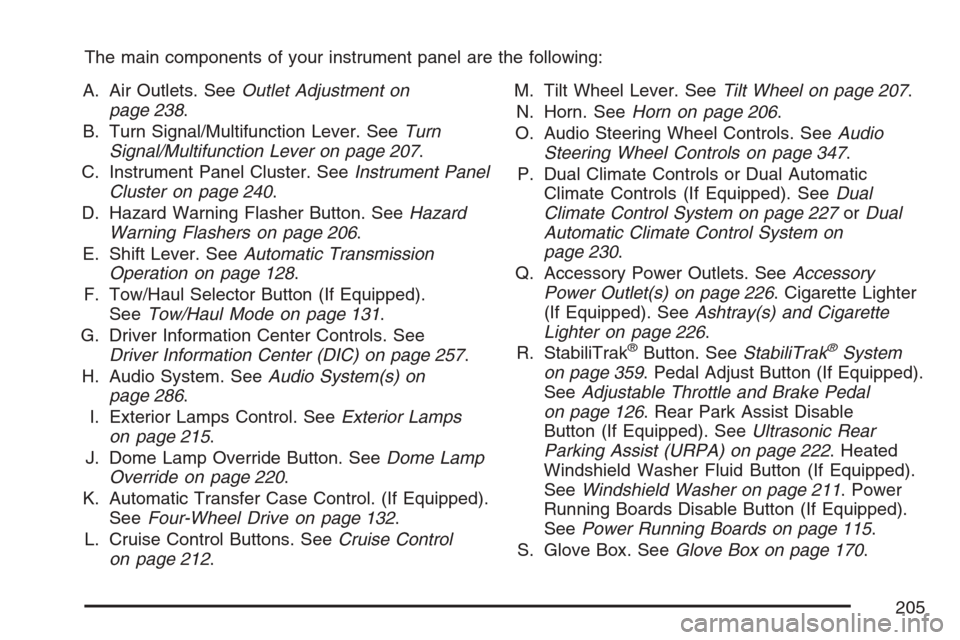
The main components of your instrument panel are the following:
A. Air Outlets. SeeOutlet Adjustment on
page 238.
B. Turn Signal/Multifunction Lever. SeeTurn
Signal/Multifunction Lever on page 207.
C. Instrument Panel Cluster. SeeInstrument Panel
Cluster on page 240.
D. Hazard Warning Flasher Button. SeeHazard
Warning Flashers on page 206.
E. Shift Lever. SeeAutomatic Transmission
Operation on page 128.
F. Tow/Haul Selector Button (If Equipped).
SeeTow/Haul Mode on page 131.
G. Driver Information Center Controls. See
Driver Information Center (DIC) on page 257.
H. Audio System. SeeAudio System(s) on
page 286.
I. Exterior Lamps Control. SeeExterior Lamps
on page 215.
J. Dome Lamp Override Button. SeeDome Lamp
Override on page 220.
K. Automatic Transfer Case Control. (If Equipped).
SeeFour-Wheel Drive on page 132.
L. Cruise Control Buttons. SeeCruise Control
on page 212.M. Tilt Wheel Lever. SeeTilt Wheel on page 207.
N. Horn. SeeHorn on page 206.
O. Audio Steering Wheel Controls. SeeAudio
Steering Wheel Controls on page 347.
P. Dual Climate Controls or Dual Automatic
Climate Controls (If Equipped). SeeDual
Climate Control System on page 227orDual
Automatic Climate Control System on
page 230.
Q. Accessory Power Outlets. SeeAccessory
Power Outlet(s) on page 226. Cigarette Lighter
(If Equipped). SeeAshtray(s) and Cigarette
Lighter on page 226.
R. StabiliTrak
®Button. SeeStabiliTrak®System
on page 359. Pedal Adjust Button (If Equipped).
SeeAdjustable Throttle and Brake Pedal
on page 126. Rear Park Assist Disable
Button (If Equipped). SeeUltrasonic Rear
Parking Assist (URPA) on page 222. Heated
Windshield Washer Fluid Button (If Equipped).
SeeWindshield Washer on page 211. Power
Running Boards Disable Button (If Equipped).
SeePower Running Boards on page 115.
S. Glove Box. SeeGlove Box on page 170.
205
Page 217 of 618

The DRL system will come on when the following
conditions are met:
The ignition is on.
The exterior lamps control is in AUTO.
The transmission is not in PARK (P).
The light sensor determines it is daytime.
When the DRL are on, only your DRL lamps will
be on. The taillamps, sidemarker, and other lamps
will not be on. The instrument panel will not be
lit up either.
When it begins to get dark, the automatic
headlamp system will switch from DRL to the
headlamps.
To turn off the DRL lamps, turn the exterior lamps
control to the OFF position and then release.
For vehicles rst sold in Canada, the transaxle
must be in the PARK (P) position, before the
DRL lamps can be turned off.
As with any vehicle, you should turn on the
regular headlamp system when you need it.
Automatic Headlamp System
When it is dark enough outside and the headlamp
switch is in AUTO, your automatic headlamp
system will turn on your headlamps at the normal
brightness along with other lamps such as the
taillamps, sidemarker, parking lamps, roof marker
lamps, and the instrument panel lights. The
radio lights will also be dim.
To turn off the automatic headlamp system,
turn the exterior lamps switch to the off position
and then release. For vehicles rst sold in Canada,
the transaxle must be in the PARK (P) position,
before the automatic headlamp system can
be turned off.
Your vehicle has a light sensor located on the
top of the instrument panel. Be sure it is not
covered, or the system will be on whenever the
ignition is on.
The system may also turn on your headlamps
when driving through a parking garage, heavy
overcast weather, or a tunnel. This is normal.
217
Page 251 of 618

This may prevent more serious damage to your
vehicle. This system is also designed to assist your
service technician in correctly diagnosing any
malfunction.
Notice:If you keep driving your vehicle with
this light on, after awhile, the emission controls
might not work as well, your vehicle’s fuel
economy might not be as good, and the engine
might not run as smoothly. This could lead
to costly repairs that might not be covered
by your warranty.
Notice:Modications made to the engine,
transmission, exhaust, intake, or fuel system
of your vehicle or the replacement of the
original tires with other than those of the same
Tire Performance Criteria (TPC) can affect
your vehicle’s emission controls and can cause
this light to come on. Modications to these
systems could lead to costly repairs not
covered by your warranty. This could also
result in a failure to pass a required Emission
Inspection/Maintenance test. SeeAccessories
and Modifications on page 433.This light should come on, as a check to show
you it is working, when the ignition is on and
the engine is not running. If the light does
not come on, have it repaired. This light will also
come on during a malfunction in one of two ways:
Light Flashing— A misre condition has
been detected. A misre increases vehicle
emissions and may damage the emission
control system on your vehicle. Diagnosis
and service may be required.
Light On Steady— An emission control
system malfunction has been detected on
your vehicle. Diagnosis and service may be
required.
If the Light is Flashing
The following may prevent more serious damage
to your vehicle:
Reducing vehicle speed
Avoiding hard accelerations
Avoiding steep uphill grades
If you are towing a trailer, reduce the amount
of cargo being hauled as soon as it is possible
If the light stops ashing and remains on steady,
see “If the Light Is On Steady” following.
251
Page 258 of 618

DIC Operation and Displays
(With DIC Buttons)
If your vehicle has DIC buttons, the information
below explains the operation of this system.
The DIC has different displays which can be
accessed by pressing the DIC buttons located
on the instrument panel, next to the steering
wheel.
The DIC displays trip, fuel, and vehicle system
information, and warning messages if a system
problem is detected.
The DIC also allows some features to be
customized. SeeDIC Vehicle Customization
(With DIC Buttons) on page 278for more
information.
If your vehicle has DIC buttons, you can also
use the trip odometer reset stem to view some
of the DIC displays. See “DIC Operation and
Displays (Without DIC Buttons)” later in this
section.
DIC Buttons
The buttons are
the trip/fuel,
vehicle information,
customization,
and set/reset buttons.
The button functions
are detailed in the
following pages.
3(Trip/Fuel):Press this button to display
the odometer, trip odometer, fuel range, average
economy, fuel used, timer, and transmission
temperature. Some vehicles also display
instantaneous economy and an Active Fuel
Management™ indicator.
T(Vehicle Information):Press this button to
display the oil life, units, tire pressure readings
for vehicles with a Tire Pressure Monitor (TPM)
system, engine hours, Tire Pressure Monitor (TPM)
system programming for vehicles with a TPM
system, and Remote Keyless Entry (RKE)
transmitter programming.
258
Page 261 of 618

Timer
Press the trip/fuel button until TIMER displays.
This display can be used as a timer.
To start the timer, press the set/reset button
while TIMER is displayed. The display will show
the amount of time that has passed since the timer
was last reset, not including time the ignition is
off. Time will continue to be counted as long as
the ignition is on, even if another display is being
shown on the DIC. The timer will record up to
99 hours, 59 minutes and 59 seconds (99:59:59)
after which the display will return to zero.
To stop the timer, press the set/reset button briey
while TIMER is displayed.
To reset the timer to zero, press and hold the
set/reset button while TIMER is displayed.
Transmission Temperature
Press the trip/fuel button until TRANS TEMP
displays. This display shows the temperature
of the automatic transmission uid in either
degrees Fahrenheit (°F) or degrees Celsius (°C).
Instantaneous Economy and Active Fuel
Management™ Indicator
If your vehicle has this display, press the
trip/fuel button until INST ECONOMY V8 MODE
displays. This display shows the current fuel
economy at a particular moment and will
change frequently as driving conditions change.
This display shows the instantaneous fuel
economy in miles per gallon (mpg) or liters
per 100 kilometers (L/100 km). Unlike average
economy, this screen cannot be reset.
An Active Fuel Management™ indicator will
display on the right side of the DIC, while
INST ECONOMY displays on the left side.
Active Fuel Management™ allows the engine to
operate on either four or eight cylinders, depending
on your driving demands. When Active Fuel
Management™ is active, V4 MODE will display
on the DIC. When Active Fuel Management™
is inactive, V8 MODE will display. SeeActive Fuel
Management™ on page 127for more information.
Blank Display
This display shows no information.
261
Page 277 of 618

TRANSMISSION HOT IDLE ENGINE
Notice:If you drive your vehicle while
the transmission uid is overheating and the
transmission temperature warning is displayed
on the instrument panel cluster and/or DIC,
you can damage the transmission. This
could lead to costly repairs that would not
be covered by your warranty. Do not drive
your vehicle with overheated transmission
uid or while the transmission temperature
warning is displayed.
This message displays along with a continuous
chime if the transmission uid in the vehicle
gets hot. Driving with the transmission uid
temperature high can cause damage to the
vehicle. Stop the vehicle and let it idle to allow
the transmission to cool. This message clears
and the chime stops when the uid temperature
reaches a safe level.
TURN SIGNAL ON
This message displays and a chime sounds if a
turn signal is left on for 3/4 of a mile (1.2 km).
Move the turn signal/multifunction lever to the
off position.
WASHER FLUID LOW ADD FLUID
This message displays when the windshield
washer uid is low. Fill the windshield washer uid
reservoir as soon as possible. SeeEngine
Compartment Overview on page 444for the
location of the windshield washer uid reservoir.
Also, seeWindshield Washer Fluid on page 470
for more information.
277
Page 362 of 618

Traction Control Operation
The traction control system is part of the
StabiliTrak®system. Traction control limits wheel
spin by reducing engine power to the wheels
(engine speed management) and by applying
brakes to each individual wheel (brake-traction
control) as necessary.
The traction control system is enabled automatically
when you start your vehicle. It will activate and
the StabiliTrak
®light will ash if it senses that any
of the wheels are spinning or beginning to lose
traction while driving. If you turn off traction control,
only the brake-traction control portion of traction
control will work. The engine speed management
will be disabled. In this mode, engine power is not
reduced automatically and the driven wheels can
spin more freely. This can cause the brake-traction
control to activate constantly.
Notice:If you allow the wheel(s) of one axle
to spin excessively while the StabiliTrak
®,
ABS and brake warning lights and the
SERVICE STABILITRAK message are
displayed, you could damage the transfer case.The repairs would not be covered by your
warranty. Reduce engine power and do
not spin the wheel(s) excessively while these
lights and this message are displayed.
The traction control system may activate on dry
or rough roads or under conditions such as
heavy acceleration while turning or abrupt
upshifts/downshifts of the transmission. When
this happens, you may notice a reduction in
acceleration, or may hear a noise or vibration.
This is normal.
If your vehicle is in cruise control when the system
activates, the StabiliTrak
®light will ash and
the cruise control will automatically disengage.
When road conditions allow you to use cruise
again, you may re-engage the cruise control.
SeeCruise Control on page 212.
StabiliTrak
®may also turn off automatically if it
determines that a problem exists with the system.
If the problem does not clear itself after restarting
the vehicle, you should see your dealer for
service.
362
Page 377 of 618
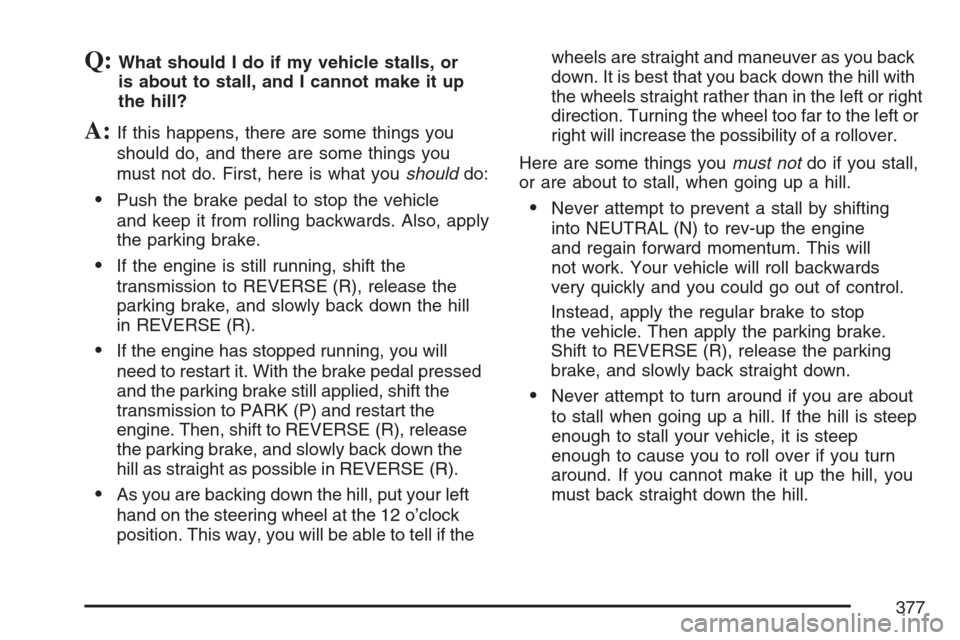
Q:What should I do if my vehicle stalls, or
is about to stall, and I cannot make it up
the hill?
A:If this happens, there are some things you
should do, and there are some things you
must not do. First, here is what youshoulddo:
Push the brake pedal to stop the vehicle
and keep it from rolling backwards. Also, apply
the parking brake.
If the engine is still running, shift the
transmission to REVERSE (R), release the
parking brake, and slowly back down the hill
in REVERSE (R).
If the engine has stopped running, you will
need to restart it. With the brake pedal pressed
and the parking brake still applied, shift the
transmission to PARK (P) and restart the
engine. Then, shift to REVERSE (R), release
the parking brake, and slowly back down the
hill as straight as possible in REVERSE (R).
As you are backing down the hill, put your left
hand on the steering wheel at the 12 o’clock
position. This way, you will be able to tell if thewheels are straight and maneuver as you back
down. It is best that you back down the hill with
the wheels straight rather than in the left or right
direction. Turning the wheel too far to the left or
right will increase the possibility of a rollover.
Here are some things youmust notdo if you stall,
or are about to stall, when going up a hill.
Never attempt to prevent a stall by shifting
into NEUTRAL (N) to rev-up the engine
and regain forward momentum. This will
not work. Your vehicle will roll backwards
very quickly and you could go out of control.
Instead, apply the regular brake to stop
the vehicle. Then apply the parking brake.
Shift to REVERSE (R), release the parking
brake, and slowly back straight down.
Never attempt to turn around if you are about
to stall when going up a hill. If the hill is steep
enough to stall your vehicle, it is steep
enough to cause you to roll over if you turn
around. If you cannot make it up the hill, you
must back straight down the hill.
377