Page 383 of 518

Headlamp Aiming
The vehicle has a visual optical headlamp aiming
system. The aim has been preset at the factory
and should need no further adjustment.
However, if the vehicle is damaged in an accident,
the headlamp aim may be affected and adjustment
may be necessary.
If oncoming vehicles �ash their high beams at
you, this may also mean the vertical aim needs to
be adjusted.
It is recommended that the vehicle is taken to your
dealer/retailer for service if the headlamps need to
be re-aimed. It is possible however, to re-aim the
headlamps as described in the following procedure.The vehicle should be properly prepared as follows:The vehicle should be placed so the headlamps
are 25 ft. (7.6 m) from a light colored wall.
The vehicle must have all four tires on a level
surface which is level all the way to the wall.
The vehicle should be placed so it is
perpendicular to the wall.
The vehicle should not have any snow, ice, or
mud on it.
The vehicle should be fully assembled and all
other work stopped while headlamp aiming is
being performed.
The vehicle should be normally loaded with a
full tank of fuel and one person or 160 lbs
(75 kg) sitting on the driver’s seat.
Tires should be properly in�ated.
The spare tire is in its original location in the
vehicle.
383
Page 406 of 518

If a low tire pressure condition is detected, the
TPMS will display the Check Tire Pressure
message on the DIC or message center and, at the
same time, illuminate the low tire pressure warning
symbol on the instrument panel cluster.
Each tire, including the spare (if provided), should
be checked monthly when cold and in�ated to the
in�ation pressure recommended by the vehicle
manufacturer on the vehicle placard or tire in�ation
pressure label. (If your vehicle has tires of a
different size than the size indicated on the vehicle
placard or tire in�ation pressure label, you should
determine the proper tire in�ation pressure for
those tires.)
As an added safety
feature, your vehicle has
been equipped with a
tire pressure monitoring
system (TPMS) that
illuminates a low tire
pressure telltale when
one or more of your tires
is signi�cantly
under-in�ated.Accordingly, when the low tire pressure telltale
illuminates, you should stop and check your tires
as soon as possible, and in�ate them to the
proper pressure. Driving on a signi�cantly
under-in�ated tire causes the tire to overheat and
can lead to the tire failure. Under-in�ation also
reduces fuel efficiency and tire tread life, and may
affect the vehicle’s handling and stopping ability.
Please note that the TPMS is not a substitute
for proper tire maintenance, and it is the driver’s
responsibility to maintain correct tire pressure,
even if under-in�ation has not reached the level to
trigger illumination of the TPMS low tire pressure
telltale.
The Tire and Loading Information label shows the
size of your vehicle’s original tires and their
recommended cold in�ation pressures. See
Loading Your Vehicle on page 321, for the location
of the tire and loading information label. Also
seeIn�ation - Tire Pressure on page 402.
The tire pressure warning light may come on in
cool weather when the vehicle is �rst started, and
then turn off as you start to drive. This could
be an early indicator that the tire pressures are
getting low and need to be in�ated to the
proper pressure.
406
Page 410 of 518

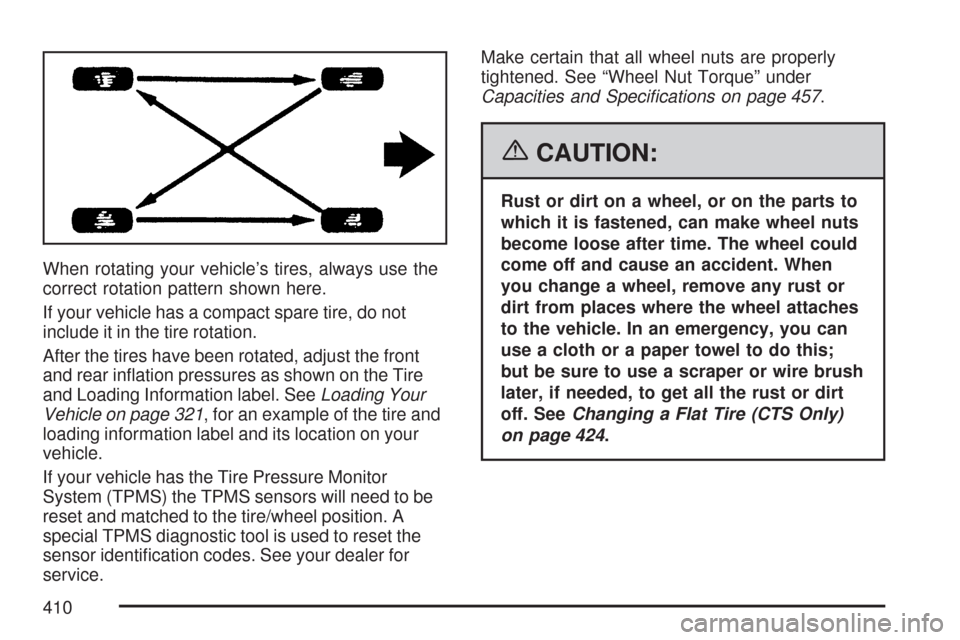
When rotating your vehicle’s tires, always use the
correct rotation pattern shown here.
If your vehicle has a compact spare tire, do not
include it in the tire rotation.
After the tires have been rotated, adjust the front
and rear in�ation pressures as shown on the Tire
and Loading Information label. SeeLoading Your
Vehicle on page 321, for an example of the tire and
loading information label and its location on your
vehicle.
If your vehicle has the Tire Pressure Monitor
System (TPMS) the TPMS sensors will need to be
reset and matched to the tire/wheel position. A
special TPMS diagnostic tool is used to reset the
sensor identi�cation codes. See your dealer for
service.Make certain that all wheel nuts are properly
tightened. See “Wheel Nut Torque” under
Capacities and Speci�cations on page 457.
{CAUTION:
Rust or dirt on a wheel, or on the parts to
which it is fastened, can make wheel nuts
become loose after time. The wheel could
come off and cause an accident. When
you change a wheel, remove any rust or
dirt from places where the wheel attaches
to the vehicle. In an emergency, you can
use a cloth or a paper towel to do this;
but be sure to use a scraper or wire brush
later, if needed, to get all the rust or dirt
off. SeeChanging a Flat Tire (CTS Only)
on page 424.
410