2007 BUICK LACROSSE sat button
[x] Cancel search: sat buttonPage 126 of 512

Outside Power Heated Mirrors
For information on the operation of the outside
power mirrors seeOutside Power Mirrors on
page 125.
If the vehicle has heated mirrors, they will warm
up to melt ice and snow, and remove condensation
when the defroster is turned on. SeeDual
Automatic Climate Control System on page 172or
Climate Control System on page 168.
Outside Convex Mirror
{CAUTION:
A convex mirror can make things (like
other vehicles) look farther away than
they really are. If you cut too sharply into
the right lane, you could hit a vehicle on
your right. Check your inside mirror or
glance over your shoulder before
changing lanes.The passenger’s side mirror is convex. A convex
mirror’s surface is curved so more can be
seen from the driver’s seat, but it also makes
things look farther away than they really are.
OnStar®System
OnStar®uses several innovative technologies and
live advisors to provide you with a wide range
of safety, security, information, and convenience
services. If your airbags deploy, the system is
designed to make an automatic call to OnStar
®
Emergency advisors who can request emergency
services be sent to your location. If you lock
your keys in the vehicle, call OnStar
®at
1-888-4-ONSTAR and they can send a signal to
unlock your doors. If you need roadside
assistance, press the OnStar
®button and they
can contact Roadside Service for you.
126
Page 129 of 512

How OnStar®Service Works
In order to provide you with OnStar®services, your
vehicle’s OnStar®system has the capability of
recording and transmitting vehicle information. This
information is automatically sent to an OnStar
®Call
Center at the time of an OnStar®button press,
Emergency button press or if your airbags or AACN
system deploys. The vehicle information usually
includes your GPS location and, in the event of a
crash, additional information regarding the accident
that your vehicle has been involved in (e.g. the
direction from which your vehicle was hit). When
you use the Virtual Advisor feature of OnStar
®
Hands-Free Calling, your vehicle also sends
OnStar®your GPS location so that we can provide
you with location-based services.
OnStar
®service cannot work unless your vehicle is
in a place where OnStar®has an agreement with a
wireless service provider for service in that area.
OnStar
®service also cannot work unless you are in
a place where the wireless service provider
OnStar
®has hired for that area has coverage,
network capacity and reception when the service is
needed, and technology that is compatible with the
OnStar
®service. Not all services are available
everywhere, particularly in remote or enclosed
areas, or at all times.OnStar
®service that involves location information
about your vehicle cannot work unless GPS
satellite signals are unobstructed and available in
that place as well.
Your vehicle must have a working electrical
system (including adequate battery power) for the
OnStar
®equipment to operate. There are other
problems OnStar®cannot control that may prevent
OnStar®from providing OnStar®service to you
at any particular time or place. Some examples are
damage to important parts of your vehicle in an
accident, hills, tall buildings, tunnels, weather
or wireless phone network congestion.
Your Responsibility
You may need to increase the volume of your
radio to hear the OnStar®advisor. If the light next
to the OnStar®buttons is red, this means that
your system is not functioning properly and should
be checked by a dealer. If the light appears
clear (no light is appearing), your OnStar
®
subscription has expired. You can always press
the OnStar®button to conrm that your OnStar®
equipment is active.
129
Page 171 of 512
Defogging and Defrosting
Fog on the inside of the vehicle is a result of high
humidity causing moisture to condense on the
cool window glass. This can be minimized if the
climate control system is used properly. There are
two modes to clear frost or fog from the windshield.
Use the defog mode to clear the windows of
condensation and to warm the vehicle’s occupants.
Use the defrost mode to remove frost or
condensation from the windshield quickly.
See “Rear Window Defogger” later in this section
for information on clearing the rear window of
fog or ice.
Turn the right knob to select the defog or
defrost mode.
Do not drive the vehicle until all windows
are clear.
-(Defog):This mode directs half of the air to the
windshield and the side window outlets and half to
the oor outlets. When you select this mode, the
system turns recirculation off and runs the air
conditioning compressor unless the outside
temperature is near or below freezing. Pressing the
recirculation button will have no effect other than
turning on the indicator light while in defog mode.
0(Defrost):This mode directs most of the air to
the windshield and the side window outlets, with
some air directed to the oor outlets. When
you select this mode, the system turns
recirculation off and runs the air conditioning
compressor unless the outside temperature is near
or below freezing. Pressing the recirculation
button will have no effect other than turning on the
indicator light while in defrost mode.
171
Page 205 of 512

Option Menu Items (Uplevel Only)
4
(Option):Press this button to scroll through the
following menu items:
Units
Press the option button until UNITS displays. This
mode allows you to select between English or
Metric units of measurement. Once in this mode,
press the set/reset button to select between
ENGLISH or METRIC units.
Language
Press the option button until the language screen
displays. This mode allows you to select the
language in which the DIC messages will appear.
Once in this mode, press the set/reset button
to select among the following choices:
English
Francais (French)
Espanol (Spanish)
Personalization
Press the option button until PERSONAL
PROGRAM displays. Your vehicle may have
personalization capabilities that allow you
to program certain features to a preferred setting
for up to two drivers.
Your vehicle may also have customization
capabilities that allow you to program certain
features to one preferred setting. Customization
features can only be programmed to one setting on
the vehicle and cannot be programmed to a
preferred setting for up to two drivers. SeeDIC
Vehicle Personalization on page 229for additional
information on personal programming.
Compass Zone
Under certain circumstances, such as during a
long distance cross-country trip, it will be
necessary to compensate for compass variance
and reset the zone. To change the compass zone
through the DIC, seeDIC Compass (Uplevel
Only) on page 206.
Compass Calibration
The compass can be manually calibrated. To
calibrate the compass through the DIC, seeDIC
Compass (Uplevel Only) on page 206.
205
Page 206 of 512

DIC Compass (Uplevel Only)
Your vehicle may have a compass in the Driver
Information Center (DIC).
Compass Zone
Under certain circumstances, such as during a
long distance cross-country trip, it will be
necessary to compensate for compass variance
and reset the zone through the DIC.
Compass variance is the difference between the
earth’s magnetic north and true geographic
north. If not adjusted to account for compass
variance, the compass in the vehicle could give
false readings.
In order to do this, the compass must be set or
calibrated to the variance zone in which the vehicle
is traveling.To adjust for compass variance, use the following
procedure:
Compass Variance Procedure
1. Press the option button until COMPASS
ZONE displays.
2. Find the vehicle’s current location and
variance zone number on the map.
Zones 1 through 15 are available.
206
Page 245 of 512
Radio with CD (Uplevel)
XM™ Satellite Radio Service
XM™ is a satellite radio service that is based in
the 48 contiguous United States and Canada.
XM™ offers a large variety of coast-to-coast
channels including music, news, sports, talk,
traffic/weather (U.S. subscribers), and children’s
programming. XM™ provides digital quality
audio and text information that includes
song title and artist name. A service fee is
required in order to receive the XM™ service.For more information, contact XM™; In the U.S. at
www.xmradio.com or call 1-800-852-XMXM (9696)
or in Canada at www.xmradio.ca or call
1-877-GET-XMSR (438-9677).
Playing the Radio
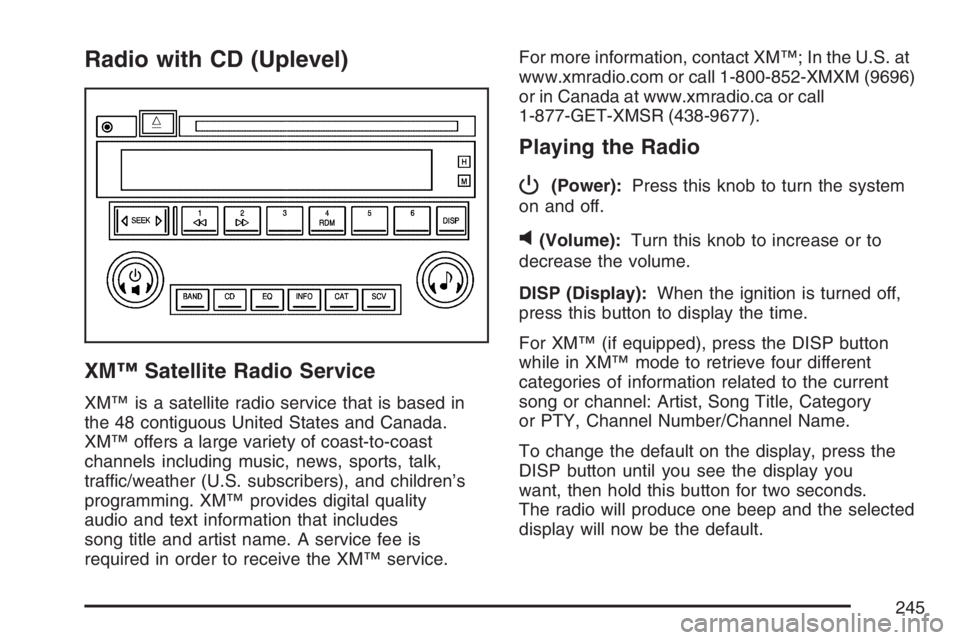
P
(Power):Press this knob to turn the system
on and off.
v(Volume):Turn this knob to increase or to
decrease the volume.
DISP (Display):When the ignition is turned off,
press this button to display the time.
For XM™ (if equipped), press the DISP button
while in XM™ mode to retrieve four different
categories of information related to the current
song or channel: Artist, Song Title, Category
or PTY, Channel Number/Channel Name.
To change the default on the display, press the
DISP button until you see the display you
want, then hold this button for two seconds.
The radio will produce one beep and the selected
display will now be the default.
245
Page 246 of 512

SCV (Speed Compensated Volume):With SCV,
the audio system adjusts automatically to make
up for road and wind noise as you drive.
Set the volume at the desired level. Press this
button to select SPEED VOL MIN, SPEED
VOL MED, or SPEED VOL MAX. Each higher
setting will allow for more volume compensation at
faster vehicle speeds. Then as you drive, SCV
increases the volume, as necessary, to overcome
noise at any speed. The volume level should
always sound the same to you as you drive. NONE
will appear on the display if the radio cannot
determine the vehicle speed. To turn SCV
off, press this button until SPEED VOL OFF
appears on the display.
Finding a Station
BAND:Press this button to switch between FM1,
FM2, AM, or XM1 or XM2 (if equipped). The
display will show the selection.
e(Tune):Turn this knob to select radio stations.
oSEEKp:Press and release the right or
the left arrow to go to the next or to the previous
station and stay there.To scan stations, press and hold either arrow for
more than two seconds. SCAN will appear on
the display and the radio will produce one beep.
The radio will go to a station, play for a few
seconds, then go on to the next station. Press
either arrow again or one of the pushbuttons
to stop scanning presets.
To scan preset stations, press and hold either arrow
for more than four seconds. PSCAN will appear on
the display and the radio will produce two beeps.
The radio will go to a preset station, play for a few
seconds, then go on to the next preset station.
Press either arrow again or one of the pushbuttons
to stop scanning presets.
The radio will only seek and scan stations with a
strong signal that are in the selected band.
INFO (Information) (XM™ Satellite Radio
Service Only):If the current station has a
message, the information symbol will appear on
the display. Press this button to see the message.
The message may display the artist, song title,
call in phone numbers, etc.
246
Page 248 of 512

EQ (Equalization):Press this button to select
customized equalization settings designed
for country/western, jazz, talk, pop, rock, classical,
and custom.
To return the bass and treble to the manual mode,
push and release the tone knob until BASS or
TREBLE appears on the display.
Adjusting the Speakers (Balance/Fade)
e
(Balance/Fade):To adjust the balance
between the right and the left speakers, push and
release this knob until BAL appears on the
display. Turn the knob to move the sound toward
the right or the left speakers.
To adjust the fade between the front and the rear
speakers, push and release the speaker knob until
FAD appears on the display. Turn the knob to move
the sound toward the front or the rear speakers.
To adjust the balance and the fade to the middle
position, push the speaker knob, then push it again
and hold it until you hear one beep.
To adjust all tone and speaker controls to the
middle position, push and hold the speaker knob
when no tone or speaker control is displayed.
ALL CENTERED will appear on the display and you
will hear a beep.
Finding a Category (CAT) Station
(XM™ Satellite Radio Service Only)
To select and nd a desired category perform the
following:
1. Press the CAT button to activate category
select mode. The current category will
appear on the display.
2. Turn the tune knob to select a category.
3. Once the desired category is displayed, press
either SEEK arrow to take you to the
categories rst station.
4. To go to another station within that category
and the category is displayed, press either
SEEK arrow again. If CAT times out and is no
longer on the display, go back to Step 1.
5. Press CAT to exit category select mode or
wait for CAT to time out.
If the radio cannot nd the desired category,
NOT FOUND will appear on the display and the
radio will return to the last station you were
listening to.
248