2007 BUICK LACROSSE radio
[x] Cancel search: radioPage 167 of 512

Accessory Power Outlet(s)
The accessory power outlets enable power
electrical equipment such as a cellular telephone
or a CB radio to be used inside the vehicle.
Your vehicle has 12-volt outlets. One outlet is
located on the center console below the climate
controls. There may be another outlet located
inside the center storage console or in the �ip and
fold console.
Open the cover to use the outlet. Be sure to close
the cover when the outlet is not in use.
Notice:Adding any electrical equipment to
your vehicle may damage it or keep other
components from working as they should. The
repairs would not be covered by your warranty.
Do not use equipment exceeding maximum
amperage rating of 20 amperes. Check with
your dealer before adding electrical equipment.Certain power accessory plugs may not be
compatible to the power accessory outlet and
could result in blown vehicle or adapter fuses.
If you experience a problem, see your dealer.
Notice:Improper use of the power outlet can
cause damage not covered by your warranty.
Do not hang any type of accessory or
accessory bracket from the plug because the
power outlets are designed for accessory
power plugs only.
Notice:Leaving electrical equipment plugged
in for an extended period of time while the
vehicle is off will drain the battery. Power is
always supplied to the outlets. Always unplug
electrical equipment when not in use and
do not plug in equipment that exceeds
the maximum 20 ampere rating.
When adding electrical equipment, be sure to
follow the proper installation instructions included
with the equipment.
167
Page 185 of 512

SeePassenger Sensing System on page 75for
more on this, including important safety
information.
If, after several seconds, all status indicator lights
remain on, or if there are no lights at all, there
may be a problem with the lights or the passenger
sensing system. See your dealer for service.
{CAUTION:
If the off indicator and the airbag
readiness light ever come on together, it
means that something may be wrong with
the airbag system. If this ever happens,
have the vehicle serviced promptly,
because an adult-size person sitting in the
right front passenger seat may not have
the protection of the frontal airbag. See
Airbag Readiness Light on page 182.
Charging System Light
This light comes on
brie�y when the ignition
is turned on, as a
check to show that it is
working. Then it
should go out.
If it stays on, or comes on while the vehicle is being
driven, a chime will sound and there may be a
problem with the charging system. It could indicate
that the vehicle has a loose accessory belt or
another electrical problem. Have it checked right
away. Driving while this light is on could drain the
battery and result in the engine suddenly stopping.
If the vehicle must be driven a short distance with
the light on, be certain to turn off all unnecessary
electrical loads, such as the radio, heater fan,
air conditioning fan, and heated seats.
185
Page 229 of 512

DIC Vehicle Personalization
Your vehicle may have customization capabilities
that allow you to program certain features to
one preferred setting. Customization features can
only be programmed to one setting on the
vehicle and cannot be programmed to a preferred
setting for two different drivers. The customization
features include the following:
Exterior lighting delay
Interior lighting delay
Delayed locking
Content theft
Remote keyless entry feedback
Remote start
Your vehicle may also have personalization
capabilities that allow you to program certain
features to a preferred setting for up to two drivers.The �rst personalized key corresponds to
driver 1 and the second personalized key
corresponds to driver 2. The personalization
features include the following:
Radio station presets
Auto door unlock preferences
Remote keyless entry unlock preferences
All of the customization and personalization options
may not be available on your vehicle. Only the
options available will be displayed on your DIC.
The default settings for the customization and
personalization features were set when your
vehicle left the factory, but may have been
changed from their default state since then.
The customization preferences are
automatically recalled.
The driver’s personalization preferences are
recalled by using the key programmed for
driver 1 or 2.
To change customization and personalization
preferences, use the following procedure.
229
Page 235 of 512

Personalization Menu Items
The following are personalization features that
allow you to program setting for up to two drivers:
PERSONALIZE KEY
This feature allows you to personalize a key to be
recognized as key 1 or 2. A personalized key
allows you to program personalization features to
a preferred setting to correspond to key 1 or 2.
If you are using a key that has already been
personalized, this screen will not display.
Press the option button until PERSONALIZE KEY
appears on the DIC display. Press the set/reset
button to scroll through the following choices:
NO (default):The key will not be personalized.
YES:The key will be personalized.
Select one of the available choices and press the
option button while it is displayed on the DIC
to select it and move on to the next feature.
REPLACE KEY
This screen displays only if YES was selected for
the PERSONALIZE KEY feature, keys 1 and 2
have already been personalized, and the current
key being used is not key 1 or 2. This feature
allows you to program a key to be recognized as
key 1 or 2 in the event that the previously
programmed key needs to be replaced.
1:The key will be programmed to be recognized
as key 1.
2:The key will be programmed to be recognized
as key 2.
CANCEL (default):The key will not be
programmed.
RADIO STATIONS PERSONALIZED
This screen displays only if YES was selected for
the PERSONALIZE KEY feature. This feature
allows you to set the radio station presets to be
recognized for the key, 1 or 2, that is being
used. You may notice a change to the radio after
this message displays. After this message
displays, any change to the presets will be
recognized for key 1 or 2 and will be maintained
by the radio.
235
Page 238 of 512

Audio System(s)
Determine which radio your vehicle has and then
read the pages following to familiarize yourself
with its features.
Driving without distraction is a necessity for a
safer driving experience. SeeDefensive Driving on
page 286. By taking a few moments to read this
manual and get familiar with your vehicle’s
audio system, you can use it with less effort, as
well as take advantage of its features. While your
vehicle is parked, set up your audio system by
presetting your favorite radio stations, setting the
tone, and adjusting the speakers. Then, when
driving conditions permit, you can tune to
your favorite stations using the presets and
steering wheel controls if the vehicle has them.{CAUTION:
This system provides you with a far greater
access to audio stations and song listings.
Giving extended attention to entertainment
tasks while driving can cause a crash and
you or others can be injured or killed.
Always keep your eyes on the road and
your mind on the drive — avoid engaging
in extended searching while driving.
Keeping your mind on the drive is important for
safe driving. Here are some ways in which you can
help avoid distraction while driving.
238
Page 239 of 512

While your vehicle is parked:
Familiarize yourself with all of its controls.
Familiarize yourself with its operation.
Set up your audio system by presetting your
favorite radio stations, setting the tone, and
adjusting the speakers. Then, when driving
conditions permit, you can tune to your favorite
radio stations using the presets and steering
wheel controls if the vehicle has them.
Notice:Before adding any sound equipment
to your vehicle, such as an audio system,
CD player, CB radio, mobile telephone,
or two-way radio, make sure that it can be
added by checking with your dealer. Also,
check federal rules covering mobile radio and
telephone units. If sound equipment can be
added, it is very important to do it properly.
Added sound equipment may interfere with the
operation of your vehicle’s engine, radio, or
other systems, and even damage them.
Your vehicle’s systems may interfere with the
operation of sound equipment that has
been added.Notice:The chime signals related to safety
belts, parking brake, and other functions of
your vehicle operate through the radio/
entertainment system. If that equipment is
replaced or additional equipment is added to
your vehicle, the chimes may not work. Make
sure that replacement or additional equipment
is compatible with your vehicle before installing
it. SeeAccessories and Modifications on
page 341.
Your vehicle has a feature called Retained
Accessory Power (RAP). With RAP, the audio
system can be played even after the ignition is
turned off. SeeRetained Accessory Power (RAP)
on page 110for more information.
Setting the Time
Press and hold H until the correct hour appears on
the display. AM or PM will appear on the display
(Radio with CD (UpLevel, MP3, and Six-Disc CD)).
Press and hold M until the correct minute
appears on the display. The time can be set with
the ignition on or off.
239
Page 240 of 512

Radio with CD (Base)
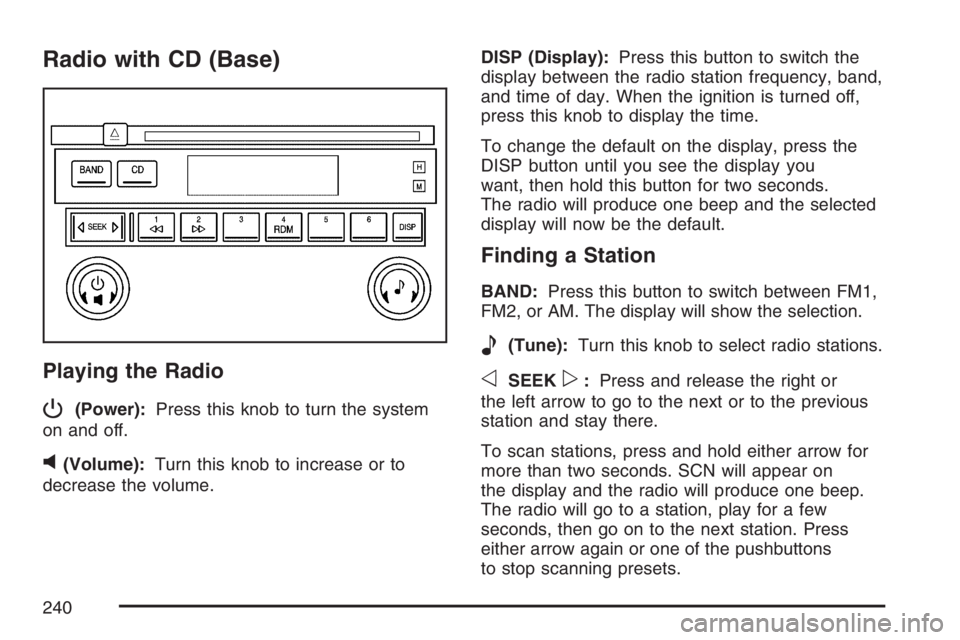
Playing the Radio
P
(Power):Press this knob to turn the system
on and off.
v(Volume):Turn this knob to increase or to
decrease the volume.DISP (Display):Press this button to switch the
display between the radio station frequency, band,
and time of day. When the ignition is turned off,
press this knob to display the time.
To change the default on the display, press the
DISP button until you see the display you
want, then hold this button for two seconds.
The radio will produce one beep and the selected
display will now be the default.
Finding a Station
BAND:Press this button to switch between FM1,
FM2, or AM. The display will show the selection.
e(Tune):Turn this knob to select radio stations.
oSEEKp:Press and release the right or
the left arrow to go to the next or to the previous
station and stay there.
To scan stations, press and hold either arrow for
more than two seconds. SCN will appear on
the display and the radio will produce one beep.
The radio will go to a station, play for a few
seconds, then go on to the next station. Press
either arrow again or one of the pushbuttons
to stop scanning presets.
240
Page 241 of 512

To scan preset stations, press and hold either arrow
for more than four seconds. PSC will appear on the
display and the radio will produce two beeps. The
radio will go to a preset station, play for a few
seconds, then go on to the next preset station.
Press either arrow again or one of the pushbuttons
to stop scanning.
The radio will only seek and scan stations with a
strong signal that are in the selected band.
Setting Preset Stations
Up to 18 stations (six FM1, six FM2, and six AM),
can be programmed on the six numbered
pushbuttons, by performing the following steps:
1. Turn the radio on.
2. Press BAND to select FM1, FM2, or AM.
3. Tune in the desired station.
4. Press and hold one of the six numbered
pushbuttons until you hear a beep.
Whenever that numbered pushbutton is
pressed, the station that was set will return for
that pushbutton.
5. Repeat the Steps 2-4 for each pushbutton.
Setting the Tone (Bass/Treble)
e
(Bass/Treble):Push and release this knob
until BAS or TRE appears on the display. Turn this
knob to increase or to decrease. The display will
show the bass or the treble level. If a station
is weak or noisy, decrease the treble.
To adjust the bass and the treble to the middle
position, push and hold the tone knob. The radio
will produce one beep.
To adjust all tone and speaker controls to the
middle position, push and hold the tone knob when
no tone or speaker control is displayed. CEN will
appear on the display and you will hear a beep.
241