2007 BMW Z4 M ROADSTER&COUPE inflation pressure
[x] Cancel search: inflation pressurePage 20 of 50
Technology for driving comfort and safety
18
Technology for driving comfort and safety
Driving stability control
systems
In contrast to the descriptions in the Owner's
Manual for the BMW Z4, your BMW Z4 M Road-
ster/Z4 M Coupe does not feature Dynamic
Traction Control DTC.
Dynamic Stability Control DSC
DSC prevents slip at the drive wheels while
starting off and accelerating the vehicle. DSC
also recognizes unstable vehicle conditions,
such as fishtailing or nose-diving. In these
cases, and subject to physical limits, DSC helps
to keep the vehicle on a steady course by
reducing engine speed and by applying brakes
at individual wheels.
The laws of physics cannot be repealed
even with DSC. It will always be the
driver's responsibility to drive in a manner that
matches road conditions. Therefore, do not
limit the additional safety margin by practicing
risky driving. <
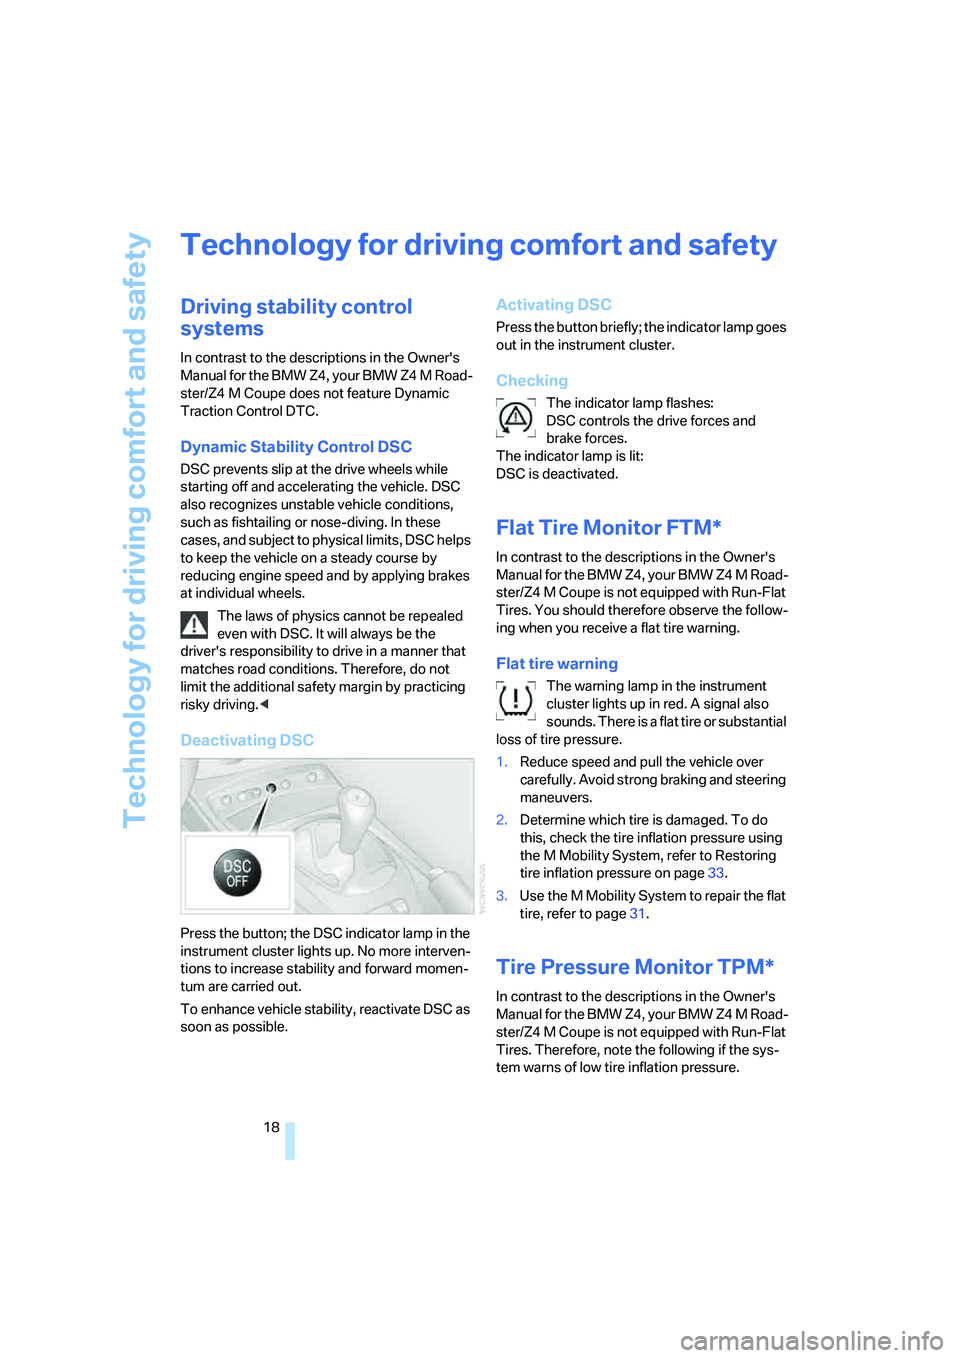
Deactivating DSC
Press the button; the DSC indicator lamp in the
instrument cluster lights up. No more interven-
tions to increase stability and forward momen-
tum are carried out.
To enhance vehicle stability, reactivate DSC as
soon as possible.
Activating DSC
Press the button briefly; the indicator lamp goes
out in the instrument cluster.
Checking
The indicator lamp flashes:
DSC controls the drive forces and
brake forces.
The indicator lamp is lit:
DSC is deactivated.
Flat Tire Monitor FTM*
In contrast to the descriptions in the Owner's
Manual for the BMW Z4, your BMW Z4 M Road-
ster/Z4 M Coupe is not equipped with Run-Flat
Tires. You should therefore observe the follow-
ing when you receive a flat tire warning.
Flat tire warning
The warning lamp in the instrument
cluster lights up in red. A signal also
sounds. There is a flat tire or substantial
loss of tire pressure.
1. Reduce speed and pull the vehicle over
carefully. Avoid strong braking and steering
maneuvers.
2. Determine which tire is damaged. To do
this, check the tire inflation pressure using
the M Mobility System, refer to Restoring
tire inflation pressure on page 33.
3. Use the M Mobility System to repair the flat
tire, refer to page 31.
Tire Pressure Monitor TPM*
In contrast to the descriptions in the Owner's
Manual for the BMW Z4, your BMW Z4 M Road-
ster/Z4 M Coupe is not equipped with Run-Flat
Tires. Therefore, note the following if the sys-
tem warns of low tire inflation pressure.
Page 21 of 50
Reference
At a glance
Controls
Driving tips
Mobility
19
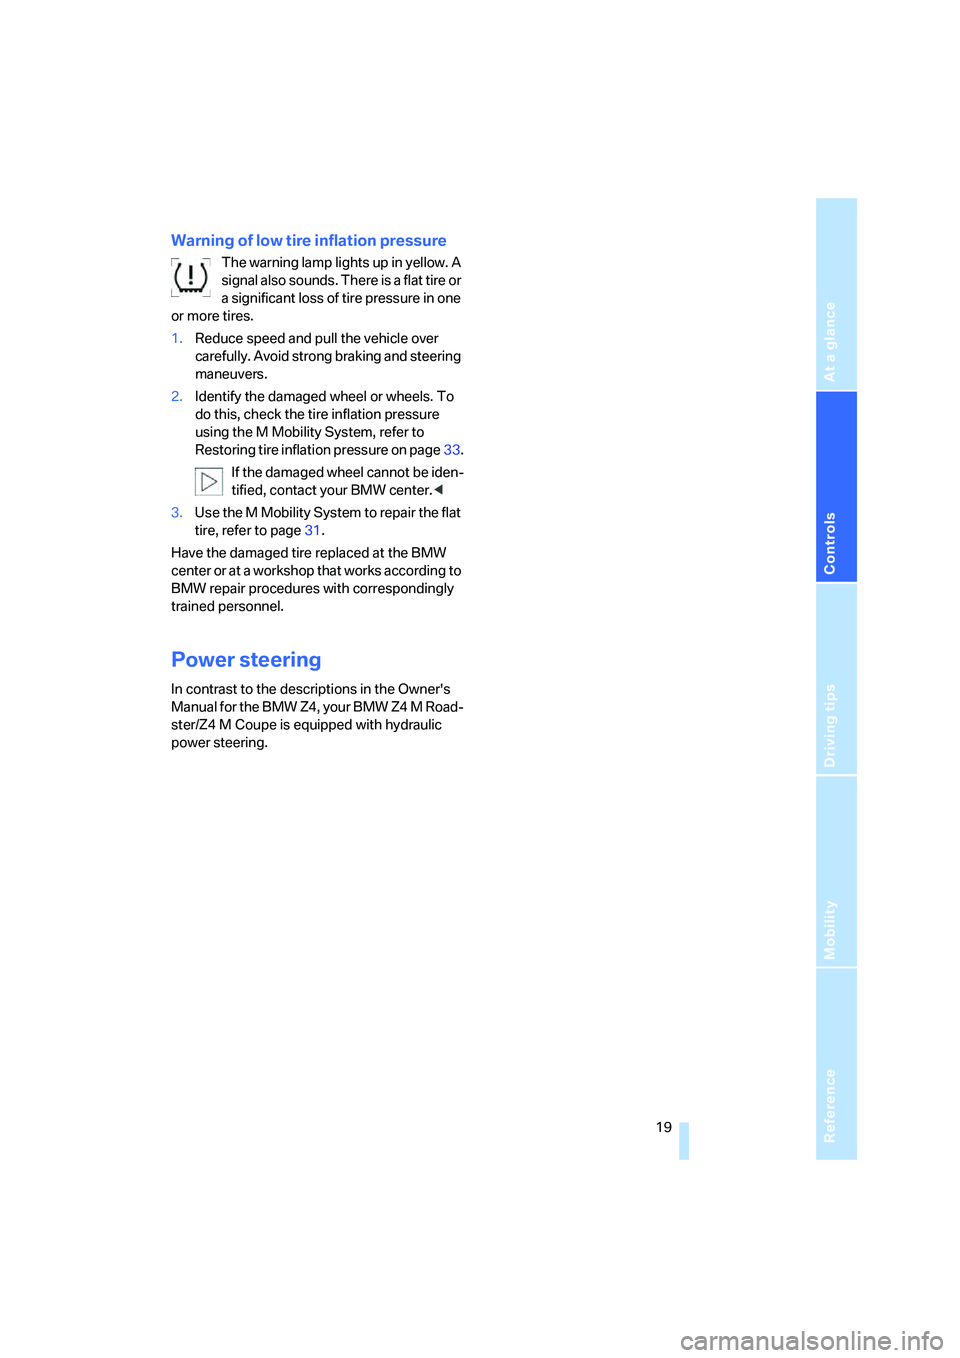
Warning of low tire inflation pressure
The warning lamp lights up in yellow. A
signal also sounds. There is a flat tire or
a significant loss of tire pressure in one
or more tires.
1. Reduce speed and pull the vehicle over
carefully. Avoid strong braking and steering
maneuvers.
2. Identify the damaged wheel or wheels. To
do this, check the tire inflation pressure
using the M Mobility System, refer to
Restoring tire inflation pressure on page 33.
If the damaged wheel cannot be iden-
tified, contact your BMW center. <
3. Use the M Mobility System to repair the flat
tire, refer to page 31.
Have the damaged tire replaced at the BMW
center or at a workshop that works according to
BMW repair procedures with correspondingly
trained personnel.
Power steering
In contrast to the descriptions in the Owner's
Manual for the BMW Z4, your BMW Z4 M Road-
ster/Z4 M Coupe is equipped with hydraulic
power steering.
Page 29 of 50
Reference
At a glance
Controls
Driving tips
Mobility
27
Wheels and tires
Correct wheels and tires
In contrast to the descriptions in the Owner's
Manual for the BMW Z4, your BMW Z4 M Road-
ster/Z4 M Coupe is not equipped with Run-Flat
Tires.
Information for your safety
The factory-approved radial-ply tires are spe-
cifically matched to your vehicle and offer opti-
mal road safety as well as enhanced driving
comfort if used properly.
In the event of a flat tire, proceed as described
under M Mobility System, refer to page31.
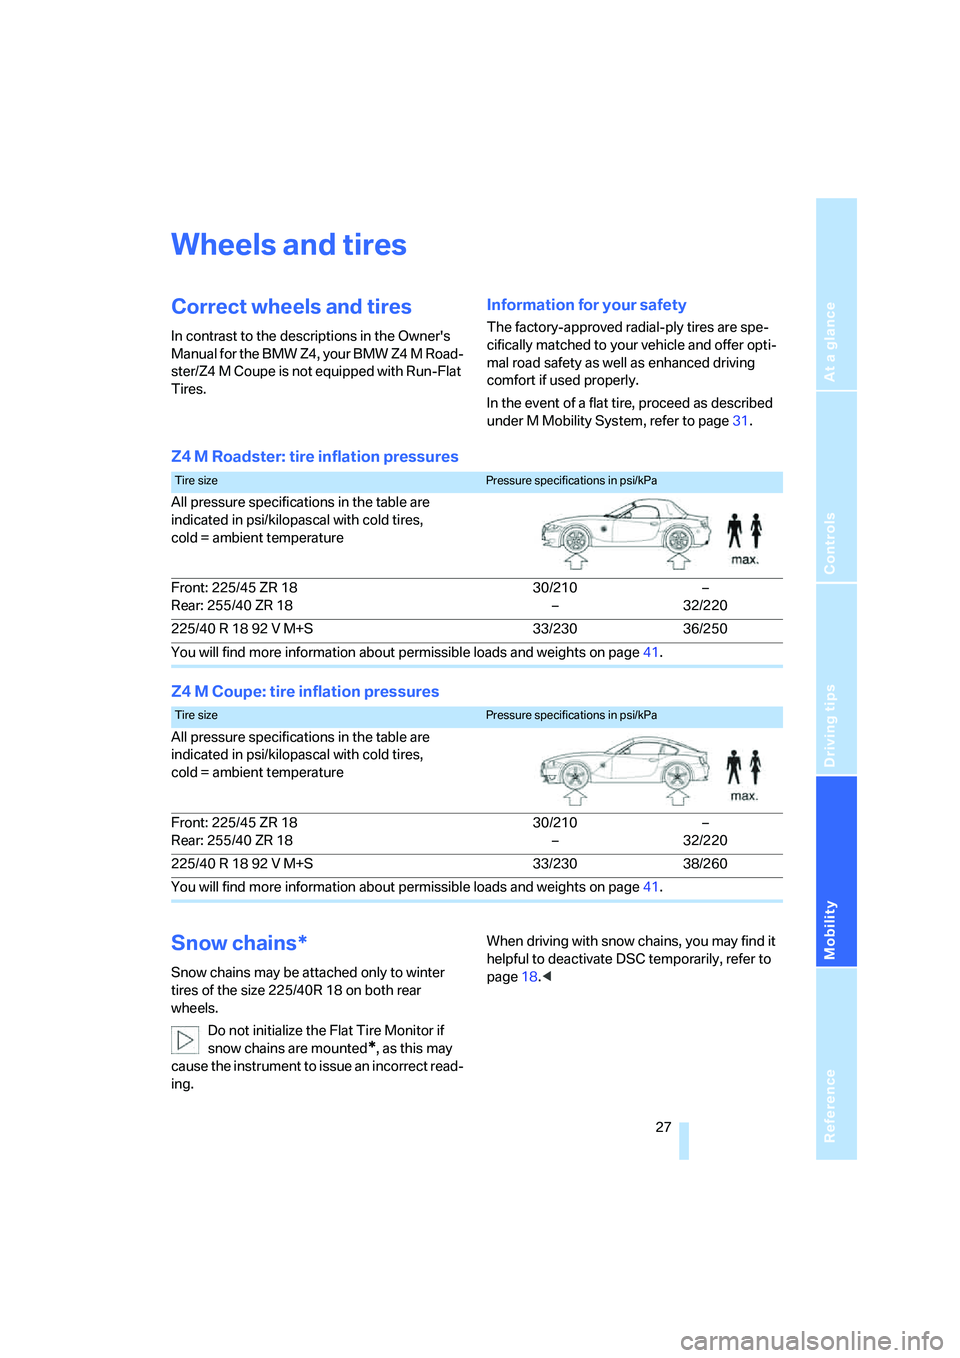
Z4 M Roadster: tire inflation pressures
Z4 M Coupe: tire inflation pressures
Snow chains*
Snow chains may be attached only to winter
tires of the size 225/40R 18 on both rear
wheels.
Do not initialize the Flat Tire Monitor if
snow chains are mounted
*, as this may
cause the instrument to issue an incorrect read-
ing. When driving with snow chains, you may find it
helpful to deactivate DSC temporarily, refer to
page
18.<
Tire sizePressure specifications in psi/kPa
All pressure specifications in the table are
indicated in psi/kilopascal with cold tires,
cold = ambient temperature
Front: 225/45 ZR 18
Rear: 255/40 ZR 18 30/210
– –
32/220
225/40 R 18 92 V M+S 33/230 36/250
You will find more information about permissible loads and weights on page 41.
Tire sizePressure specifications in psi/kPa
All pressure specifications in the table are
indicated in psi/kilopascal with cold tires,
cold = ambient temperature
Front: 225/45 ZR 18
Rear: 255/40 ZR 18 30/210
– –
32/220
225/40 R 18 92 V M+S 33/230 38/260
You will find more information about permissible loads and weights on page 41.
Page 33 of 50
Reference
At a glance
Controls
Driving tips
Mobility
31
Replacing components
Onboard tool kit
The onboard tool kit is stored in a tool pouch.
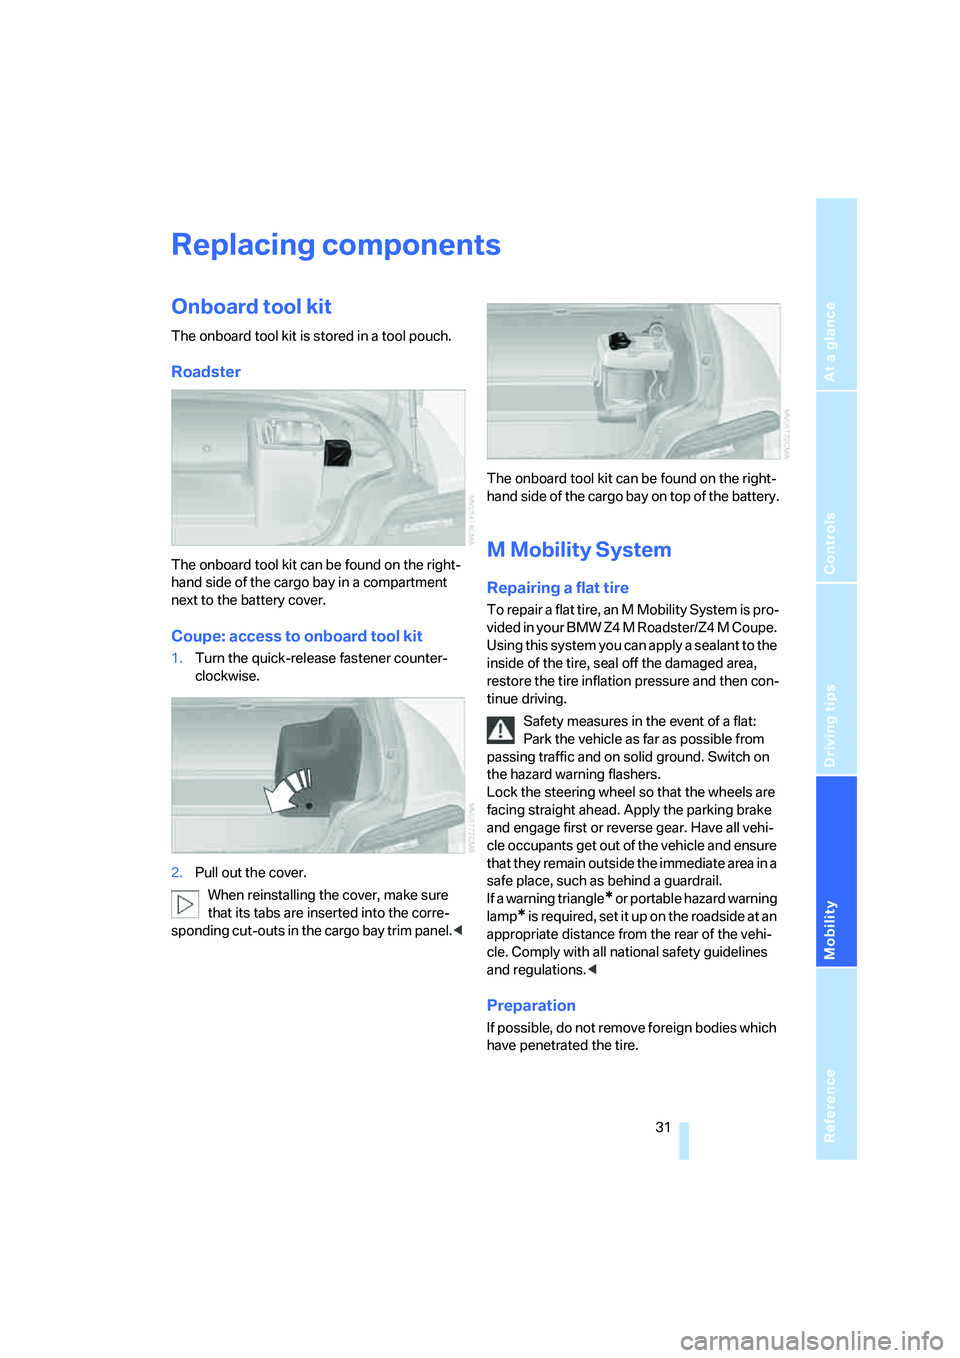
Roadster
The onboard tool kit can be found on the right-
hand side of the cargo bay in a compartment
next to the battery cover.
Coupe: access to onboard tool kit
1.Turn the quick-release fastener counter-
clockwise.
2. Pull out the cover.
When reinstalling the cover, make sure
that its tabs are inserted into the corre-
sponding cut-outs in the cargo bay trim panel.
M Mobility System
Repairing a flat tire
To repair a flat tire, an M Mobility System is pro-
vided in your BMW Z4 M Roadster/Z4 M Coupe.
Using this system you can apply a sealant to the
inside of the tire, seal off the damaged area,
restore the tire inflation pressure and then con-
tinue driving.
Safety measures in the event of a flat:
Park the vehicle as far as possible from
passing traffic and on solid ground. Switch on
the hazard warning flashers.
Lock the steering wheel so that the wheels are
facing straight ahead. Apply the parking brake
and engage first or reve rse gear. Have all vehi-
cle occupants get out of the vehicle and ensure
that they remain outside the immediate area in a
safe place, such as behind a guardrail.
If a warning triangle
* or portable hazard warning
lamp
* is required, set it up on the roadside at an
appropriate distance from the rear of the vehi-
cle. Comply with all national safety guidelines
and regulations. <
Preparation
If possible, do not remove foreign bodies which
have penetrated the tire.
Page 34 of 50
Replacing components
32
Corresponding information on using the
M Mobility System is also provided on the
device. <
Before using the M Mobility System, note
the information on the sealant bottle. <
Pull the sticker for the sp eed limit off the sealant
bottle and affix it to the steering wheel.
Please observe the expiry date on the
sealant bottle. <
Roadster
The M Mobility System is located on the right-
hand side of the cargo bay on the battery cover.
With the convertible top closed, fold the
convertible top compartment panel up to
remove the Mobility Set. <
To avoid any damage when opening the
convertible top, make sure that the con-
vertible top compartment panel in the cargo bay
has been folded down. <
Coupe: access to the Mobility Set
1.Turn the quick-release fastener counter-
clockwise.
2. Pull out the cover. When reinstalling the cover, make sure
that its tabs are inserted into the corre-
sponding cut-outs in the cargo bay trim panel. <
The M Mobility System is located on the right-
hand side of the cargo bay in a compartment on
top of the battery.
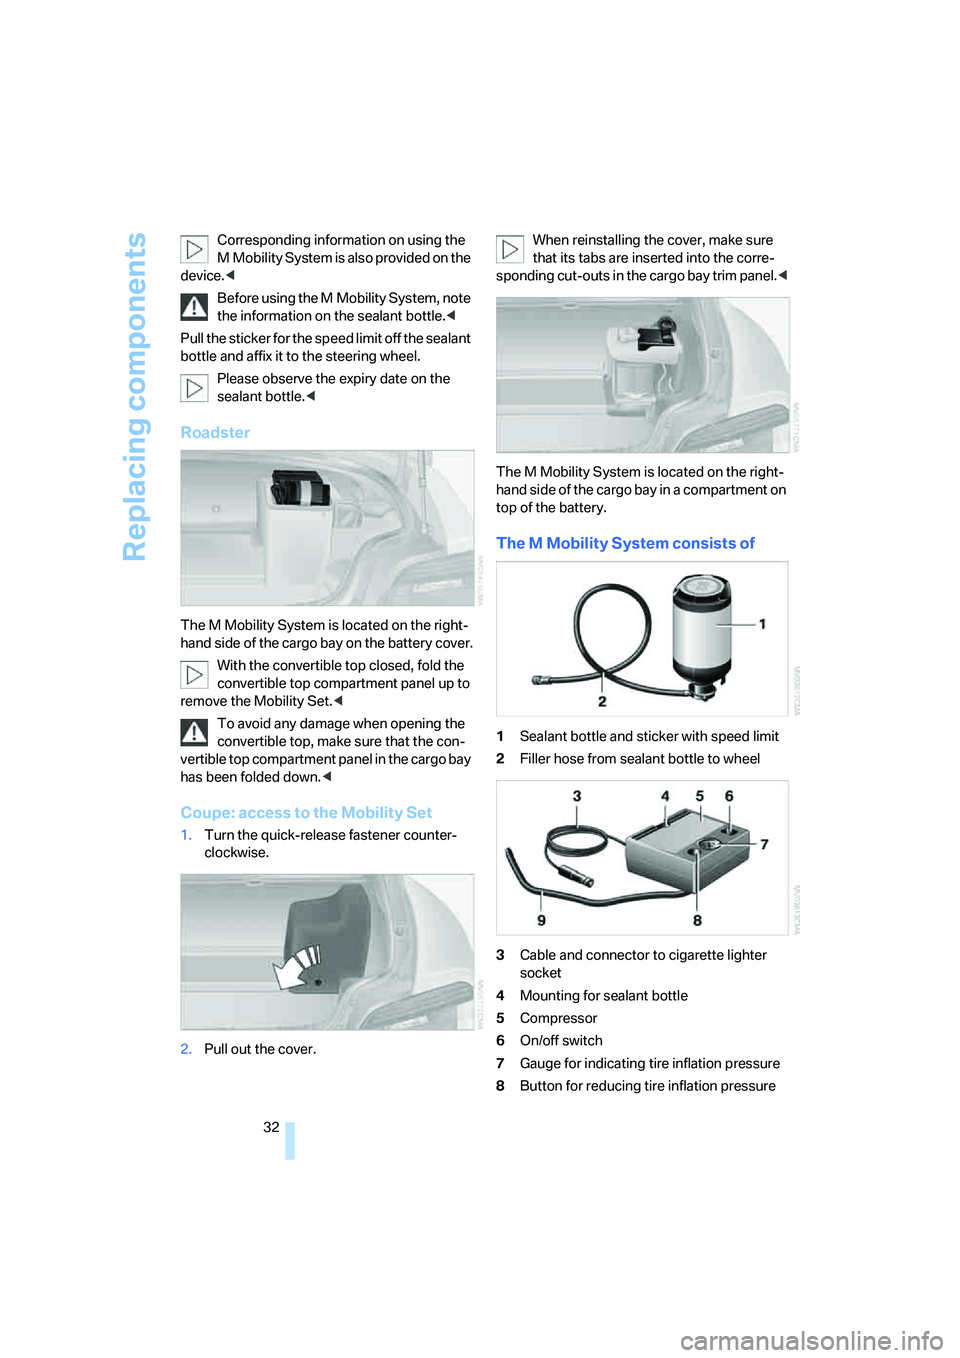
The M Mobility System consists of
1 Sealant bottle and sticker with speed limit
2 Filler hose from sealant bottle to wheel
3 Cable and connector to cigarette lighter
socket
4 Mounting for sealant bottle
5 Compressor
6 On/off switch
7 Gauge for indicating tire inflation pressure
8 Button for reducing tire inflation pressure
Page 35 of 50
Reference
At a glance
Controls
Driving tips
Mobility
33
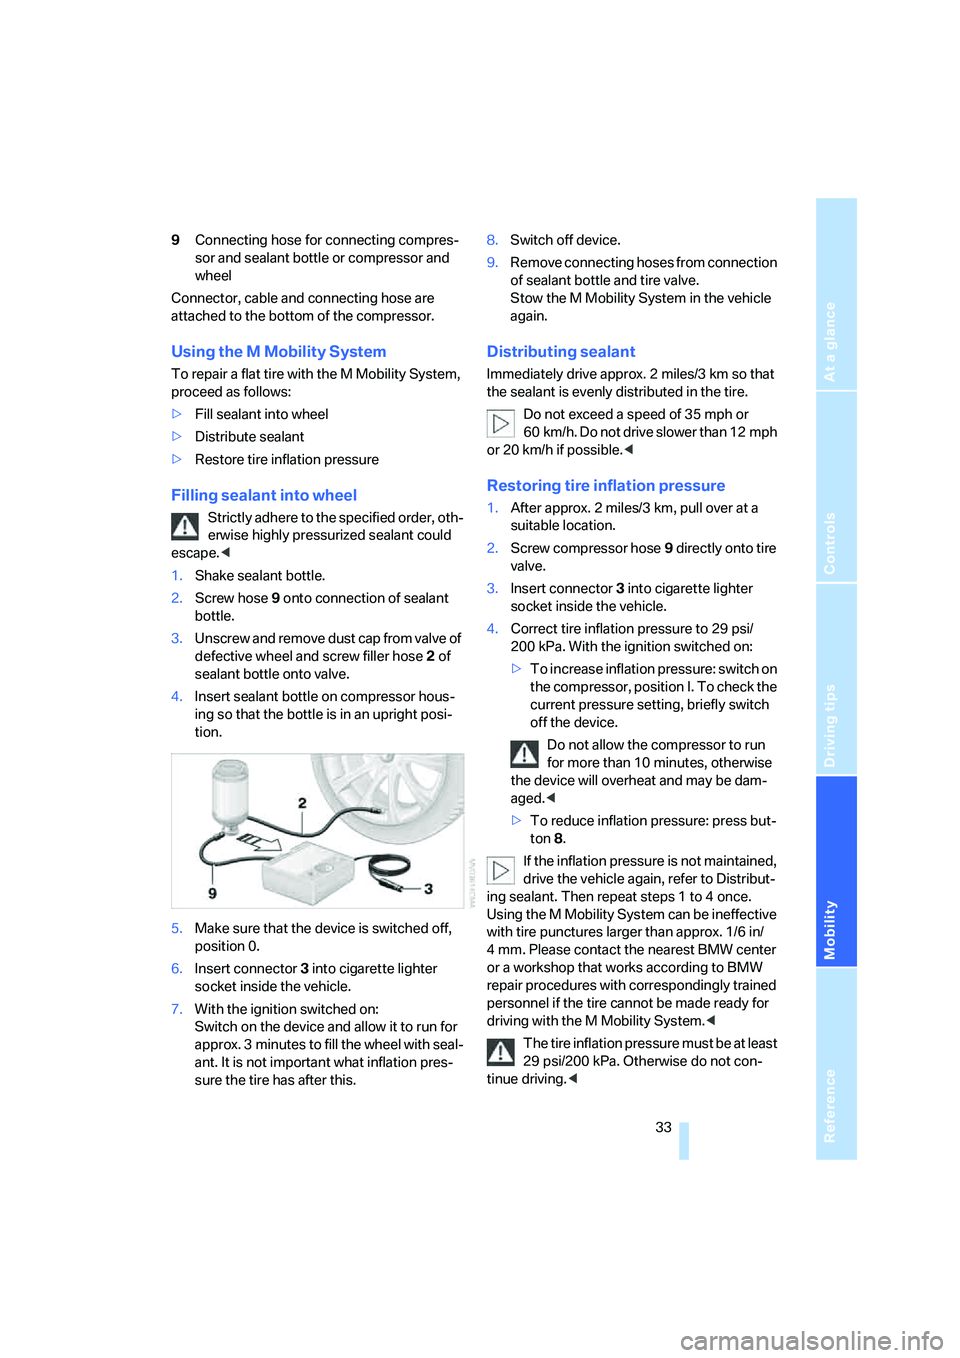
9Connecting hose for connecting compres-
sor and sealant bottle or compressor and
wheel
Connector, cable and connecting hose are
attached to the bottom of the compressor.
Using the M Mobility System
To repair a flat tire with the M Mobility System,
proceed as follows:
> Fill sealant into wheel
> Distribute sealant
> Restore tire inflation pressure
Filling sealant into wheel
Strictly adhere to the specified order, oth-
erwise highly pressurized sealant could
escape. <
1. Shake sealant bottle.
2. Screw hose 9 onto connection of sealant
bottle.
3. Unscrew and remove dust cap from valve of
defective wheel and screw filler hose 2 of
sealant bottle onto valve.
4. Insert sealant bottle on compressor hous-
ing so that the bottle is in an upright posi-
tion.
5. Make sure that the device is switched off,
position 0.
6. Insert connector 3 into cigarette lighter
socket inside the vehicle.
7. With the ignition switched on:
Switch on the device and allow it to run for
approx. 3 minutes to fill the wheel with seal-
ant. It is not important what inflation pres-
sure the tire has after this. 8.
Switch off device.
9. Remove connecting hoses from connection
of sealant bottle and tire valve.
Stow the M Mobility System in the vehicle
again.
Distributing sealant
Immediately drive approx. 2 miles/3 km so that
the sealant is evenly distributed in the tire.
Do not exceed a speed of 35 mph or
60 km/h. Do not drive slower than 12 mph
or 20 km/h if possible. <
Restoring tire inflation pressure
1.After approx. 2 miles/3 km, pull over at a
suitable location.
2. Screw compressor hose 9 directly onto tire
valve.
3. Insert connector 3 into cigarette lighter
socket inside the vehicle.
4. Correct tire inflation pressure to 29 psi/
200 kPa. With the ignition switched on:
>To increase inflation pressure: switch on
the compressor, position I. To check the
current pressure setting, briefly switch
off the device.
Do not allow the compressor to run
for more than 10 minutes, otherwise
the device will overheat and may be dam-
aged. <
> To reduce inflation pressure: press but-
ton 8.
If the inflation pressure is not maintained,
drive the vehicle again, refer to Distribut-
ing sealant. Then repeat steps 1 to 4 once.
Using the M Mobility System can be ineffective
with tire punctures larger than approx. 1/6 in/
4 mm. Please contact the nearest BMW center
or a workshop that works according to BMW
repair procedures with correspondingly trained
personnel if the tire cannot be made ready for
driving with the M Mobility System. <
The tire inflation pressure must be at least
29 psi/200 kPa. Otherwise do not con-
tinue driving. <
Page 45 of 50
Reference
At a glance
Controls
Driving tips
Mobility
43
Engine compartment28
Engine data 38
Engine oil 28
– adding 29
– additives 29
– alternative oil grades 30
– approved engine oils 29
– dipstick 29
– indicator/warning lamp 10
– oil grades, refer also to
Approved engine oils 29
Engine oil level 28
– checking 29
– indicator/warning lamp 10
Engine oil pressure 28
– indicator/warning lamp 10
Engine oil sensor
– indicator/warning lamp 10
Engine oil temperature, refer
to Engine oil
thermometer 17
Engine oil thermometer 17
Engine output, refer to Engine data 38
Engine speed, refer to Engine
data 38
ESP Electronic Stability Program, refer to Dynamic
Stability Control DSC 18
F
Fasten safety belts
– warning lamp11
Filling sealant into wheel 33
Flat tire
– Flat Tire Monitor 18
– M Mobility System 31
– Tire Pressure Monitor 18
Flat tire, refer to Repairing a
flat tire 31
Flat Tire Monitor FTM 18
– indicator/warning
lamp 11,18
– snow chains 27
FTM, refer to Flat Tire
Monitor 18 Fuel
– capacity, refer to
Capacities 41
– display 17
– quality 26
Fuel, refer to Fuel specifications 26
Fuel display, refer to Fuel gauge 17
Fuel reserve indicator, refer to
Fuel gauge 17
Fuel tank capacity, refer to Capacities 41
G
Gasoline, refer to Fuel
specifications 26
Gross weight, refer to
Weights 41
Ground clearance 22
H
Hazard warning flashers 12
Headlamp flasher
– indicator lamp 10
Headlamp washer reservoir
– volume, refer to
Capacities 41
Height, refer to
Dimensions 39,40
High beams
– indicator lamp 10
Hood 28
Horn 8
I
Indicator/warning lamp
– brakes 11
– Flat Tire Monitor 18
– Tire Pressure Monitor 19
Indicator and warning lamps, overview 10
Inflation pressure monitoring,
refer to
– Flat Tire Monitor 18
– Tire Pressure Monitor 18Inspection, refer to Service
interval display 17
Instrument cluster 10
Instrument panel, refer to
Cockpit 8
Instrument panel, refer to Instrument cluster 10
Interval
– display, service 17
K
Knock control26
L
Length, refer to
Dimensions 39,40
Longlife oils 30
– alternative oils 30
– approved engine oils 29
Low-beam headlamps
– indicator lamp 11
Low beams
– indicator lamp, defective bulb 11
Luggage compartment capacity, refer to Cargo bay
capacity 41
Luggage compartment lid
– indicator lamp 11
M
M Mobility System 31
– compressor 32
– viscosity 32
Maintenance
– refer to Service interval display 17
Manufacturer 5
Measurements, refer to Dimensions 39,40
Mobility System 31
O
Octane numbers, refer to Fuel
specifications 26
Page 46 of 50
Everything from A to Z
44
Oil, refer to Engine oil
28
Oil consumption 28
Oil grades 29
Oil level 28
– checking 29
– indicator lamp 10
Oil pressure 28
– indicator/warning lamp 10
Oil sensor
– indicator lamp 10
Oil service 17
Onboard tool kit 31
P
Parking brake
– indicator lamp11
Parking lamps
– indicator lamp 11
Parts and accessories, refer to Your individual vehicle 5
Permissible axle load, refer to
Weights 41
Permissible gross weight, refer to Weights 41
Power output, refer to Engine data 38
Power steering, hydraulic 19
Pressure, tires
– restoring with M Mobility System 31
Pressure monitoring, tires, refer to
– Flat Tire Monitor 18
– Tire Pressure Monitor TPM 18
R
Rear lamps
– indicator lamp, defective
bulb 11
Refueling 26
S
Safety belts
– warning lamp 11 Safety systems, refer to
– Dynamic Stability Control
DSC 18
Sealant bottle, refer to
M Mobility System 31
Service interval display 17
Signal horn, refer to Horn 8
Special oils, refer to Approved engine oils 29
Specified engine oils 29
Speedometer 10
Sport program
– Dynamic Driving Control 16
Stability control, refer to
– Driving stability control systems 18
– Dynamic Stability Control DSC 18
Status at time of printing 5
Steering wheel 8
– buttons on steering wheel 9
Switches, refer to Cockpit 8
Symbols 4
T
Table of contents 3
Tachometer 17
Tailgate
– indicator lamp 11
Tank capacity, refer to Fuel
tank capacity 41
Tank indicator, refer to Fuel gauge 17
Technical data 38
Temperature
– engine 17
Tire, flat 18,19
– Flat Tire Monitor 18
– indicator/warning lamp 11
– M Mobility System 31
– Tire Pressure Monitor 18
Tire inflation pressure 27
– loss 18
Tire pressure monitoring, refer to
– Flat Tire Monitor 18
– Tire Pressure Monitor 18Tire Pressure Monitor
TPM 18
– indicator/warning lamp 19
Tires
– flat 18,19
– M Mobility System 31
– pressure monitoring, refer to
Flat Tire Monitor 18
Tool kit, refer to Onboard tool kit 31
Torque, refer to Engine data 38
TPM Tire Pressure
Monitor 18
Track width, refer to Dimensions 39,40
Traction control, refer to Dynamic Stability Control
DSC 18
Turning circle, refer to Dimensions 39,40
Turn signal indicators
– indicator lamp 10
V
Vehicle
– break-in period 22
– dimensions, refer to Dimensions 39,40
– weight 41
Volume
– fuel tank, refer to Capacities 41
W
Warning and indicator
lamps 10
Washer fluid reservoir, refer to
– Capacities 41
Weights 41
Wheelbase, refer to
Dimensions 39,40
Wheels and tires 27
Width, refer to
Dimensions 39,40