2007 BMW MOTORRAD K 1200 R bulb
[x] Cancel search: bulbPage 5 of 168

5 Riding . . . . . . . . . . . . . . . . . . . . 69
Safety instructions . . . . . . . . . . . 70
Checklist . . . . . . . . . . . . . . . . . . . . . 72
Starting . . . . . . . . . . . . . . . . . . . . . . . 72
Running in . . . . . . . . . . . . . . . . . . . 75
Brakes . . . . . . . . . . . . . . . . . . . . . . . 76
Parking your motorcycle . . . . . 77
Refuelling . . . . . . . . . . . . . . . . . . . . 79
6 Engineering details . . . . . 81
Brake system with BMW Mo-
torrad Integral ABS
OE
........ 82
Electronic engine manage-
ment with BMW Motorrad
ASC
OE
....................... 84
Tyre pressure monitoring
RDC
OE
....................... 86
7 Accessories . . . . . . . . . . . . . 89
General instructions . . . . . . . . . . 90
Power socket . . . . . . . . . . . . . . . . 90
Luggage . . . . . . . . . . . . . . . . . . . . . 91
CaseOA
...................... 92
8 Maintenance . . . . . . . . . . . . 97
General instructions . . . . . . . . . . 98
Toolkit . . . . . . . . . . . . . . . . . . . . . . . . 98
Engine oil . . . . . . . . . . . . . . . . . . . . 99 Brake system, general . . . . . . 101
Brake pads . . . . . . . . . . . . . . . . . 102
Brake fluid . . . . . . . . . . . . . . . . . . 103
Clutch . . . . . . . . . . . . . . . . . . . . . . 105
Tyres . . . . . . . . . . . . . . . . . . . . . . . 106
Rims . . . . . . . . . . . . . . . . . . . . . . . 107
Wheels . . . . . . . . . . . . . . . . . . . . . 107
Front-wheel stand . . . . . . . . . . 115
Rear-wheel stand . . . . . . . . . . 116
Bulbs . . . . . . . . . . . . . . . . . . . . . . . 118
Jump starting . . . . . . . . . . . . . . 125
Battery . . . . . . . . . . . . . . . . . . . . . 126
9 Care . . . . . . . . . . . . . . . . . . . . . 131
Care products . . . . . . . . . . . . . . 132
Washing motorcycle . . . . . . . . 132
Cleaning easily damaged
components . . . . . . . . . . . . . . . . 132
Paint care . . . . . . . . . . . . . . . . . . 133
Protective wax coating . . . . . 134
Laying up motorcycle . . . . . . 134
Restoring motorcycle to
use......................... 134
10 Technical data . . . . . . . 135
Troubleshooting chart . . . . . . 136
Threaded fasteners . . . . . . . . 137
Engine . . . . . . . . . . . . . . . . . . . . . 139
Fuel . . . . . . . . . . . . . . . . . . . . . . . . 140
Engine oil . . . . . . . . . . . . . . . . . . 140
Clutch . . . . . . . . . . . . . . . . . . . . . . 141
Transmission . . . . . . . . . . . . . . . 141
Rear-wheel drive . . . . . . . . . . . 142
Running gear . . . . . . . . . . . . . . . 142
Brakes . . . . . . . . . . . . . . . . . . . . . 143
Wheels and tyres . . . . . . . . . . . 143
Electrics . . . . . . . . . . . . . . . . . . . . 146
Frame . . . . . . . . . . . . . . . . . . . . . . 147
Dimensions . . . . . . . . . . . . . . . . 148
Weights . . . . . . . . . . . . . . . . . . . . 148
Riding specifications . . . . . . . 149
11 Service . . . . . . . . . . . . . . . . 151
BMW Motorrad service . . . . . 152
BMW Motorrad service
quality . . . . . . . . . . . . . . . . . . . . . . 152
BMW Motorrad Service
Card: on-the-spot break-
down assistance . . . . . . . . . . . 152
Page 27 of 168
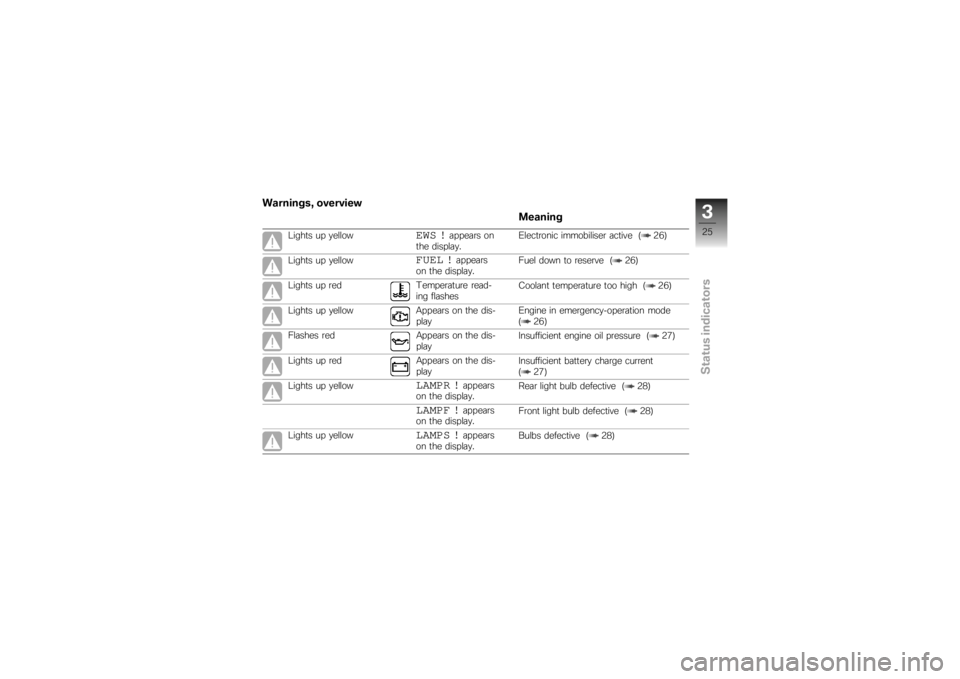
Warnings, overviewMeaning
Lights up yellow
EWS !
appears on
the display. Electronic immobiliser active ( 26)
Lights up yellow
FUEL !
appears
on the display. Fuel down to reserve ( 26)
Lights up red Temperature read- ing flashesCoolant temperature too high ( 26)
Lights up yellow Appears on the dis- playEngine in emergency-operation mode
( 26)
Flashes red Appears on the dis- playInsufficient engine oil pressure ( 27)
Lights up red Appears on the dis- playInsufficient battery charge current
( 27)
Lights up yellow
LAMPR !
appears
on the display. Rear light bulb defective ( 28)
LAMPF !
appears
on the display. Front light bulb defective ( 28)
Lights up yellow
LAMPS !
appears
on the display. Bulbs defective ( 28)
325zStatus indicators
Page 30 of 168
If the battery is not char-
ging, continuing to ride can
cause it to discharge completely,
in which case it will suffer irrepar-
able damage.
If possible, do not continue your
journey.
Battery is not being charged.
You can continue to ride until
the battery is discharged. Bear
in mind, however, that the en-
gine could cut out suddenly
and that the battery could dis-
charge until completely flat,
in which case it might have
suffered irreparable damage.
Have the fault rectified as
quickly as possible by a
specialist workshop, preferably
an authorised BMW Motorrad
dealer.
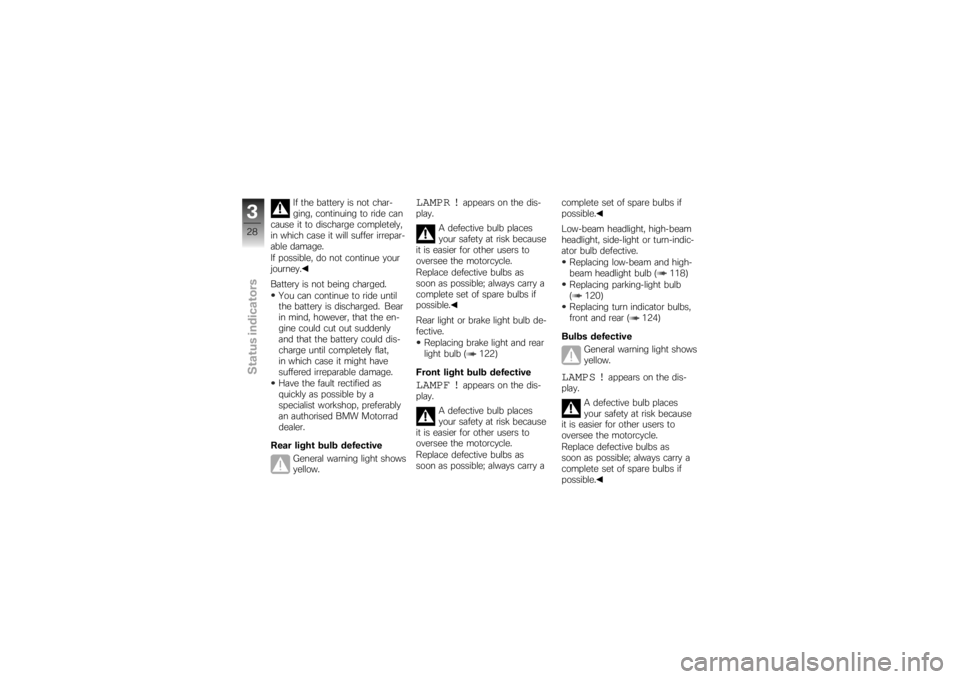
Rear light bulb defective General warning light shows
yellow.
LAMPR !
appears on the dis-
play.
A defective bulb places
your safety at risk because
it is easier for other users to
oversee the motorcycle.
Replace defective bulbs as
soon as possible; always carry a
complete set of spare bulbs if
possible.
Rear light or brake light bulb de-
fective.
Replacing brake light and rear
light bulb ( 122)
Front light bulb defective
LAMPF !
appears on the dis-
play.
A defective bulb places
your safety at risk because
it is easier for other users to
oversee the motorcycle.
Replace defective bulbs as
soon as possible; always carry a complete set of spare bulbs if
possible.
Low-beam headlight, high-beam
headlight, side-light or turn-indic-
ator bulb defective.
Replacing low-beam and high-
beam headlight bulb ( 118)
Replacing parking-light bulb
( 120)
Replacing turn indicator bulbs,
front and rear ( 124)
Bulbs defective General warning light shows
yellow.
LAMPS !
appears on the dis-
play.
A defective bulb places
your safety at risk because
it is easier for other users to
oversee the motorcycle.
Replace defective bulbs as
soon as possible; always carry a
complete set of spare bulbs if
possible.
328zStatus indicators
Page 31 of 168
A combination of the bulb de-
fects described above has oc-
curred.See the fault descriptions
above.Warnings issued by the
on-board computer
OE
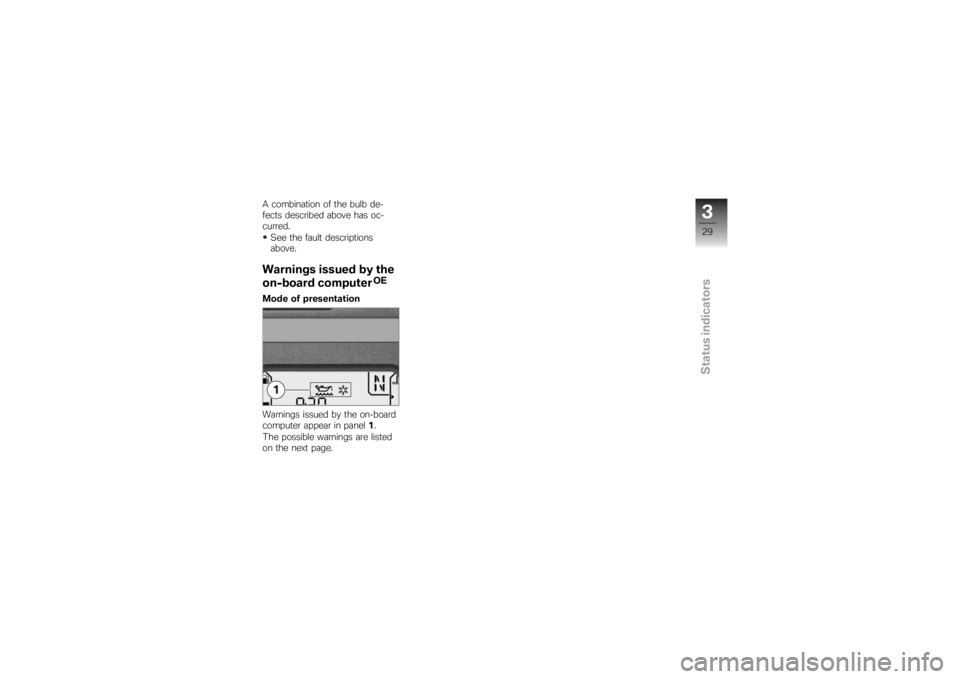
Mode of presentation
Warnings issued by the on-board
computer appear in panel 1.
The possible warnings are listed
on the next page.
329zStatus indicators
Page 99 of 168

Maintenance
Maintenance
General instructions.................. 98
Toolkit ............................... 98
Engine oil ............................ 99
Brake system, general . . . .......... 101
Brake pads . . . ..................... 102
Brake fluid ......................... 103
Clutch ............................. 105
Tyres .............................. 106
Rims ............................... 107
Wheels ............................ 107
Front-wheel stand ................. 115
Rear-wheel stand .................. 116
Bulbs .............................. 118
Jump starting . ..................... 125
Battery ............................. 126
897zMaintenance
Page 101 of 168
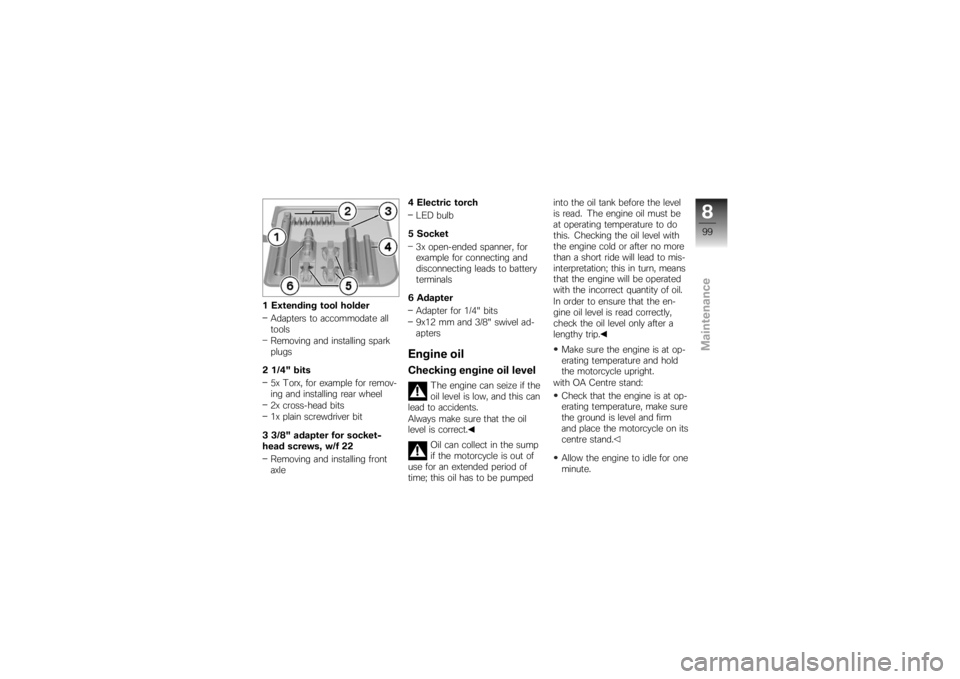
1 Extending tool holderAdapters to accommodate all
tools
Removing and installing spark
plugs
2 1/4" bits 5x Torx, for example for remov-
ing and installing rear wheel
2x cross-head bits
1x plain screwdriver bit
3 3/8" adapter for socket-
head screws, w/f 22 Removing and installing front
axle 4 Electric torch
LED bulb
5 Socket 3x open-ended spanner, for
example for connecting and
disconnecting leads to battery
terminals
6 Adapter Adapter for 1/4" bits
9x12 mm and 3/8" swivel ad-
apters
Engine oilChecking engine oil level
The engine can seize if the
oil level is low, and this can
lead to accidents.
Always make sure that the oil
level is correct.
Oil can collect in the sump
if the motorcycle is out of
use for an extended period of
time; this oil has to be pumped into the oil tank before the level
is read. The engine oil must be
at operating temperature to do
this. Checking the oil level with
the engine cold or after no more
than a short ride will lead to mis-
interpretation; this in turn, means
that the engine will be operated
with the incorrect quantity of oil.
In order to ensure that the en-
gine oil level is read correctly,
check the oil level only after a
lengthy trip.
Make sure the engine is at op-
erating temperature and hold
the motorcycle upright.
with OA Centre stand:
Check that the engine is at op-
erating temperature, make sure
the ground is level and firm
and place the motorcycle on its
centre stand.
Allow the engine to idle for one
minute.
899zMaintenance
Page 120 of 168

Press the lever down to the
ground.BulbsGeneral instructionsThe failure of a bulb is signalled
in the display by the defective
lamp symbol. If the brake or rear
light fails, the symbol is accom-
panied by the 'General' warning
light, which lights up yellow. If
the rear light fails the second fil-
ament of the brake light shines
at reduced brightness to double
as a rear light. Even though you
have this substitute rear light, theindicators in the display tell you
that a bulb defect has occurred.
A defective bulb places
your safety at risk because
it is easier for other users to
oversee the motorcycle.
Replace defective bulbs as
soon as possible; always carry a
complete set of spare bulbs if
possible.
The bulb is pressurised and
can cause injury if dam-
aged.
Wear protective goggles and
gloves when changing bulbs.
The types of bulb fitted to
your motorcycle are listed
in the section entitled "Technical
data".
Do not touch the glass of
new bulbs with your fingers.
Use a clean, dry cloth to hold
the bulbs when handling them.
Dirt deposits, in particular oil and
grease, interfere with heat radi- ation from the bulb. This leads
to overheating and shortens the
bulb's operating life.
Replacing low-beam and
high-beam headlight bulb
If it is not standing firmly,
the motorcycle could topple
in the course of the operations
described below.
Always make sure that the
motorcycle is stable and firmly
supported.
Make sure the ground is level
and firm and place the motor-
cycle on its stand.
Switch off the ignition. Turn the handlebars to the
left to facilitate access.
8118zMaintenance
Page 121 of 168
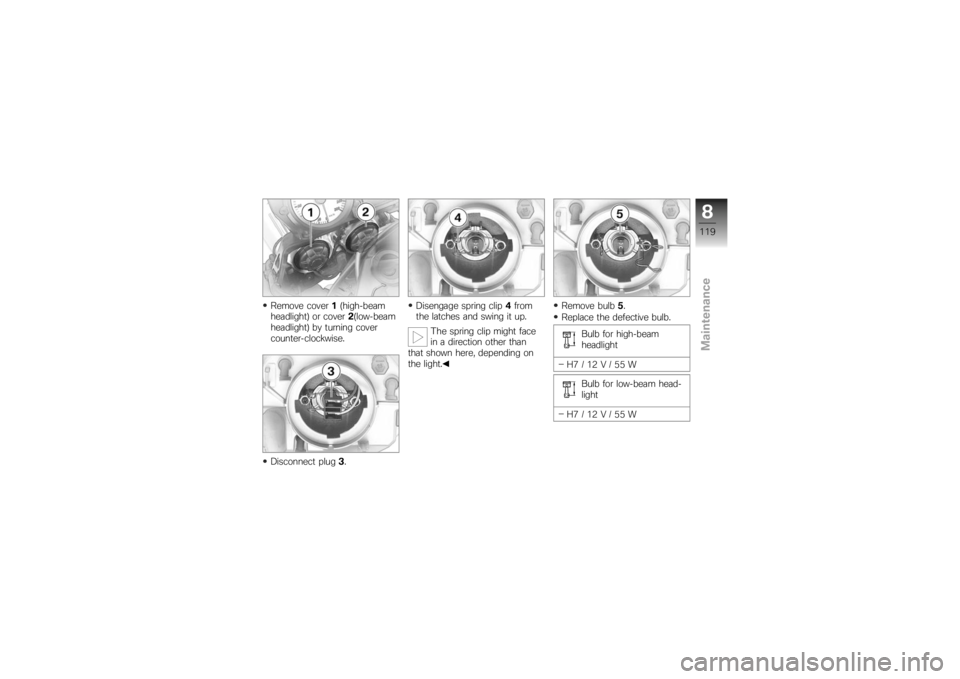
Remove cover1(high-beam
headlight) or cover 2(low-beam
headlight) by turning cover
counter-clockwise.
Disconnect plug 3. Disengage spring clip
4from
the latches and swing it up.
The spring clip might face
in a direction other than
that shown here, depending on
the light. Remove bulb
5.
Replace the defective bulb.
Bulb for high-beam
headlight
H7/12V/55W Bulb for low-beam head-
light
H7/12V/55W
8119zMaintenance