2007 BMW M6 COUPE light
[x] Cancel search: lightPage 120 of 256

Things to remember when driving
118
Securing cargo
>Use the luggage net* or securing straps to
hold down small and lightweight luggage
and cargo.
>Heavy-duty cargo straps
* for securing
larger and heavier objects are available at
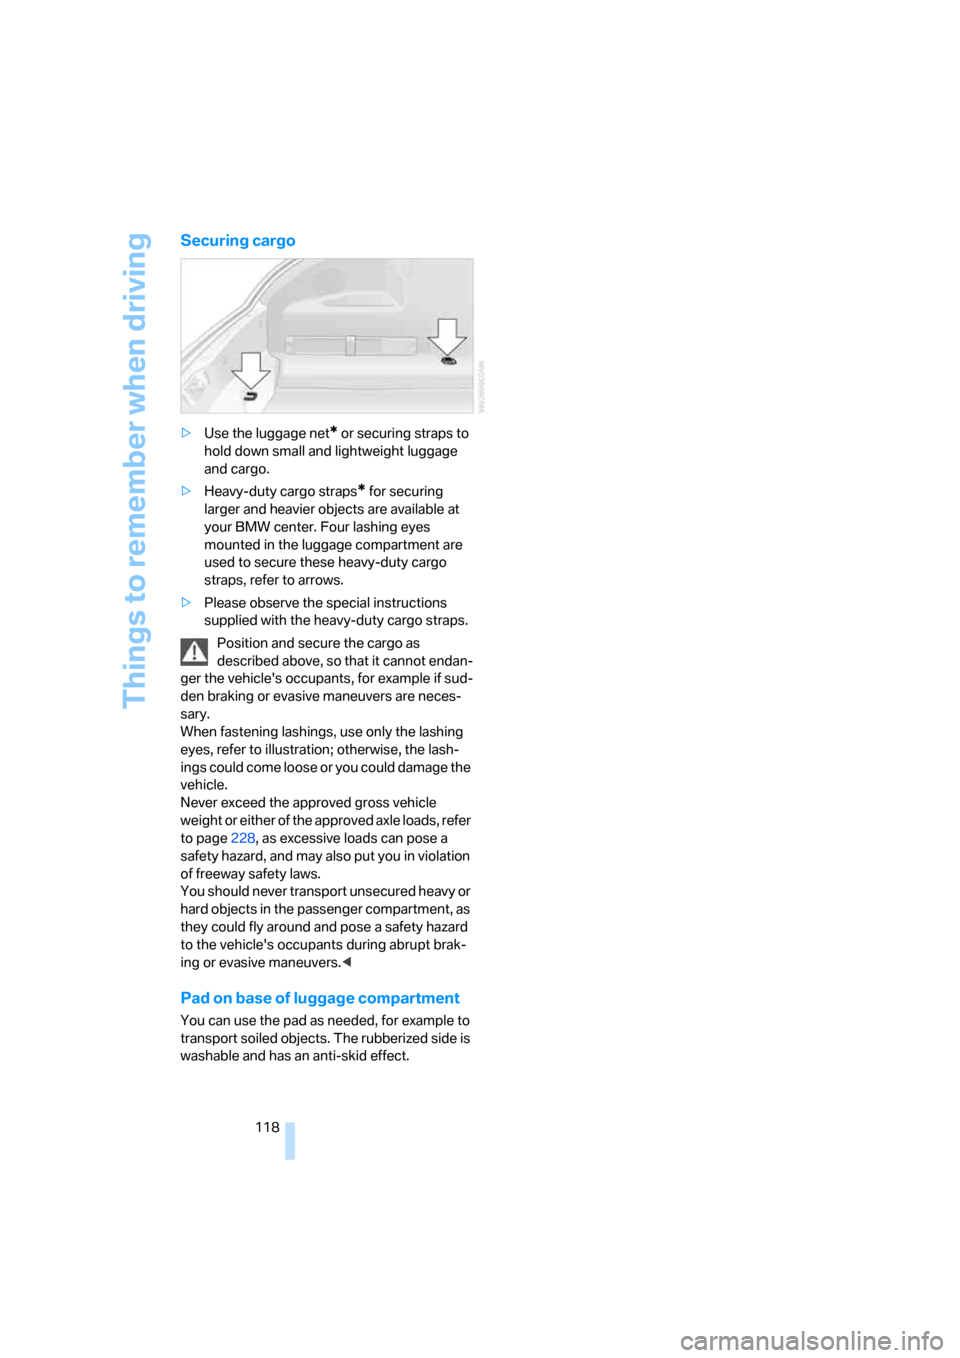
your BMW center. Four lashing eyes
mounted in the luggage compartment are
used to secure these heavy-duty cargo
straps, refer to arrows.
>Please observe the special instructions
supplied with the heavy-duty cargo straps.
Position and secure the cargo as
described above, so that it cannot endan-
ger the vehicle's occupants, for example if sud-
den braking or evasive maneuvers are neces-
sary.
When fastening lashings, use only the lashing
eyes, refer to illustration; otherwise, the lash-
ings could come loose or you could damage the
vehicle.
Never exceed the approved gross vehicle
weight or either of the approved axle loads, refer
to page228, as excessive loads can pose a
safety hazard, and may also put you in violation
of freeway safety laws.
You should never transport unsecured heavy or
hard objects in the passenger compartment, as
they could fly around and pose a safety hazard
to the vehicle's occupants during abrupt brak-
ing or evasive maneuvers.<
Pad on base of luggage compartment
You can use the pad as needed, for example to
transport soiled objects. The rubberized side is
washable and has an anti-skid effect.
Page 124 of 256

Starting navigation system
122
Starting navigation system
Your navigation system can use satellites to
ascertain the precise position of your vehicle
and guide you reliably to any destination you
enter.
Navigation DVD
The navigation system requires a special navi-
gation DVD. The latest version is available at
your BMW center.
Inserting navigation DVD
1.Insert the navigation DVD with the labeled
side up. The navigation DVD is pulled in
automatically.
2.Wait several seconds for the system to scan
the data from the DVD.
Removing navigation DVD
1.Press button 1.
The DVD emerges slightly from the drive.
2.Remove the DVD.
If the DVD is not ejected from the drive, it is pos-
sible that it is blocked. In this case a message is
also shown on the Control Display.
Display in the assistance
window
You can display the route or the current position
in the assistance window. This display remains
visible even if you change to another applica-
tion.
1.Move the controller to the right to enter the
assistance window.
2.Press the controller.
Other menu items are displayed.
3.Select the desired route view or "Current
position".
4.Press the controller.
Displaying arrow view in map view
If the navigation system suggests a change of
direction, the arrow view is briefly displayed.
1.Press the button.
This opens the start menu.
2.Press the controller to open the menu.
3.Turn the controller until "Settings" is
selected and press the controller.
*
Page 130 of 256

Destination entry
128 Up to 6 entries are displayed at once on the
Control Display.
The town/city can also be selected from the list
via iDrive:
Turn the controller until the town/city of desti-
nation is selected and press the controller.
Entering the destination as an entire
word*
Towns/cities of destination and streets located
in the region where the language of the voice
command system is spoken can be entered as
an entire word.
Example: to enter a US town/city of destination
as an entire word, the system language must be
English.
The condition for this is the use of a suitable
navigation DVD.
Speak smoothly and at normal volume, avoiding
excessive emphasis and pauses.
1.Wait for the system to request the town/city
of destination.
The system can suggest up to 6 towns/cit-
ies of destination that match your entries.The town/city can also be selected from the list
via iDrive:
Turn the controller until the town/city of desti-
nation is selected and press the controller.
Destinations that sound the same which
cannot be differentiated by the system
are summarized in a separate list and shown as
a destination followed by three dots.
Select this entry with {Yes} if necessary. Then
select the desired city/town in this list.<
Entering street and house number
The street is entered in the same way as the
town/city of destination.
To enter the house number:
Up to 4-digit house numbers can be entered.
Say the house number as individual digits.
Starting destination guidance
Destination guidance starts immediately. A destination is suggested by the system.
2.Select a town/city:
>Select highlighted town/city: {Yes}
>Select other town/city: {No}
>Select entry, e.g. {Entry 3}
>Display additional entries of the list:
{Next page}
>To respell the town/city: {Repeat}
2.Say the name of the town/city of desti-
nation.
A destination is suggested by the system.
3.Select a town/city:
>Select highlighted town/city: {Yes}
>Select other town/city: {No}
>Select entry, e.g. {Entry 3}
>Reenter the town/city: {Repeat}
>Enter town/city of destination by
spelling it: {Spell}
1.{House number}
2.Say the house number.
{Start guidance}
Page 145 of 256

Navigation
Driving tips
143Reference
At a glance
Controls
Communications
Entertainment
Mobility
Traffic information during destination
guidance
The system behavior varies depending on
whether "Dynamic route" is selected.
Displaying traffic obstructions
If a traffic obstruction is reported to the naviga-
tion system and "Dynamic route" is not
selected, you will be provided with certain infor-
mation from a distance of approx. 25 miles/
40 km, e.g. the length of the traffic congestion.
The last possible junction will be displayed
shortly before this.
Select "Detour" and press the controller.
The navigation system determines a new route
to bypass the traffic congestion.
This information is also displayed if you have
called up a different application on the Control
Display.
Hiding traffic obstructions
If "Dynamic route" is selected, the route in case
of traffic obstructions is automatically changed.
The system does not point out traffic obstruc-
tions along the original route.
Depending on the type of road as well as the
type and length of traffic obstruction, the route
can also be calculated in a way that passes
through the traffic obstruction.
Symbols for traffic information
Traffic light failure
Roadwork
General traffic obstruction
Transport of hazardous load
Vehicle on wrong carriage way
Danger
Low clearance
No parking
Fog
Heavy rain
Slippery road
Cross winds
Smog
Road close
Slow traffic
Traffic back up
Stopped traffic
Icy roads
Uneven surface
Accident
Lane closure
Delay
Police checkpoint
Page 163 of 256

Navigation
Entertainment
Driving tips
161Reference
At a glance
Controls
Communications
Mobility
CD player and CD changer
Listening to CDs
Compressed audio files*
CDs with compressed audio files, i.e. MP3,
can be played by the CD player, but not by the
CD changer.
CD player: starting CD
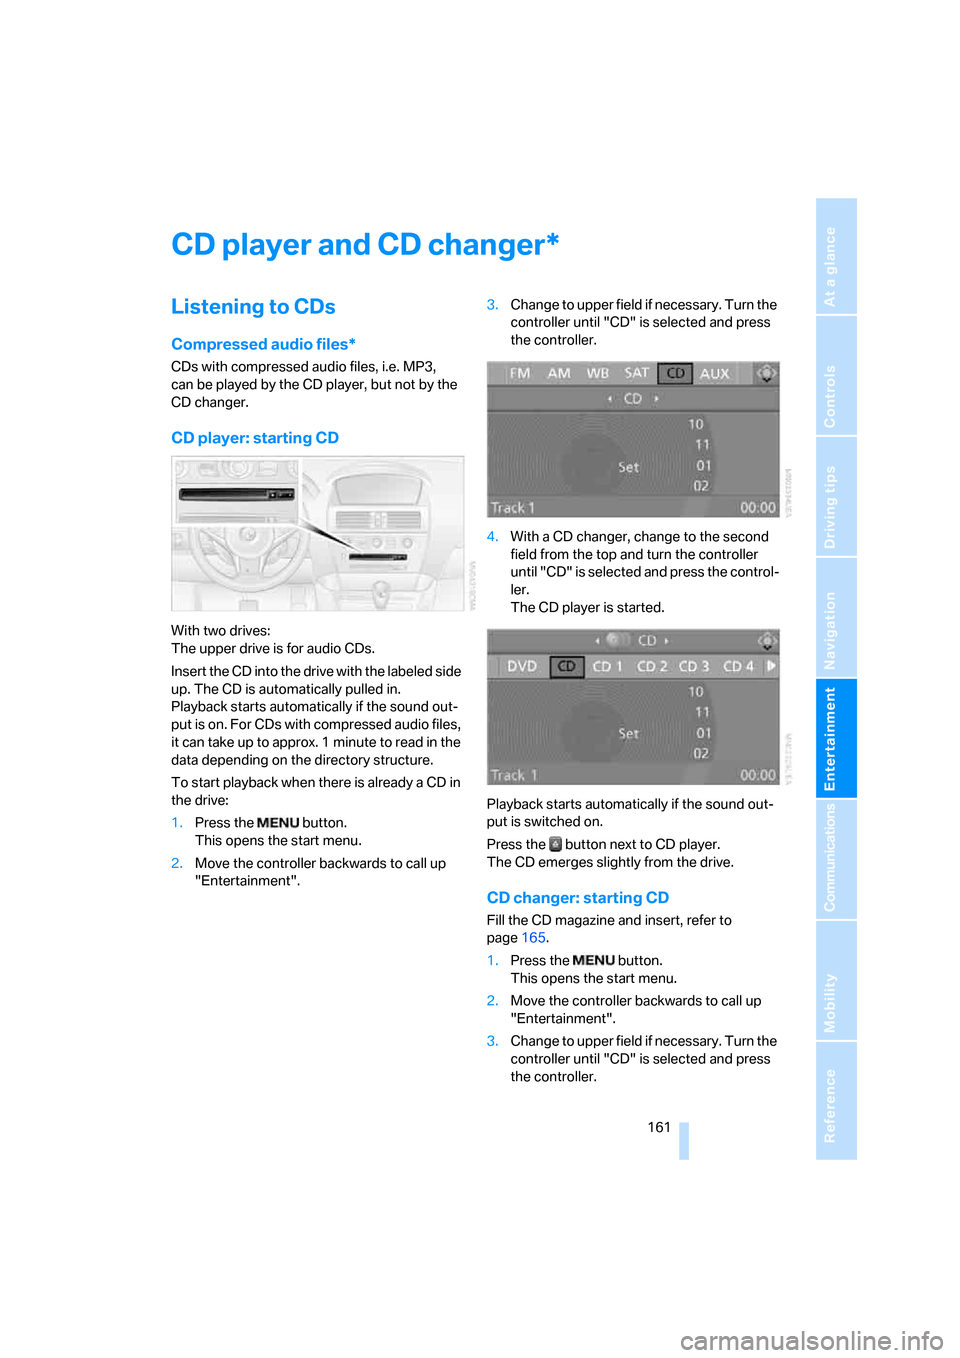
With two drives:
The upper drive is for audio CDs.
Insert the CD into the drive with the labeled side
up. The CD is automatically pulled in.
Playback starts automatically if the sound out-
put is on. For CDs with compressed audio files,
it can take up to approx. 1 minute to read in the
data depending on the directory structure.
To start playback when there is already a CD in
the drive:
1.Press the button.
This opens the start menu.
2.Move the controller backwards to call up
"Entertainment".3.Change to upper field if necessary. Turn the
controller until "CD" is selected and press
the controller.
4.With a CD changer, change to the second
field from the top and turn the controller
until "CD" is selected and press the control-
ler.
The CD player is started.
Playback starts automatically if the sound out-
put is switched on.
Press the button next to CD player.
The CD emerges slightly from the drive.
CD changer: starting CD
Fill the CD magazine and insert, refer to
page165.
1.Press the button.
This opens the start menu.
2.Move the controller backwards to call up
"Entertainment".
3.Change to upper field if necessary. Turn the
controller until "CD" is selected and press
the controller.
*
Page 168 of 256

CD player and CD changer
166
Malfunctions with individual CDs/DVDs
If malfunctions occur only with particular CDs/
DVDs, this can be due to one of the following
causes.
Home-recorded CDs/DVDs
Possible reasons for malfunctions with self-
recorded CDs/DVDs are, e.g., inconsistent
data-creation or recording processes, or poor
quality or advanced age of the CD/DVD blank.
Label CDs/DVDs only on the top, using a marker
designed for this purpose.
Damaged CDs/DVDs
Avoid fingerprints dust, scratches, and mois-
ture.
Keep CDs/DVDs in a sleeve.
Do not subject CDs/DVDs to temperatures over
1227/506, high levels of humidity or direct
sunlight.
CDs/DVDs with copy protection
Manufacturers often provide CDs/DVDs with
copy protection. This can mean that some CDs/
DVDs cannot be played or can only be played to
a limited extent.
Care
If necessary, clean the reflective scanning side
of the CDs/DVDs with a commercially available
cleaning cloth by wiping in straight lines from
the center outward.
Page 203 of 256

Mobility
201Reference
At a glance
Controls
Driving tips
Communications
Navigation
Entertainment
After changing wheels/tires
After changing tires or wheels, the slip detec-
tion of the Sequential Manual Transmission
must become familiar with the changed state.
Reinitialize the system for this purpose:
1.Move the selector lever into the idling
position N on a straight stretch of road at a
speed between 20 mph/30 km/h and
90 mph/150 km/h.
2.Pull both shift paddles for approx. 2 sec-
onds.
If you do not carry out initialization, the system
will automatically learn the changed state grad-
ually during driving. This may be noticeable
from the clutch opening and closing briefly.
Storage
Store wheels and tires in a cool, dry place with
as little exposure to light as possible. Always
protect tires against all contact with oil, grease
and fuels. Do not exceed the maximum tire
inflation pressure indicated on the side wall of
the tire.
Rotating wheels between axles
BMW does not recommend moving the front
wheels to the rear or vice versa, as otherwise
the handling characteristics may be impaired.
Snow chains*
BMW only tests certain fine-link snow chains,
classifies them as road-safe and recommends
them. Consult your BMW center for more infor-
mation.
Use is only permitted in pairs, with winter tires
of the size 245/45 R 18 on the rear wheels.
Observe the manufacturer's instructions when
mounting snow chains. Do not exceed a speed
of 30 mph/50 km/h with the chains mounted.
Make sure that the snow chains are always suf-
ficiently tensioned. Retension in accordance
with the chain manufacturer's specifications if
necessary.Do not initialize the Flat Tire Monitor after
installing snow chains as this could cause
the Flat Tire Monitor to malfunction.
After mounting or removing snow chains, the
slip detection of the Sequential Manual Trans-
mission must become familiar with the altered
state. To do this, reinitialize the system, refer to
After changing wheels/tires.<
Page 206 of 256

Under the hood
204 After starting the engine, the last determined
value is displayed.
The oil level must be between the two marks.
Manual transmission: the fluid level will be
shown in the lower display.<
Exact measurement
The oil level is measured continuously while
driving or when stopped with the engine run-
ning.
The determination of a new value can take
30 minutes or longer.
If only dashes are shown in the display,
it was not possible to determine a new
value. This can, for example, be the case when
driving short distances or with a sporty driving
style.<
Fast measurement
In addition to the continuous measurement, you
can also quickly determine the current oil level,
e.g. after adding engine oil, however with a low
measuring accuracy.
1.With the engine at operating temperature,
i.e. after at least 6 miles/10 km of uninter-
rupted driving, park the vehicle in a horizon-
tal position.
2.Allow the engine to run at idle.
3.Press the BC button in the turn signal lever
repeatedly until the oil level display is
shown in the instrument cluster.
4.Press the BC button in the turn signal lever
for at least 2 seconds.
The oil level is determined. A clock symbol
is displayed during the measurement.
5.After approx. 1 minute the current oil level is
displayed.
If not all measuring conditions are met,
e.g. with the engine cold, "-.-" is dis-
played. The requested measurement is carried
out as soon as possible.<
Possible displays
1Oil level OK
2Oil level at minimum:
Add a maximum of 1 US quart/1 liter of
engine oil at the next opportunity, refer to
Adding engine oil below
3Oil level is too high
Have the vehicle checked immedi-
ately; otherwise, engine damage may
result if too much oil has been added.<
4Oil level at maximum
5Fast measurement running: oil level is being
determined
6No value can be determined at this time
Adding engine oil
Do not add oil until a value slightly above the
minimum of 0.0 US quarts/liters is displayed by
the oil level measurement. In this area a mes-
sage is also shown on the Control Display.
Add oil within the next 125 miles/200 km,
otherwise the engine could be damaged.
Add a maximum of 1 US quart/1 liter of oil, oth-
erwise the engine may be damaged by adding
too much oil.