2007 BMW M6 COUPE tow
[x] Cancel search: towPage 141 of 256

Navigation
Driving tips
139Reference
At a glance
Controls
Communications
Entertainment
Mobility
Displaying towns/cities and streets of
the route
You can have the roads and towns along the
route displayed during destination guidance.
The distances remaining to be traveled on each
individual road are also displayed.
1.Select "Navigation" and press the control-
ler.
2.Change into the third field from the top.
Turn the controller until "Route list" is
selected and press the controller.
To exit the menu:
Select the arrow and press the controller.
Destination guidance with
voice instructions
Switching voice instructions on/off
Voice instructions can be switched on or off
during the destination guidance in the arrow or
map view:
Select the symbol and press the controller.To switch the voice instructions on/off at any
time:
1.Press the button.
This opens the start menu.
2.Press the controller to open the menu.
3.Turn the controller until "Settings" is
selected and press the controller.
4.Turn the controller until "Language / Units"
is selected and press the controller.
5.Change to upper field if necessary. Turn the
controller until "Languages" is selected and
press the controller.
6.Select "Navigation voice instructions" and
press the controller.
The voice instructions are switched on.
The setting is stored for the remote control cur-
rently in use
*.
Page 146 of 256

Destination guidance
144
Displaying current position
You can also display your current position with
the destination guidance switched off.
1.Select "Navigation" and press the control-
ler.
2.Change into the fourth field from the top.
Turn the controller until "Current position"
is selected and press the controller.
The current position of your BMW is displayed.
If the navigation system is unable to identify a
town or city, your current map coordinates will
appear.
To exit from the menu:
Select the arrow and press the controller.
You can also have the current position dis-
played on a map, refer to page138.
Page 147 of 256

Navigation
Driving tips
145Reference
At a glance
Controls
Communications
Entertainment
Mobility
What to do if …
What to do if …
>a navigation DVD is inserted, but the
request to insert the DVD is displayed on
the Control Display?
The navigation DVD may not be the right
DVD for the navigation system. The DVD is
labeled accordingly.
>you request the current position of your
vehicle, but do not receive a precise dis-
play?
The system is unable to receive enough
GPS signals at your current position due to
obstructions, your position is not yet avail-
able on your navigation DVD, or the system
is in the process of calculating your posi-
tion. As a rule, reception is guaranteed in
the open air.
>the destination guidance does not accept a
destination?
The data of the destination is not stored on
the navigation DVD that is loaded. Select a
destination that is as close as possible to
the original.
>the destination guidance does not accept a
destination without the street name?
On the navigation DVD, no downtown area
can be determined for the city or town
entered. Enter any street, or a destination
such as the railway station etc., then start
the destination guidance.
>you want to enter a destination for the des-
tination guidance, but it is not possible to
select the letters for your desired entry?
The data of the destination is not stored on
the navigation DVD that is loaded. In this
case, the system will not offer you any let-
ters to choose from. Select a destination
that is as close as possible to the original.>the system stops furnishing directions on
which way to turn as you approach intersec-
tions?
You are driving in an area that has not yet
been completely recorded on the naviga-
tion DVD. Instead of an arrow indicating a
turn, you will see an arrow which indicates
the general direction of your planned route.
Or you have left the recommended route
and the system requires a few seconds to
calculate a new recommended route.
>the navigation system does not react to
entries?
If the battery has just been reconnected
after having been disconnected, it then
takes up to 10 minutes before the system is
once again operational.
Page 179 of 256

177
Entertainment
Reference
At a glance
Controls
Driving tips Communications
Navigation
Mobility
Accepting a call
Press the button on the steering wheel.
Alternative:
"Accept" is selected.
Press the controller.
Rejecting a call
Select "Reject" and press the controller.
The caller is diverted to your mailbox if it has
been activated.
Calling
Dialing phone numbers
1.Select "Phone" and press the controller.
2.Select "Dial" and press the controller.
3.Enter the desired phone number by dialing
the individual digits and pressing the con-
troller.
Always enter the complete phone number
consisting of national dialing code, area
code, and phone number.
The letters correspond to the digits on the
keypad of the mobile phone.To delete the last digit:
Move the controller toward the right to
select the arrow and press the control-
ler down.
4.Select "Dial number" and press the control-
ler.
Alternative:
Press the button on the steering wheel.
For your phone number to be displayed to the
person you are calling, the display of phone
numbers must be enabled by your service pro-
vider.
Ending call
Press the button on the steering wheel.
Alternative:
1.Select the phone number and press the
controller.
Page 186 of 256

Telephoning
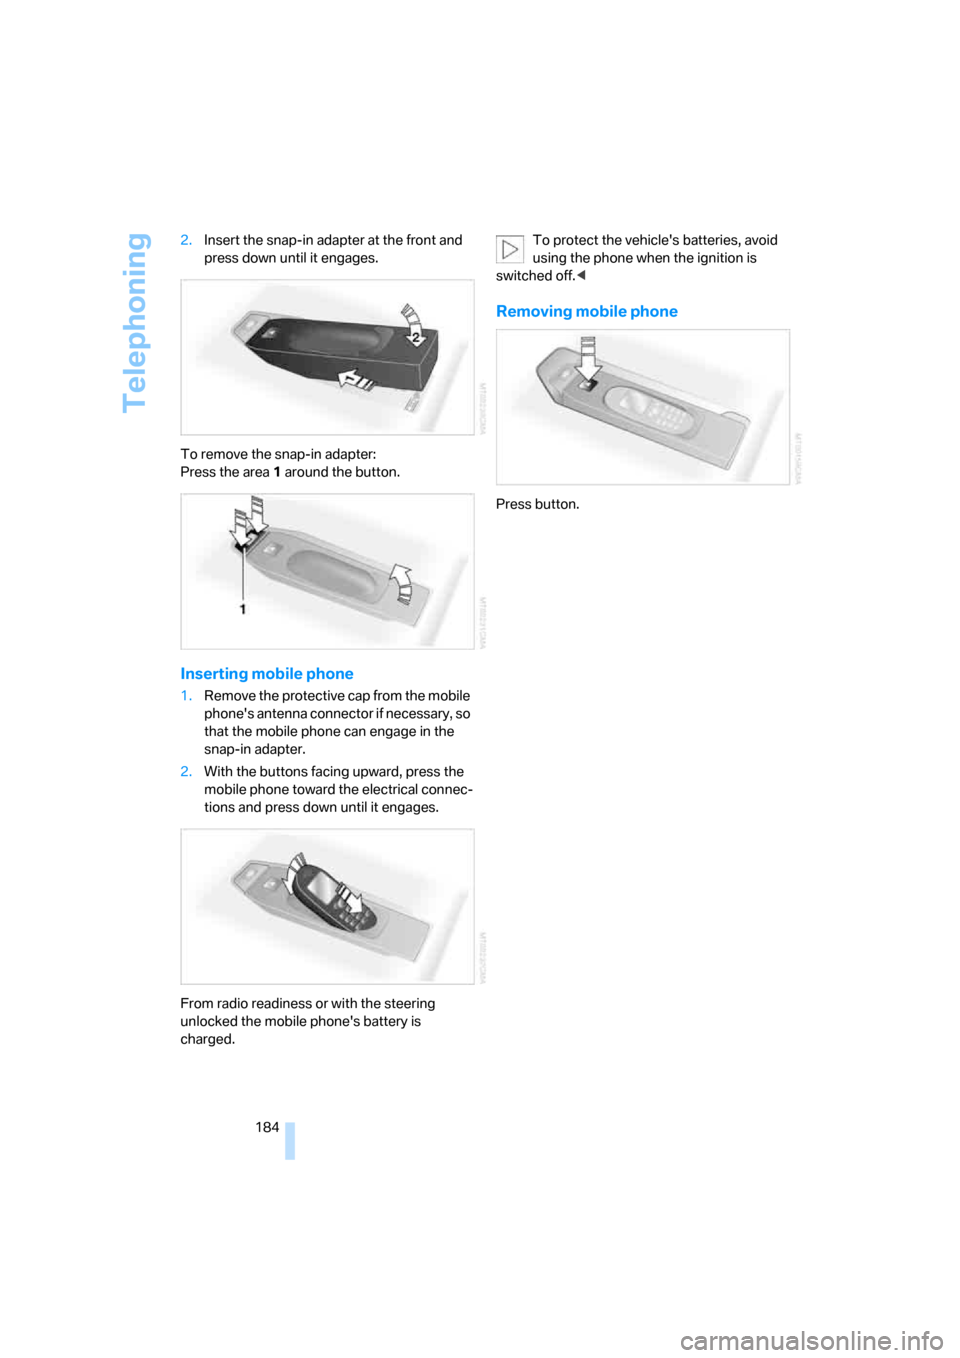
184 2.Insert the snap-in adapter at the front and
press down until it engages.
To remove the snap-in adapter:
Press the area 1 around the button.
Inserting mobile phone
1.Remove the protective cap from the mobile
phone's antenna connector if necessary, so
that the mobile phone can engage in the
snap-in adapter.
2.With the buttons facing upward, press the
mobile phone toward the electrical connec-
tions and press down until it engages.
From radio readiness or with the steering
unlocked the mobile phone's battery is
charged.To protect the vehicle's batteries, avoid
using the phone when the ignition is
switched off.<
Removing mobile phone
Press button.
Page 201 of 256

Mobility
199Reference
At a glance
Controls
Driving tips
Communications
Navigation
Entertainment
Temperature
The temperature grades are A, the highest, B,
and C, representing the tire's resistance to the
generation of heat and its ability to dissipate
heat when tested under controlled conditions
on a specified indoor laboratory test wheel.
Sustained high temperature can cause the
material of the tire to degenerate and reduce
tire life, and excessive temperature can lead to
sudden tire failure. The grade C corresponds to
a level of performance which all passenger car
tires must meet under the Federal Motor Vehi-
cle Safety Standard No. 109. Grades B and A
represent higher levels of performance on the
laboratory test wheel than the minimum
required by law.
The temperature grade for this tire is
established for a tire that is properly
inflated and not overloaded. Excessive speed,
underinflation, or excessive loading, either sep-
arately or in combination, can cause heat
buildup and possible tire failure.<
M+S
Winter and all-season tires.
These have better winter properties than sum-
mer tires.
XL
Indicates specially reinforced tires.
Tire condition
Inspect your tires frequently for tread wear,
signs of damage and foreign objects lodged in
the tread, and check the tread depth.
Minimum tread depth
The tread depth should not drop below 0.12 in/
3 mm, although, for example, European legisla-
tion only specifies a minimum tread depth of
0.063 in/1.6 mm. At tread depths below 0.12 in/
3 mm, there is an increased risk of high-speed
hydroplaning, even when only small amounts of
water are present on the road surface.
Winter tires noticeably loose their suitability for
winter use below a tread depth of 0.16 in/4 mm. New tires should be mounted in the interest of
safety.
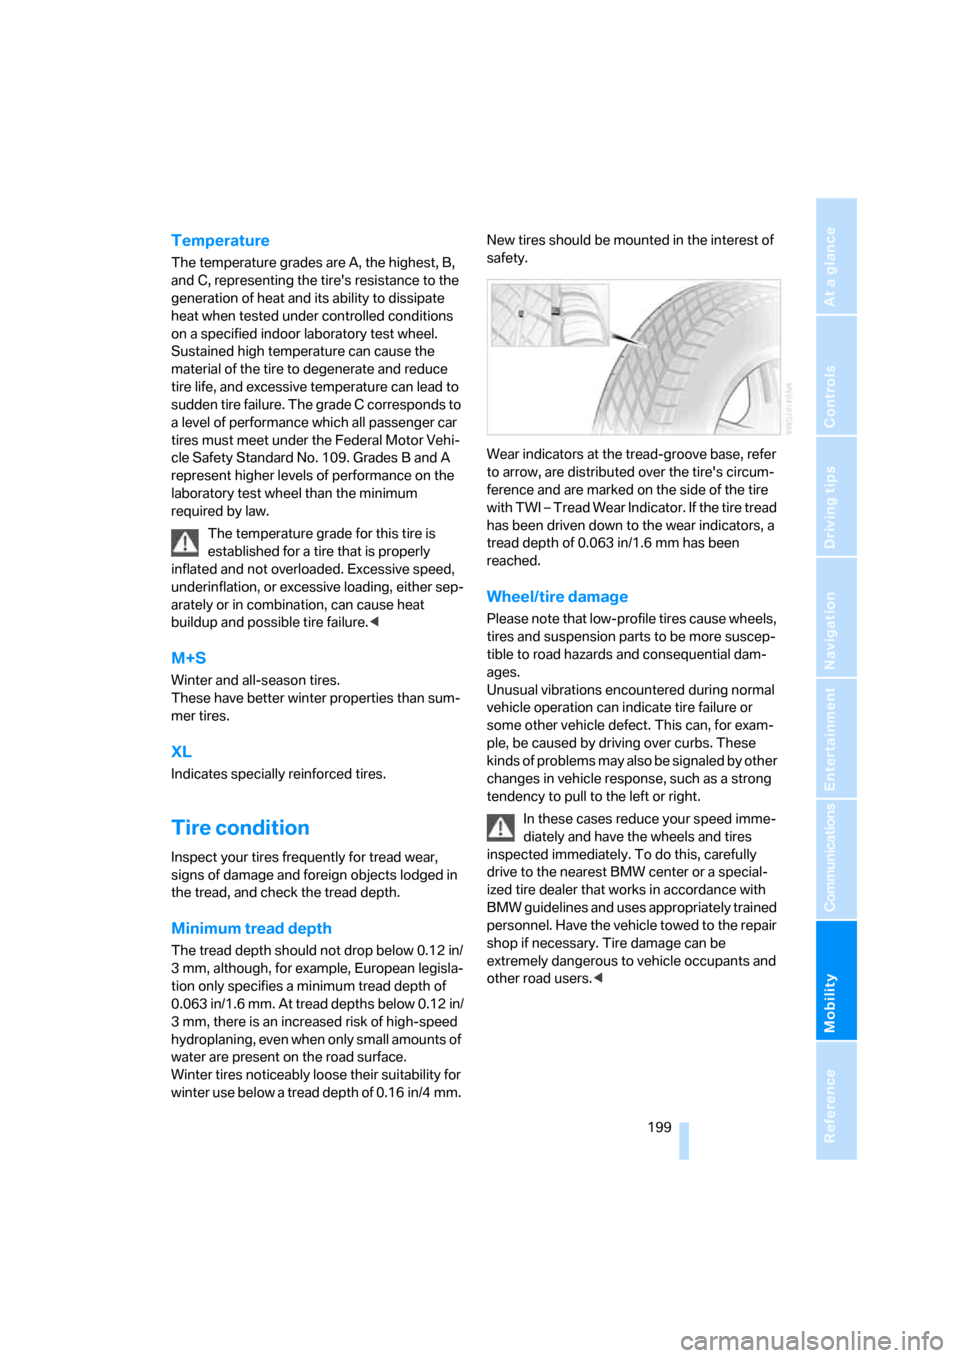
Wear indicators at the tread-groove base, refer
to arrow, are distributed over the tire's circum-
ference and are marked on the side of the tire
with TWI – Tread Wear Indicator. If the tire tread
has been driven down to the wear indicators, a
tread depth of 0.063 in/1.6 mm has been
reached.
Wheel/tire damage
Please note that low-profile tires cause wheels,
tires and suspension parts to be more suscep-
tible to road hazards and consequential dam-
ages.
Unusual vibrations encountered during normal
vehicle operation can indicate tire failure or
some other vehicle defect. This can, for exam-
ple, be caused by driving over curbs. These
kinds of problems may also be signaled by other
changes in vehicle response, such as a strong
tendency to pull to the left or right.
In these cases reduce your speed imme-
diately and have the wheels and tires
inspected immediately. To do this, carefully
drive to the nearest BMW center or a special-
ized tire dealer that works in accordance with
BMW guidelines and uses appropriately trained
personnel. Have the vehicle towed to the repair
shop if necessary. Tire damage can be
extremely dangerous to vehicle occupants and
other road users.<
Page 211 of 256

Mobility
209Reference
At a glance
Controls
Driving tips
Communications
Navigation
Entertainment
Replacing components
Onboard tool kit
The onboard tool kit is located in the luggage
compartment under the floor mat.
Replacing wiper blades
1.Fold the wiper arm out and grasp it firmly.
2.Press the locking tabs together while slid-
ing the wiper blade toward the front to dis-
engage it.
3.Insert the new wiper blade and slide it in
until it audibly clicks into place.
Lamps and bulbs
Lamps and bulbs make an essential contribu-
tion to driving safety. You must be duly diligent
in replacing them. If you are not familiar with the
specified procedures, have the corresponding
work carried out at your BMW center.Never touch the glass on new bulbs with
your bare fingers, as even minute
amounts of contamination will burn into the
bulb's surface and reduce its service life. Use a
clean cloth, napkin, etc., or hold the bulb by its
metal socket.<
A selection of replacement bulbs is available at
your BMW center.
Whenever you perform any work on the
electrical system, turn off the electrical
devices involved to prevent short circuits from
occurring. To avoid possible injury or equip-
ment damage when replacing bulbs, follow any
instructions provided by the bulb manufac-
turer.<
When performing maintenance on the head-
lamps, follow the instructions in the separate
Caring for your vehicle brochure.
For bulbs for which changing is not
described, and for checking and adjusting
headlamp aim, please contact your BMW cen-
ter.<
Light-emitting diodes LEDs
Light-emitting diodes installed behind translu-
cent lenses serve as the light source for many of
the controls and displays in your vehicle. These
light-emitting diodes, which operate using a
concept similar to that applied in conventional
lasers, are officially designated as Class 1 light-
emitting diodes.
Do not remove the covers, and never
stare into the unfiltered light for several
hours, as irritation of the retina could result.<
Xenon lamps
The service life of these lamps is very long and
the probability of a failure is very low, provided
that they are not switched on and off an unusual
number of times.
Page 212 of 256

Replacing components
210 Have work on the xenon lighting system
performed only by your BMW center or a
workshop that works according to BMW repair
procedures with correspondingly trained per-
sonnel. Due to the high voltage involved, there
is a danger to life and limb when work is carried
out improperly.<
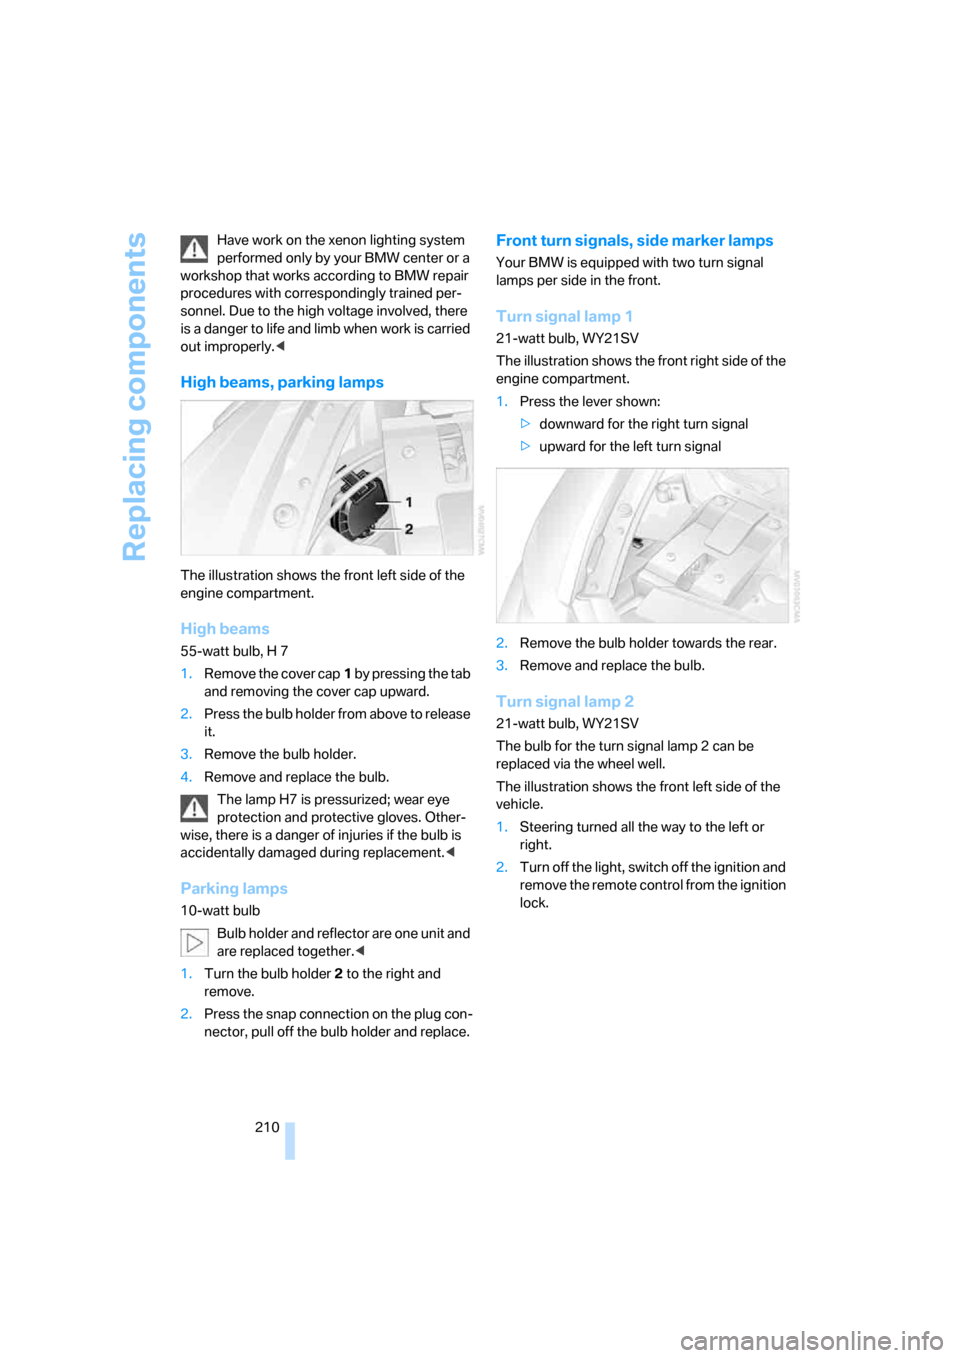
High beams, parking lamps
The illustration shows the front left side of the
engine compartment.
High beams
55-watt bulb, H 7
1.Remove the cover cap1 by pressing the tab
and removing the cover cap upward.
2.Press the bulb holder from above to release
it.
3.Remove the bulb holder.
4.Remove and replace the bulb.
The lamp H7 is pressurized; wear eye
protection and protective gloves. Other-
wise, there is a danger of injuries if the bulb is
accidentally damaged during replacement.<
Parking lamps
10-watt bulb
Bulb holder and reflector are one unit and
are replaced together.<
1.Turn the bulb holder2 to the right and
remove.
2.Press the snap connection on the plug con-
nector, pull off the bulb holder and replace.
Front turn signals, side marker lamps
Your BMW is equipped with two turn signal
lamps per side in the front.
Turn signal lamp 1
21-watt bulb, WY21SV
The illustration shows the front right side of the
engine compartment.
1.Press the lever shown:
>downward for the right turn signal
>upward for the left turn signal
2.Remove the bulb holder towards the rear.
3.Remove and replace the bulb.
Turn signal lamp 2
21-watt bulb, WY21SV
The bulb for the turn signal lamp 2 can be
replaced via the wheel well.
The illustration shows the front left side of the
vehicle.
1.Steering turned all the way to the left or
right.
2.Turn off the light, switch off the ignition and
remove the remote control from the ignition
lock.