2007 BMW M6 COUPE rear entertainment
[x] Cancel search: rear entertainmentPage 91 of 256

Controls
89Reference
At a glance
Driving tips
Communications
Navigation
Entertainment
Mobility
Airbags
The following airbags are located under the
marked covers:
1Front airbags
2Coupe: head airbags
3Side airbags
4Knee airbag
5Knee airbag
Protective action
To ensure that the safety systems con-
tinue to provide optimized protection,
please follow the adjustment instructions on
page46.<
The front airbags help protect the driver and
front passenger by responding to frontal
impacts in which safety belts alone cannot pro-
vide adequate restraint. When needed, the
head and side airbags help provide protection in
the event of a side impact. The relevant side air-
bag supports the side upper body area. The
head airbag supports the head. The knee airbag
protects the legs from colliding with the cockpit.
The airbags are deliberately not triggered in
every impact situation, e. g. less severe acci-
dents or rear-end collisions.
Do not apply adhesive materials to the
cover panels of the airbags, cover them or
modify them in any other way. Do not attempt to
remove the airbag restraint system from the
vehicle. Do not modify or tamper with either the
wiring or the individual components in the air-
bag system. This category includes the uphol-
stery in the center of the steering wheel, on the
instrument panel, the side trim panels on the
doors and on the Coupe, the roof pillars along with the sides of the headliner. Do not attempt
to remove or dismantle the steering wheel.
Do not touch the individual components
directly after the system has been triggered,
because there is a danger of burns.
In the event of malfunctions, deactivation, or
triggering of the airbag restraint system, have
the testing, repair, removal, and disposal of air-
bag generators carried out only by a BMW cen-
ter or a workshop that works according to BMW
repair procedures with appropriately trained
personnel and has the required explosives
licenses. Otherwise unprofessional attempts to
service the system could lead to failure in an
emergency or undesired airbag triggering,
either of which could result in personal injury.<
Warnings and information on the airbags is also
provided on the sun visors.
Automatic deactivation of front
passenger airbags
The occupation of the seat is detected by eval-
uating the impression on the occupied seat sur-
face of the front passenger seat. The system
correspondingly activates or deactivates the
front, knee and side airbags on the front pas-
senger side.
The current status of the front passenger
airbags, i.e. deactivated or activated, is
indicated by the indicator lamp over the interior
rearview mirror, refer to Operating state of front
passenger airbags below.<
Before transporting a child in the front
passenger seat, read the safety informa-
tion and follow the instructions under Trans-
porting children safely, refer to page56.
Page 93 of 256

Controls
91Reference
At a glance
Driving tips
Communications
Navigation
Entertainment
Mobility
Convertible: rollover
protection system
The rollover protection system is automatically
activated in the event of an accident or a critical
driving situation, extreme inclination on the lon-
gitudinal axis, or loss of ground contact. The
rollover bars located behind the rear head
restraints are deployed within fractions of a sec-
ond.
As a supplement to the rollover bar integrated
into the windshield frame, the rollover protec-
tion system ensures that all vehicle occupants
have the necessary headroom.
Always keep the path of movement of the
rollover protection system clear.
In less severe accidents, you are protected by
the fastened safety belt and, depending on the
severity of the accident, the belt tensioner and
the multistage airbag restraint system.<
Lowering
If the rollover protection system experienced no
impact after automatic activation, then it can be
lowered again. No tools are necessary for this
purpose.
1.Press the release backward and hold in that
position.
2.Press the rollover protection unit halfway
down from above.
3.Let go of the release.4.Press the rollover protection unit down until
it snaps into place.
5.Use the same procedure for the second roll-
over protection unit.
Have the rollover protection system checked
after unexpected triggering.
Never move the convertible top when the
rollover protection system is raised.
No changes of any nature may be made to the
individual components of the rollover protec-
tion system and wiring.
Work on the rollover protection system may
only be performed at a BMW center.
Unprofessional attempts to service the system
can lead to failure or malfunction.
For a system check and to ensure long-term
functioning, you must comply with the mainte-
nance intervals of the service requirements,
refer to page71.<
Head-Up Display*
The concept
With the Head-Up Display, important informa-
tion is projected into the driver's field of view,
e.g. navigation instructions. This enables you to
absorb this information without looking away
from the road.
Page 97 of 256

Controls
95Reference
At a glance
Driving tips
Communications
Navigation
Entertainment
Mobility
Lamps
Parking lamps/low beams
0Lights off and daytime running lamps*
1Parking lamps and daytime running lamps*
2Low beams
3Automatic headlamp control,
daytime run-
ning lamps
* and Adaptive Head Light*
Parking lamps
In switch position1, the front, rear and side
vehicle lighting is switched on. You can use the
parking lamps for parking.
The parking lamps drain the battery. Do
not leave them switched on for long peri-
ods of time, otherwise it may no longer be pos-
sible to start the engine. It is preferable to
switch on the roadside parking lamps on one
side, refer to page97.<
Low beams
The low beams light up when the light switch is
in position 2 and the ignition is on.
If the light switch remains in position 2, the
exterior lamps are switched off automatically
when the driver's door is opened while the igni-
tion is off.
Switch on the parking lamps if required as
described under Parking lamps.
Automatic headlamp control
In switch position3, the system activates the
low beams and switches them on or off in
response to changes in ambient light condi-
tions, for instance, in a tunnel, at dawn and dusk
and in case of precipitation. Adaptive Head
Light
* is active. The LED next to the symbol is
illuminated when the low beams are on.
A blue sky with the sun low on the horizon can
cause the lights to be switched on.
If desired, the light switch can be left in posi-
tion3. The exterior lighting is automatically
switched off after switching off the vehicle.
The automatic headlamp control cannot
serve as a substitute for your personal
judgment in determining when the lamps
should be switched on in response to ambient
lighting conditions. For example, the sensors
cannot detect fog of hazy weather. To avoid
safety risks, you should always switch on the
low beams manually under these conditions.<
Pathway lighting
When you activate the headlamp flasher after
parking the vehicle and switching off the lamps,
the low beams will come on for a brief period.
You can set the duration or deactivate the func-
tion via iDrive.
iDrive, for explanation of principle, refer to
page16.
1.Press the button.
This opens the start menu.
2.Press the controller to open the menu.
3.Select "Settings" and press the controller.
4.Select "Vehicle / Tires" and press the con-
troller.
Page 101 of 256

Controls
99Reference
At a glance
Driving tips
Communications
Navigation
Entertainment
Mobility
Climate
Automatic climate control
1Air directed toward the windshield and
side windows
2Air for the upper body area, refer to
Ventilation on page102
3Air to footwell
4Temperature, left side of passenger
compartment
5Maximum cooling
6Defrosting windows and removing
condensation
7Air volume, manual
8Switching off automatic climate control9Switching cooling function on and off
manually
10Temperature, right side of passenger
compartment
11Residual heat mode
12AUTO program
13AUC automatic recirculated-air control/
recirculated air mode
14LED for parked car ventilation
15Rear window defroster
16Air grill for interior temperature sensor –
please keep clear and unobstructed
Page 103 of 256

Controls
101Reference
At a glance
Driving tips
Communications
Navigation
Entertainment
Mobility
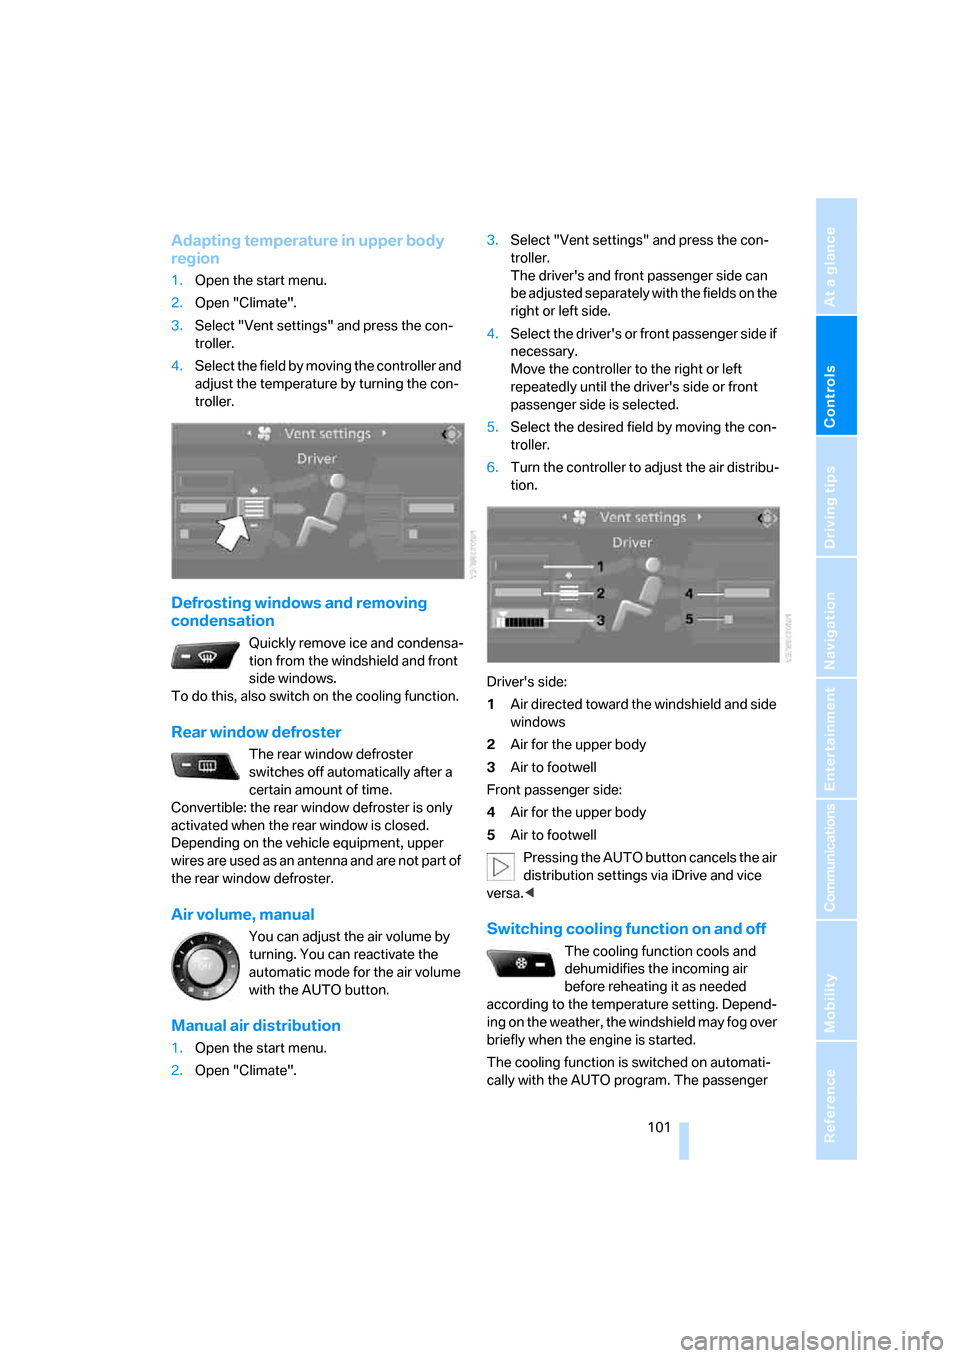
Adapting temperature in upper body
region
1.Open the start menu.
2.Open "Climate".
3.Select "Vent settings" and press the con-
troller.
4.Select the field by moving the controller and
adjust the temperature by turning the con-
troller.
Defrosting windows and removing
condensation
Quickly remove ice and condensa-
tion from the windshield and front
side windows.
To do this, also switch on the cooling function.
Rear window defroster
The rear window defroster
switches off automatically after a
certain amount of time.
Convertible: the rear window defroster is only
activated when the rear window is closed.
Depending on the vehicle equipment, upper
wires are used as an antenna and are not part of
the rear window defroster.
Air volume, manual
You can adjust the air volume by
turning. You can reactivate the
automatic mode for the air volume
with the AUTO button.
Manual air distribution
1.Open the start menu.
2.Open "Climate".3.Select "Vent settings" and press the con-
troller.
The driver's and front passenger side can
be adjusted separately with the fields on the
right or left side.
4.Select the driver's or front passenger side if
necessary.
Move the controller to the right or left
repeatedly until the driver's side or front
passenger side is selected.
5.Select the desired field by moving the con-
troller.
6.Turn the controller to adjust the air distribu-
tion.
Driver's side:
1Air directed toward the windshield and side
windows
2Air for the upper body
3Air to footwell
Front passenger side:
4Air for the upper body
5Air to footwell
Pressing the AUTO button cancels the air
distribution settings via iDrive and vice
versa.<
Switching cooling function on and off
The cooling function cools and
dehumidifies the incoming air
before reheating it as needed
according to the temperature setting. Depend-
ing on the weather, the windshield may fog over
briefly when the engine is started.
The cooling function is switched on automati-
cally with the AUTO program. The passenger
Page 111 of 256

Controls
109Reference
At a glance
Driving tips
Communications
Navigation
Entertainment
Mobility
The lighter can be removed as soon as it pops
back out.
Hold or touch the hot cigarette lighter by
the knob only. Holding or touching it in
other areas could result in burns.
Always take along the remote control when you
leave the vehicle; otherwise, children could, for
example, use the lighter and burn themselves.<
Connecting electrical devices
Socket
With the engine running or the ignition switched
on, the cigarette lighter socket can be used as a
power outlet for hand flashlights, car vacuum
cleaners, etc., with power ratings of up to
approx. 200 W at 12 V. Avoid damaging the
socket by inserting plugs of different shapes or
sizes.
In front passenger footwell
Access to the socket:
Fold open the cover.
Ski bag*
It permits safe and clean transport of up to two
pairs of standard skis or one snowboard.
You can use the ski bag to stow skis up to 6.9 ft/
2.10 m long.
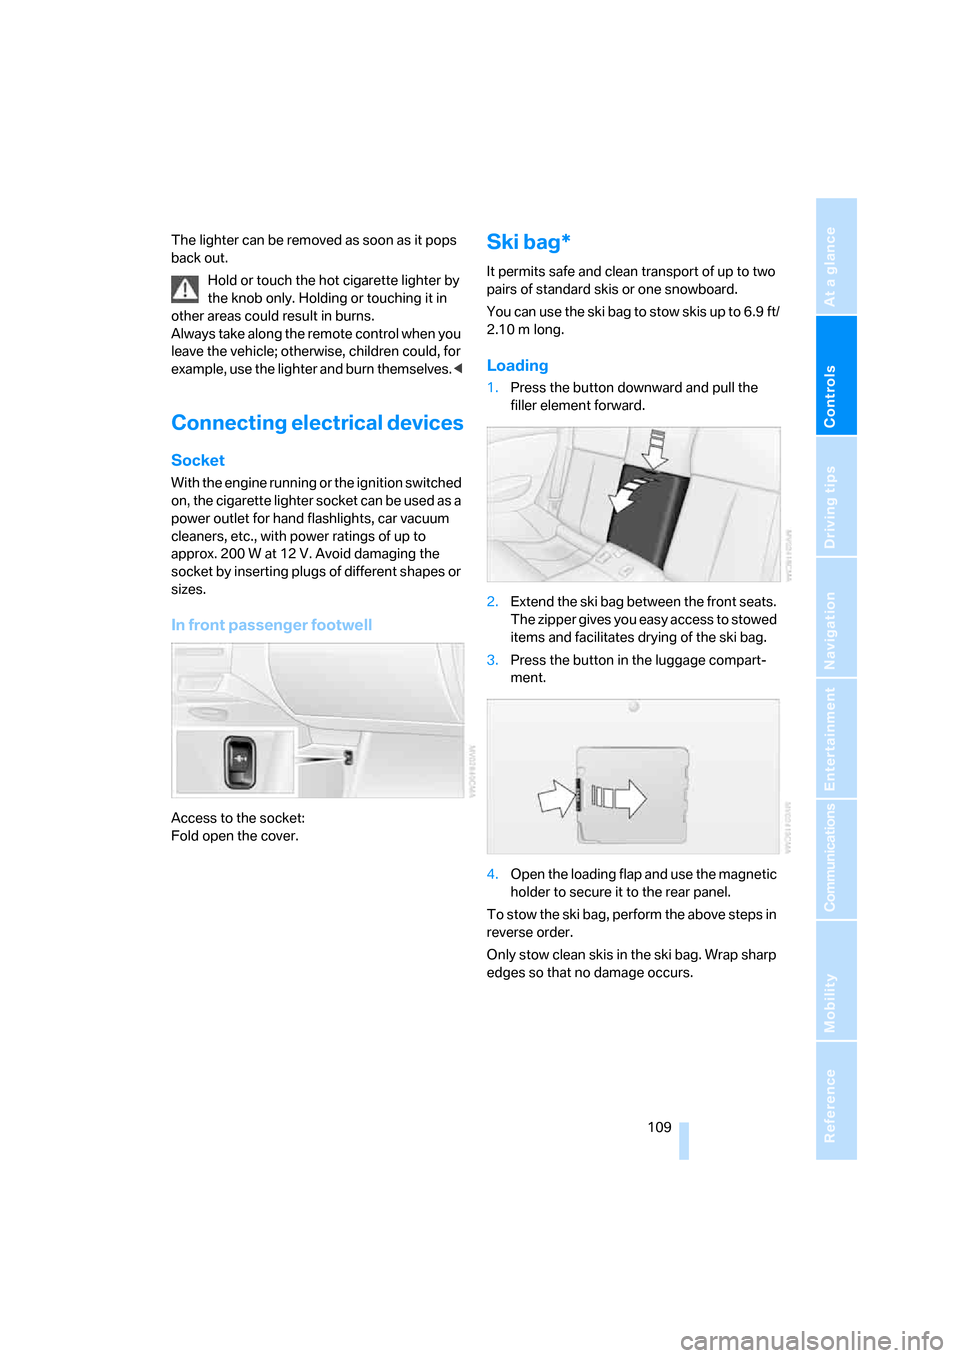
Loading
1.Press the button downward and pull the
filler element forward.
2.Extend the ski bag between the front seats.
The zipper gives you easy access to stowed
items and facilitates drying of the ski bag.
3.Press the button in the luggage compart-
ment.
4.Open the loading flap and use the magnetic
holder to secure it to the rear panel.
To stow the ski bag, perform the above steps in
reverse order.
Only stow clean skis in the ski bag. Wrap sharp
edges so that no damage occurs.
Page 119 of 256

Driving tips
117Reference
At a glance
Controls
Communications
Navigation
Entertainment
Mobility
Cargo loading
To avoid loading the tires beyond their
approved carrying capacity, never over-
load the vehicle. Overloading can lead to over-
heating and increases the rate at which damage
develops inside the tires. The ultimate result
can assume the form of a sudden blow-out.<
Determining loading limit
1.Locate the following statement on your
vehicle's placard
*:
The combined weight of occupants
and cargo should never exceed
YYY lbs. or XXX kg, as otherwise the vehicle
may be damaged and unstable driving con-
ditions may result.<
2.Determine the combined weight of the
driver and passengers that will be riding in
your vehicle.
3.Subtract the combined weight of the driver
and passengers from XXX lbs. or YYY kg.
4.The resulting figure equals the available
amount of cargo and luggage load capacity.
For example, if the XXX amount equals
800 lbs. and there will be four 150-lb. pas-
sengers in your vehicle, the amount of avail-
able cargo and luggage load capacity is
200 lbs.:
800lbs. minus 600lbs. = 200lbs.
5.Determine the combined weight of luggage
and cargo being loaded on the vehicle. That
weight may not safely exceed the available
cargo and luggage load capacity calculated
in step 4.6.If your vehicle will be towing a trailer, part of
the load from your trailer will be transferred
to your vehicle. Consult the manual for
transporting a trailer to determine how this
may reduce the available cargo and luggage
load capacity of your vehicle.
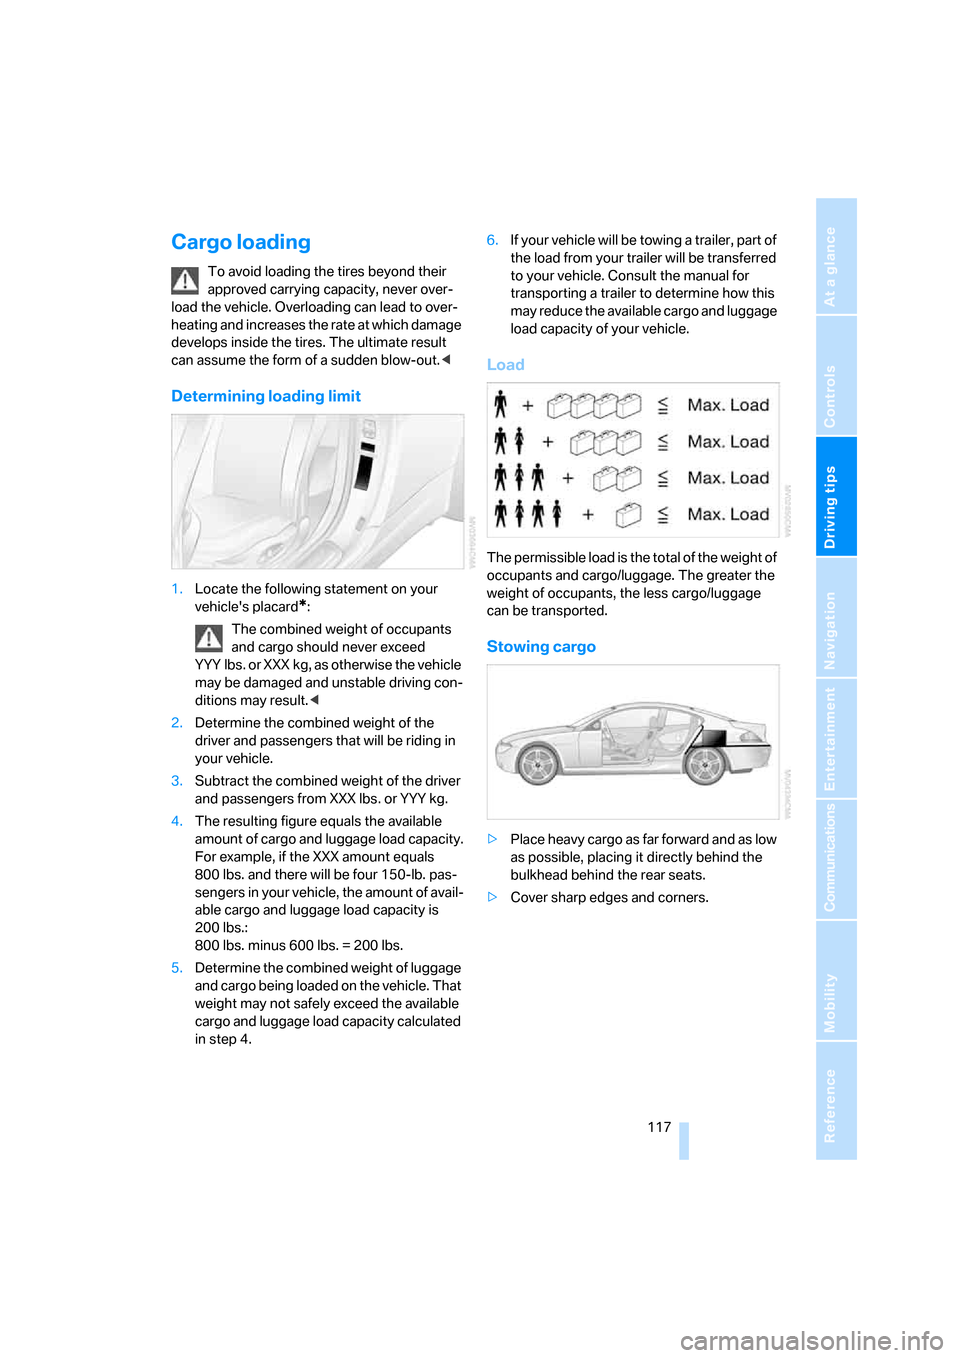
Load
The permissible load is the total of the weight of
occupants and cargo/luggage. The greater the
weight of occupants, the less cargo/luggage
can be transported.
Stowing cargo
>Place heavy cargo as far forward and as low
as possible, placing it directly behind the
bulkhead behind the rear seats.
>Cover sharp edges and corners.
Page 203 of 256

Mobility
201Reference
At a glance
Controls
Driving tips
Communications
Navigation
Entertainment
After changing wheels/tires
After changing tires or wheels, the slip detec-
tion of the Sequential Manual Transmission
must become familiar with the changed state.
Reinitialize the system for this purpose:
1.Move the selector lever into the idling
position N on a straight stretch of road at a
speed between 20 mph/30 km/h and
90 mph/150 km/h.
2.Pull both shift paddles for approx. 2 sec-
onds.
If you do not carry out initialization, the system
will automatically learn the changed state grad-
ually during driving. This may be noticeable
from the clutch opening and closing briefly.
Storage
Store wheels and tires in a cool, dry place with
as little exposure to light as possible. Always
protect tires against all contact with oil, grease
and fuels. Do not exceed the maximum tire
inflation pressure indicated on the side wall of
the tire.
Rotating wheels between axles
BMW does not recommend moving the front
wheels to the rear or vice versa, as otherwise
the handling characteristics may be impaired.
Snow chains*
BMW only tests certain fine-link snow chains,
classifies them as road-safe and recommends
them. Consult your BMW center for more infor-
mation.
Use is only permitted in pairs, with winter tires
of the size 245/45 R 18 on the rear wheels.
Observe the manufacturer's instructions when
mounting snow chains. Do not exceed a speed
of 30 mph/50 km/h with the chains mounted.
Make sure that the snow chains are always suf-
ficiently tensioned. Retension in accordance
with the chain manufacturer's specifications if
necessary.Do not initialize the Flat Tire Monitor after
installing snow chains as this could cause
the Flat Tire Monitor to malfunction.
After mounting or removing snow chains, the
slip detection of the Sequential Manual Trans-
mission must become familiar with the altered
state. To do this, reinitialize the system, refer to
After changing wheels/tires.<