2007 BMW 750LI reset
[x] Cancel search: resetPage 92 of 254

Technology for comfort, convenience and safety
90 There are two programs.
With each press of the controller, you can
switch back and forth between "Comfort" and
"Sport".
Comfort program
The Comfort program is suitable for use
throughout the vehicle's entire speed range and
regardless of load.
Sport program
You should select the Sport program for consis-
tently performance-oriented response from
shock absorbers and steering.
FTM Flat Tire Monitor*
The concept
The Flat Tire Monitor keeps track of the infla-
tion pressures in the four mounted tires as you
drive. The system triggers an alert whenever
the inflation pressure drops significantly in rela-
tion to the pressure in another tire.
When a loss of pressure occurs, the rolling
radius changes and with it, the rotational speed
of the wheels. This change is detected and sig-
naled as a flat tire.
Functional requirements
To ensure the reliable signaling of a flat tire, the
system must be initialized at the correct tire
inflation pressure.
The initialization must be repeated after
every correction of the tire inflation pres-
sure and after every tire or wheel change.<
System limits
The Flat Tire Monitor cannot indicate
sudden severe tire damage caused by
outside factors and does not detect a natural,
even pressure drop in all four tires.<
In the following situations, the system could be
delayed or malfunction:
>When the system has not been initialized.>When driving on snow-covered or slippery
road surfaces.
>Performance-oriented style of driving: slip
in the drive wheels, high lateral acceleration.
>When driving with snow chains
*.
Initializing system
The initialization is completed during driv-
ing, which can be interrupted at any time.
The initialization automatically continues when
driving resumes. Do not initialize the system
when driving with snow chains
*.<
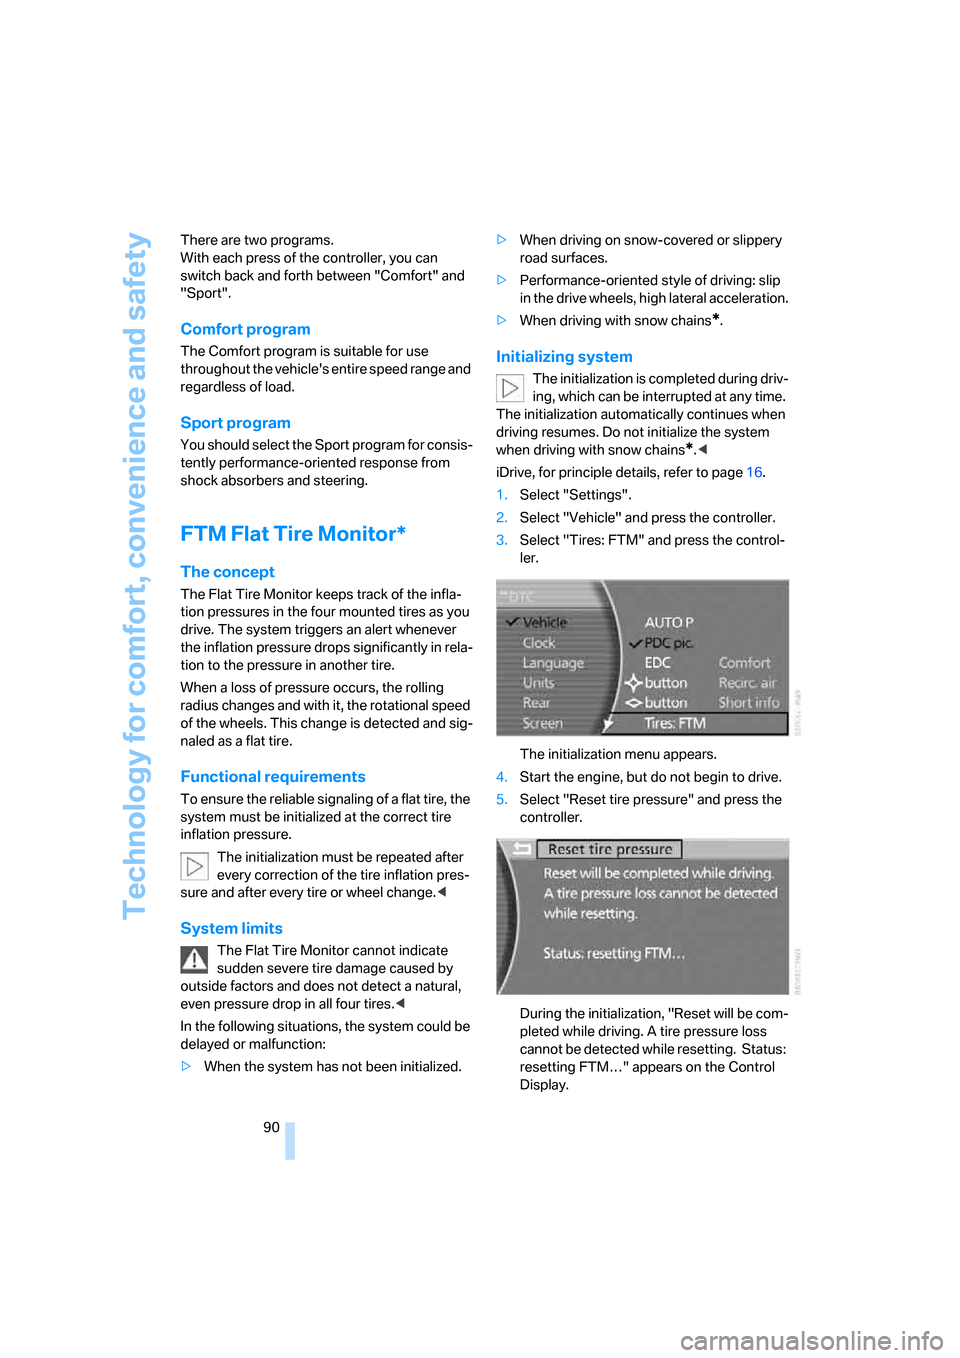
iDrive, for principle details, refer to page16.
1.Select "Settings".
2.Select "Vehicle" and press the controller.
3.Select "Tires: FTM" and press the control-
ler.
The initialization menu appears.
4.Start the engine, but do not begin to drive.
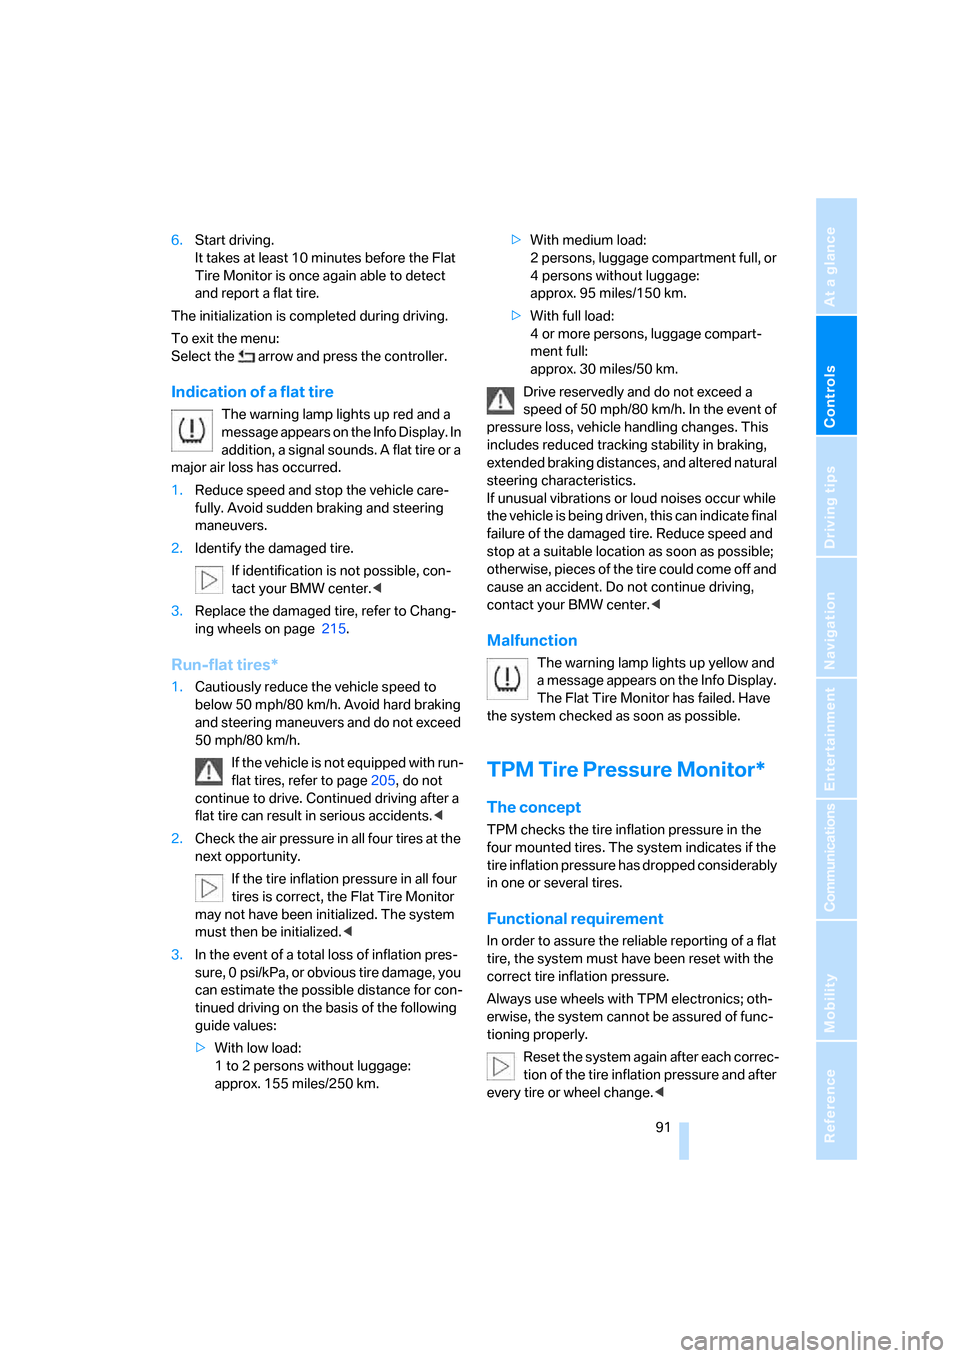
5.Select "Reset tire pressure" and press the
controller.
During the initialization, "Reset will be com-
pleted while driving. A tire pressure loss
cannot be detected while resetting. Status:
resetting FTM…" appears on the Control
Display.
Page 93 of 254

Controls
91Reference
At a glance
Driving tips
Communications
Navigation
Entertainment
Mobility
6.Start driving.
It takes at least 10 minutes before the Flat
Tire Monitor is once again able to detect
and report a flat tire.
The initialization is completed during driving.
To exit the menu:
Select the arrow and press the controller.
Indication of a flat tire
The warning lamp lights up red and a
message appears on the Info Display. In
addition, a signal sounds. A flat tire or a
major air loss has occurred.
1.Reduce speed and stop the vehicle care-
fully. Avoid sudden braking and steering
maneuvers.
2.Identify the damaged tire.
If identification is not possible, con-
tact your BMW center.<
3.Replace the damaged tire, refer to Chang-
ing wheels on page215.
Run-flat tires*
1.Cautiously reduce the vehicle speed to
below 50 mph/80 km/h. Avoid hard braking
and steering maneuvers and do not exceed
50 mph/80 km/h.
If the vehicle is not equipped with run-
flat tires, refer to page205, do not
continue to drive. Continued driving after a
flat tire can result in serious accidents.<
2.Check the air pressure in all four tires at the
next opportunity.
If the tire inflation pressure in all four
tires is correct, the Flat Tire Monitor
may not have been initialized. The system
must then be initialized.<
3.In the event of a total loss of inflation pres-
sure, 0 psi/kPa, or obvious tire damage, you
can estimate the possible distance for con-
tinued driving on the basis of the following
guide values:
>With low load:
1 to 2 persons without luggage:
approx. 155 miles/250 km.>With medium load:
2 persons, luggage compartment full, or
4 persons without luggage:
approx. 95 miles/150 km.
>With full load:
4 or more persons, luggage compart-
ment full:
approx. 30 miles/50 km.
Drive reservedly and do not exceed a
speed of 50 mph/80 km/h. In the event of
pressure loss, vehicle handling changes. This
includes reduced tracking stability in braking,
extended braking distances, and altered natural
steering characteristics.
If unusual vibrations or loud noises occur while
the vehicle is being driven, this can indicate final
failure of the damaged tire. Reduce speed and
stop at a suitable location as soon as possible;
otherwise, pieces of the tire could come off and
cause an accident. Do not continue driving,
contact your BMW center.<
Malfunction
The warning lamp lights up yellow and
a message appears on the Info Display.
The Flat Tire Monitor has failed. Have
the system checked as soon as possible.
TPM Tire Pressure Monitor*
The concept
TPM checks the tire inflation pressure in the
four mounted tires. The system indicates if the
tire inflation pressure has dropped considerably
in one or several tires.
Functional requirement
In order to assure the reliable reporting of a flat
tire, the system must have been reset with the
correct tire inflation pressure.
Always use wheels with TPM electronics; oth-
erwise, the system cannot be assured of func-
tioning properly.
Reset the system again after each correc-
tion of the tire inflation pressure and after
every tire or wheel change.<
Page 94 of 254

Technology for comfort, convenience and safety
92
System limits
TPM cannot warn you of sudden serious
tire damage caused by external influ-
ences.<
The system does not work correctly if it has not
been reset; for example, a flat tire may be indi-
cated even though the tire inflation pressures
are correct.
If a wheel without TPM electronics has been
mounted or if the TPM experiences temporary
interference from other systems or devices that
use the same radio frequency, then the system
is inactive and unable to report a flat tire.
Status display on Control Display
The tire and system status is indicated by the
color of the tires.
TPM takes into account the fact that the tire
pressure changes during driving. A correction is
only required if the color of the TPM display
indicates that it is necessary.
Green
The tire pressure matches the learned set state.
"Status: TPM active" appears on the Control
Display.
One wheel is yellow
There is a flat tire or a major drop in inflation
pressure in the indicated tire. A message
appears on the Control Display.
All wheels are yellow
There is a flat tire or a major drop in inflation
pressure in several tires. A message appears on
the Control Display.
Gray
The system cannot detect a flat tire.
Reasons for this can include:
>TPM is in the process of being reset
>Temporary interference due to systems or
devices that use the same radio frequency
>Malfunction
Resetting system
Reset the system again after each correc-
tion of the tire inflation pressure and after
every tire or wheel change.<
The reset process is completed during driving
and can be interrupted at any time. When driv-
ing resumes, the process resumes automati-
cally.
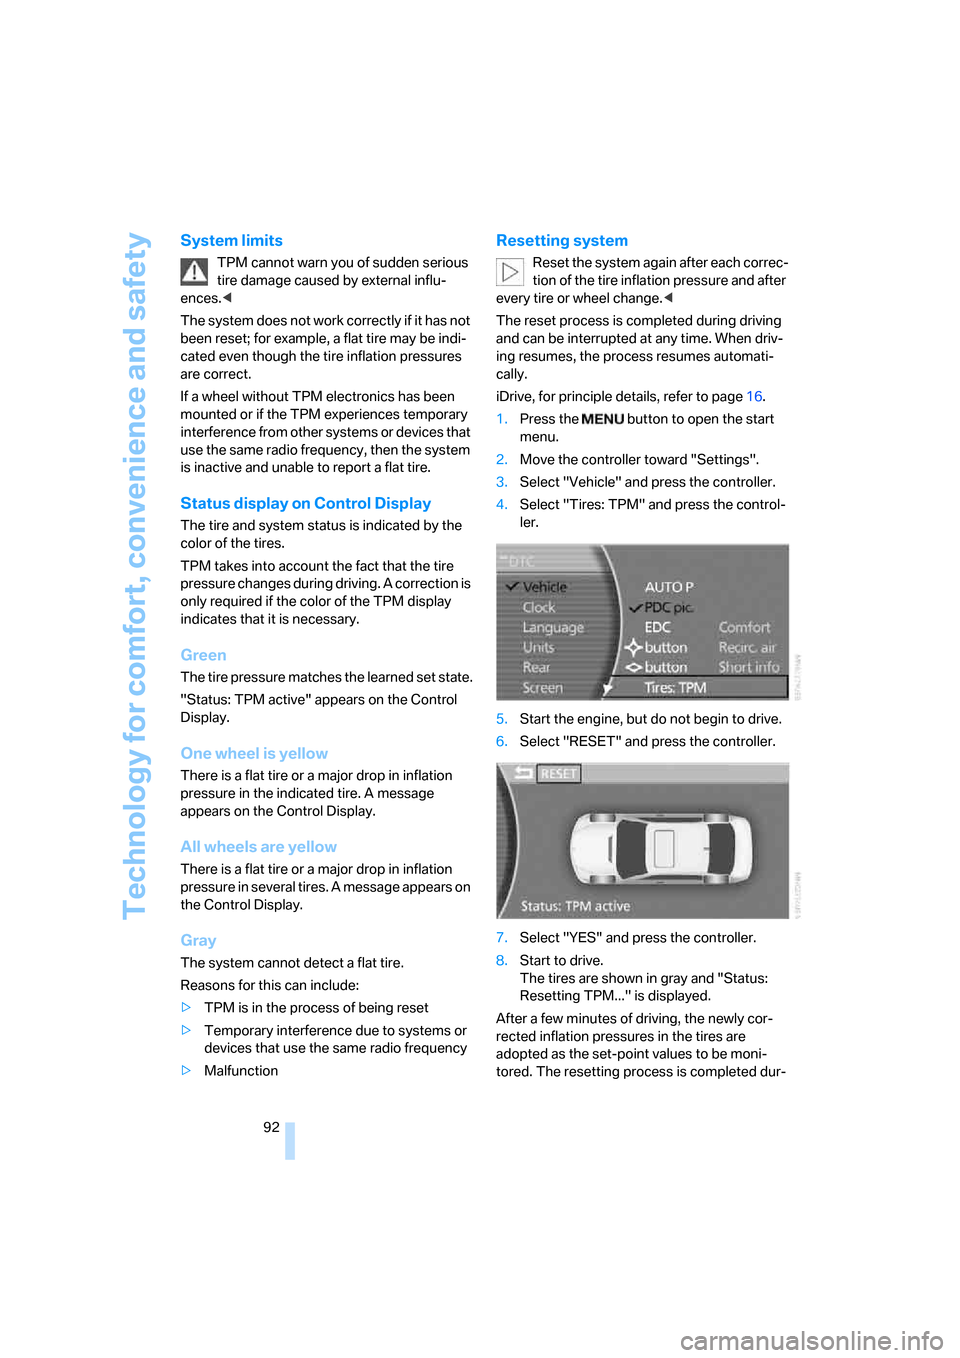
iDrive, for principle details, refer to page16.
1.Press the button to open the start
menu.
2.Move the controller toward "Settings".
3.Select "Vehicle" and press the controller.
4.Select "Tires: TPM" and press the control-
ler.
5.Start the engine, but do not begin to drive.
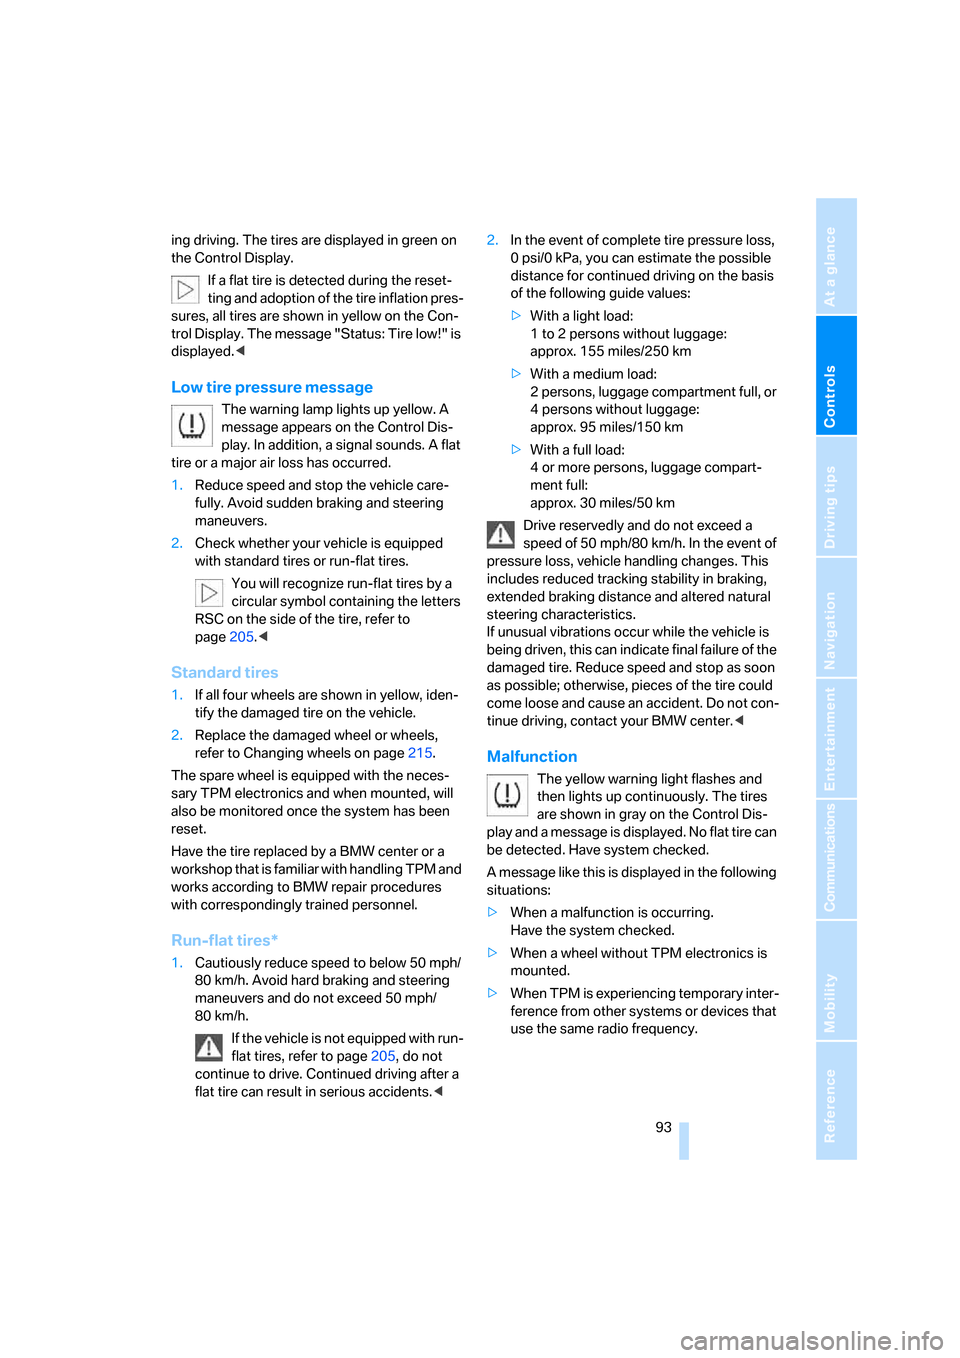
6.Select "RESET" and press the controller.
7.Select "YES" and press the controller.
8.Start to drive.
The tires are shown in gray and "Status:
Resetting TPM..." is displayed.
After a few minutes of driving, the newly cor-
rected inflation pressures in the tires are
adopted as the set-point values to be moni-
tored. The resetting process is completed dur-
Page 95 of 254

Controls
93Reference
At a glance
Driving tips
Communications
Navigation
Entertainment
Mobility
ing driving. The tires are displayed in green on
the Control Display.
If a flat tire is detected during the reset-
ting and adoption of the tire inflation pres-
sures, all tires are shown in yellow on the Con-
trol Display. The message "Status: Tire low!" is
displayed.<
Low tire pressure message
The warning lamp lights up yellow. A
message appears on the Control Dis-
play. In addition, a signal sounds. A flat
tire or a major air loss has occurred.
1.Reduce speed and stop the vehicle care-
fully. Avoid sudden braking and steering
maneuvers.
2.Check whether your vehicle is equipped
with standard tires or run-flat tires.
You will recognize run-flat tires by a
circular symbol containing the letters
RSC on the side of the tire, refer to
page205.<
Standard tires
1.If all four wheels are shown in yellow, iden-
tify the damaged tire on the vehicle.
2.Replace the damaged wheel or wheels,
refer to Changing wheels on page215.
The spare wheel is equipped with the neces-
sary TPM electronics and when mounted, will
also be monitored once the system has been
reset.
Have the tire replaced by a BMW center or a
workshop that is familiar with handling TPM and
works according to BMW repair procedures
with correspondingly trained personnel.
Run-flat tires*
1.Cautiously reduce speed to below 50 mph/
80 km/h. Avoid hard braking and steering
maneuvers and do not exceed 50 mph/
80 km/h.
If the vehicle is not equipped with run-
flat tires, refer to page205, do not
continue to drive. Continued driving after a
flat tire can result in serious accidents.<2.In the event of complete tire pressure loss,
0 psi/0 kPa, you can estimate the possible
distance for continued driving on the basis
of the following guide values:
>With a light load:
1 to 2 persons without luggage:
approx. 155 miles/250 km
>With a medium load:
2 persons, luggage compartment full, or
4 persons without luggage:
approx. 95 miles/150 km
>With a full load:
4 or more persons, luggage compart-
ment full:
approx. 30 miles/50 km
Drive reservedly and do not exceed a
speed of 50 mph/80 km/h. In the event of
pressure loss, vehicle handling changes. This
includes reduced tracking stability in braking,
extended braking distance and altered natural
steering characteristics.
If unusual vibrations occur while the vehicle is
being driven, this can indicate final failure of the
damaged tire. Reduce speed and stop as soon
as possible; otherwise, pieces of the tire could
come loose and cause an accident. Do not con-
tinue driving, contact your BMW center.<
Malfunction
The yellow warning light flashes and
then lights up continuously. The tires
are shown in gray on the Control Dis-
play and a message is displayed. No flat tire can
be detected. Have system checked.
A message like this is displayed in the following
situations:
>When a malfunction is occurring.
Have the system checked.
>When a wheel without TPM electronics is
mounted.
>When TPM is experiencing temporary inter-
ference from other systems or devices that
use the same radio frequency.
Page 157 of 254

Navigation
Entertainment
Driving tips
155Reference
At a glance
Controls
Communications
Mobility
Resetting tone settings
You can reset all tone settings except "Speed
Vol." to the standard default settings.
Select "RESET" and press the controller.
Page 158 of 254

Radio
156
Radio
Your radio is equipped to receive the FM and
AM wavebands.
Listening to radio
Switch on audio or video sources, refer to
page153.
iDrive, for principle details, refer to page16.
1.Press the button to open the start
menu.
2.Move the controller toward "Entertain-
ment".
3.Select "FM" or "AM" and press the control-
ler.
Stations are shown on the Control Display on
the basis of various selection criteria, e.g. "Pre-
sets".
Using the voice command system:
Changing station
Using buttons in center console
Press the button for the corresponding
direction until you reach the next station.
Using the voice command system:
Using iDrive
FM waveband:
1.Select "FM" and press the controller.
2.Choose the selection criterion and press
the controller.
>"Autostore list":
Selection of "FM" stations within recep-
tion range during the last autostoring
procedure, refer to page158.
>"Presets":
Display of up to twelve stations that you
have previously stored, refer to
page158.
3.Turn the controller to select a station and
press the controller.
AM waveband
1.Select "AM" and press the controller.
2.Choose the selection criterion and press
the controller.
>"Presets":
Display of up to twelve stations that you
have previously stored, refer to
page158.
>"Autostore list":
Selection of stations in the "AM" wave-
band within reception range during the
last autostoring procedure. 1.{Radio}.
2.{FM} or {AM}.
1.{Radio}.
2.{Next station} or {Station back}.
Page 163 of 254

Navigation
Entertainment
Driving tips
161Reference
At a glance
Controls
Communications
Mobility
Using iDrive
1.Select "SAT" and press the controller.
2.Choose the selection criterion and press
the controller.
>"Channels":
All channels are displayed.
>"Categories":
All channels are displayed, sorted
according to categories.
>"Presets":
Up to twelve channels that you have pre-
viously stored are displayed.
3.Select channel and press the controller.
Using the voice command system:
Select a stored channel:
Displaying additional information
Select the channel currently being played and
press the controller.The name of the station, the name of the artist,
and the title of the track are displayed.
Notes
If no signal can be received for more than 4 sec-
onds, a message appears on the Control Dis-
play.
Reception may not be possible for certain
reasons, e.g. environmental influences or
topographical conditions. The satellite radio
has no influence on this.
The signal may not be available in tunnels or
underground garages, next to tall buildings,
near trees, mountains or other powerful
sources of radio interference.
Reception is usually possible again as soon as
the signal is available once more.<
Storing a station
1.Select "SAT" and press the controller.
2.Select "Channels" and press the controller.
3.Select the desired station.
4.Select "STORE" and press the controller.
The list of stored stations appears on the
display.
5.Select the desired station.
6.Turn the controller until you reach the
desired memory position. {Satellite Radio} or {SDARS}.
>{Previous station} or {Next station}
>{Previous} or {Next}.
1.{Satellite Radio} or {SDARS}.
2.{Station 1...12}.
Page 184 of 254

Getting started
182 2.Remove the protective cap from the mobile
phone's antenna connector if necessary, so
that the mobile phone can engage in the
snap-in adapter.
3.Push the mobile phone downward toward
the electrical connections, arrow1, and
press forward, arrow2, until it engages.
The battery is charged starting from radio ready
state of the vehicle, refer to charge indicator on
mobile phone.
Removing mobile phone
To remove mobile phone, depending on model:
>Press the button.
>Push the button upward.
Pairing mobile phone with
vehicle
To pair your mobile phone with the vehicle, you
need a special Bluetooth passkey. This is
included in the information kit.
The following prerequisites must be met:
>The ignition is switched on.
>The mobile phone is ready for operation.>The Bluetooth connections in the vehicle
and the mobile phone are activated.
>Depending on the mobile phone model,
certain presets are required on the mobile
phone, e.g. detecting, connecting or pairing
Bluetooth unit, refer to the operating
instructions of your mobile phone.
Only pair the mobile phone with the vehi-
cle stopped; otherwise, the passengers
and other road user can be endangered due to a
lack of attentiveness on the part of the driver.<
Preparation via iDrive
iDrive, for principle details, refer to page16.
1.Press the button to open the start
menu.
2.Move the controller toward "Settings".
3.Select "Phone" and press the controller.
4.Select "PAIRING" and press the controller.
The three LEDs in the status line flash, refer
to page20.
The mobile phone can also be paired
with the vehicle via "Communica-
tion". When pairing, follow the instructions
that appear in the Control Display.<
Establishing connection between
mobile phone and vehicle
5.Additional operations must be carried out
on the mobile phone and differ depending
on the model, refer to the operating instruc-
tions of your mobile phone, e.g. under
searching for, connecting to, or linking to a
Bluetooth device.
6.Enter and confirm Bluetooth passkey using
your mobile phone keypad.
Following successful logon, the name of