2007 BMW 750I SEDAN light
[x] Cancel search: lightPage 61 of 254
Controls
59Reference
At a glance
Driving tips
Communications
Navigation
Entertainment
Mobility
It is only possible to disengage the parking
brake with the ignition on.
If exceptional circumstances should make it
necessary to engage the parking brake while
the vehicle is in motion, maintain pressure on
the button.
The indicator lamp on the Info Display lights up
in red, a chime sounds, and the brake lamps
light up.
The vehicle continues to brake forcefully for as
long as you maintain pressure on the button.
When you brake the vehicle almost to a stop,
i.e., down to a speed of approximately 2 mph/
3 km/h or below, the parking brake remains
engaged.
Manual release
Briefly press the button with the ignition
switched on.
The indicator lamp on the Info Display goes
out.
As long as the remote control is inserted
into the ignition lock, you can also release
the parking brake after the engine has been
switched off. This function is useful, for exam-
ple, in automatic car washes, refer to
page123<
When leaving the vehicle, always bring
the remote control with you; this precau-
tion prevents children from disengaging the
parking brake, for example.<
Automatic Hold
You can activate the system after starting the
engine; it then remains operational until the
next time the engine is switched off.
This feature provides additional assistance dur-
ing vehicle operation by automatically engaging
and releasing the parking brake during stops at
traffic lights, in stop-and-go traffic, etc. The
vehicle is automatically held in place so as to
suppress the tendency to creep when the
transmission is in drive.
It also prevents the vehicle from rolling back-
ward during uphill starts.
The parking brake engages automatically when
you stop the vehicle and switch off the engine.You can activate or deactivate Automatic Hold
via the "Settings" menu in iDrive.
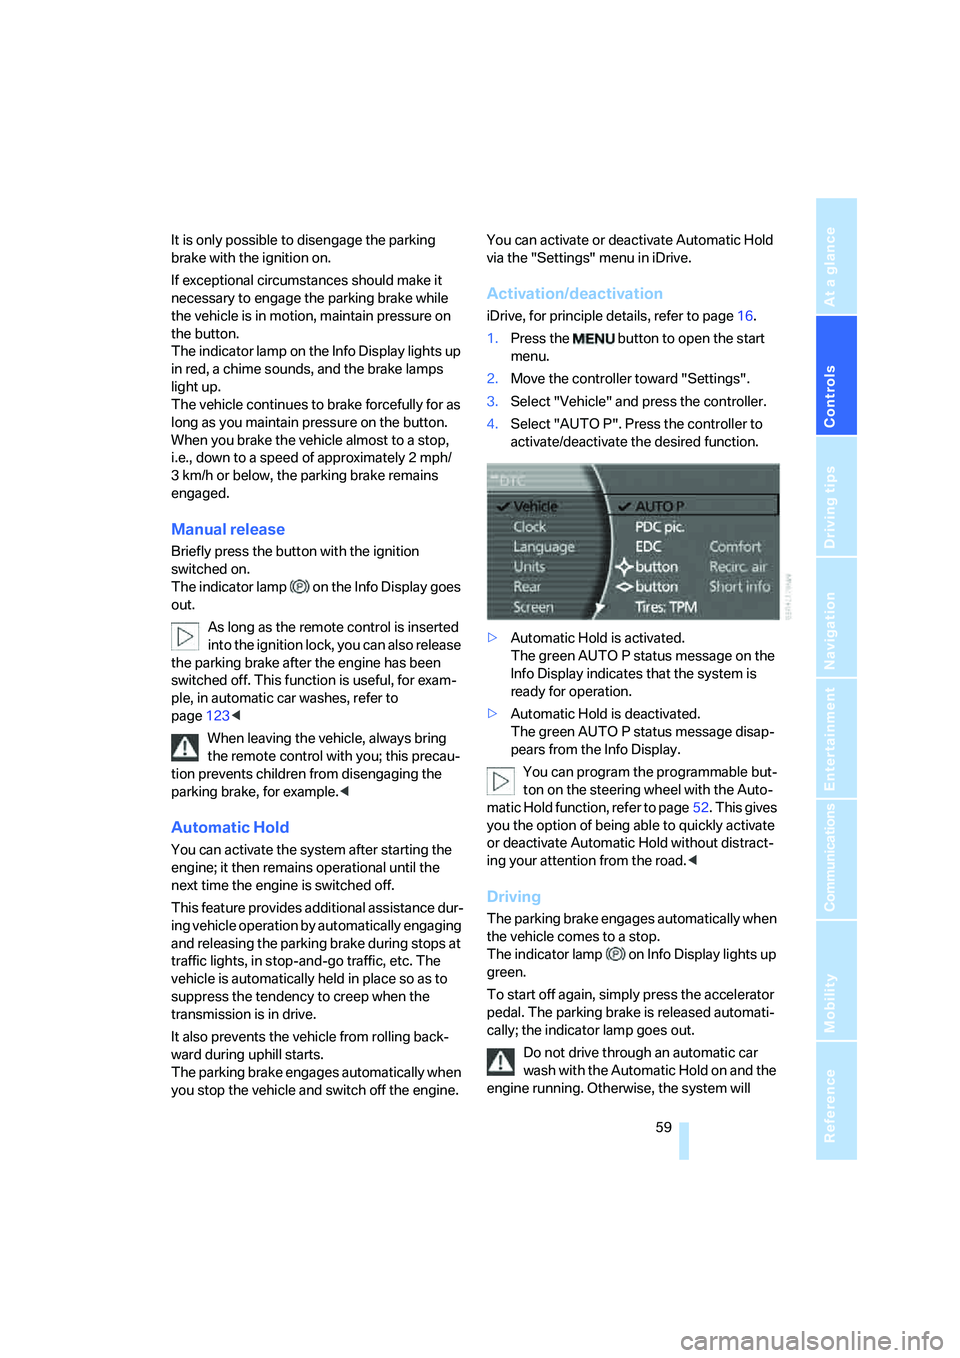
Activation/deactivation
iDrive, for principle details, refer to page16.
1.Press the button to open the start
menu.
2.Move the controller toward "Settings".
3.Select "Vehicle" and press the controller.
4.Select "AUTO P". Press the controller to
activate/deactivate the desired function.
>Automatic Hold is activated.
The green AUTO P status message on the
Info Display indicates that the system is
ready for operation.
>Automatic Hold is deactivated.
The green AUTO P status message disap-
pears from the Info Display.
You can program the programmable but-
ton on the steering wheel with the Auto-
matic Hold function, refer to page52. This gives
you the option of being able to quickly activate
or deactivate Automatic Hold without distract-
ing your attention from the road.<
Driving
The parking brake engages automatically when
the vehicle comes to a stop.
The indicator lamp on Info Display lights up
green.
To start off again, simply press the accelerator
pedal. The parking brake is released automati-
cally; the indicator lamp goes out.
Do not drive through an automatic car
wash with the Automatic Hold on and the
engine running. Otherwise, the system will
Page 63 of 254
Controls
61Reference
At a glance
Driving tips
Communications
Navigation
Entertainment
Mobility
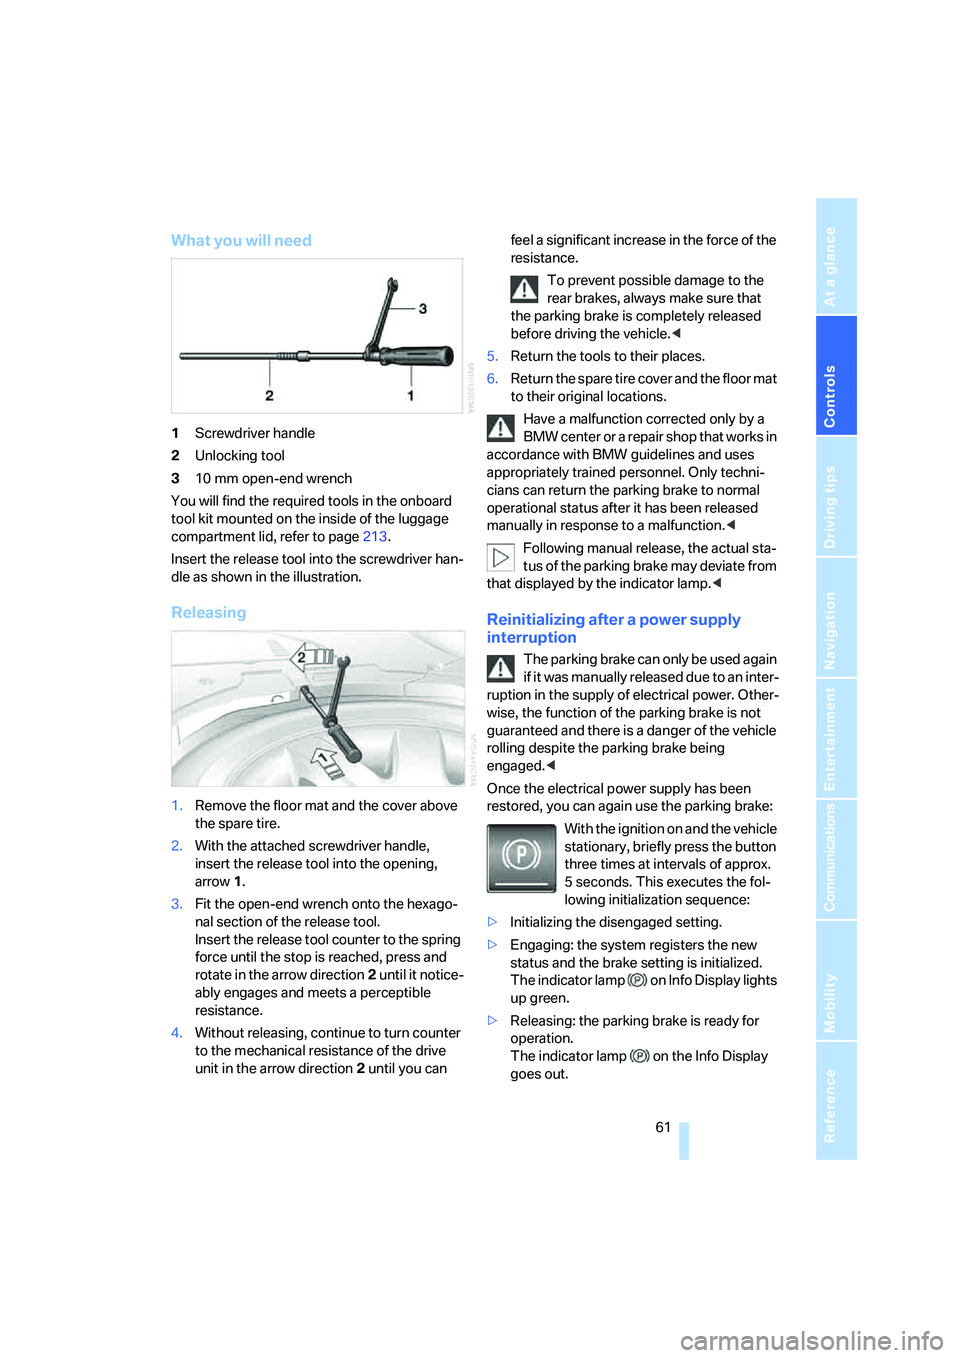
What you will need
1Screwdriver handle
2Unlocking tool
310 mm open-end wrench
You will find the required tools in the onboard
tool kit mounted on the inside of the luggage
compartment lid, refer to page213.
Insert the release tool into the screwdriver han-
dle as shown in the illustration.
Releasing
1.Remove the floor mat and the cover above
the spare tire.
2.With the attached screwdriver handle,
insert the release tool into the opening,
arrow1.
3.Fit the open-end wrench onto the hexago-
nal section of the release tool.
Insert the release tool counter to the spring
force until the stop is reached, press and
rotate in the arrow direction2 until it notice-
ably engages and meets a perceptible
resistance.
4.Without releasing, continue to turn counter
to the mechanical resistance of the drive
unit in the arrow direction 2 until you can feel a significant increase in the force of the
resistance.
To prevent possible damage to the
rear brakes, always make sure that
the parking brake is completely released
before driving the vehicle.<
5.Return the tools to their places.
6.Return the spare tire cover and the floor mat
to their original locations.
Have a malfunction corrected only by a
BMW center or a repair shop that works in
accordance with BMW guidelines and uses
appropriately trained personnel. Only techni-
cians can return the parking brake to normal
operational status after it has been released
manually in response to a malfunction.<
Following manual release, the actual sta-
tus of the parking brake may deviate from
that displayed by the indicator lamp.<
Reinitializing after a power supply
interruption
The parking brake can only be used again
if it was manually released due to an inter-
ruption in the supply of electrical power. Other-
wise, the function of the parking brake is not
guaranteed and there is a danger of the vehicle
rolling despite the parking brake being
engaged.<
Once the electrical power supply has been
restored, you can again use the parking brake:
With the ignition on and the vehicle
stationary, briefly press the button
three times at intervals of approx.
5 seconds. This executes the fol-
lowing initialization sequence:
>Initializing the disengaged setting.
>Engaging: the system registers the new
status and the brake setting is initialized.
The indicator lamp on Info Display lights
up green.
>Releasing: the parking brake is ready for
operation.
The indicator lamp on the Info Display
goes out.
Page 64 of 254
Driving
62
Automatic transmission with
Steptronic
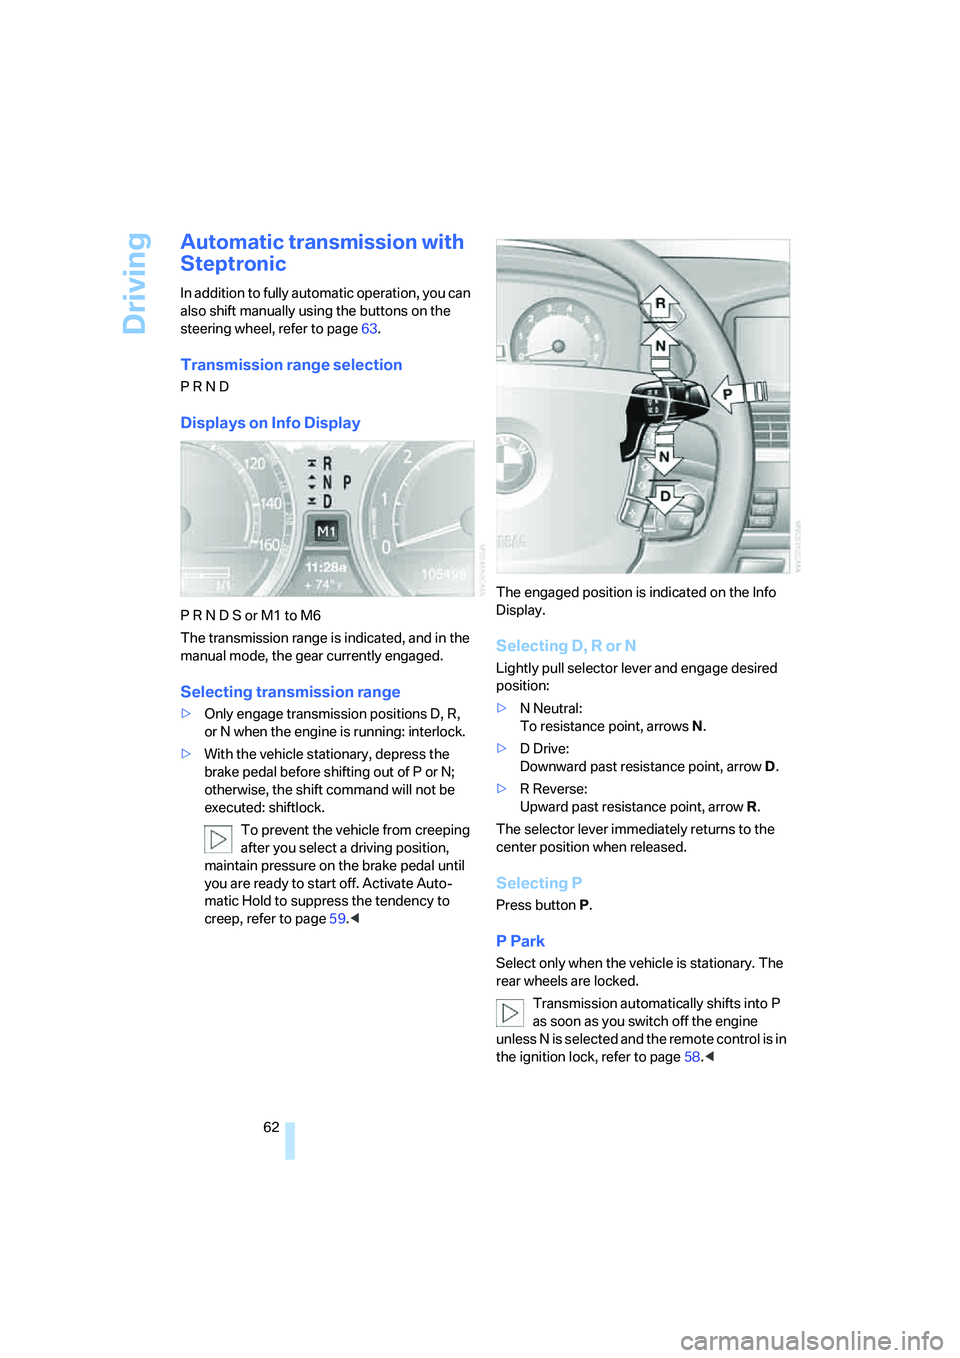
In addition to fully automatic operation, you can
also shift manually using the buttons on the
steering wheel, refer to page63.
Transmission range selection
P R N D
Displays on Info Display
P R N D S or M1 to M6
The transmission range is indicated, and in the
manual mode, the gear currently engaged.
Selecting transmission range
>Only engage transmission positions D, R,
or N when the engine is running: interlock.
>With the vehicle stationary, depress the
brake pedal before shifting out of P or N;
otherwise, the shift command will not be
executed: shiftlock.
To prevent the vehicle from creeping
after you select a driving position,
maintain pressure on the brake pedal until
you are ready to start off. Activate Auto-
matic Hold to suppress the tendency to
creep, refer to page59.
Selecting D, R or N
Lightly pull selector lever and engage desired
position:
>N Neutral:
To resistance point, arrowsN.
>D Drive:
Downward past resistance point, arrowD.
>R Reverse:
Upward past resistance point, arrowR.
The selector lever immediately returns to the
center position when released.
Selecting P
Press button P.
P Park
Select only when the vehicle is stationary. The
rear wheels are locked.
Transmission automatically shifts into P
as soon as you switch off the engine
unless N is selected and the remote control is in
the ignition lock, refer to page58.<
Page 68 of 254
Driving
66
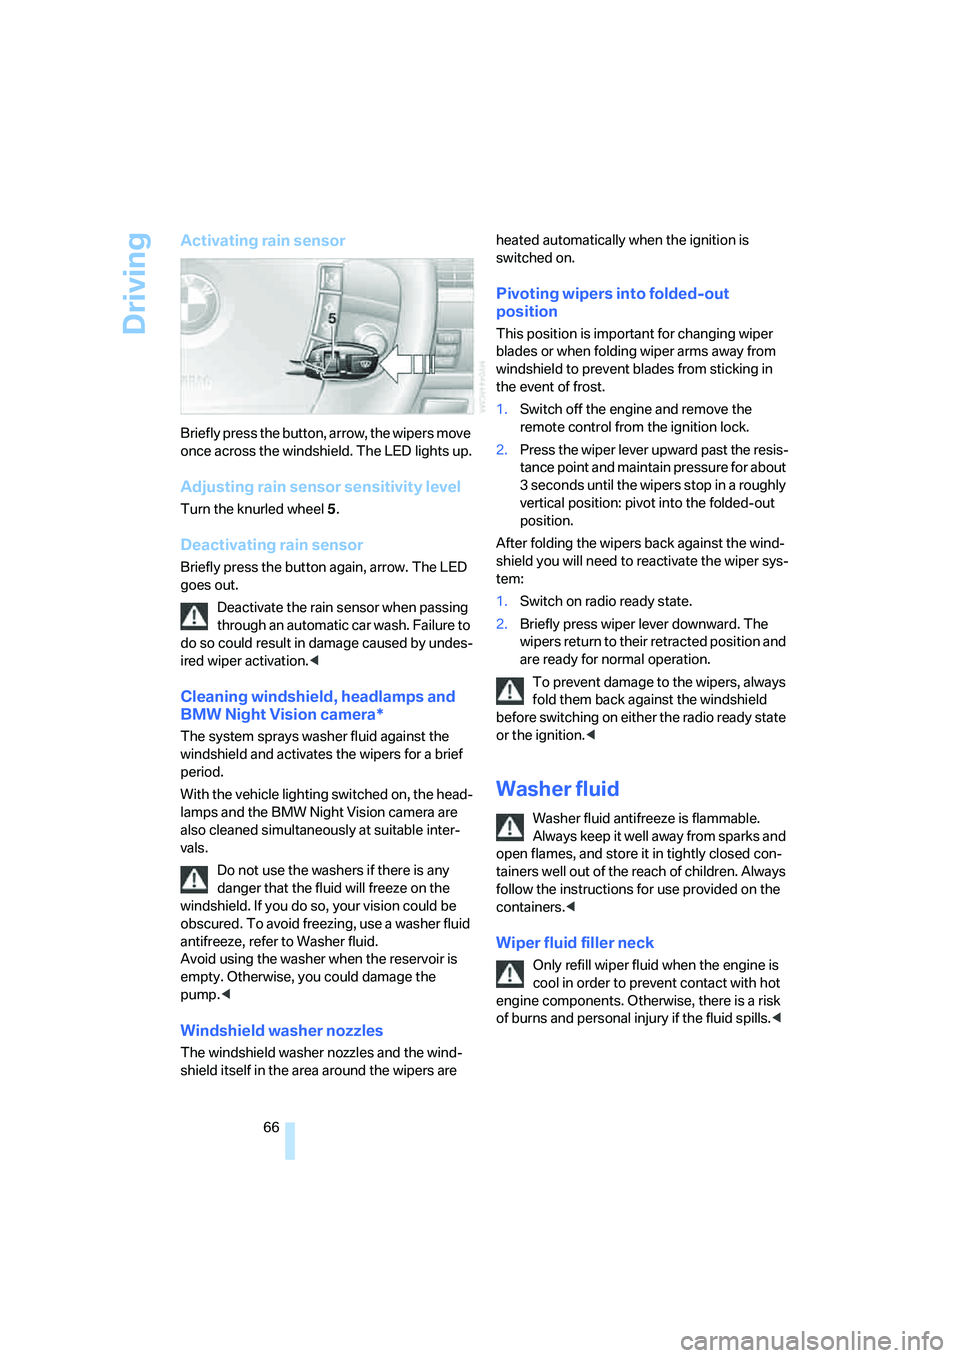
Activating rain sensor
Briefly press the button, arrow, the wipers move
once across the windshield. The LED lights up.
Adjusting rain sensor sensitivity level
Turn the knurled wheel 5.
Deactivating rain sensor
Briefly press the button again, arrow. The LED
goes out.
Deactivate the rain sensor when passing
through an automatic car wash. Failure to
do so could result in damage caused by undes-
ired wiper activation.<
Cleaning windshield, headlamps and
BMW Night Vision camera*
The system sprays washer fluid against the
windshield and activates the wipers for a brief
period.
With the vehicle lighting switched on, the head-
lamps and the BMW Night Vision camera are
also cleaned simultaneously at suitable inter-
vals.
Do not use the washers if there is any
danger that the fluid will freeze on the
windshield. If you do so, your vision could be
obscured. To avoid freezing, use a washer fluid
antifreeze, refer to Washer fluid.
Avoid using the washer when the reservoir is
empty. Otherwise, you could damage the
pump.<
Windshield washer nozzles
The windshield washer nozzles and the wind-
shield itself in the area around the wipers are heated automatically when the ignition is
switched on.
Pivoting wipers into folded-out
position
This position is important for changing wiper
blades or when folding wiper arms away from
windshield to prevent blades from sticking in
the event of frost.
1.Switch off the engine and remove the
remote control from the ignition lock.
2.Press the wiper lever upward past the resis-
tance point and maintain pressure for about
3 seconds until the wipers stop in a roughly
vertical position: pivot into the folded-out
position.
After folding the wipers back against the wind-
shield you will need to reactivate the wiper sys-
tem:
1.Switch on radio ready state.
2.Briefly press wiper lever downward. The
wipers return to their retracted position and
are ready for normal operation.
To prevent damage to the wipers, always
fold them back against the windshield
before switching on either the radio ready state
or the ignition.<
Washer fluid
Washer fluid antifreeze is flammable.
Always keep it well away from sparks and
open flames, and store it in tightly closed con-
tainers well out of the reach of children. Always
follow the instructions for use provided on the
containers.<
Wiper fluid filler neck
Only refill wiper fluid when the engine is
cool in order to prevent contact with hot
engine components. Otherwise, there is a risk
of burns and personal injury if the fluid spills.<
Page 71 of 254
Controls
69Reference
At a glance
Driving tips
Communications
Navigation
Entertainment
Mobility
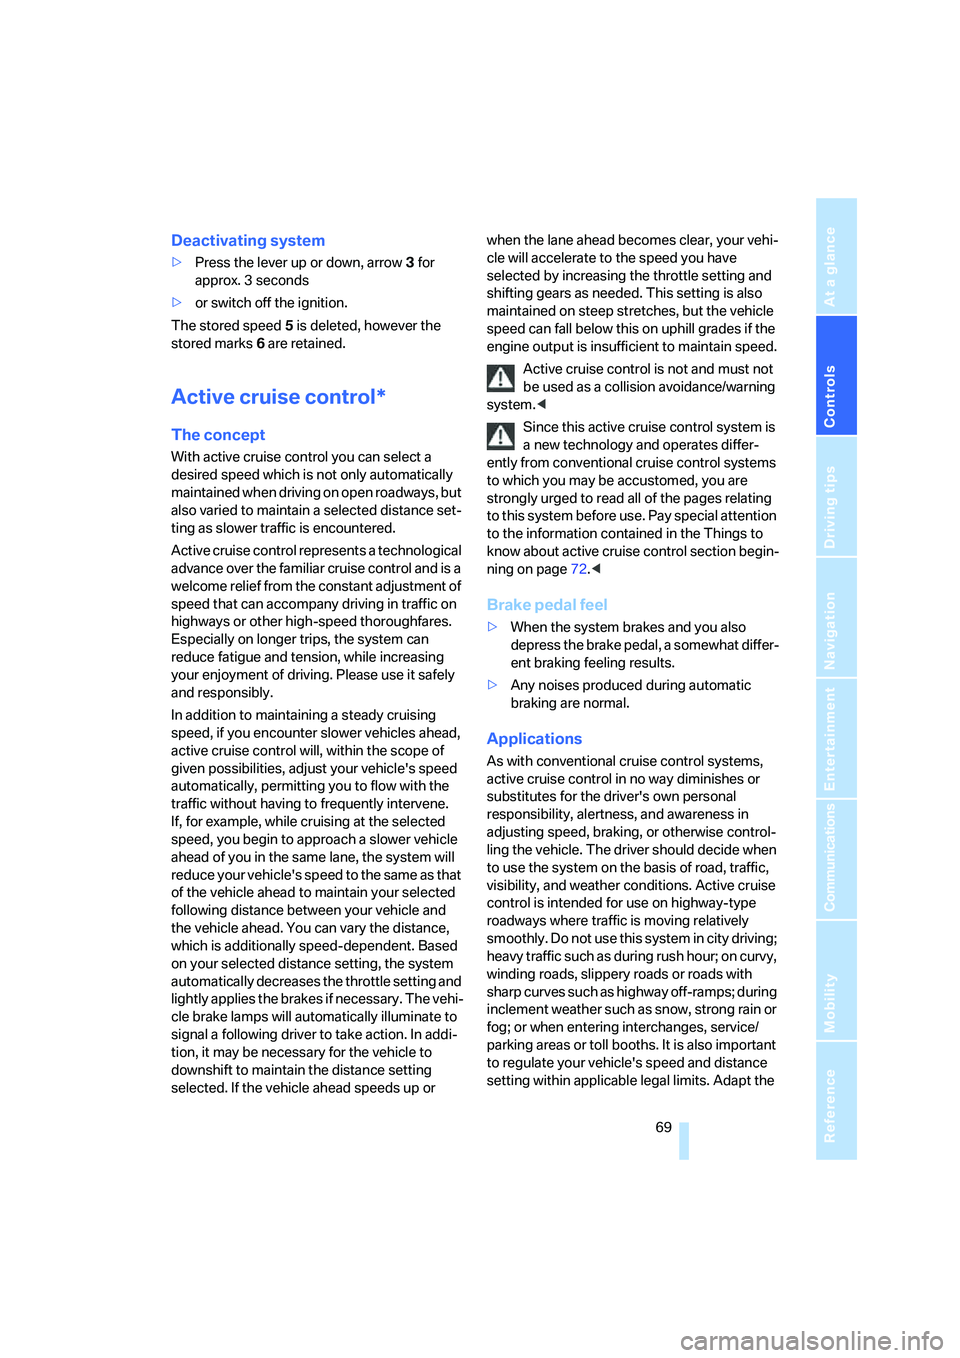
Deactivating system
>Press the lever up or down, arrow3 for
approx. 3 seconds
>or switch off the ignition.
The stored speed5 is deleted, however the
stored marks6 are retained.
Active cruise control*
The concept
With active cruise control you can select a
desired speed which is not only automatically
maintained when driving on open roadways, but
also varied to maintain a selected distance set-
ting as slower traffic is encountered.
Active cruise control represents a technological
advance over the familiar cruise control and is a
welcome relief from the constant adjustment of
speed that can accompany driving in traffic on
highways or other high-speed thoroughfares.
Especially on longer trips, the system can
reduce fatigue and tension, while increasing
your enjoyment of driving. Please use it safely
and responsibly.
In addition to maintaining a steady cruising
speed, if you encounter slower vehicles ahead,
active cruise control will, within the scope of
given possibilities, adjust your vehicle's speed
automatically, permitting you to flow with the
traffic without having to frequently intervene.
If, for example, while cruising at the selected
speed, you begin to approach a slower vehicle
ahead of you in the same lane, the system will
reduce your vehicle's speed to the same as that
of the vehicle ahead to maintain your selected
following distance between your vehicle and
the vehicle ahead. You can vary the distance,
which is additionally speed-dependent. Based
on your selected distance setting, the system
automatically decreases the throttle setting and
lightly applies the brakes if necessary. The vehi-
cle brake lamps will automatically illuminate to
signal a following driver to take action. In addi-
tion, it may be necessary for the vehicle to
downshift to maintain the distance setting
selected. If the vehicle ahead speeds up or when the lane ahead becomes clear, your vehi-
cle will accelerate to the speed you have
selected by increasing the throttle setting and
shifting gears as needed. This setting is also
maintained on steep stretches, but the vehicle
speed can fall below this on uphill grades if the
engine output is insufficient to maintain speed.
Active cruise control is not and must not
be used as a collision avoidance/warning
system.<
Since this active cruise control system is
a new technology and operates differ-
ently from conventional cruise control systems
to which you may be accustomed, you are
strongly urged to read all of the pages relating
to this system before use. Pay special attention
to the information contained in the Things to
know about active cruise control section begin-
ning on page72.<
Brake pedal feel
>When the system brakes and you also
depress the brake pedal, a somewhat differ-
ent braking feeling results.
>Any noises produced during automatic
braking are normal.
Applications
As with conventional cruise control systems,
active cruise control in no way diminishes or
substitutes for the driver's own personal
responsibility, alertness, and awareness in
adjusting speed, braking, or otherwise control-
ling the vehicle. The driver should decide when
to use the system on the basis of road, traffic,
visibility, and weather conditions. Active cruise
control is intended for use on highway-type
roadways where traffic is moving relatively
smoothly. Do not use this system in city driving;
heavy traffic such as during rush hour; on curvy,
winding roads, slippery roads or roads with
sharp curves such as highway off-ramps; during
inclement weather such as snow, strong rain or
fog; or when entering interchanges, service/
parking areas or toll booths. It is also important
to regulate your vehicle's speed and distance
setting within applicable legal limits. Adapt the
Page 73 of 254
Controls
71Reference
At a glance
Driving tips
Communications
Navigation
Entertainment
Mobility
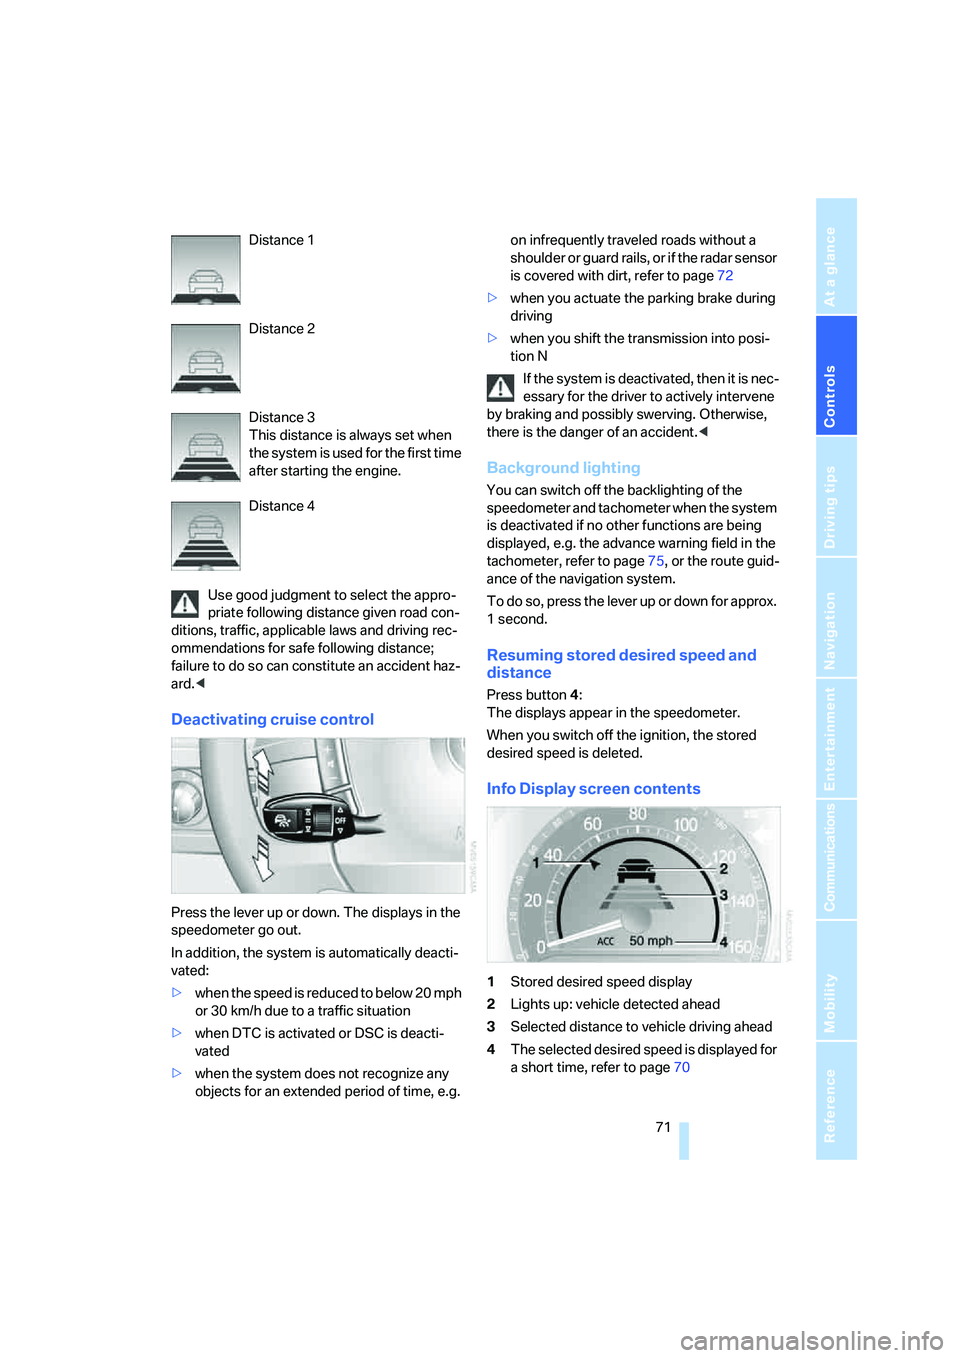
Distance 1
Distance 2
Distance 3
This distance is always set when
the system is used for the first time
after starting the engine.
Distance 4
Use good judgment to select the appro-
priate following distance given road con-
ditions, traffic, applicable laws and driving rec-
ommendations for safe following distance;
failure to do so can constitute an accident haz-
ard.<
Deactivating cruise control
Press the lever up or down. The displays in the
speedometer go out.
In addition, the system is automatically deacti-
vated:
>when the speed is reduced to below 20 mph
or 30 km/h due to a traffic situation
>when DTC is activated or DSC is deacti-
vated
>when the system does not recognize any
objects for an extended period of time, e.g. on infrequently traveled roads without a
shoulder or guard rails, or if the radar sensor
is covered with dirt, refer to page72
>when you actuate the parking brake during
driving
>when you shift the transmission into posi-
tion N
If the system is deactivated, then it is nec-
essary for the driver to actively intervene
by braking and possibly swerving. Otherwise,
there is the danger of an accident.<
Background lighting
You can switch off the backlighting of the
speedometer and tachometer when the system
is deactivated if no other functions are being
displayed, e.g. the advance warning field in the
tachometer, refer to page75, or the route guid-
ance of the navigation system.
To do so, press the lever up or down for approx.
1second.
Resuming stored desired speed and
distance
Press button4:
The displays appear in the speedometer.
When you switch off the ignition, the stored
desired speed is deleted.
Info Display screen contents
1Stored desired speed display
2Lights up: vehicle detected ahead
3Selected distance to vehicle driving ahead
4The selected desired speed is displayed for
a short time, refer to page70
Page 75 of 254
Controls
73Reference
At a glance
Driving tips
Communications
Navigation
Entertainment
Mobility
of you, for example when approaching a traffic
light or a parked vehicle. Also, the system does
not react to oncoming traffic, pedestrians or
other types of potential traffic such as a rider on
horseback. It is also possible that the system
may not detect smaller moving objects such as
motorcycles or bicycles. Be especially alert
when encountering any of these situations as
the system will neither automatically brake, nor
provide a warning to you. Also, be aware that
every decrease in the distance setting allows
your vehicle to come closer to a vehicle in front
of you and requires a heightened amount of
alertness.<
When your vehicle is actively following a vehicle
in front of you, if the vehicle ahead speeds up or
the lane ahead becomes clear, then your vehi-
cle will accelerate to the speed you have
selected. Be aware that changing to a clear,
unobstructed lane may also result in accelera-
tion of your vehicle.
Be certain to deactivate the system when
you pull into an exit lane for a highway off-
ramp.<
Also, vehicles traveling in a staggered manner
on a highway may cause a delay in the system's
reaction to a vehicle in front of you or may cause
the system to react to a vehicle actually in the
lane next to you. Always be ready to take action
or apply the brakes if necessary.
Active cruise control can only decelerate the
vehicle to approx. 20 mph/30 km/h. If the sys-
tem reduces vehicle speed below 20 mph/
30 km/h or if DSC/ABS is engaged while driving,
the system will automatically deactivate.
Remember, the system cannot stop your
vehicle. In addition, the system is deacti-
vated whenever the driver applies the vehicle
brakes, shifts the transmission from drive/D to
neutral/N, or deactivates DSC. After any deacti-
vation, the system will no longer automatically
activate the vehicle brakes, which means the
driver must intervene and resume manual brak-
ing. You should then reactivate the system only
when you are fully aware of the prior speed and
distance settings.
driver must constantly monitor traffic and inter-
vene if necessary.
When you switch off the engine or ignition,
active cruise control is fully switched off, too,
and any settings you have selected are can-
celed.
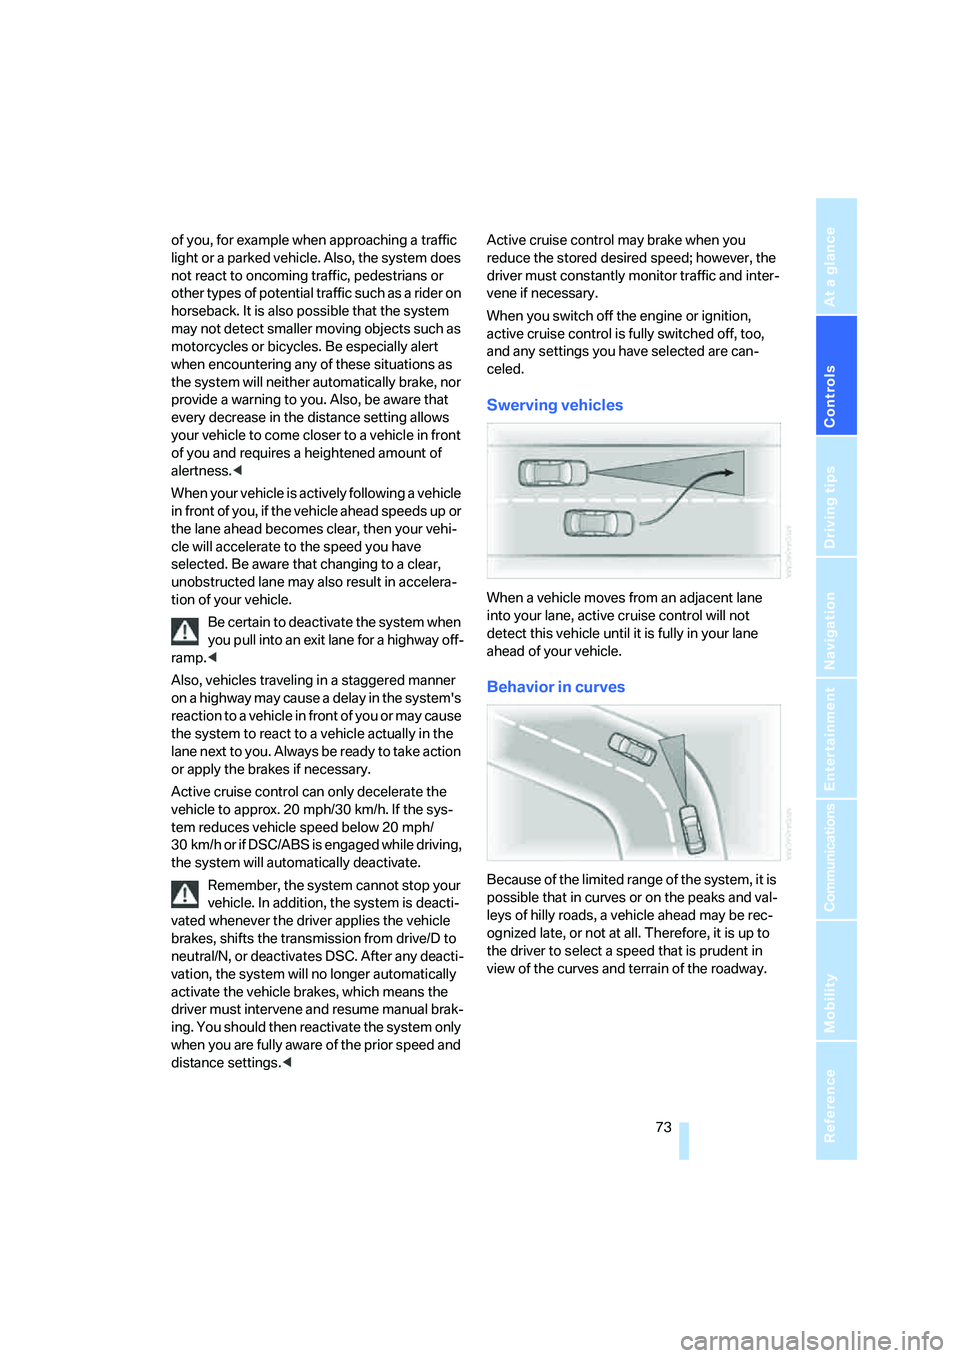
Swerving vehicles
When a vehicle moves from an adjacent lane
into your lane, active cruise control will not
detect this vehicle until it is fully in your lane
ahead of your vehicle.
Behavior in curves
Because of the limited range of the system, it is
possible that in curves or on the peaks and val-
leys of hilly roads, a vehicle ahead may be rec-
ognized late, or not at all. Therefore, it is up to
the driver to select a speed that is prudent in
view of the curves and terrain of the roadway.
Page 78 of 254
Everything under control
76
Coolant temperature
Should the coolant, and with it the engine
become too hot, a warning lamp lights up. In
addition, a message appears on the Control
Display.
Checking coolant level, refer to page210.
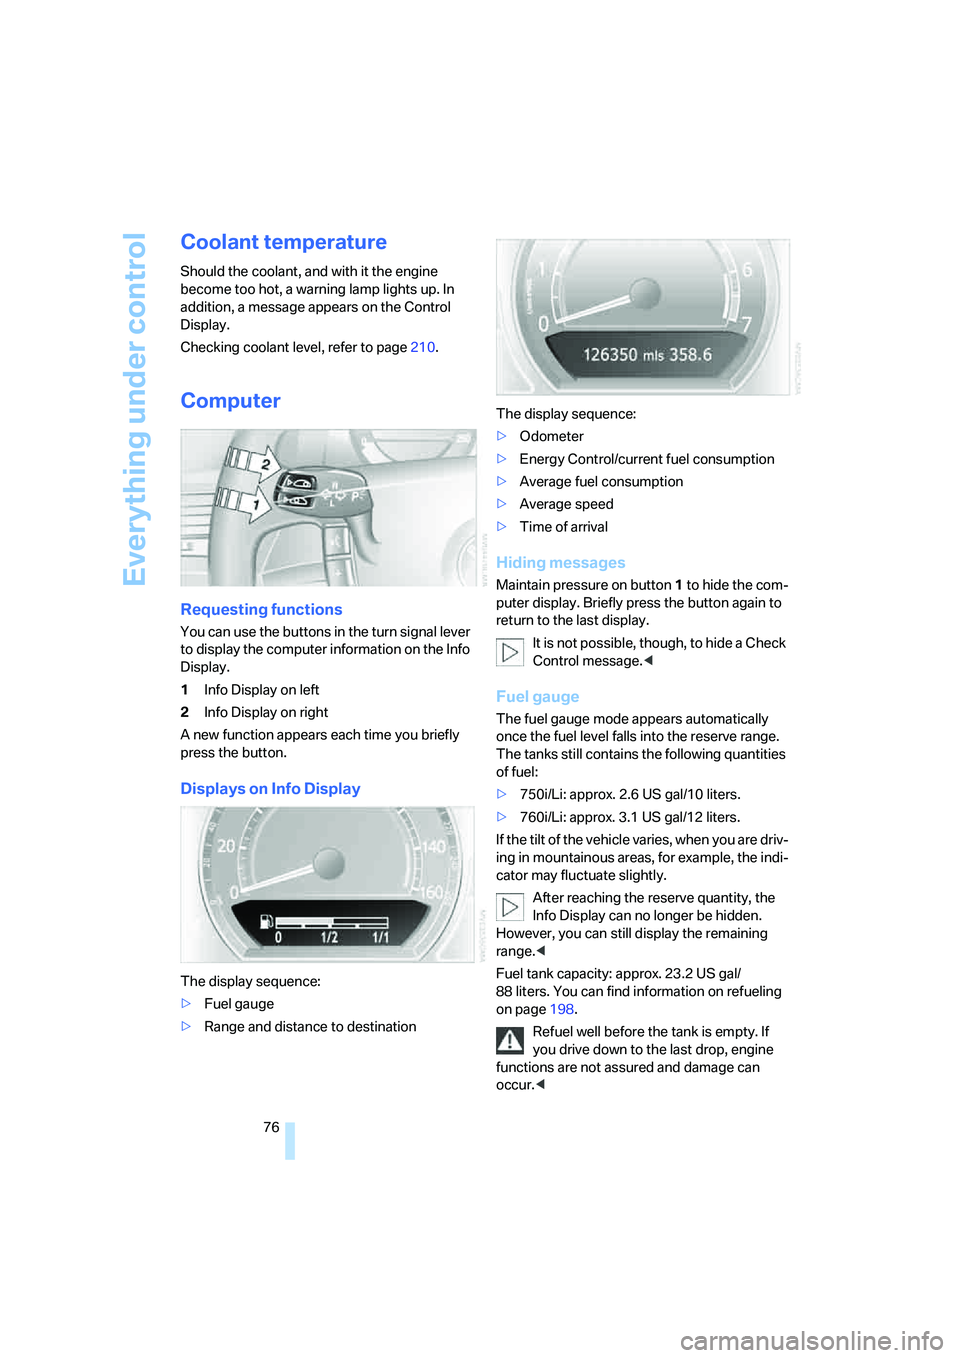
Computer
Requesting functions
You can use the buttons in the turn signal lever
to display the computer information on the Info
Display.
1Info Display on left
2Info Display on right
A new function appears each time you briefly
press the button.
Displays on Info Display
The display sequence:
>Fuel gauge
>Range and distance to destinationThe display sequence:
>Odometer
>Energy Control/current fuel consumption
>Average fuel consumption
>Average speed
>Time of arrival
Hiding messages
Maintain pressure on button1 to hide the com-
puter display. Briefly press the button again to
return to the last display.
It is not possible, though, to hide a Check
Control message.<
Fuel gauge
The fuel gauge mode appears automatically
once the fuel level falls into the reserve range.
The tanks still contains the following quantities
of fuel:
>750i/Li: approx. 2.6 US gal/10 liters.
>760i/Li: approx. 3.1 US gal/12 liters.
If the tilt of the vehicle varies, when you are driv-
ing in mountainous areas, for example, the indi-
cator may fluctuate slightly.
After reaching the reserve quantity, the
Info Display can no longer be hidden.
However, you can still display the remaining
range.<
Fuel tank capacity: approx. 23.2 US gal/
88 liters. You can find information on refueling
on page198.
Refuel well before the tank is empty. If
you drive down to the last drop, engine
functions are not assured and damage can
occur.<