2007 BMW 750I audio
[x] Cancel search: audioPage 155 of 254
Navigation
Entertainment
Driving tips
153Reference
At a glance
Controls
Communications
Mobility
wheel, refer to page11, and via the voice com-
mand system
*, refer to page23.
Switching on/off
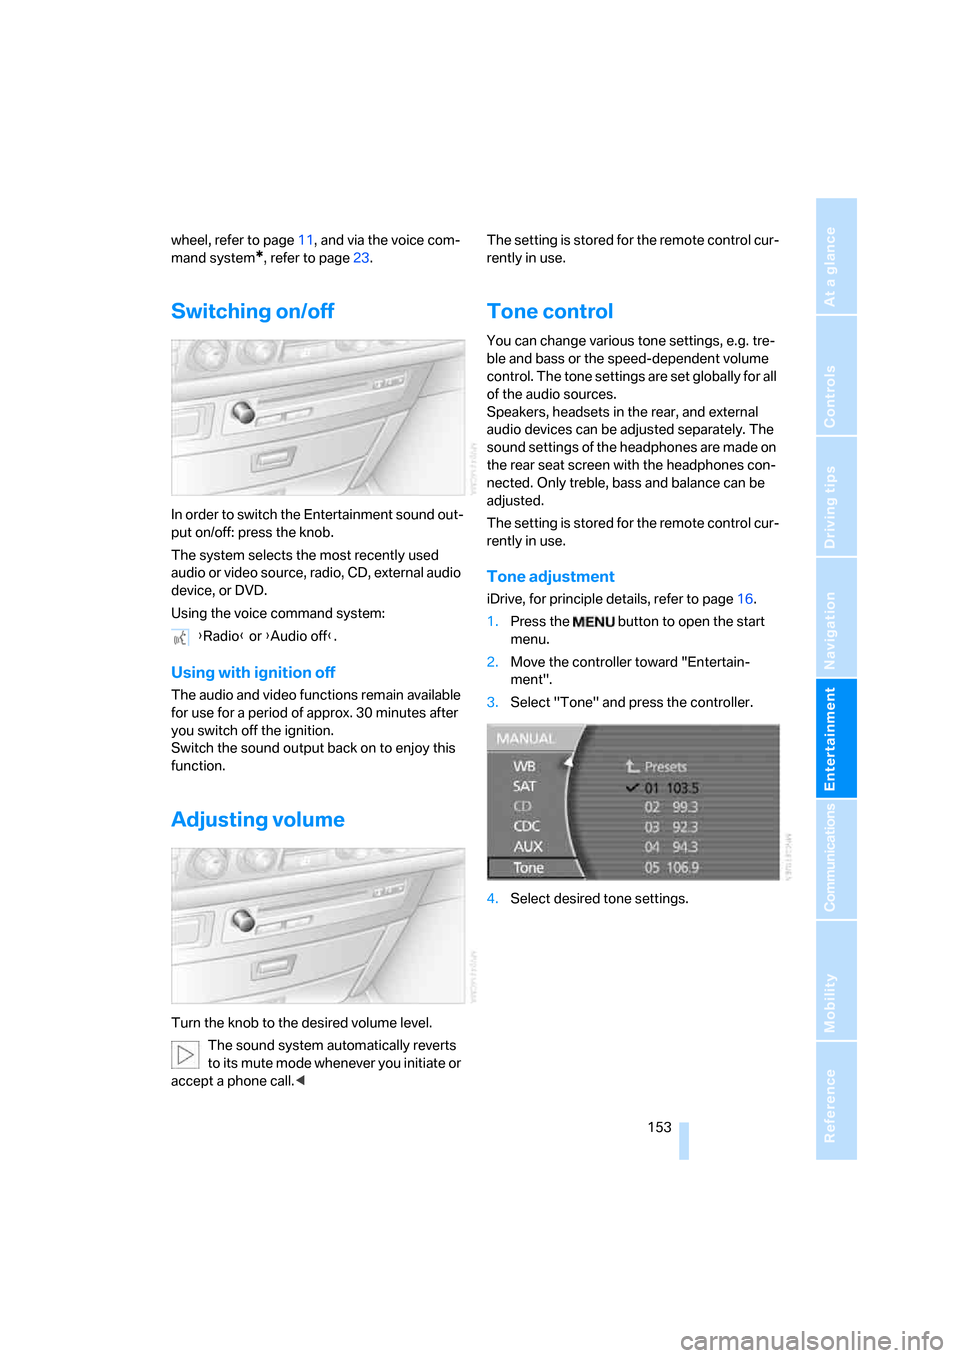
In order to switch the Entertainment sound out-
put on/off: press the knob.
The system selects the most recently used
audio or video source, radio, CD, external audio
device, or DVD.
Using the voice command system:
Using with ignition off
The audio and video functions remain available
for use for a period of approx. 30 minutes after
you switch off the ignition.
Switch the sound output back on to enjoy this
function.
Adjusting volume
Turn the knob to the desired volume level.
The sound system automatically reverts
to its mute mode whenever you initiate or
accept a phone call.
Tone control
You can change various tone settings, e.g. tre-
ble and bass or the speed-dependent volume
control. The tone settings are set globally for all
of the audio sources.
Speakers, headsets in the rear, and external
audio devices can be adjusted separately. The
sound settings of the headphones are made on
the rear seat screen with the headphones con-
nected. Only treble, bass and balance can be
adjusted.
The setting is stored for the remote control cur-
rently in use.
Tone adjustment
iDrive, for principle details, refer to page16.
1.Press the button to open the start
menu.
2.Move the controller toward "Entertain-
ment".
3.Select "Tone" and press the controller.
4.Select desired tone settings. {Radio} or {Audio off}.
Page 156 of 254
On/off and settings
154
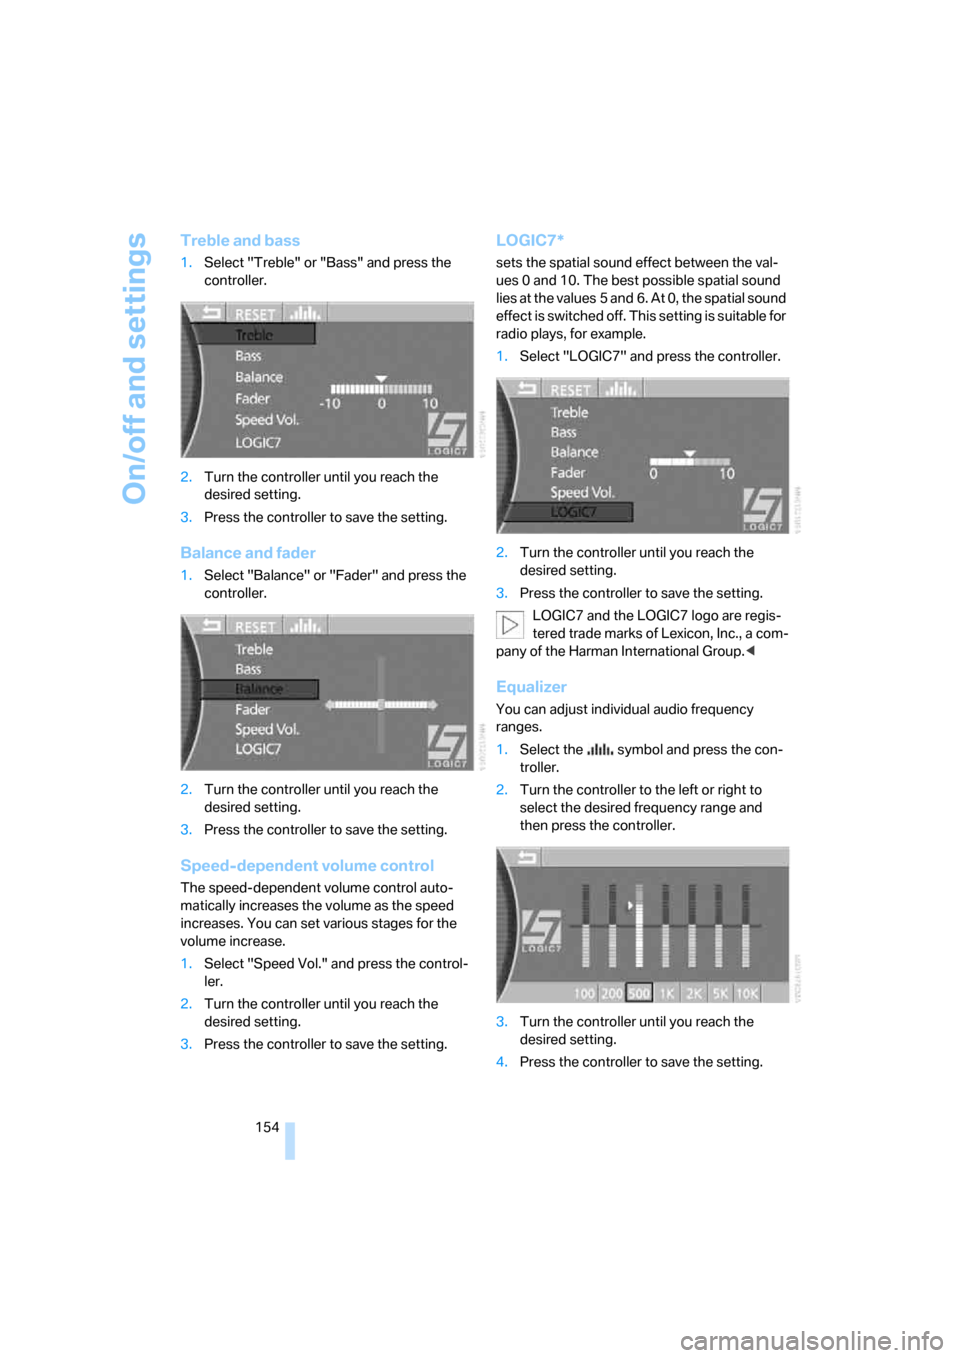
Treble and bass
1.Select "Treble" or "Bass" and press the
controller.
2.Turn the controller until you reach the
desired setting.
3.Press the controller to save the setting.
Balance and fader
1.Select "Balance" or "Fader" and press the
controller.
2.Turn the controller until you reach the
desired setting.
3.Press the controller to save the setting.
Speed-dependent volume control
The speed-dependent volume control auto-
matically increases the volume as the speed
increases. You can set various stages for the
volume increase.
1.Select "Speed Vol." and press the control-
ler.
2.Turn the controller until you reach the
desired setting.
3.Press the controller to save the setting.
LOGIC7*
sets the spatial sound effect between the val-
ues 0 and 10. The best possible spatial sound
lies at the values 5 and 6. At 0, the spatial sound
effect is switched off. This setting is suitable for
radio plays, for example.
1.Select "LOGIC7" and press the controller.
2.Turn the controller until you reach the
desired setting.
3.Press the controller to save the setting.
LOGIC7 and the LOGIC7 logo are regis-
tered trade marks of Lexicon, Inc., a com-
pany of the Harman International Group.<
Equalizer
You can adjust individual audio frequency
ranges.
1.Select the symbol and press the con-
troller.
2.Turn the controller to the left or right to
select the desired frequency range and
then press the controller.
3.Turn the controller until you reach the
desired setting.
4.Press the controller to save the setting.
Page 158 of 254

Radio
156
Radio
Your radio is equipped to receive the FM and
AM wavebands.
Listening to radio
Switch on audio or video sources, refer to
page153.
iDrive, for principle details, refer to page16.
1.Press the button to open the start
menu.
2.Move the controller toward "Entertain-
ment".
3.Select "FM" or "AM" and press the control-
ler.
Stations are shown on the Control Display on
the basis of various selection criteria, e.g. "Pre-
sets".
Using the voice command system:
Changing station
Using buttons in center console
Press the button for the corresponding
direction until you reach the next station.
Using the voice command system:
Using iDrive
FM waveband:
1.Select "FM" and press the controller.
2.Choose the selection criterion and press
the controller.
>"Autostore list":
Selection of "FM" stations within recep-
tion range during the last autostoring
procedure, refer to page158.
>"Presets":
Display of up to twelve stations that you
have previously stored, refer to
page158.
3.Turn the controller to select a station and
press the controller.
AM waveband
1.Select "AM" and press the controller.
2.Choose the selection criterion and press
the controller.
>"Presets":
Display of up to twelve stations that you
have previously stored, refer to
page158.
>"Autostore list":
Selection of stations in the "AM" wave-
band within reception range during the
last autostoring procedure. 1.{Radio}.
2.{FM} or {AM}.
1.{Radio}.
2.{Next station} or {Station back}.
Page 167 of 254
Navigation
Entertainment
Driving tips
165Reference
At a glance
Controls
Communications
Mobility
CD changer
Installation location
The BMW CD changer for six CDs is installed
above the glove compartment.
Compressed audio files
The CD changer can play CDs with compressed
audio files, such as MP3s.
Removing CD magazine
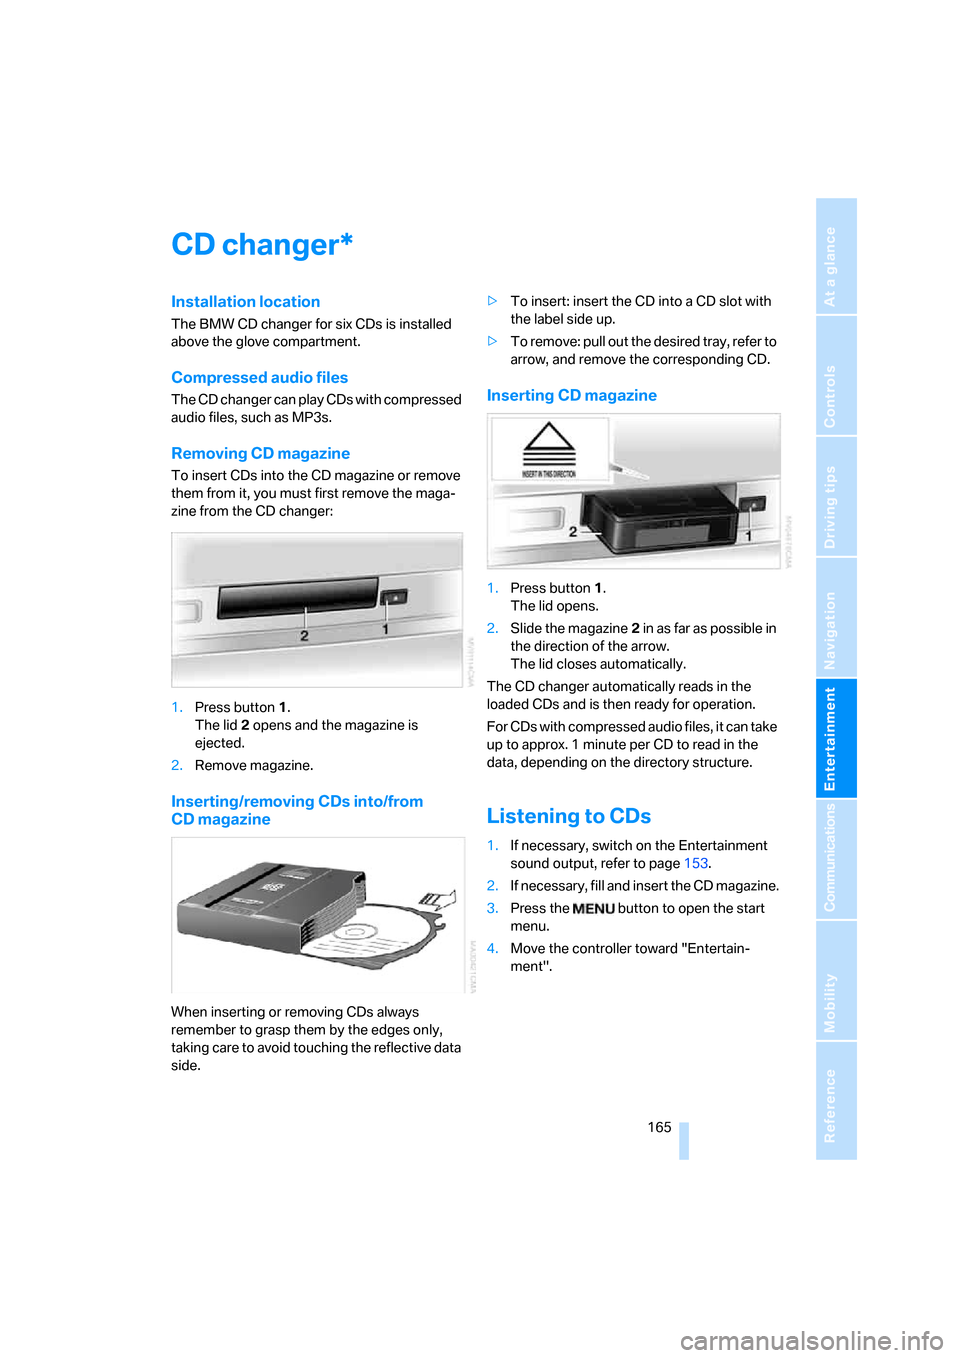
To insert CDs into the CD magazine or remove
them from it, you must first remove the maga-
zine from the CD changer:
1.Press button1.
The lid2 opens and the magazine is
ejected.
2.Remove magazine.
Inserting/removing CDs into/from
CD magazine
When inserting or removing CDs always
remember to grasp them by the edges only,
taking care to avoid touching the reflective data
side.>To insert: insert the CD into a CD slot with
the label side up.
>To remove: pull out the desired tray, refer to
arrow, and remove the corresponding CD.
Inserting CD magazine
1.Press button1.
The lid opens.
2.Slide the magazine2 in as far as possible in
the direction of the arrow.
The lid closes automatically.
The CD changer automatically reads in the
loaded CDs and is then ready for operation.
For CDs with compressed audio files, it can take
up to approx. 1 minute per CD to read in the
data, depending on the directory structure.
Listening to CDs
1.If necessary, switch on the Entertainment
sound output, refer to page153.
2.I f n ec e s s a r y, f il l a n d i n s e r t t h e C D m a g a z in e .
3.Press the button to open the start
menu.
4.Move the controller toward "Entertain-
ment".
*
Page 168 of 254
CD changer
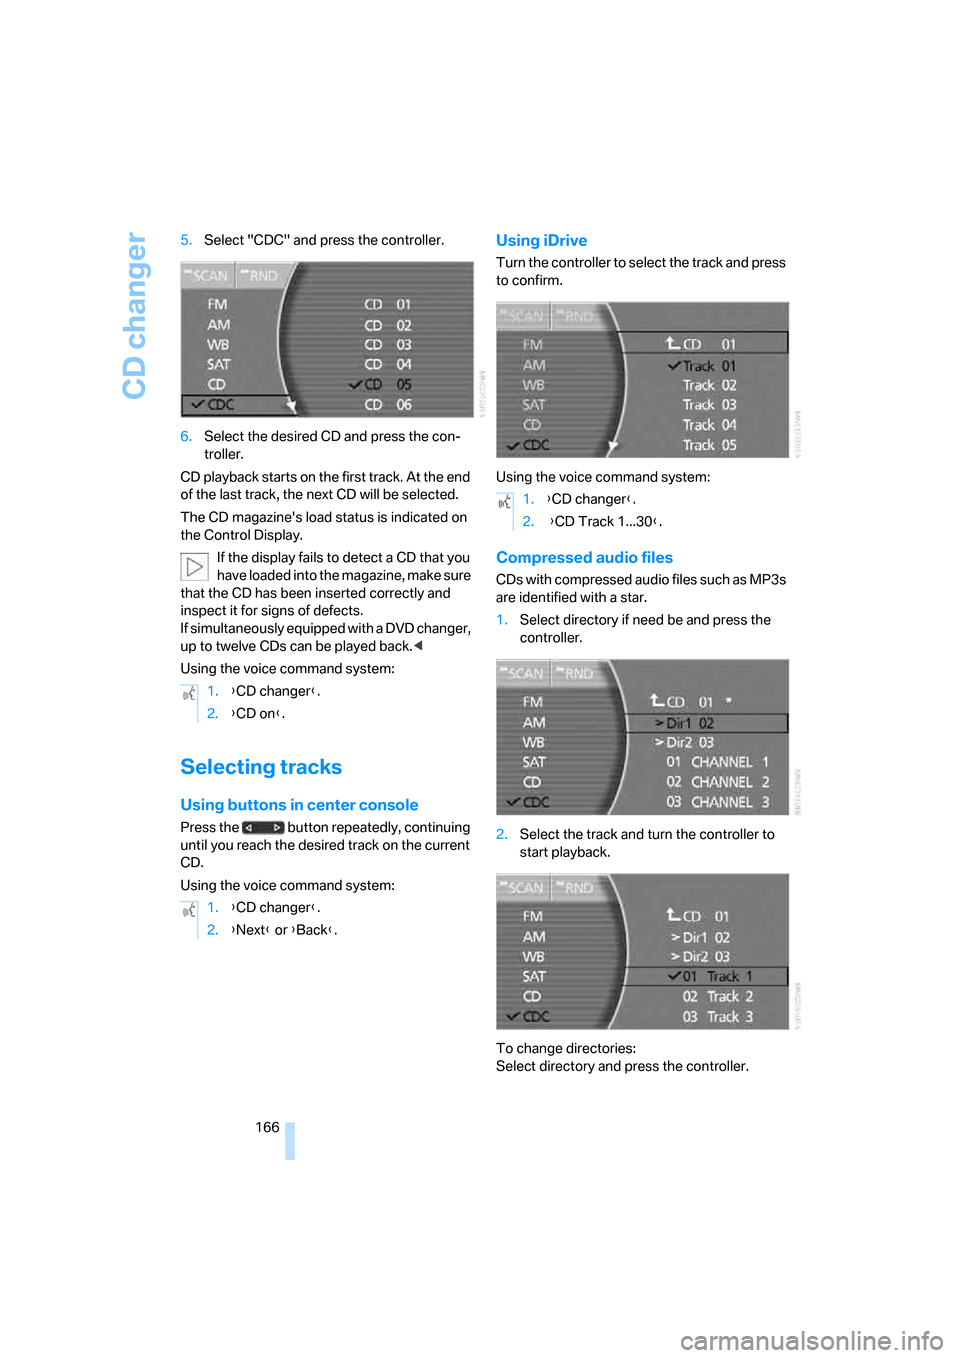
166 5.Select "CDC" and press the controller.
6.Select the desired CD and press the con-
troller.
CD playback starts on the first track. At the end
of the last track, the next CD will be selected.
The CD magazine's load status is indicated on
the Control Display.
If the display fails to detect a CD that you
have loaded into the magazine, make sure
that the CD has been inserted correctly and
inspect it for signs of defects.
If simultaneously equipped with a DVD changer,
up to twelve CDs can be played back.<
Using the voice command system:
Selecting tracks
Using buttons in center console
Press the button repeatedly, continuing
until you reach the desired track on the current
CD.
Using the voice command system:
Using iDrive
Turn the controller to select the track and press
to confirm.
Using the voice command system:
Compressed audio files
CDs with compressed audio files such as MP3s
are identified with a star.
1.Select directory if need be and press the
controller.
2.Select the track and turn the controller to
start playback.
To change directories:
Select directory and press the controller. 1.{CD changer}.
2.{CD on}.
1.{CD changer}.
2.{Next} or {Back}.
1.{CD changer}.
2. {CD Track 1...30}.
Page 169 of 254
Navigation
Entertainment
Driving tips
167Reference
At a glance
Controls
Communications
Mobility
Using the voice command system:
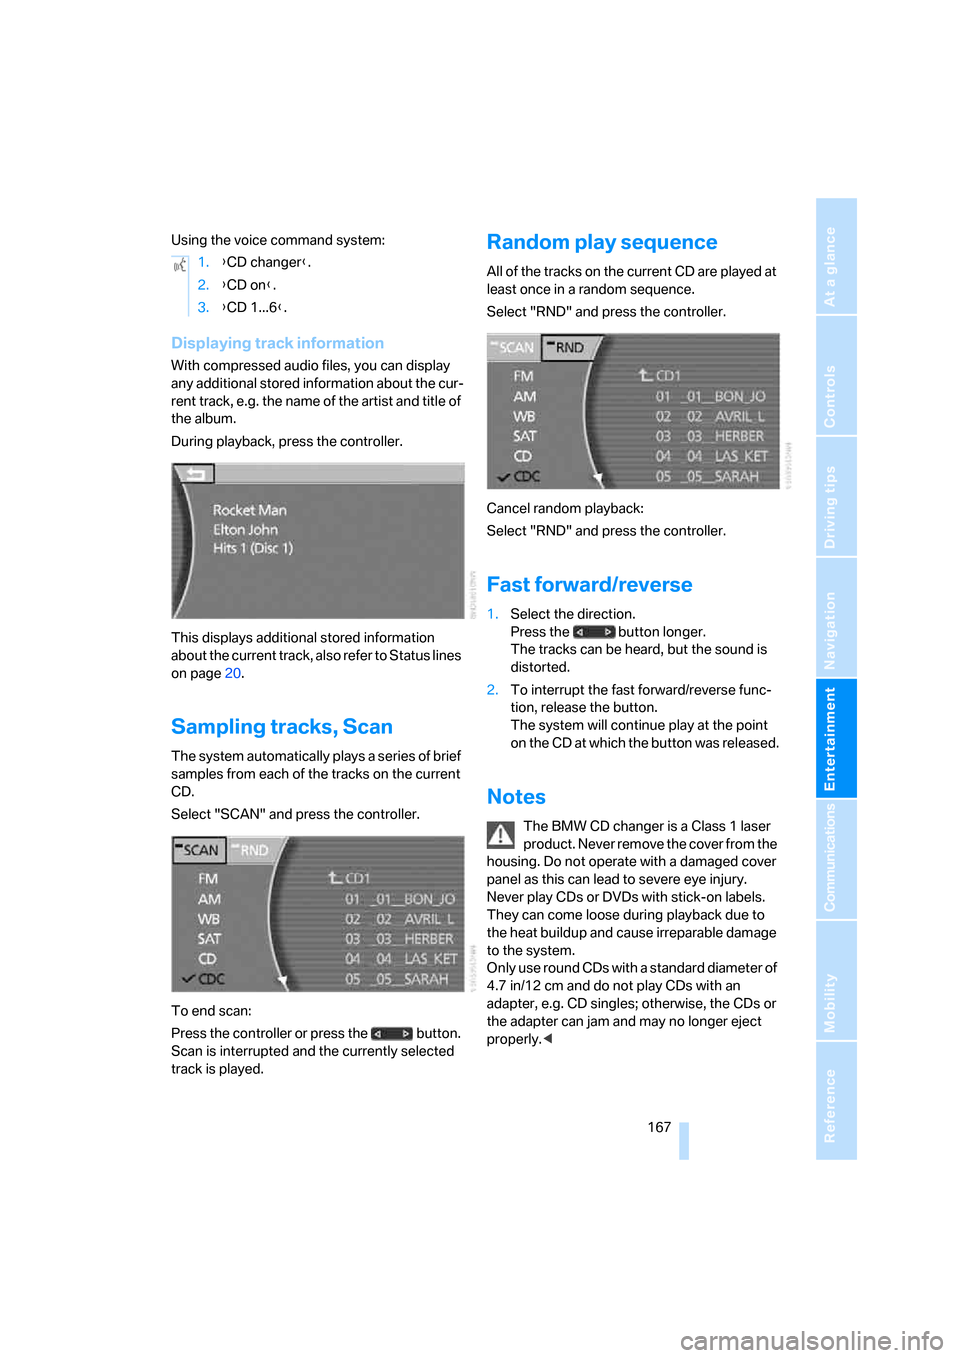
Displaying track information
With compressed audio files, you can display
any additional stored information about the cur-
rent track, e.g. the name of the artist and title of
the album.
During playback, press the controller.
This displays additional stored information
about the current track, also refer to Status lines
on page20.
Sampling tracks, Scan
The system automatically plays a series of brief
samples from each of the tracks on the current
CD.
Select "SCAN" and press the controller.
To end scan:
Press the controller or press the button.
Scan is interrupted and the currently selected
track is played.
Random play sequence
All of the tracks on the current CD are played at
least once in a random sequence.
Select "RND" and press the controller.
Cancel random playback:
Select "RND" and press the controller.
Fast forward/reverse
1.Select the direction.
Press the button longer.
The tracks can be heard, but the sound is
distorted.
2.To interrupt the fast forward/reverse func-
tion, release the button.
The system will continue play at the point
on the CD at which the button was released.
Notes
The BMW CD changer is a Class 1 laser
product. Never remove the cover from the
housing. Do not operate with a damaged cover
panel as this can lead to severe eye injury.
Never play CDs or DVDs with stick-on labels.
They can come loose during playback due to
the heat buildup and cause irreparable damage
to the system.
Only use round CDs with a standard diameter of
4.7 in/12 cm and do not play CDs with an
adapter, e.g. CD singles; otherwise, the CDs or
the adapter can jam and may no longer eject
properly.< 1.{CD changer}.
2.{CD on}.
3.{CD 1...6}.
Page 171 of 254

Navigation
Entertainment
Driving tips
169Reference
At a glance
Controls
Communications
Mobility
External audio device
You can connect an external audio device, for
instance an MP3 player, and output the sound
to vehicle's speaker system. You can adjust the
tone using iDrive.
It is recommended that the external audio
device be set to a mid-level volume and neutral
tone settings. The tone may depend on the
quality of the audio data.
Connecting
Fold the cover of the center armrest upward.
1Power supply for your external audio
device:
Socket with removable cap
2Connection for audio playback:
Jack 0.14 in/3,5 mm
For audio playback over the vehicle's speaker
system, connect the headset or line-out port of
the external device to connection 2.
Starting audio playback
The audio device must be switched on.
iDrive, for principle details, refer to page16.
1.Press the button to open the start
menu.
2.Move the controller toward "Entertain-
ment".
3.Select "AUX" and press the controller.
Adjusting volume
The volume at which the sound from the exter-
nal audio device is played back in the vehicle
depends on the audio device. If this volume dif-
fers sharply from that of the other audio and
video sources, then it makes sense to adjust the
volumes.
1.Select "AUX level" and press the controller.
2.Turn the controller to adjust the volume and
press the controller.
The volume setting is saved when the device is
disconnected from the vehicle.
Page 172 of 254
DVD changer
170
DVD changer
Installation location
The BMW DVD changer for six DVDs or audio
CDs is mounted behind the left side trim panel
in the luggage compartment.
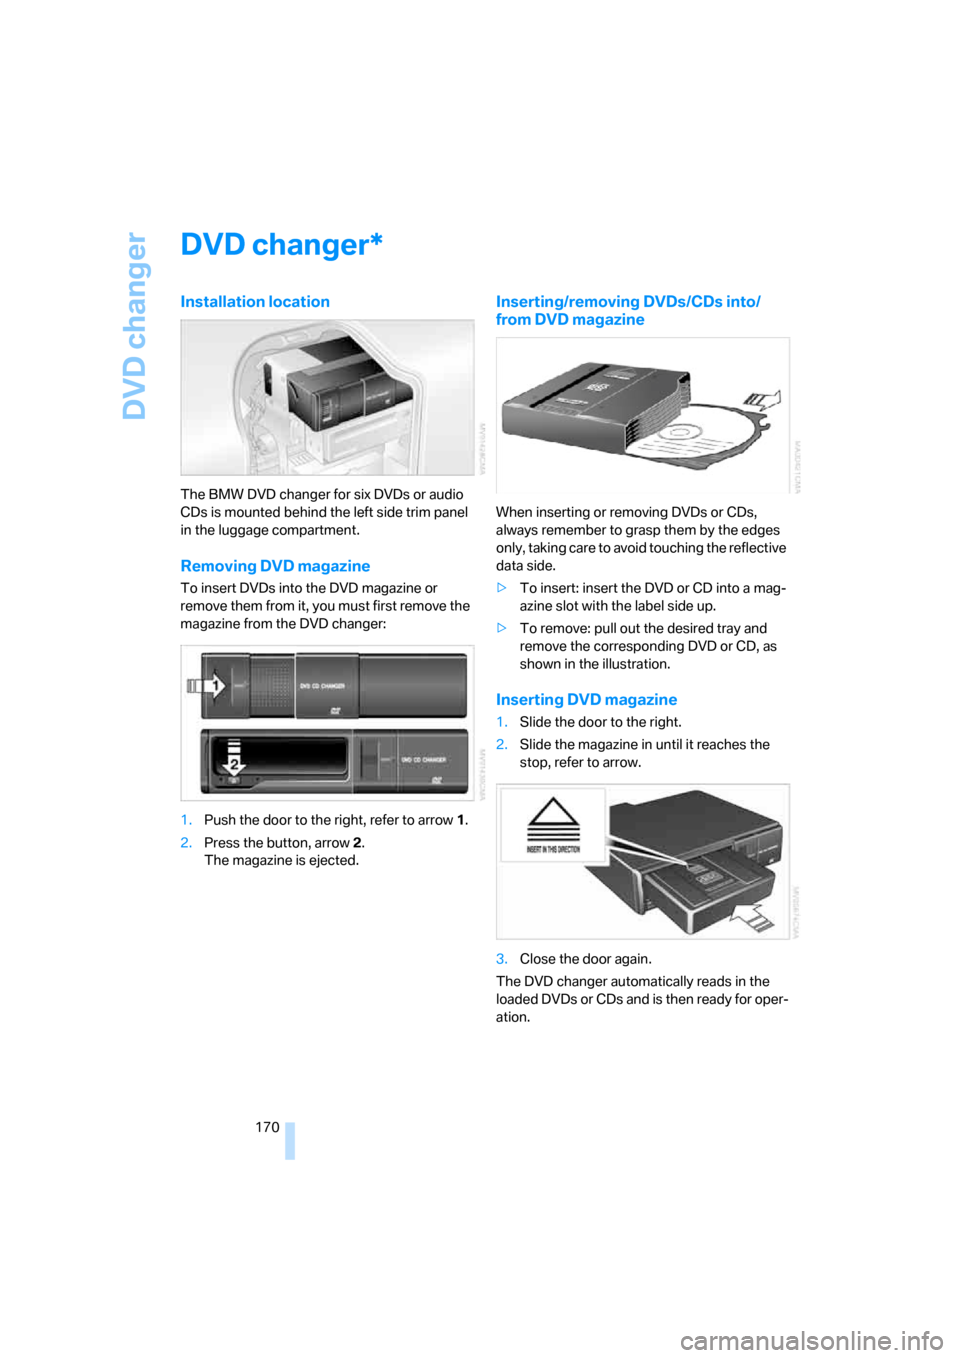
Removing DVD magazine
To insert DVDs into the DVD magazine or
remove them from it, you must first remove the
magazine from the DVD changer:
1.Push the door to the right, refer to arrow1.
2.Press the button, arrow2.
The magazine is ejected.
Inserting/removing DVDs/CDs into/
from DVD magazine
When inserting or removing DVDs or CDs,
always remember to grasp them by the edges
only, taking care to avoid touching the reflective
data side.
>To insert: insert the DVD or CD into a mag-
azine slot with the label side up.
>To remove: pull out the desired tray and
remove the corresponding DVD or CD, as
shown in the illustration.
Inserting DVD magazine
1.Slide the door to the right.
2.Slide the magazine in until it reaches the
stop, refer to arrow.
3.Close the door again.
The DVD changer automatically reads in the
loaded DVDs or CDs and is then ready for oper-
ation.
*