2007 BMW 650I COUPE ECU
[x] Cancel search: ECUPage 73 of 254
Controls
71Reference
At a glance
Driving tips
Communications
Navigation
Entertainment
Mobility
Deactivating system
Press the lever up or down. The displays in the
instrument cluster disappear.
You also deactivate the system when you apply
the brakes, shift very slowly, or shift into neutral.
In addition, the system is deactivated automati-
cally:
>when you activate the DTC Dynamic Trac-
tion Control
>when you deactivate the DSC Dynamic Sta-
bility Control
>when the system does not recognize any
objects for a longer time, e. g. on infre-
quently traveled roads without a shoulder or
guard rails, or if the radar sensor is covered
with dirt, refer to page72
>when the speed is reduced to below
20 mph/30 km/h due to a traffic situation
The system deactivates automatically
when the speed is set to below 20 mph/
30 km/h. A signal sounds and a message
appears in the Control Display. The active inter-
vention of the driver is required, otherwise there
is a risk of an accident.<
Resuming stored desired speed and
distance
Press button 4.
The displays appear in the instrument cluster.
When you switch off the ignition, the stored
desired speed is deleted.
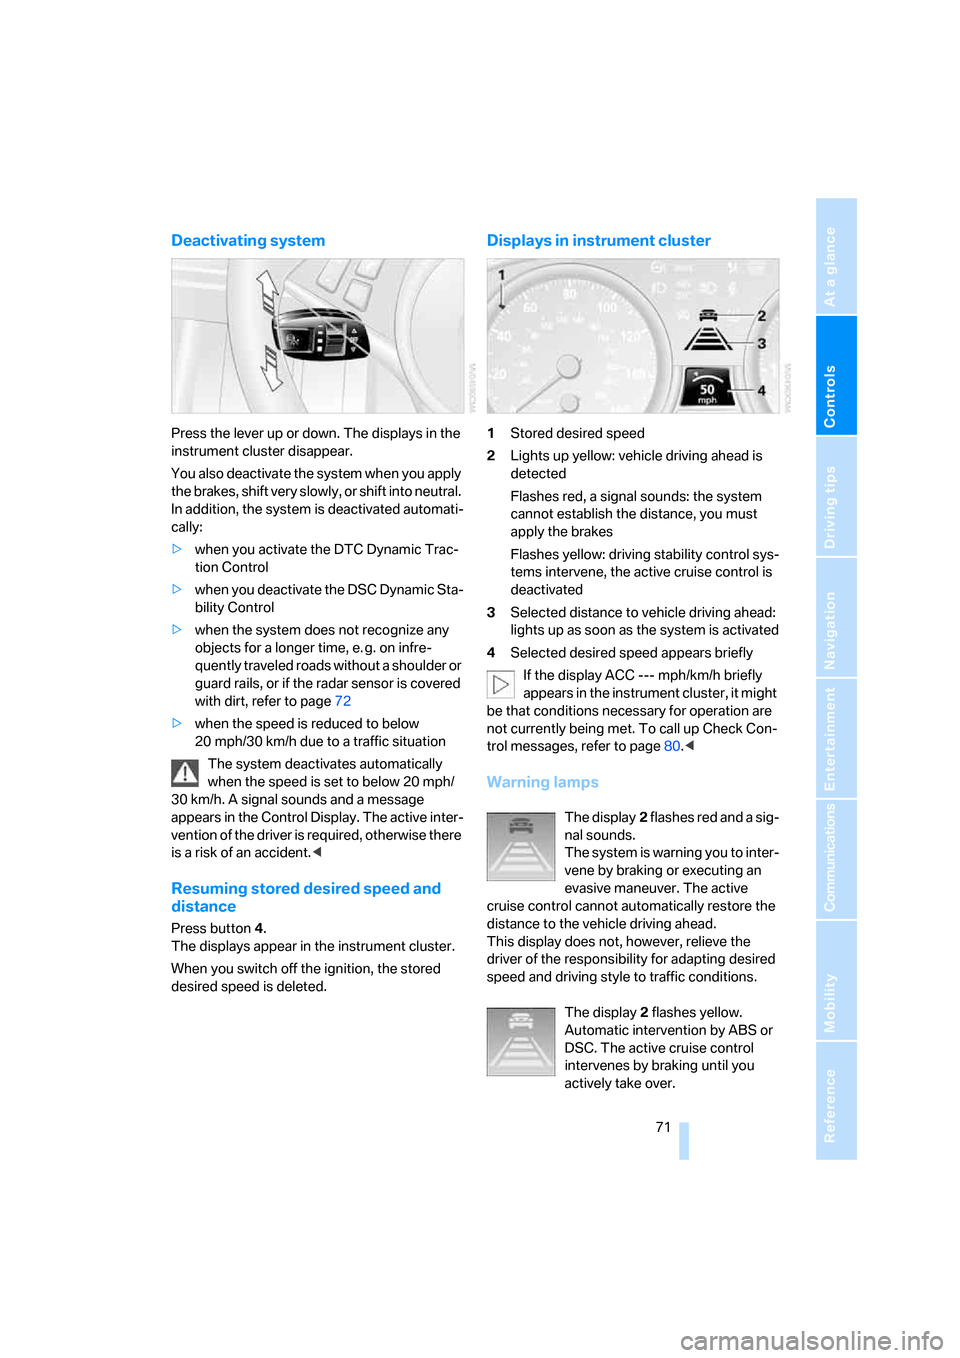
Displays in instrument cluster
1Stored desired speed
2Lights up yellow: vehicle driving ahead is
detected
Flashes red, a signal sounds: the system
cannot establish the distance, you must
apply the brakes
Flashes yellow: driving stability control sys-
tems intervene, the active cruise control is
deactivated
3Selected distance to vehicle driving ahead:
lights up as soon as the system is activated
4Selected desired speed appears briefly
If the display ACC --- mph/km/h briefly
appears in the instrument cluster, it might
be that conditions necessary for operation are
not currently being met. To call up Check Con-
trol messages, refer to page80.<
Warning lamps
The display2 flashes red and a sig-
nal sounds.
The system is warning you to inter-
vene by braking or executing an
evasive maneuver. The active
cruise control cannot automatically restore the
distance to the vehicle driving ahead.
This display does not, however, relieve the
driver of the responsibility for adapting desired
speed and driving style to traffic conditions.
The display2 flashes yellow.
Automatic intervention by ABS or
DSC. The active cruise control
intervenes by braking until you
actively take over.
Page 84 of 254
Everything under control
82
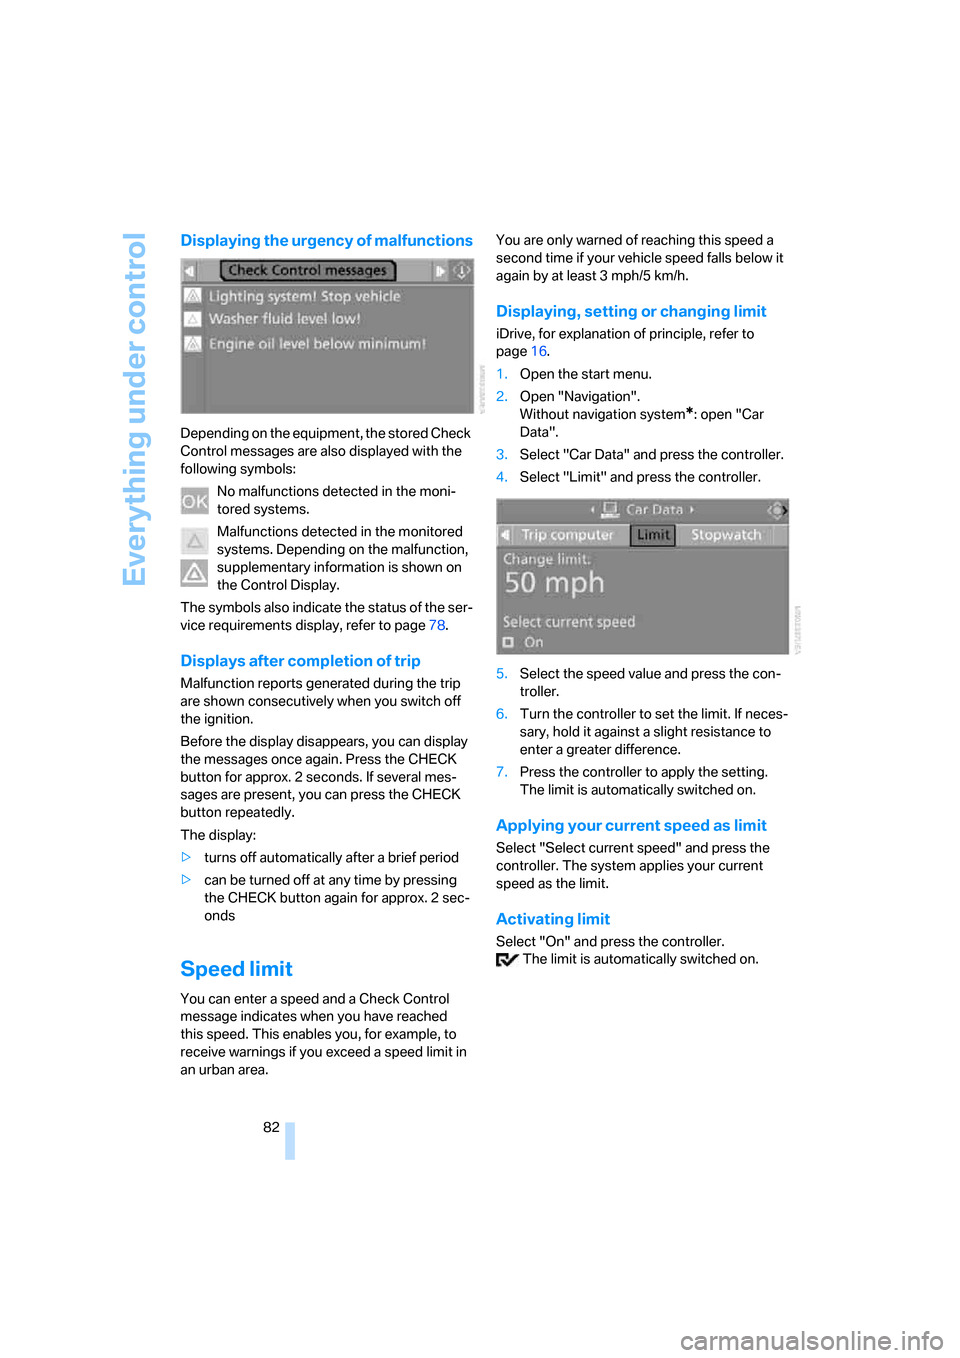
Displaying the urgency of malfunctions
Depending on the equipment, the stored Check
Control messages are also displayed with the
following symbols:
No malfunctions detected in the moni-
tored systems.
Malfunctions detected in the monitored
systems. Depending on the malfunction,
supplementary information is shown on
the Control Display.
The symbols also indicate the status of the ser-
vice requirements display, refer to page78.
Displays after completion of trip
Malfunction reports generated during the trip
are shown consecutively when you switch off
the ignition.
Before the display disappears, you can display
the messages once again. Press the CHECK
button for approx. 2 seconds. If several mes-
sages are present, you can press the CHECK
button repeatedly.
The display:
>turns off automatically after a brief period
>can be turned off at any time by pressing
the CHECK button again for approx. 2 sec-
onds
Speed limit
You can enter a speed and a Check Control
message indicates when you have reached
this speed. This enables you, for example, to
receive warnings if you exceed a speed limit in
an urban area.You are only warned of reaching this speed a
second time if your vehicle speed falls below it
again by at least 3 mph/5 km/h.
Displaying, setting or changing limit
iDrive, for explanation of principle, refer to
page16.
1.Open the start menu.
2.Open "Navigation".
Without navigation system
*: open "Car
Data".
3.Select "Car Data" and press the controller.
4.Select "Limit" and press the controller.
5.Select the speed value and press the con-
troller.
6.Turn the controller to set the limit. If neces-
sary, hold it against a slight resistance to
enter a greater difference.
7.Press the controller to apply the setting.
The limit is automatically switched on.
Applying your current speed as limit
Select "Select current speed" and press the
controller. The system applies your current
speed as the limit.
Activating limit
Select "On" and press the controller.
The limit is automatically switched on.
Page 114 of 254

Practical interior accessories
112
Practical interior accessories
Integrated universal remote
control*
The concept
The integrated universal remote control can
replace as many as three hand-held transmit-
ters for various remote-controlled accessories,
such as garage and gate or lighting systems.
The integrated universal remote control regis-
ters and stores signals from the original hand-
held transmitters.
The signal of an original hand-held transmitter
can be programmed on one of the three mem-
ory buttons1. After this, the programmed
memory button1 will operate the system in
question. The LED2 flashes to confirm trans-
mission of the signal.
If you sell your vehicle one day, delete the saved
programs beforehand for your own security,
refer to page113.
To prevent possible damage or injury,
before programming or using the inte-
grated universal remote control, always inspect
the immediate area to make certain that no peo-
ple, animals or objects are within the travel
range of the device. Also, comply with the
safety precautions of the original hand-held
transmitter.<
Checking compatibility
If you see this symbol on the packaging
or in the manual supplied with the orig-
inal hand-held transmitter, it is safe to
assume that it is compatible with the integrated
universal remote control.
If you have additional questions, please
contact your BMW center or call:
1-800-355-3515.
Information is also provided on the Internet at:
www.bmwusa.com or
www.homelink.com.
HomeLink is a registered trademark of
Johnson Controls, Inc.<
Programming
1Memory buttons
2LED
Fixed-code hand-held transmitters
1.Switch on ignition, refer to page59.
2.When using for the first time: press the left
and right-hand memory button1 for approx.
20 seconds until the LED2 flashes quickly.
All stored programs are deleted.
3.Hold the original hand-held transmitter at a
distance of approx. 4 in/10 cm to 12 in/
30 cm from the memory buttons1.
The required distance between the
hand-held transmitter and the mem-
ory buttons1 depends on the particular
system of the original hand-held transmitter
used.<
4.Simultaneously press the transmit key on
the original hand-held transmitter and the
desired memory button 1 on the integrated
universal remote control. The LED2 flashes
slowly at first. As soon as the LED2 flashes
rapidly, release both buttons. If the LED2
does not flash rapidly after approx. 15 sec-
onds, alter the distance and repeat the step.
5.To program other original hand-held trans-
mitters, repeat steps 3 and 4.
The corresponding memory button 1 is now
programmed with the signal of the original
hand-held transmitter.
You can operate the device when the engine is
running or when the ignition is switched on.
Page 118 of 254
Practical interior accessories
116
Cigarette lighter
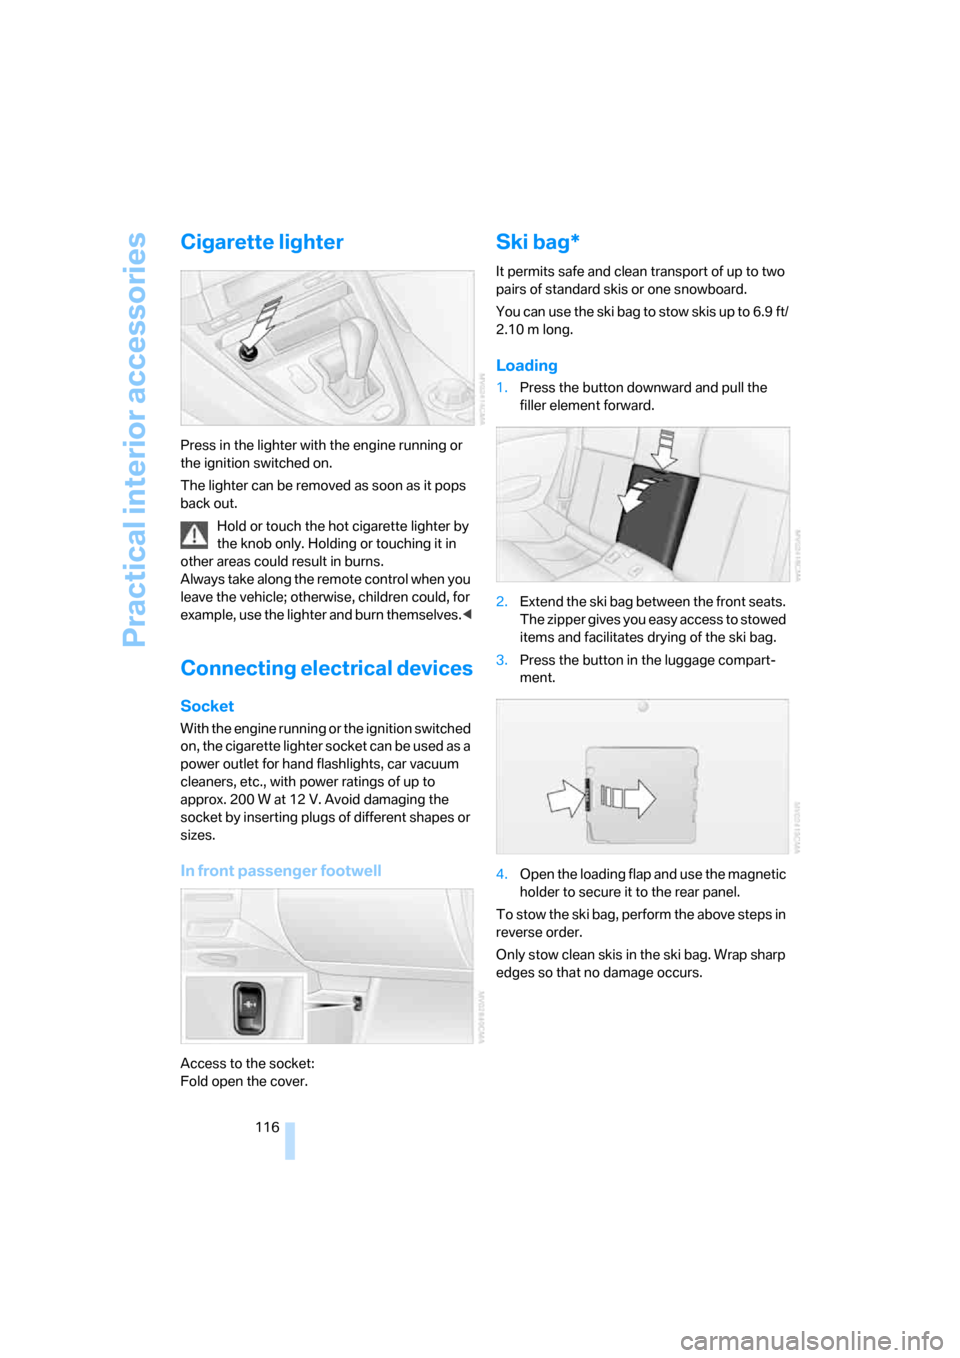
Press in the lighter with the engine running or
the ignition switched on.
The lighter can be removed as soon as it pops
back out.
Hold or touch the hot cigarette lighter by
the knob only. Holding or touching it in
other areas could result in burns.
Always take along the remote control when you
leave the vehicle; otherwise, children could, for
example, use the lighter and burn themselves.<
Connecting electrical devices
Socket
With the engine running or the ignition switched
on, the cigarette lighter socket can be used as a
power outlet for hand flashlights, car vacuum
cleaners, etc., with power ratings of up to
approx. 200 W at 12 V. Avoid damaging the
socket by inserting plugs of different shapes or
sizes.
In front passenger footwell
Access to the socket:
Fold open the cover.
Ski bag*
It permits safe and clean transport of up to two
pairs of standard skis or one snowboard.
You can use the ski bag to stow skis up to 6.9 ft/
2.10 m long.
Loading
1.Press the button downward and pull the
filler element forward.
2.Extend the ski bag between the front seats.
The zipper gives you easy access to stowed
items and facilitates drying of the ski bag.
3.Press the button in the luggage compart-
ment.
4.Open the loading flap and use the magnetic
holder to secure it to the rear panel.
To stow the ski bag, perform the above steps in
reverse order.
Only stow clean skis in the ski bag. Wrap sharp
edges so that no damage occurs.
Page 119 of 254
Controls
117Reference
At a glance
Driving tips
Communications
Navigation
Entertainment
Mobility
Securing cargo
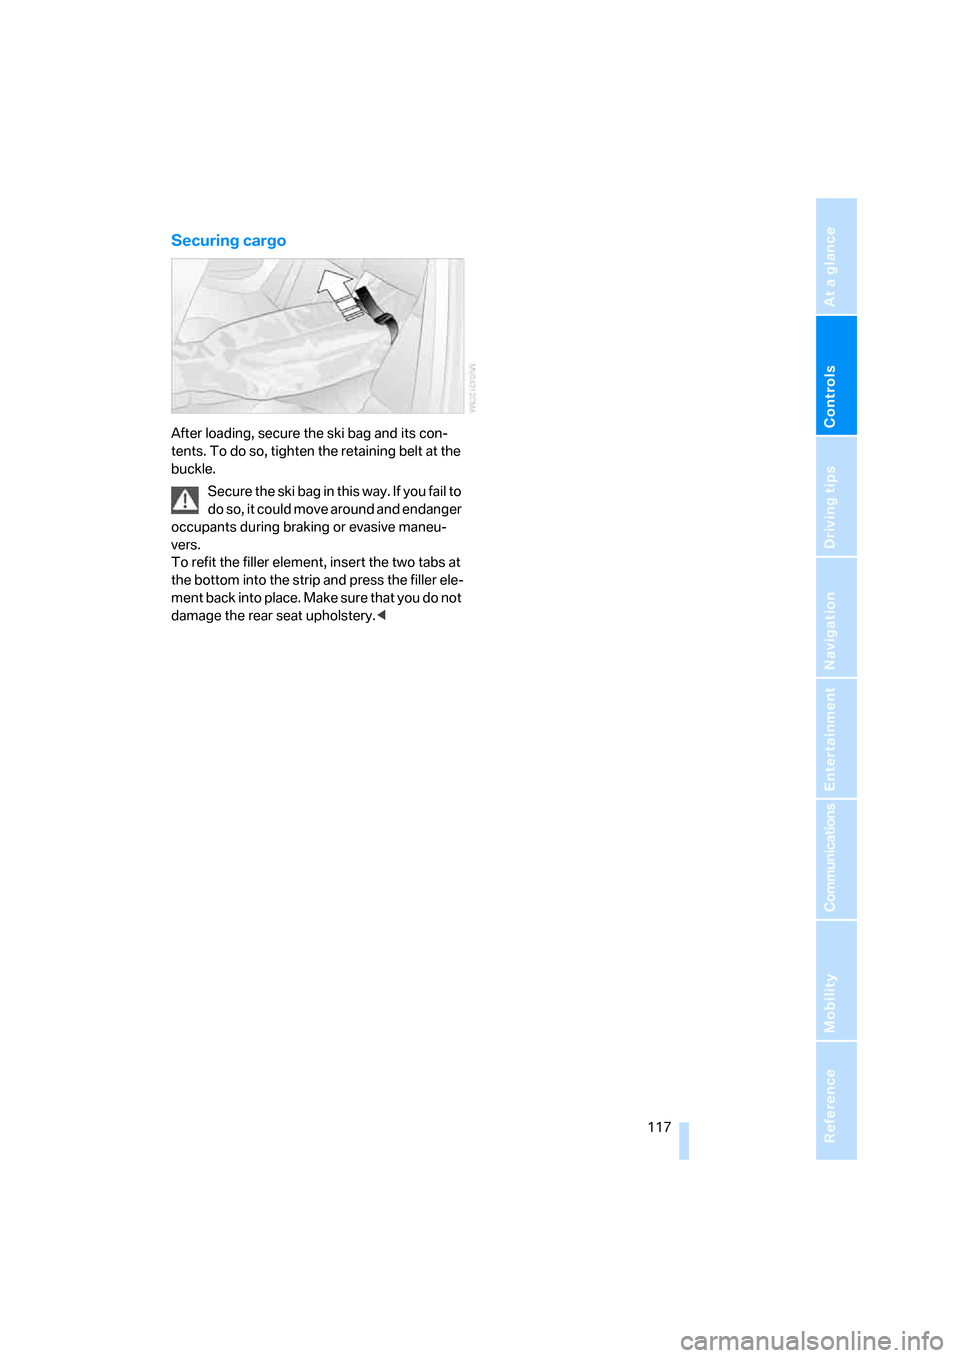
After loading, secure the ski bag and its con-
tents. To do so, tighten the retaining belt at the
buckle.
Secure the ski bag in this way. If you fail to
do so, it could move around and endanger
occupants during braking or evasive maneu-
vers.
To refit the filler element, insert the two tabs at
the bottom into the strip and press the filler ele-
ment back into place. Make sure that you do not
damage the rear seat upholstery.<
Page 125 of 254
Driving tips
123Reference
At a glance
Controls
Communications
Navigation
Entertainment
Mobility
5.Determine the combined weight of luggage
and cargo being loaded on the vehicle. That
weight may not safely exceed the available
cargo and luggage load capacity calculated
in step 4.
6.If your vehicle will be towing a trailer, part of
the load from your trailer will be transferred
to your vehicle. Consult the manual for
transporting a trailer to determine how this
may reduce the available cargo and luggage
load capacity of your vehicle.
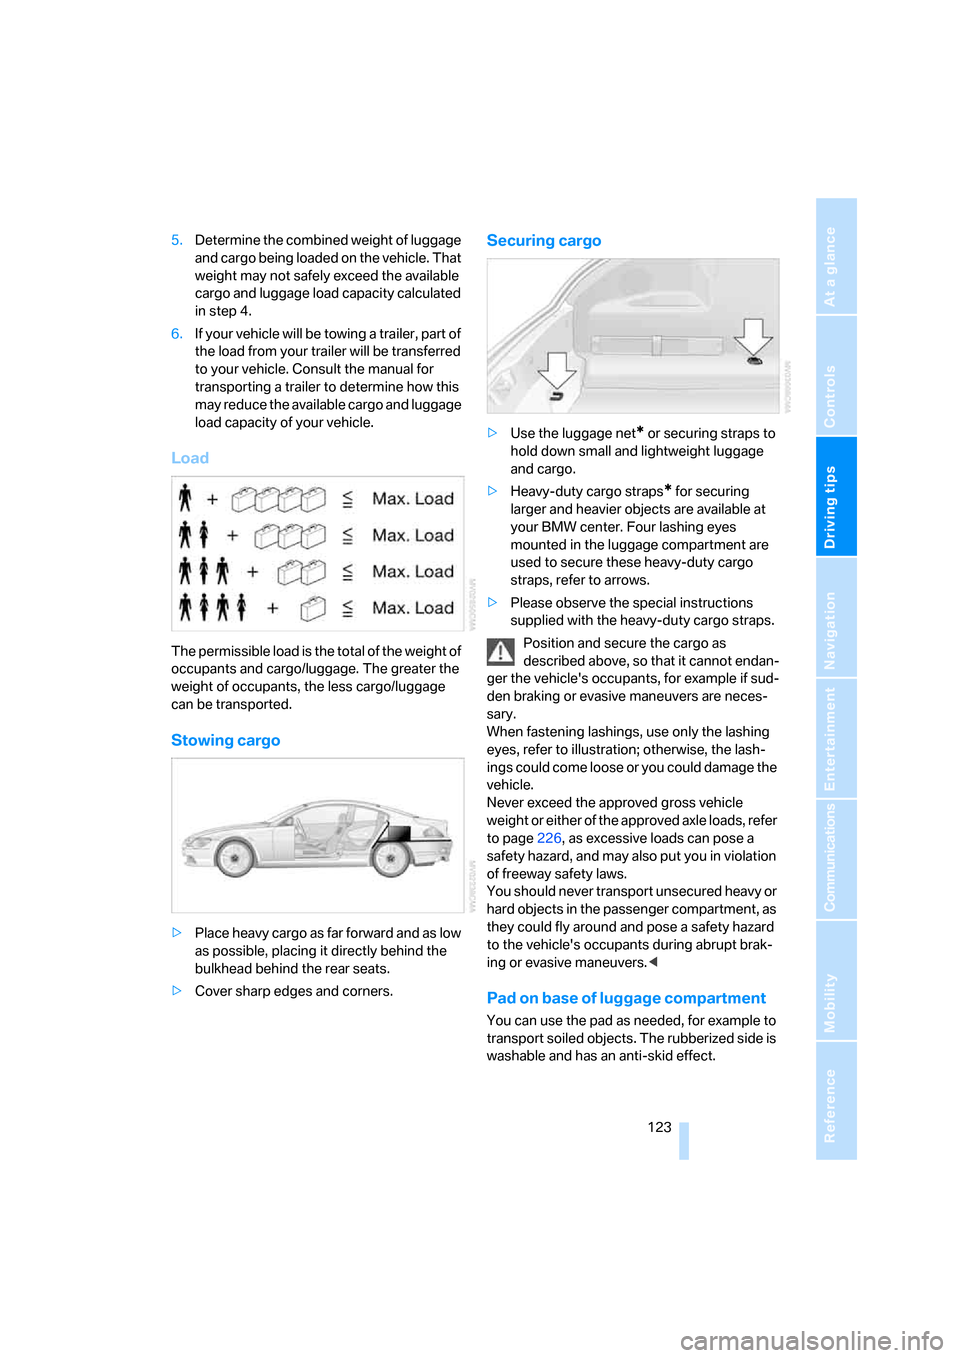
Load
The permissible load is the total of the weight of
occupants and cargo/luggage. The greater the
weight of occupants, the less cargo/luggage
can be transported.
Stowing cargo
>Place heavy cargo as far forward and as low
as possible, placing it directly behind the
bulkhead behind the rear seats.
>Cover sharp edges and corners.
Securing cargo
>Use the luggage net* or securing straps to
hold down small and lightweight luggage
and cargo.
>Heavy-duty cargo straps
* for securing
larger and heavier objects are available at
your BMW center. Four lashing eyes
mounted in the luggage compartment are
used to secure these heavy-duty cargo
straps, refer to arrows.
>Please observe the special instructions
supplied with the heavy-duty cargo straps.
Position and secure the cargo as
described above, so that it cannot endan-
ger the vehicle's occupants, for example if sud-
den braking or evasive maneuvers are neces-
sary.
When fastening lashings, use only the lashing
eyes, refer to illustration; otherwise, the lash-
ings could come loose or you could damage the
vehicle.
Never exceed the approved gross vehicle
weight or either of the approved axle loads, refer
to page226, as excessive loads can pose a
safety hazard, and may also put you in violation
of freeway safety laws.
You should never transport unsecured heavy or
hard objects in the passenger compartment, as
they could fly around and pose a safety hazard
to the vehicle's occupants during abrupt brak-
ing or evasive maneuvers.<
Pad on base of luggage compartment
You can use the pad as needed, for example to
transport soiled objects. The rubberized side is
washable and has an anti-skid effect.
Page 178 of 254
Telephoning
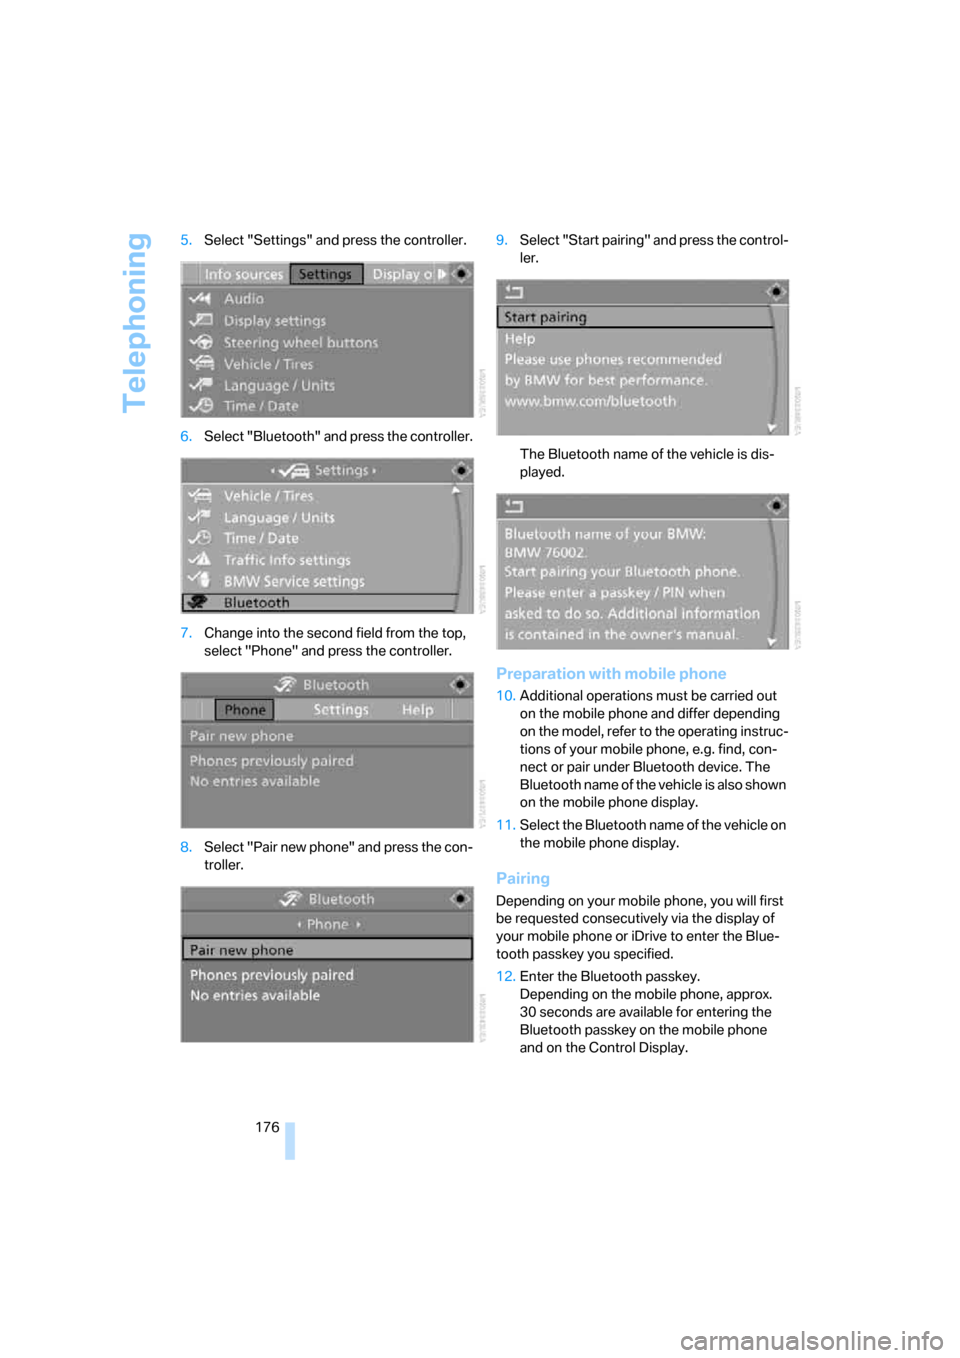
176 5.Select "Settings" and press the controller.
6.Select "Bluetooth" and press the controller.
7.Change into the second field from the top,
select "Phone" and press the controller.
8.Select "Pair new phone" and press the con-
troller.9.Select "Start pairing" and press the control-
ler.
The Bluetooth name of the vehicle is dis-
played.
Preparation with mobile phone
10.Additional operations must be carried out
on the mobile phone and differ depending
on the model, refer to the operating instruc-
tions of your mobile phone, e.g. find, con-
nect or pair under Bluetooth device. The
Bluetooth name of the vehicle is also shown
on the mobile phone display.
11.Select the Bluetooth name of the vehicle on
the mobile phone display.
Pairing
Depending on your mobile phone, you will first
be requested consecutively via the display of
your mobile phone or iDrive to enter the Blue-
tooth passkey you specified.
12.Enter the Bluetooth passkey.
Depending on the mobile phone, approx.
30 seconds are available for entering the
Bluetooth passkey on the mobile phone
and on the Control Display.
Page 179 of 254

177
Entertainment
Reference
At a glance
Controls
Driving tips Communications
Navigation
Mobility
13.Change into the third field from the top,
select "Confirm passkey" and press the
controller.
14.Wait a few seconds until the "Communica-
tion" menu appears.
The next time you use the mobile phone in the
vehicle interior, it will be detected within a max-
imum of 2 minutes with the engine running or
the ignition switched on.
With some mobile phone models it may
be necessary to make certain settings for
a permanent Bluetooth link, e.g. via the menu
item Authorization or Secure connection. Refer
to the operating instructions of your mobile
phone.<
As soon as a mobile phone is detected by the
vehicle, the phone book entries stored on the
SIM card or on your mobile phone are trans-
mitted to your vehicle. This transmission is
dependent on your mobile phone, refer to the
operating instructions of your mobile phone if
necessary, and can take several minutes.
If not all phone book entries are displayed:
>Transfer all phone book entries from the
SIM card to the mobile phone if necessary.
>It may not be possible to display phone
book entries with special characters.
Up to four mobile phones can be paired consec-
utively. When you pair a fifth mobile phone, the
pairing data of the mobile phone for which the
pairing data were stored first in the vehicle will
be deleted.
Check if pairing is unsuccessful
>Is the mobile phone supported by the
mobile phone preparation package? Infor-
mation on this subject is also provided on
the Internet at: www.bmw.com.
>Do the Bluetooth passkey on the mobile
phone and the vehicle match? The same
Bluetooth passkey must be entered both on
the mobile phone display and via iDrive.
>Have you required longer than 30 seconds
to enter the Bluetooth passkey?
>Only a limited number of devices can be
connected to the mobile phone. Delete the
connection to other devices if necessary.
>The mobile phone no longer reacts? Switch
the mobile phone off and then on again or
disconnect the power supply.
To repeat pairing:
1.Select "Restart pairing" and press the con-
troller.
2.Repeat steps 9 to 14.
If pairing was repeatedly unsuccessful, contact
the BMW Hotline.
To call the BMW Hotline:
Select "Help" and press the controller.