2007 BMW 650I COUPE&CONVERTIBLE steering wheel
[x] Cancel search: steering wheelPage 182 of 256
Telephoning
180 ferred from your mobile phone to your vehi-
cle are also deleted in the process.
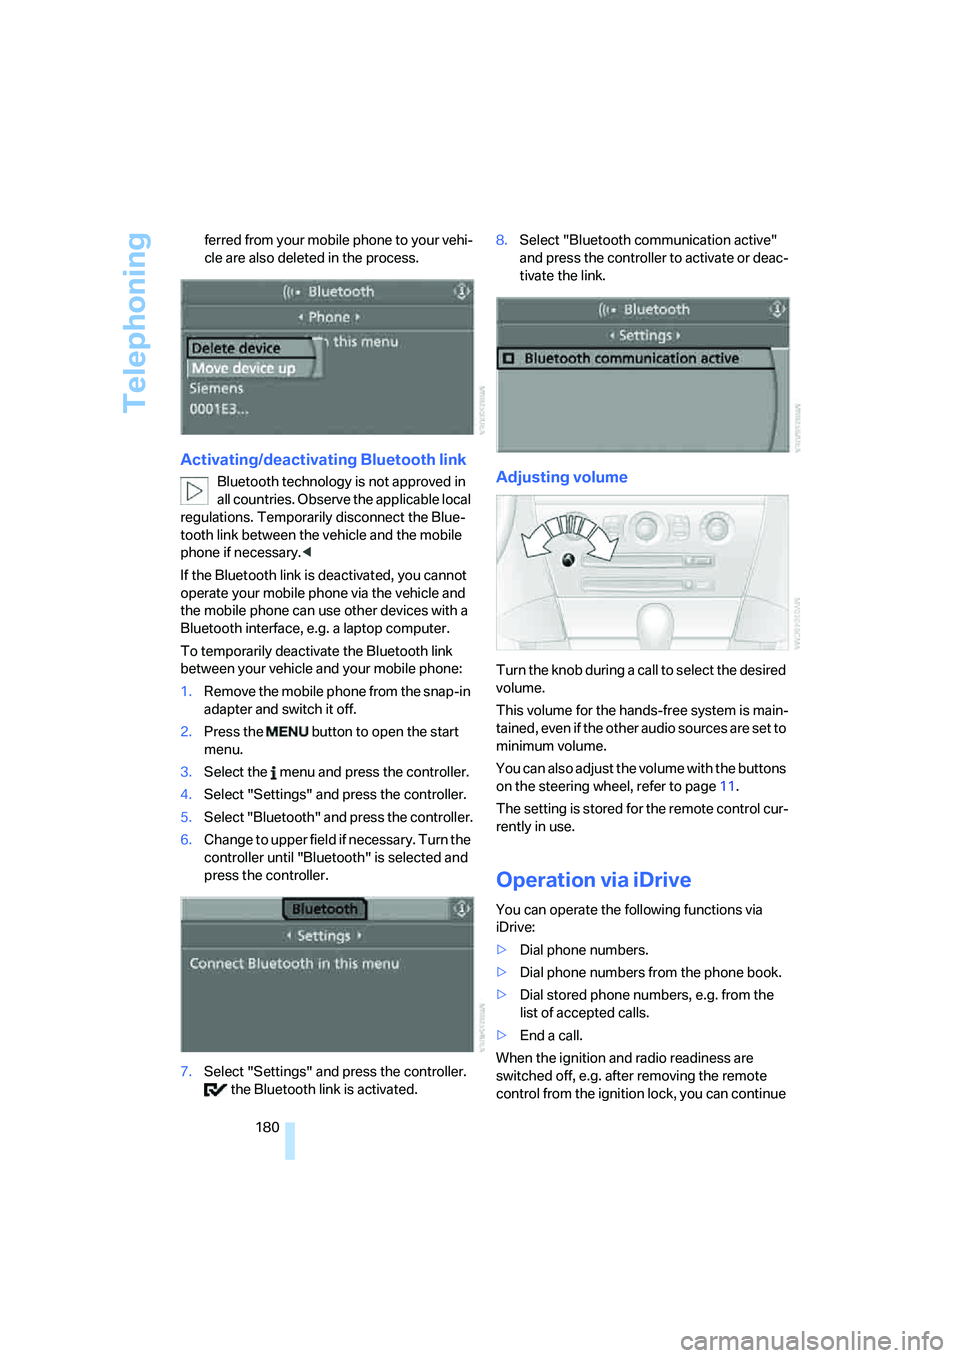
Activating/deactivating Bluetooth link
Bluetooth technology is not approved in
all countries. Observe the applicable local
regulations. Temporarily disconnect the Blue-
tooth link between the vehicle and the mobile
phone if necessary.<
If the Bluetooth link is deactivated, you cannot
operate your mobile phone via the vehicle and
the mobile phone can use other devices with a
Bluetooth interface, e.g. a laptop computer.
To temporarily deactivate the Bluetooth link
between your vehicle and your mobile phone:
1.Remove the mobile phone from the snap-in
adapter and switch it off.
2.Press the button to open the start
menu.
3.Select the menu and press the controller.
4.Select "Settings" and press the controller.
5.Select "Bluetooth" and press the controller.
6.Change to upper field if necessary. Turn the
controller until "Bluetooth" is selected and
press the controller.
7.Select "Settings" and press the controller.
the Bluetooth link is activated.8.Select "Bluetooth communication active"
and press the controller to activate or deac-
tivate the link.Adjusting volume
Turn the knob during a call to select the desired
volume.
This volume for the hands-free system is main-
tained, even if the other audio sources are set to
minimum volume.
You can also adjust the volume with the buttons
on the steering wheel, refer to page11.
The setting is stored for the remote control cur-
rently in use.
Operation via iDrive
You can operate the following functions via
iDrive:
>Dial phone numbers.
>Dial phone numbers from the phone book.
>Dial stored phone numbers, e.g. from the
list of accepted calls.
>End a call.
When the ignition and radio readiness are
switched off, e.g. after removing the remote
control from the ignition lock, you can continue
Page 187 of 256
185
Entertainment
Reference
At a glance
Controls
Driving tips Communications
Navigation
Mobility
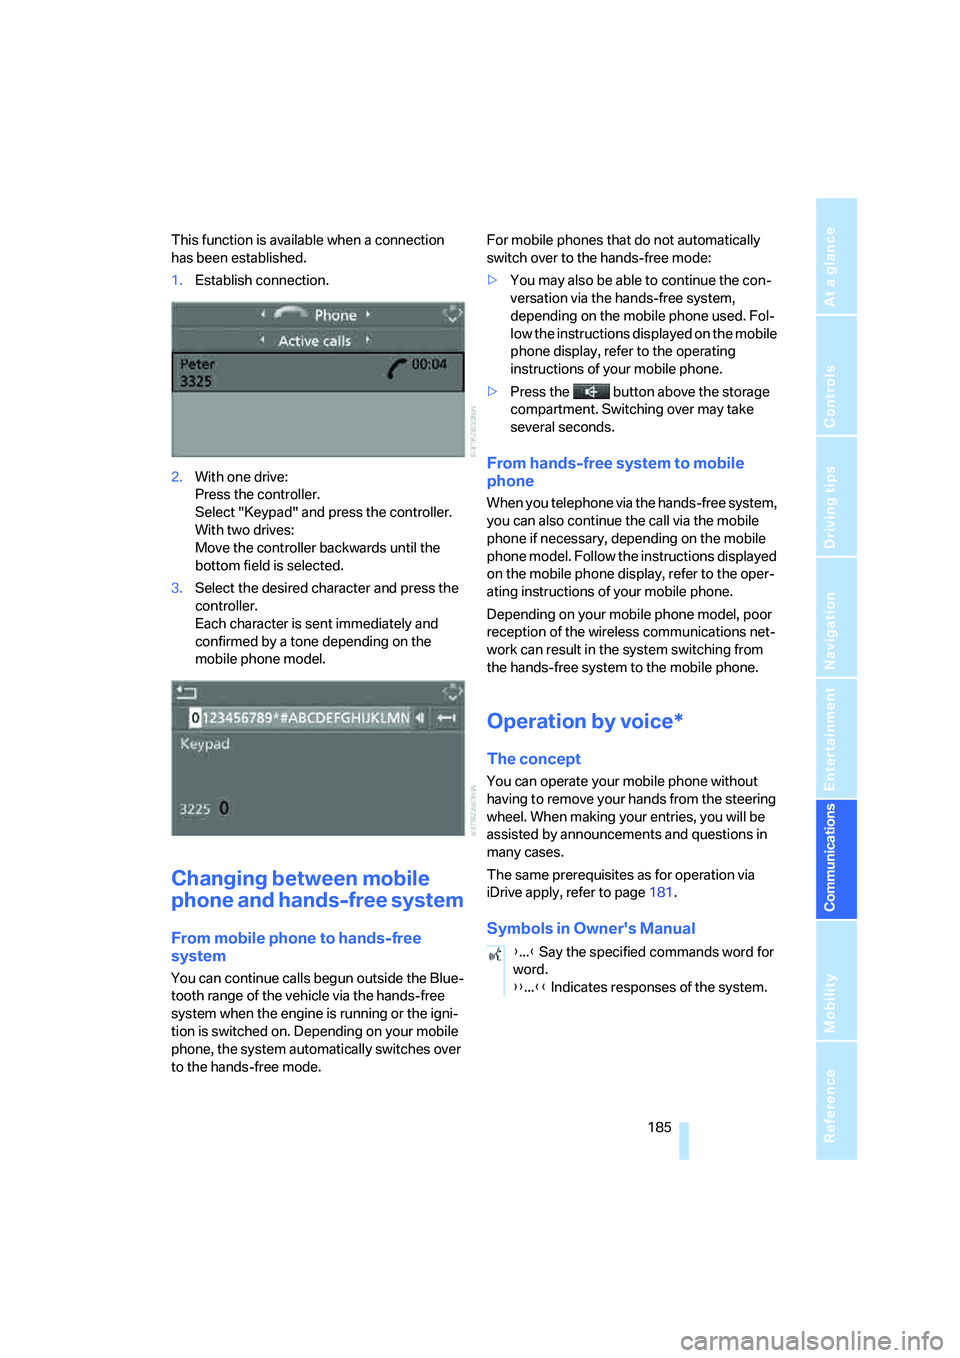
This function is available when a connection
has been established.
1.Establish connection.
2.With one drive:
Press the controller.
Select "Keypad" and press the controller.
With two drives:
Move the controller backwards until the
bottom field is selected.
3.Select the desired character
and press the
controller.
Each character is sent immediately and
confirmed by a tone depending on the
mobile phone model.
Changing between mobile
phone and hands-free system
From mobile phone to hands-free
system
You can continue calls begun outside the Blue-
tooth range of the vehicle via the hands-free
system when the engine is running or the igni-
tion is switched on. Depending on your mobile
phone, the system automatically switches over
to the hands-free mode.For mobile phones that do not automatically
switch over to the hands-free mode:
>You may also be able to continue the con-
versation via the hands-free system,
depending on the mobile phone used. Fol-
low the instructions displayed on the mobile
phone display, refer to the operating
instructions of your mobile phone.
>Press the button above the storage
compartment. Switching over may take
several seconds.
From hands-free system to mobile
phone
When you telephone via the hands-free system,
you can also continue the call via the mobile
phone if necessary, depending on the mobile
phone model. Follow the instructions displayed
on the mobile phone display, refer to the oper-
ating instructions of your mobile phone.
Depending on your mobile phone model, poor
reception of the wireless communications net-
work can result in the system switching from
the hands-free system to the mobile phone.
Operation by voice*
The concept
You can operate your mobile phone without
having to remove your hands from the steering
wheel. When making your entries, you will be
assisted by announcements and questions in
many cases.
The same prerequisites as for operation via
iDrive apply, refer to page181.
Symbols in Owner's Manual
{...} Say the specified commands word for
word.
{{...}} Indicates responses of the system.
Page 188 of 256
Telephoning
186
Voice commands
Activating system
1.Press the button on the steering wheel.
An acoustic signal indicates that you can
say commands.
2.Say the command.
The text or numbers that the voice com-
mand system has registered will appear on
the Control Display.
Ending/canceling operation by voice
Press the button on the steering wheel
or
In dialogs where text is spoken, not a command,
e.g. a name, canceling is only possible using the
button on the steering wheel.
Having possible commands read aloud
The system understands default commands
that must be spoken word for word.
You can have the system read aloud the possi-
ble commands at any point:
Using alternative commands
There are often a number of commands to run a
function, e.g.:
The system recognizes digits from zero to nine.
You can say each digit individually or group
them into a sequence to accelerate the input.
Example: dialing phone numbers
Start the dialog:
Press the button on the steering wheel.
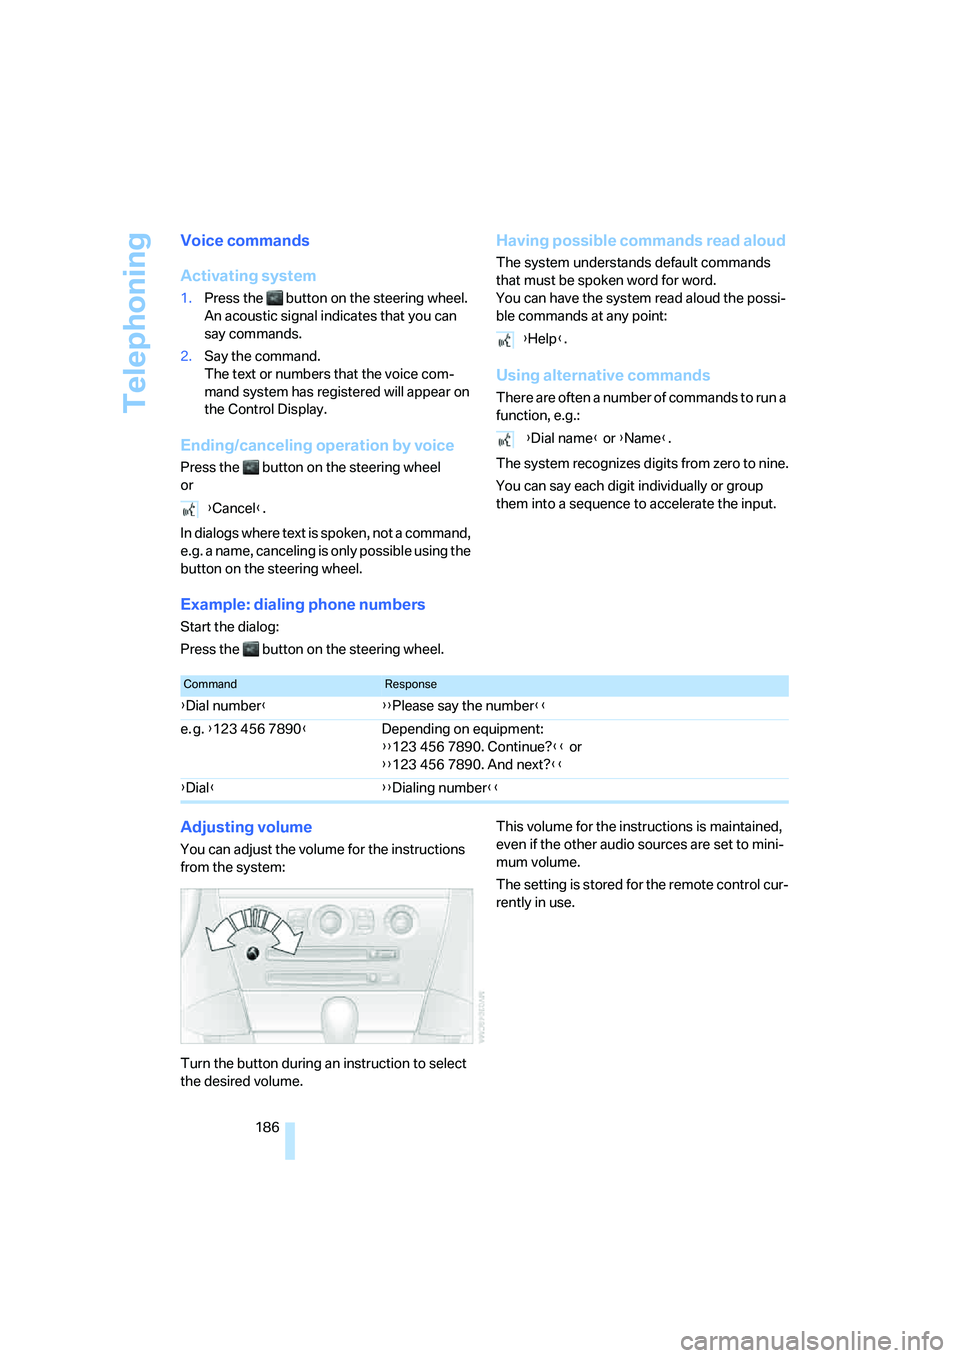
Adjusting volume
You can adjust the volume for the instructions
from the system:
Turn the button during an instruction to select
the desired volume.This volume for the instructions is maintained,
even if the other audio sources are set to mini-
mum volume.
The setting is stored for the remote control cur-
rently in use. {Cancel}.
{Help}.
{Dial name} or {Name}.
CommandResponse
{Dial number}{{Please say the number}}
e. g. {123 456 7890}Depending on equipment:
{{123 456 7890. Continue?}} or
{{123 456 7890. And next?}}
{Dial}{{Dialing number}}
Page 217 of 256
Mobility
215Reference
At a glance
Controls
Driving tips
Communications
Navigation
Entertainment
Have work on the xenon lighting system
performed only by your BMW center or a
workshop that works according to BMW repair
procedures with correspondingly trained per-
sonnel. Due to the high voltage involved, there
is a danger to life and limb when work is carried
out improperly.<
High beams, parking lamps
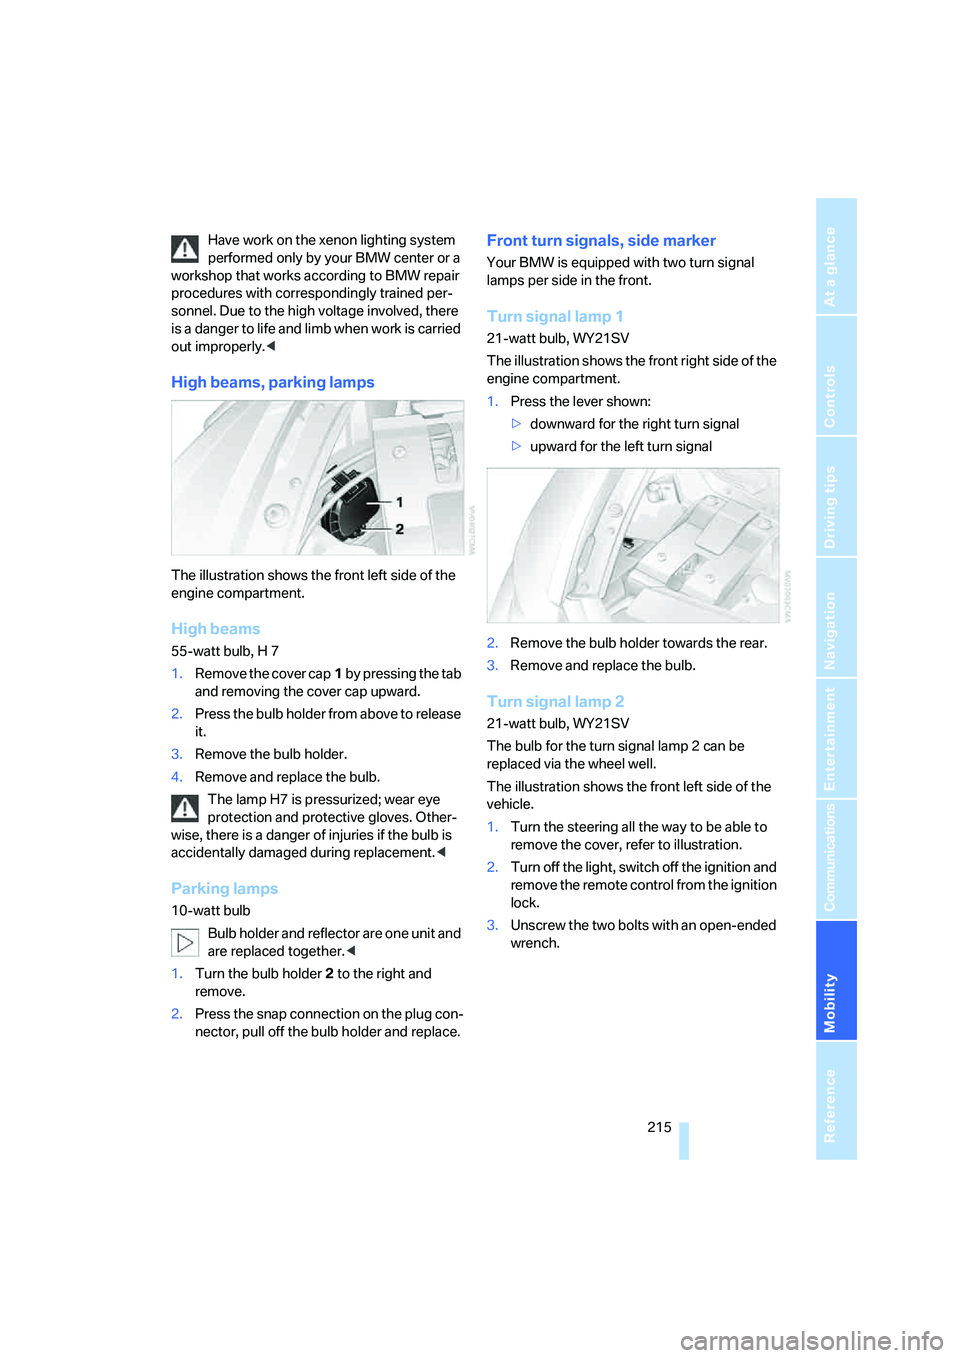
The illustration shows the front left side of the
engine compartment.
High beams
55-watt bulb, H 7
1.Remove the cover cap1 by pressing the tab
and removing the cover cap upward.
2.Press the bulb holder from above to release
it.
3.Remove the bulb holder.
4.Remove and replace the bulb.
The lamp H7 is pressurized; wear eye
protection and protective gloves. Other-
wise, there is a danger of injuries if the bulb is
accidentally damaged during replacement.<
Parking lamps
10-watt bulb
Bulb holder and reflector are one unit and
are replaced together.<
1.Turn the bulb holder2 to the right and
remove.
2.Press the snap connection on the plug con-
nector, pull off the bulb holder and replace.
Front turn signals, side marker
Your BMW is equipped with two turn signal
lamps per side in the front.
Turn signal lamp 1
21-watt bulb, WY21SV
The illustration shows the front right side of the
engine compartment.
1.Press the lever shown:
>downward for the right turn signal
>upward for the left turn signal
2.Remove the bulb holder towards the rear.
3.Remove and replace the bulb.
Turn signal lamp 2
21-watt bulb, WY21SV
The bulb for the turn signal lamp 2 can be
replaced via the wheel well.
The illustration shows the front left side of the
vehicle.
1.Turn the steering all the way to be able to
remove the cover, refer to illustration.
2.Turn off the light, switch off the ignition and
remove the remote control from the ignition
lock.
3.Unscrew the two bolts with an open-ended
wrench.
Page 219 of 256

Mobility
217Reference
At a glance
Controls
Driving tips
Communications
Navigation
Entertainment
License plate lamps
5-watt bulb, W5W
1.Push a screwdriver from the left under the
lamp and pry out the lamp toward the right.
2.Turn the bulb holder to the left by 905 and
remove.
3.Remove and replace the bulb.
Changing wheels
Your BMW is equipped with run-flat tires as a
standard feature. An immediate wheel change
in the event of a flat tire is therefore no longer
required.
To continue driving with a damaged tire:
>With Flat Tire Monitor, refer to Indication of
a flat tire, page91
>With Tire Pressure Monitor, refer to Mes-
sage with low tire inflation pressure,
page93
You will recognize run-flat tires by a circular
symbol containing the letters RSC on the side
of the tire, refer to Run-flat tires on page206.
If you have new tires mounted or switch from
summer to winter tires, or vice versa, use run-
flat tires because no spare tire is provided in
case of a flat. Your BMW center will be glad to
advise you.
Also refer to New wheels and tires, page206.
The suitable tools for changing tires are
available as accessories from your BMW
center.<
Car jacking points
The jacking points for the car jack are located in
the positions shown.
Vehicle battery
Maintenance
The battery is 100 % maintenance-free, i.e., the
electrolyte will last for the life of the battery
when the vehicle is operated in a temperate cli-
mate.
Your BMW center will be glad to advise in all
matters concerning the battery.
Charging battery
Only charge the battery in the vehicle via the
terminals in the engine compartment with the
engine switched off. For the connections, refer
to Jump starting on page220.
Disposal
After replacement, have old batteries dis-
posed of by your BMW center or deposit
them at a recycling center. Maintain the battery
in an upright position for transport and storage.
Always secure the battery to prevent it from tip-
ping over during transport.<
Power failure
Following a temporary interruption of the power
supply, the operation of some equipment is lim-
ited and must be reinitialized. Individual settings
are also lost and must be updated:
>Seat, mirror and steering wheel memory
The position must be stored again, refer to
page50.
Page 224 of 256
Giving and receiving assistance
222
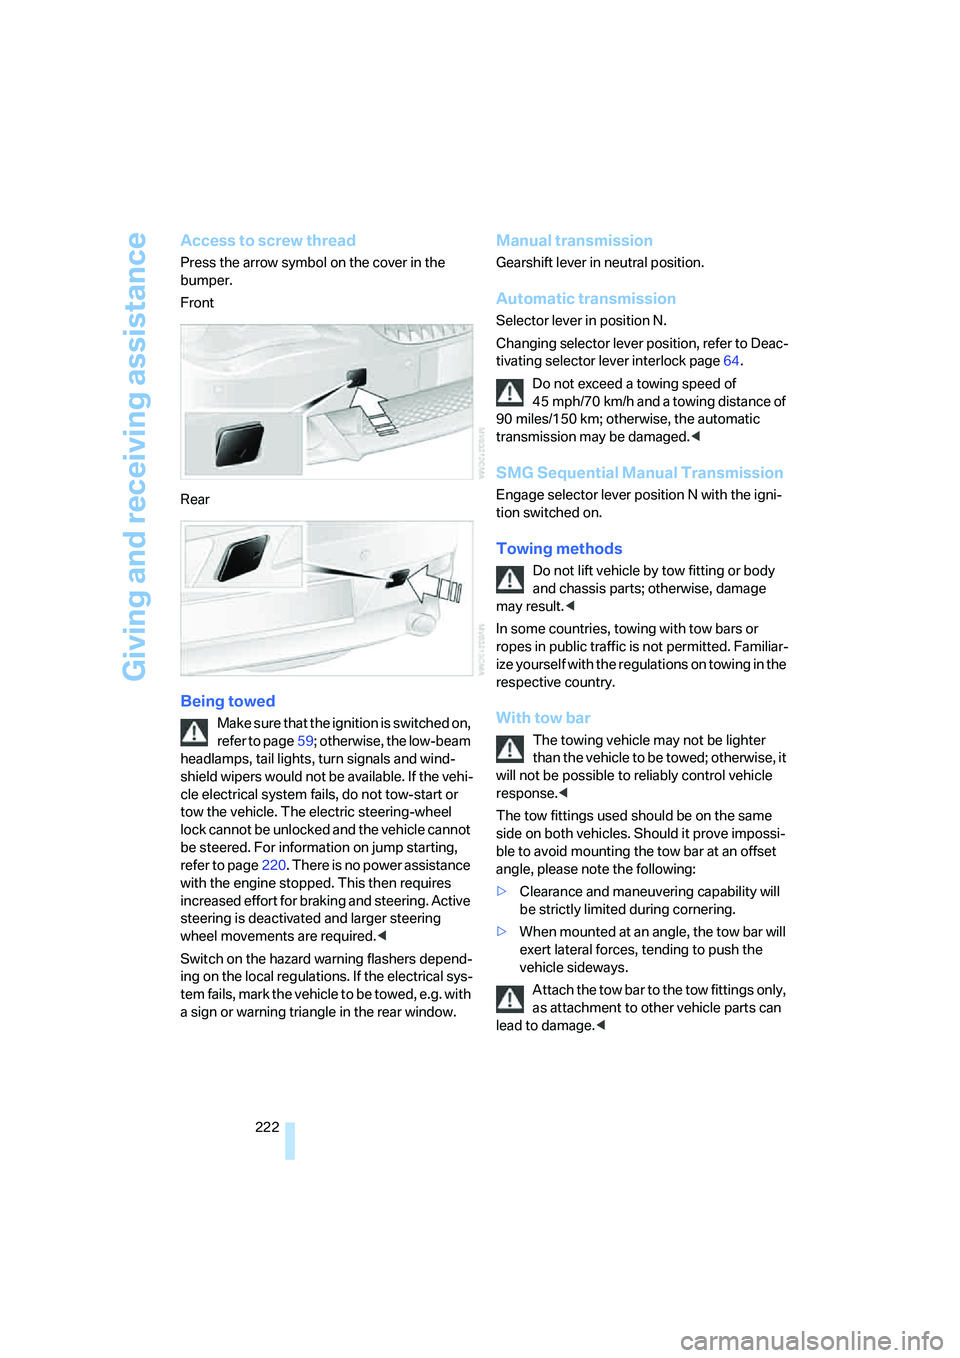
Access to screw thread
Press the arrow symbol on the cover in the
bumper.
Front
Rear
Being towed
Make sure that the ignition is switched on,
refer to page59; otherwise, the low-beam
headlamps, tail lights, turn signals and wind-
shield wipers would not be available. If the vehi-
cle electrical system fails, do not tow-start or
tow the vehicle. The electric steering-wheel
lock cannot be unlocked and the vehicle cannot
be steered. For information on jump starting,
refer to page220. There is no power assistance
with the engine stopped. This then requires
increased effort for braking and steering. Active
steering is deactivated and larger steering
wheel movements are required.<
Switch on the hazard warning flashers depend-
ing on the local regulations. If the electrical sys-
tem fails, mark the vehicle to be towed, e.g. with
a sign or warning triangle in the rear window.
Manual transmission
Gearshift lever in neutral position.
Automatic transmission
Selector lever in position N.
Changing selector lever position, refer to Deac-
tivating selector lever interlock page64.
Do not exceed a towing speed of
45 mph/70 km/h and a towing distance of
90 miles/150 km; otherwise, the automatic
transmission may be damaged.<
SMG Sequential Manual Transmission
Engage selector lever position N with the igni-
tion switched on.
Towing methods
Do not lift vehicle by tow fitting or body
and chassis parts; otherwise, damage
may result.<
In some countries, towing with tow bars or
ropes in public traffic is not permitted. Familiar-
ize yourself with the regulations on towing in the
respective country.
With tow bar
The towing vehicle may not be lighter
than the vehicle to be towed; otherwise, it
will not be possible to reliably control vehicle
response.<
The tow fittings used should be on the same
side on both vehicles. Should it prove impossi-
ble to avoid mounting the tow bar at an offset
angle, please note the following:
>Clearance and maneuvering capability will
be strictly limited during cornering.
>When mounted at an angle, the tow bar will
exert lateral forces, tending to push the
vehicle sideways.
Attach the tow bar to the tow fittings only,
as attachment to other vehicle parts can
lead to damage.<
Page 225 of 256
Mobility
223Reference
At a glance
Controls
Driving tips
Communications
Navigation
Entertainment
With tow rope
When starting off in the towing vehicle, make
sure that the tow rope is taut.
To avoid jerking and the associated
stresses on vehicle components when
towing, always use nylon ropes or nylon straps.
Attach tow ropes to the tow fittings only, as
attachment to other vehicle parts can lead to
damage.<
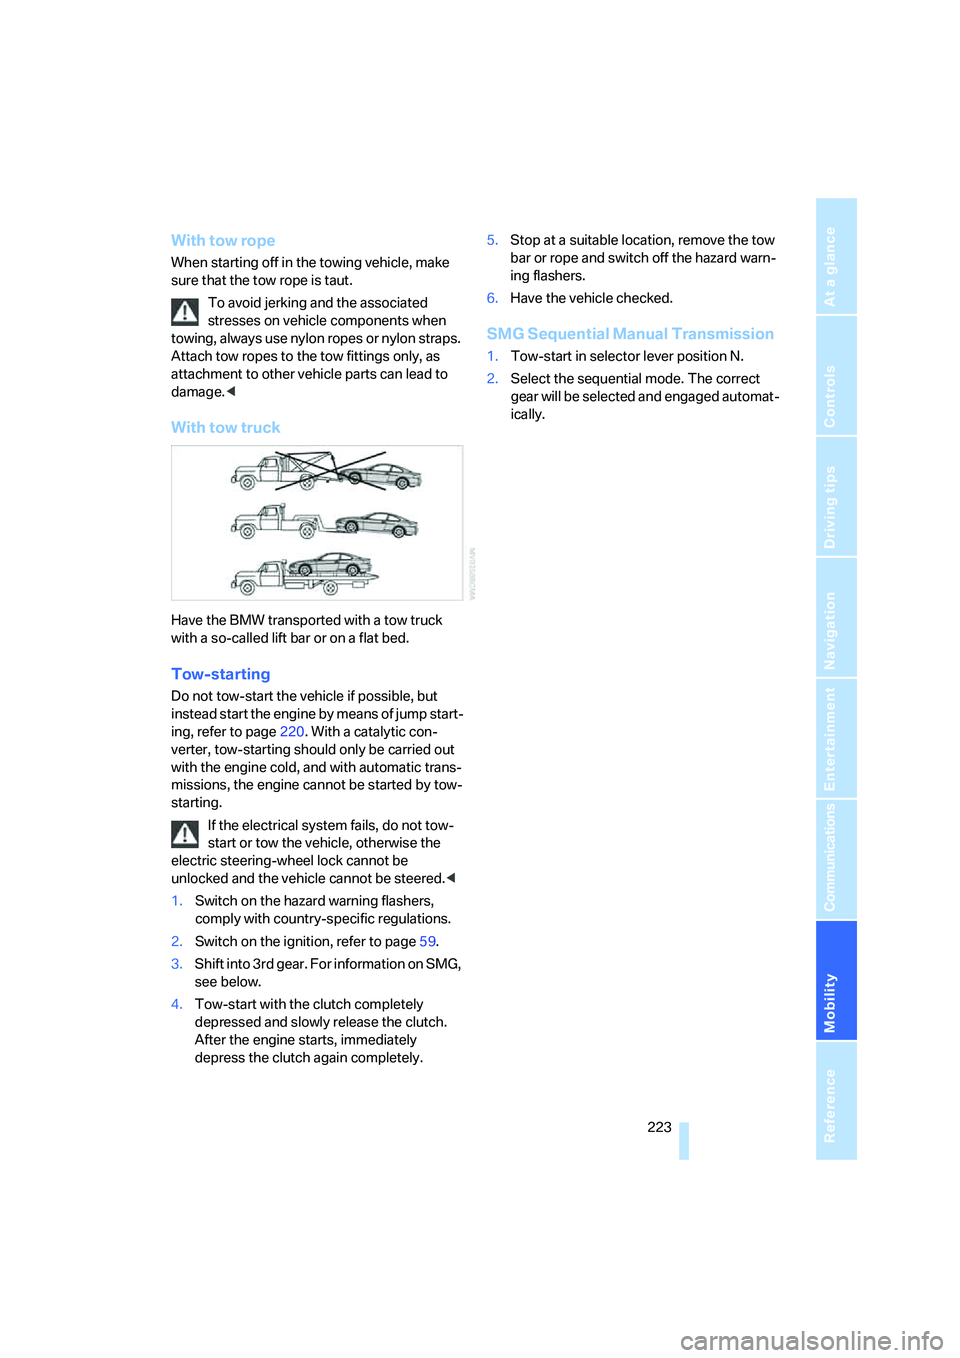
With tow truck
Have the BMW transported with a tow truck
with a so-called lift bar or on a flat bed.
Tow-starting
Do not tow-start the vehicle if possible, but
instead start the engine by means of jump start-
ing, refer to page220. With a catalytic con-
verter, tow-starting should only be carried out
with the engine cold, and with automatic trans-
missions, the engine cannot be started by tow-
starting.
If the electrical system fails, do not tow-
start or tow the vehicle, otherwise the
electric steering-wheel lock cannot be
unlocked and the vehicle cannot be steered.<
1.Switch on the hazard warning flashers,
comply with country-specific regulations.
2.Switch on the ignition, refer to page59.
3.Shift into 3rd gear. For information on SMG,
see below.
4.Tow-start with the clutch completely
depressed and slowly release the clutch.
After the engine starts, immediately
depress the clutch again completely.5.Stop at a suitable location, remove the tow
bar or rope and switch off the hazard warn-
ing flashers.
6.Have the vehicle checked.
SMG Sequential Manual Transmission
1.Tow-start in selector lever position N.
2.Select the sequential mode. The correct
gear will be selected and engaged automat-
ically.
Page 235 of 256
Reference 233
At a glance
Controls
Driving tips
Communications
Navigation
Entertainment
Mobility
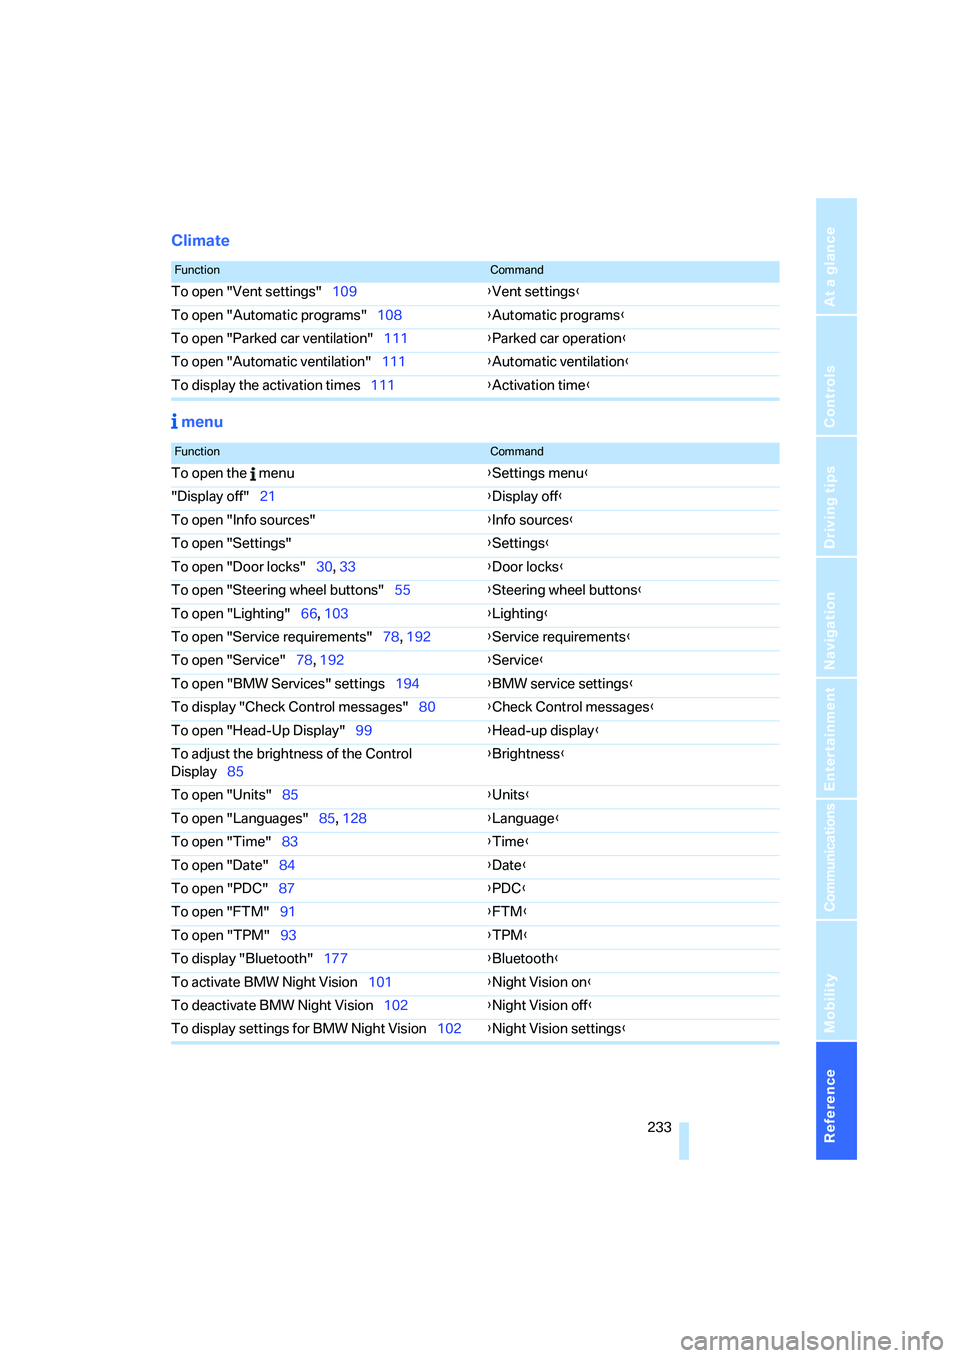
Climate
menu
FunctionCommand
To open "Vent settings"109{Vent settings}
To open "Automatic programs"108{Automatic programs}
To open "Parked car ventilation"111{Parked car operation}
To open "Automatic ventilation"111{Automatic ventilation}
To display the activation times111{Activation time}
FunctionCommand
To open the menu{Settings menu}
"Display off"21{Display off}
To open "Info sources"{Info sources}
To open "Settings"{Settings}
To open "Door locks"30, 33{Door locks}
To open "Steering wheel buttons"55{Steering wheel buttons}
To open "Lighting"66, 103{Lighting}
To open "Service requirements"78, 192{Service requirements}
To open "Service"78, 192{Service}
To open "BMW Services" settings194{BMW service settings}
To display "Check Control messages"80{Check Control messages}
To open "Head-Up Display"99{Head-up display}
To adjust the brightness of the Control
Display85{Brightness}
To open "Units"85{Units}
To open "Languages"85, 128{Language}
To open "Time"83{Time}
To open "Date"84{Date}
To open "PDC"87{PDC}
To open "FTM"91{
FTM}
To open "TPM"93{TPM}
To display "Bluetooth"177{Bluetooth}
To activate BMW Night Vision101{Night Vision on}
To deactivate BMW Night Vision102{Night Vision off}
To display settings for BMW Night Vision102{Night Vision settings}