2007 BMW 650I CONVERTIBLE light
[x] Cancel search: lightPage 118 of 254
Practical interior accessories
116
Cigarette lighter
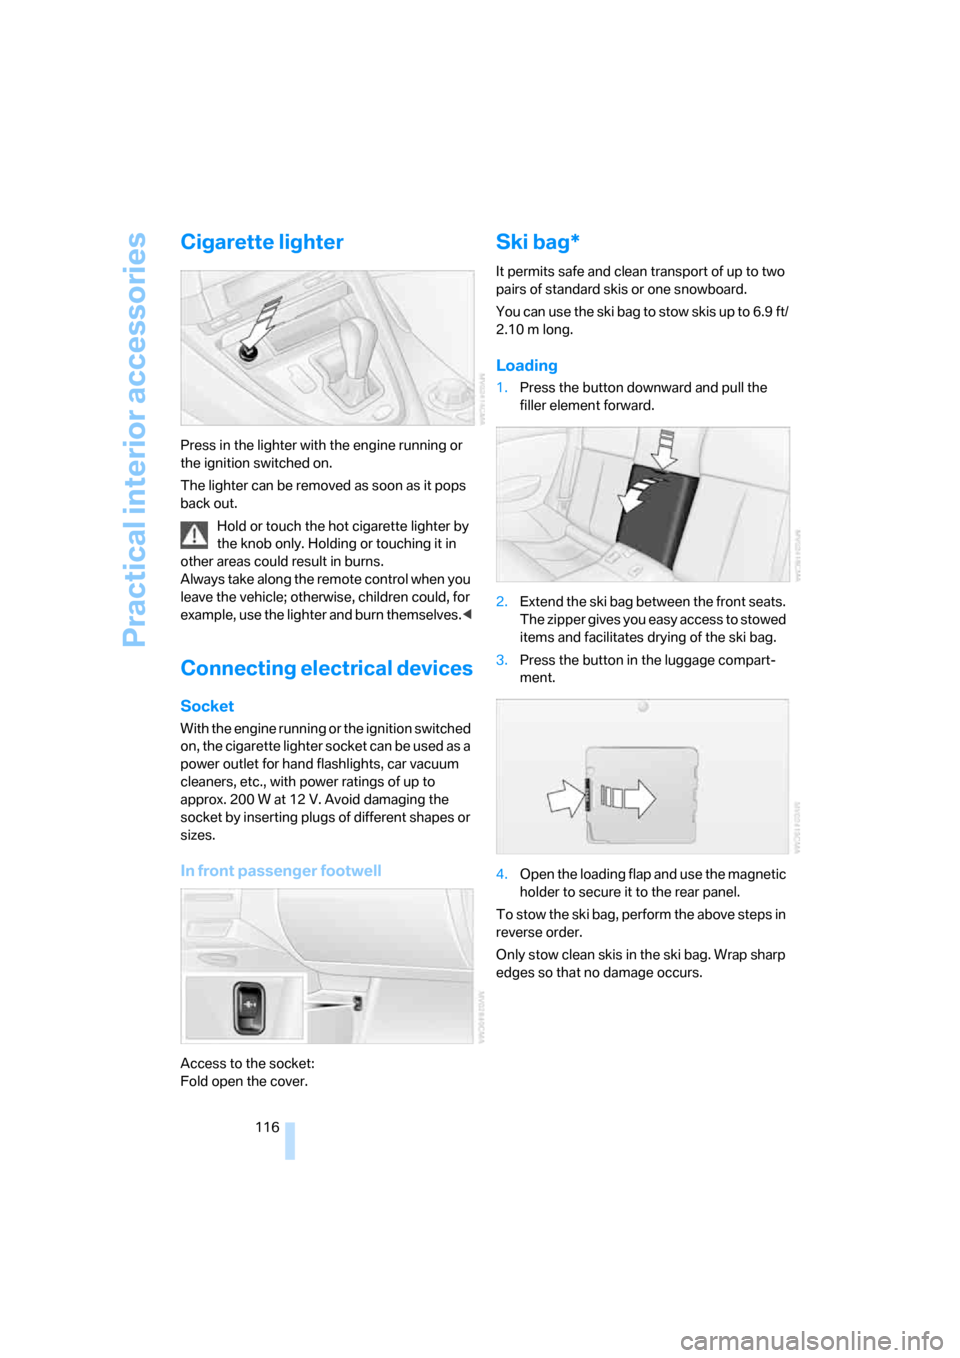
Press in the lighter with the engine running or
the ignition switched on.
The lighter can be removed as soon as it pops
back out.
Hold or touch the hot cigarette lighter by
the knob only. Holding or touching it in
other areas could result in burns.
Always take along the remote control when you
leave the vehicle; otherwise, children could, for
example, use the lighter and burn themselves.<
Connecting electrical devices
Socket
With the engine running or the ignition switched
on, the cigarette lighter socket can be used as a
power outlet for hand flashlights, car vacuum
cleaners, etc., with power ratings of up to
approx. 200 W at 12 V. Avoid damaging the
socket by inserting plugs of different shapes or
sizes.
In front passenger footwell
Access to the socket:
Fold open the cover.
Ski bag*
It permits safe and clean transport of up to two
pairs of standard skis or one snowboard.
You can use the ski bag to stow skis up to 6.9 ft/
2.10 m long.
Loading
1.Press the button downward and pull the
filler element forward.
2.Extend the ski bag between the front seats.
The zipper gives you easy access to stowed
items and facilitates drying of the ski bag.
3.Press the button in the luggage compart-
ment.
4.Open the loading flap and use the magnetic
holder to secure it to the rear panel.
To stow the ski bag, perform the above steps in
reverse order.
Only stow clean skis in the ski bag. Wrap sharp
edges so that no damage occurs.
Page 123 of 254
Driving tips
121Reference
At a glance
Controls
Communications
Navigation
Entertainment
Mobility
Mobile communications devices in
vehicle
BMW advises against using mobile com-
munications devices, e.g. mobile phones,
inside the vehicle without a direct connection to
an external antenna. Otherwise, the vehicle
electronics and mobile communications device
can interfere with each other. In addition, there
is no assurance that the radiation emitted dur-
ing transmission will be conveyed out of the
vehicle interior.<
Hydroplaning
When driving on wet or slushy roads,
reduce road speed. If you do not, a wedge
of water can form between tires and road sur-
face. This phenomenon is referred to as hydro-
planing, and is characterized by a partial or
complete loss of contact between the tires and
the road surface, ultimately undermining your
ability to steer and brake the vehicle.<
The risk of hydroplaning increases as the tread
depth of the tires decreases, also refer to Mini-
mum tire tread on page203.
Driving through water
Do not drive through water on the road if it
is deeper than 1 ft/30 cm, and then only at
walking speed at the most. Otherwise, the vehi-
cle's engine, the electrical systems and the
transmission may be damaged.<
Using handbrake on inclines
On inclines, do not hold the vehicle with
the clutch; use the handbrake. Otherwise,
greater clutch wear will result.<
SMG Sequential Manual Transmission
Start off quickly on slopes. Do not hold
the vehicle on a hill by applying the throt-
tle, but engage the handbrake instead. Other-
wise, overheating can occur in the transmission
region.<
Starting assistant
The starting assistant enables you to start off
conveniently on slopes. The handbrake is not
required for this purpose.
1.Hold the vehicle with the footbrake.
2.Release the footbrake and drive off quickly.
The starting assistant holds the vehicle
for approx. 2 seconds after releasing the
footbrake. Depending on the load, the vehicle
may also roll back slightly during this time.
After releasing the footbrake, drive off quickly,
otherwise the starting assistant no longer holds
the vehicle after approx. 2 seconds and it
begins to roll back.<
Braking safely
Your BMW is equipped with ABS as a standard
feature. In situations that require it, it is best to
brake with full force. Since the vehicle maintains
steering responsiveness, you can still avoid
possible obstacles with a minimum of steering
effort.
Pulsation at the brake pedal combines with
sounds from the hydraulic circuits to indicate to
the driver that ABS is in its active mode.
Do not drive with your foot resting on the
brake pedal. Even light but consistent
pedal pressure can lead to high temperatures,
brake wear and possibly even brake failure.<
Driving in wet conditions
When driving on wet roads or in heavy rain, it is
a good idea to apply light pressure to the brake
pedal every few miles. Monitor traffic conditions
to ensure that this maneuver does not endan-
ger other road users. The heat generated in this
process helps dry the pads and rotors to ensure
that full braking efficiency will then be available
when you need it.
Hills
To prevent overheating and thus reduced
efficiency of the brake system, downshift
to a gear in which only minimal brake applica-
tions are needed when descending long or
steep downhill stretches. Even light but consis-
Page 125 of 254
Driving tips
123Reference
At a glance
Controls
Communications
Navigation
Entertainment
Mobility
5.Determine the combined weight of luggage
and cargo being loaded on the vehicle. That
weight may not safely exceed the available
cargo and luggage load capacity calculated
in step 4.
6.If your vehicle will be towing a trailer, part of
the load from your trailer will be transferred
to your vehicle. Consult the manual for
transporting a trailer to determine how this
may reduce the available cargo and luggage
load capacity of your vehicle.
Load
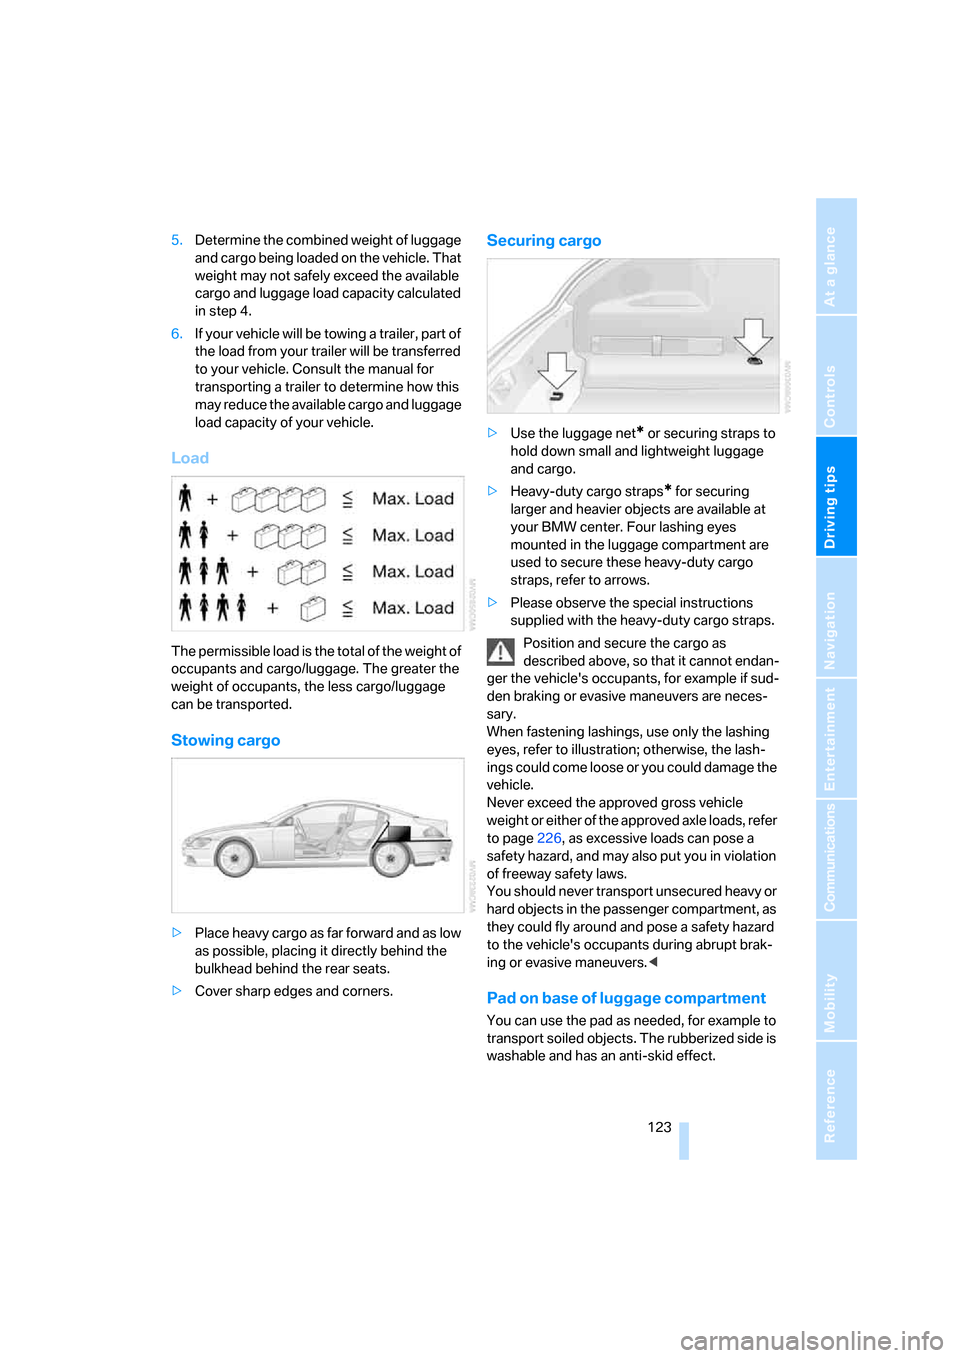
The permissible load is the total of the weight of
occupants and cargo/luggage. The greater the
weight of occupants, the less cargo/luggage
can be transported.
Stowing cargo
>Place heavy cargo as far forward and as low
as possible, placing it directly behind the
bulkhead behind the rear seats.
>Cover sharp edges and corners.
Securing cargo
>Use the luggage net* or securing straps to
hold down small and lightweight luggage
and cargo.
>Heavy-duty cargo straps
* for securing
larger and heavier objects are available at
your BMW center. Four lashing eyes
mounted in the luggage compartment are
used to secure these heavy-duty cargo
straps, refer to arrows.
>Please observe the special instructions
supplied with the heavy-duty cargo straps.
Position and secure the cargo as
described above, so that it cannot endan-
ger the vehicle's occupants, for example if sud-
den braking or evasive maneuvers are neces-
sary.
When fastening lashings, use only the lashing
eyes, refer to illustration; otherwise, the lash-
ings could come loose or you could damage the
vehicle.
Never exceed the approved gross vehicle
weight or either of the approved axle loads, refer
to page226, as excessive loads can pose a
safety hazard, and may also put you in violation
of freeway safety laws.
You should never transport unsecured heavy or
hard objects in the passenger compartment, as
they could fly around and pose a safety hazard
to the vehicle's occupants during abrupt brak-
ing or evasive maneuvers.<
Pad on base of luggage compartment
You can use the pad as needed, for example to
transport soiled objects. The rubberized side is
washable and has an anti-skid effect.
Page 128 of 254
Starting navigation system
126
Starting navigation system
Your navigation system can use satellites to
ascertain the precise position of your vehicle
and guide you reliably to any destination you
enter.
Navigation DVD
The navigation system requires a special navi-
gation DVD. The latest version is available at
your BMW center.
Inserting navigation DVD
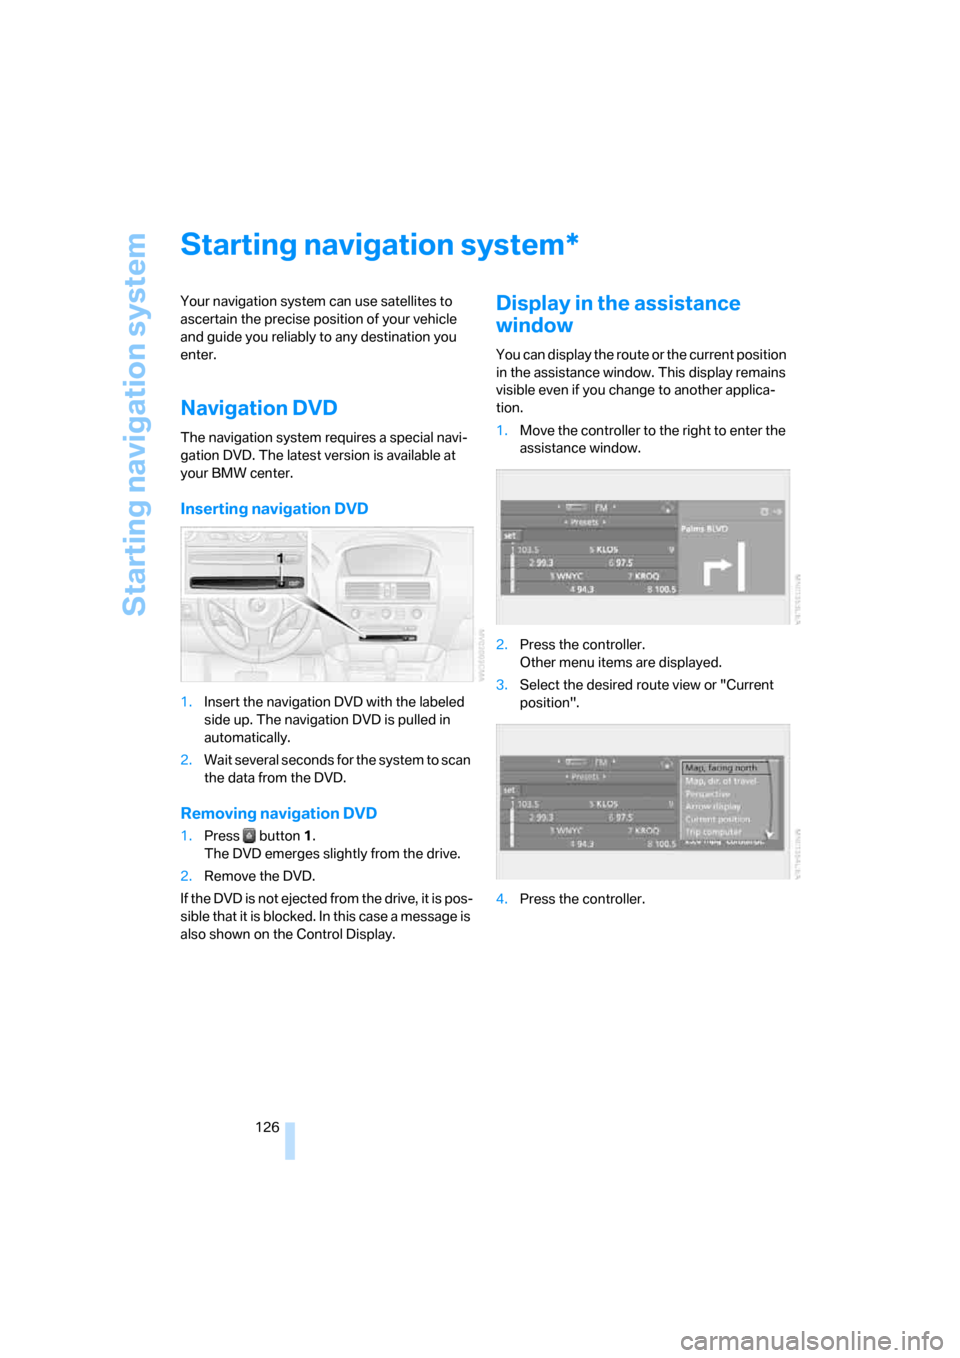
1.Insert the navigation DVD with the labeled
side up. The navigation DVD is pulled in
automatically.
2.Wait several seconds for the system to scan
the data from the DVD.
Removing navigation DVD
1.Press button 1.
The DVD emerges slightly from the drive.
2.Remove the DVD.
If the DVD is not ejected from the drive, it is pos-
sible that it is blocked. In this case a message is
also shown on the Control Display.
Display in the assistance
window
You can display the route or the current position
in the assistance window. This display remains
visible even if you change to another applica-
tion.
1.Move the controller to the right to enter the
assistance window.
2.Press the controller.
Other menu items are displayed.
3.Select the desired route view or "Current
position".
4.Press the controller.
*
Page 134 of 254

Destination entry
132 The town/city can also be selected from the list
via iDrive:
Turn the controller until the town/city of desti-
nation is selected and press the controller.
Entering the destination as an entire
word*
Towns/cities of destination and streets located
in the region where the language of the voice
command system is spoken can be entered as
an entire word.
Example: to enter a US town/city of destination
as an entire word, the system language must be
English.
The condition for this is the use of a suitable
navigation DVD.
Speak smoothly and at normal volume, avoiding
excessive emphasis and pauses.
1.Wait for the system to request the town/city
of destination.
The system can suggest up to 6 towns/cit-
ies of destination that match your entries.The town/city can also be selected from the list
via iDrive:
Turn the controller until the town/city of desti-
nation is selected and press the controller.
Destinations that sound the same which
cannot be differentiated by the system
are summarized in a separate list and shown as
a destination followed by three dots.
Select this entry with {Yes} if necessary. Then
select the desired city/town in this list.<
Entering street and house number
The street is entered in the same way as the
town/city of destination.
To enter the house number:
Up to 4-digit house numbers can be entered.
Say the house number as individual digits.
Starting destination guidance
Destination guidance starts immediately. A destination is suggested by the system.
2.Select a town/city:
>Select highlighted town/city: {Yes}
>Select other town/city: {No}
>Select entry, e.g. {Entry 3}
>Display additional entries of the list:
{Next page}
>To respell the town/city: {Repeat}
2.Say the name of the town/city of desti-
nation.
A destination is suggested by the system.
3.Select a town/city:
>Select highlighted town/city: {Yes}
>Select other town/city: {No}
>Select entry, e.g. {Entry 3}
>Reenter the town/city: {Repeat}
>Enter town/city of destination by
spelling it: {Spell}
1.{House number}
2.Say the house number.
{Start guidance}
Page 149 of 254
Navigation
Driving tips
147Reference
At a glance
Controls
Communications
Entertainment
Mobility
Traffic information during destination
guidance
The system behavior varies depending on
whether "Dynamic route" is selected.
Displaying traffic obstructions
If a traffic obstruction is reported to the naviga-
tion system and "Dynamic route" is not
selected, you will be provided with certain infor-
mation from a distance of approx. 25 miles/
40 km, e.g. the length of the traffic congestion.
The last possible junction will be displayed
shortly before this.
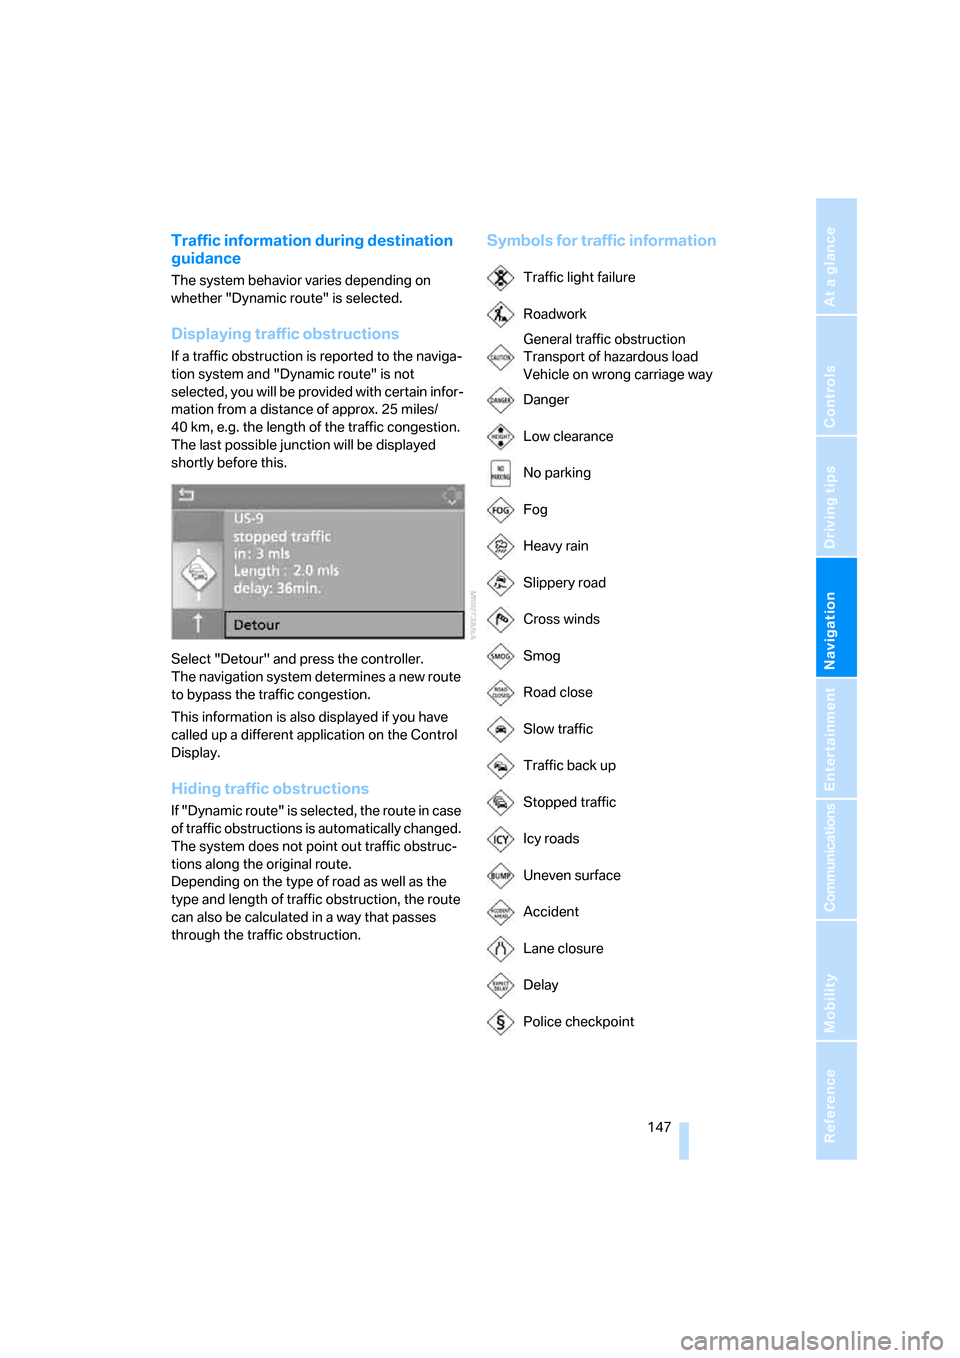
Select "Detour" and press the controller.
The navigation system determines a new route
to bypass the traffic congestion.
This information is also displayed if you have
called up a different application on the Control
Display.
Hiding traffic obstructions
If "Dynamic route" is selected, the route in case
of traffic obstructions is automatically changed.
The system does not point out traffic obstruc-
tions along the original route.
Depending on the type of road as well as the
type and length of traffic obstruction, the route
can also be calculated in a way that passes
through the traffic obstruction.
Symbols for traffic information
Traffic light failure
Roadwork
General traffic obstruction
Transport of hazardous load
Vehicle on wrong carriage way
Danger
Low clearance
No parking
Fog
Heavy rain
Slippery road
Cross winds
Smog
Road close
Slow traffic
Traffic back up
Stopped traffic
Icy roads
Uneven surface
Accident
Lane closure
Delay
Police checkpoint
Page 167 of 254
Navigation
Entertainment
Driving tips
165Reference
At a glance
Controls
Communications
Mobility
CD player and CD changer
Listening to CDs
Compressed audio files*
CDs with compressed audio files, i.e. MP3,
can be played by the CD player, but not by the
CD changer.
CD player: starting CD
With two drives:
The upper drive is for audio CDs.
Insert the CD into the drive with the labeled side
up. The CD is automatically pulled in.
Playback starts automatically if the sound out-
put is on. For CDs with compressed audio files,
it can take up to approx. 1 minute to read in the
data depending on the directory structure.
To start playback when there is already a CD in
the drive:
1.Press the button.
This opens the start menu.
2.Move the controller backwards to call up
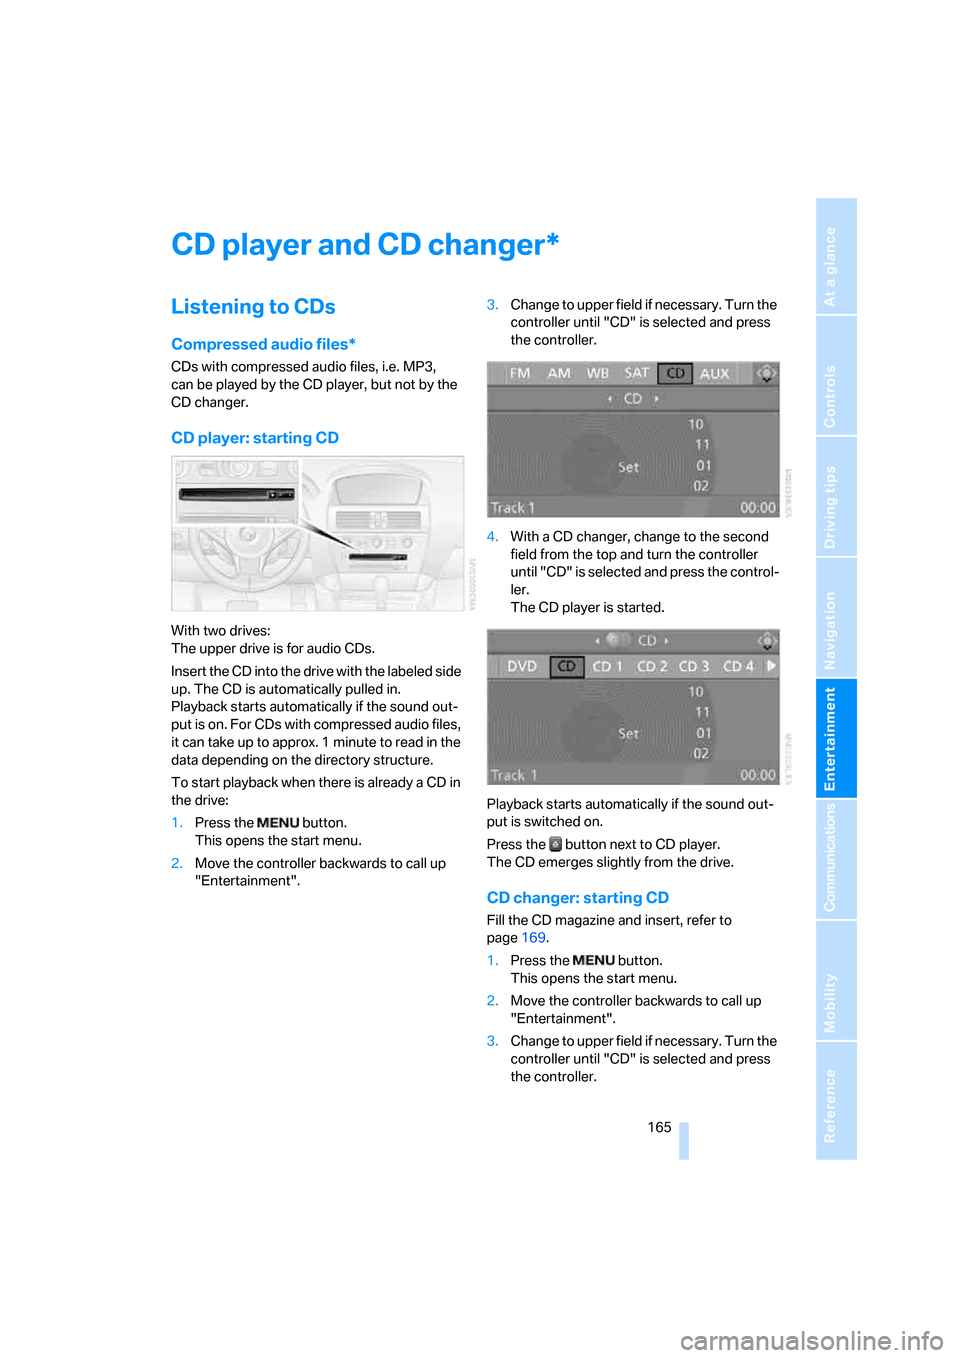
"Entertainment".3.Change to upper field if necessary. Turn the
controller until "CD" is selected and press
the controller.
4.With a CD changer, change to the second
field from the top and turn the controller
until "CD" is selected and press the control-
ler.
The CD player is started.
Playback starts automatically if the sound out-
put is switched on.
Press the button next to CD player.
The CD emerges slightly from the drive.
CD changer: starting CD
Fill the CD magazine and insert, refer to
page169.
1.Press the button.
This opens the start menu.
2.Move the controller backwards to call up
"Entertainment".
3.Change to upper field if necessary. Turn the
controller until "CD" is selected and press
the controller.
*
Page 172 of 254
CD player and CD changer
170
Malfunctions with individual CDs/DVDs
If malfunctions occur only with particular CDs/
DVDs, this can be due to one of the following
causes.
Home-recorded CDs/DVDs
Possible reasons for malfunctions with self-
recorded CDs/DVDs are, e.g., inconsistent
data-creation or recording processes, or poor
quality or advanced age of the CD/DVD blank.
Label CDs/DVDs only on the top, using a marker
designed for this purpose.
Damaged CDs/DVDs
Avoid fingerprints dust, scratches, and mois-
ture.
Keep CDs/DVDs in a sleeve.
Do not subject CDs/DVDs to temperatures over
1227/506, high levels of humidity or direct
sunlight.
CDs/DVDs with copy protection
Manufacturers often provide CDs/DVDs with
copy protection. This can mean that some CDs/
DVDs cannot be played or can only be played to
a limited extent.
Care
If necessary, clean the reflective scanning side
of the CDs/DVDs with a commercially available
cleaning cloth by wiping in straight lines from
the center outward.