2007 BMW 650I CONVERTIBLE door lock
[x] Cancel search: door lockPage 59 of 254

Controls
57Reference
At a glance
Driving tips
Communications
Navigation
Entertainment
Mobility
Transporting children safely
The right place for children
Do not leave children unattended in the
vehicle; otherwise, they could endanger
themselves and other persons, e.g. by opening
the doors.<
Children always in the rear
Accident research shows that the safest place
for children is in the back.
Children younger than 13 years of age or
with a height under 5 ft/150 cm may only
be transported in the rear in child restraint sys-
tems which correspond to the age, weight and
height of the child. Otherwise, there is an
increased danger of injury in an accident.<
Children 13 years of age or older must wear a
safety belt as soon as a suitable child restraint
system can no longer be used due to their age,
size and weight.
Exception for front passenger seat
Should it be necessary to use a child
restraint system on the front passenger
seat, the front, knee and side airbags on the
passenger side must be deactivated. Other-
wise, there is an increased risk of injury for the
child if the airbags are triggered, even with a
child restraint system.<
For more information on automatic deactivation
of the front passenger airbags, refer to page95.
Installing child restraint
systems
Follow child restraint system manufac-
turer's instructions for the selection,
installation and use of child restraint systems.
Otherwise, the degree of protection they offer
may be reduced.<
On front passenger seat
After mounting a child restraint system on
the front passenger seat, make sure that
the front and side airbags on the front passen-
ger side are deactivated, as otherwise there is
an increased risk of injury if the airbags are trig-
gered.<
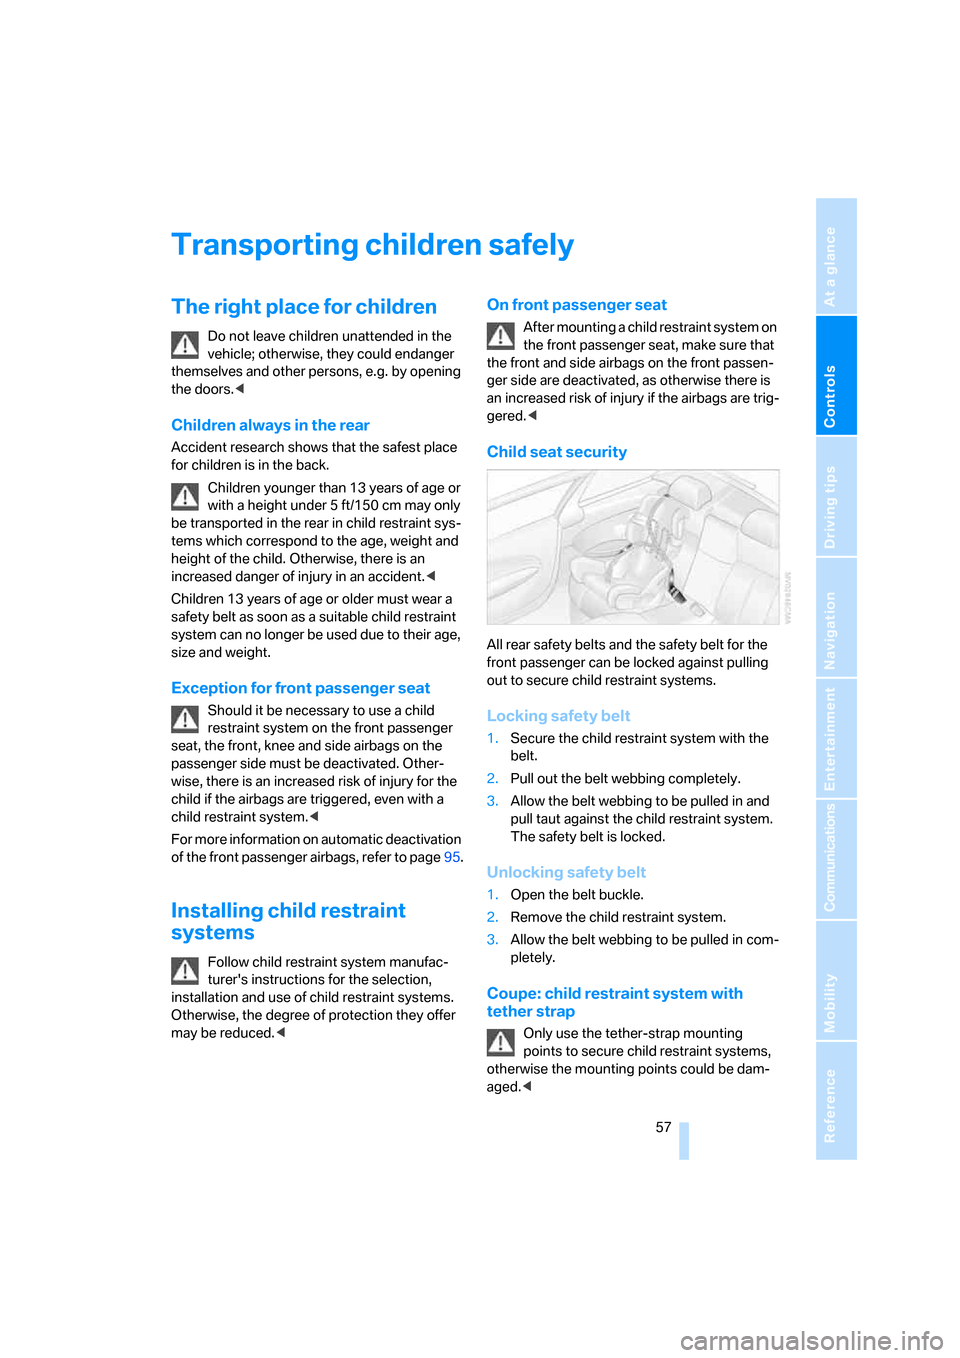
Child seat security
All rear safety belts and the safety belt for the
front passenger can be locked against pulling
out to secure child restraint systems.
Locking safety belt
1.Secure the child restraint system with the
belt.
2.Pull out the belt webbing completely.
3.Allow the belt webbing to be pulled in and
pull taut against the child restraint system.
The safety belt is locked.
Unlocking safety belt
1.Open the belt buckle.
2.Remove the child restraint system.
3.Allow the belt webbing to be pulled in com-
pletely.
Coupe: child restraint system with
tether strap
Only use the tether-strap mounting
points to secure child restraint systems,
otherwise the mounting points could be dam-
aged.<
Page 61 of 254

Controls
59Reference
At a glance
Driving tips
Communications
Navigation
Entertainment
Mobility
Driving
Ignition lock
Inserting remote control into ignition
lock
Insert the remote control as far as possible into
the ignition lock.
Radio readiness switches on.
Some electronic systems/consumers are ready
for operation.
Comfort access*
With comfort access, only insert the remote
control into the ignition lock in exceptional
cases, refer to page37.
Removing remote control from ignition
lock
Do not pull the remote control out of the
ignition lock using force, as otherwise
damage may result.<
Before removing the remote control, first press
it in as far as possible to release the locking
device.
The ignition is switched off if it was still
switched on.
Automatic transmission
The remote control can only be removed when
the selector lever is in position P: interlock.
Start/Stop button
Pressing the Start/Stop button switches the
radio readiness or the ignition on and off.
The engine is started when you press the
Start/Stop button and depress the clutch
if the car has manual transmission or the brake if
the car has automatic transmission.<
Radio readiness
Some electronic systems/consumers are ready
for operation. The time and outside tempera-
ture are displayed in the instrument cluster.
Radio readiness is automatically switched off:
>when the remote control is removed from
the ignition lock
>with comfort access
* by touching the sen-
sitive surface on the door handle, refer to
Locking doors on page37
Ignition on
All electronic systems/consumers are ready for
operation. The odometer and the trip odometer
are displayed in the instrument cluster, refer to
page75.
Please switch off the ignition and the
electronic systems/consumers which are
not required when the engine is not running to
save the battery.<
Radio readiness and ignition off
All indicator and warning lamps in the instru-
ment cluster go out.
Page 64 of 254

Driving
62 >Automatic downshifting and prevention of
incorrect shifting even in sequential opera-
tion
>Acceleration assistant, refer to page65
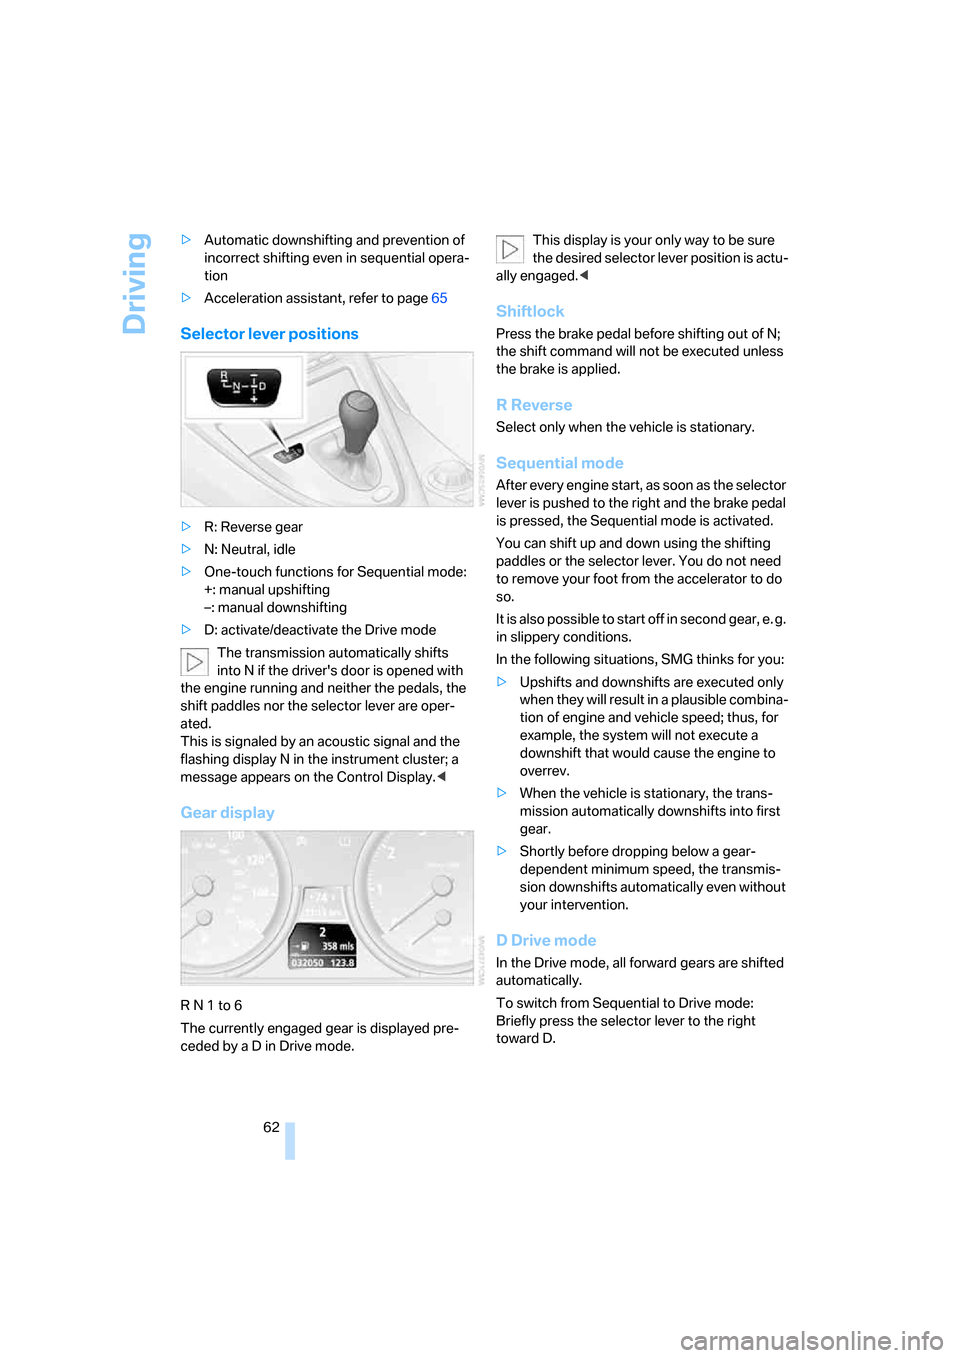
Selector lever positions
>R: Reverse gear
>N: Neutral, idle
>One-touch functions for Sequential mode:
+: manual upshifting
–: manual downshifting
>D: activate/deactivate the Drive mode
The transmission automatically shifts
into N if the driver's door is opened with
the engine running and neither the pedals, the
shift paddles nor the selector lever are oper-
ated.
This is signaled by an acoustic signal and the
flashing display N in the instrument cluster; a
message appears on the Control Display.<
Gear display
R N 1 to 6
The currently engaged gear is displayed pre-
ceded by a D in Drive mode.This display is your only way to be sure
the desired selector lever position is actu-
ally engaged.<
Shiftlock
Press the brake pedal before shifting out of N;
the shift command will not be executed unless
the brake is applied.
R Reverse
Select only when the vehicle is stationary.
Sequential mode
After every engine start, as soon as the selector
lever is pushed to the right and the brake pedal
is pressed, the Sequential mode is activated.
You can shift up and down using the shifting
paddles or the selector lever. You do not need
to remove your foot from the accelerator to do
so.
It is also possible to start off in second gear, e. g.
in slippery conditions.
In the following situations, SMG thinks for you:
>Upshifts and downshifts are executed only
when they will result in a plausible combina-
tion of engine and vehicle speed; thus, for
example, the system will not execute a
downshift that would cause the engine to
overrev.
>When the vehicle is stationary, the trans-
mission automatically downshifts into first
gear.
>Shortly before dropping below a gear-
dependent minimum speed, the transmis-
sion downshifts automatically even without
your intervention.
D Drive mode
In the Drive mode, all forward gears are shifted
automatically.
To switch from Sequential to Drive mode:
Briefly press the selector lever to the right
toward D.
Page 116 of 254

Practical interior accessories
114 Be sure that the flashlight is switched off
when it is inserted into its socket. Failure
to comply with this precaution could lead to
overcharging and damage.<
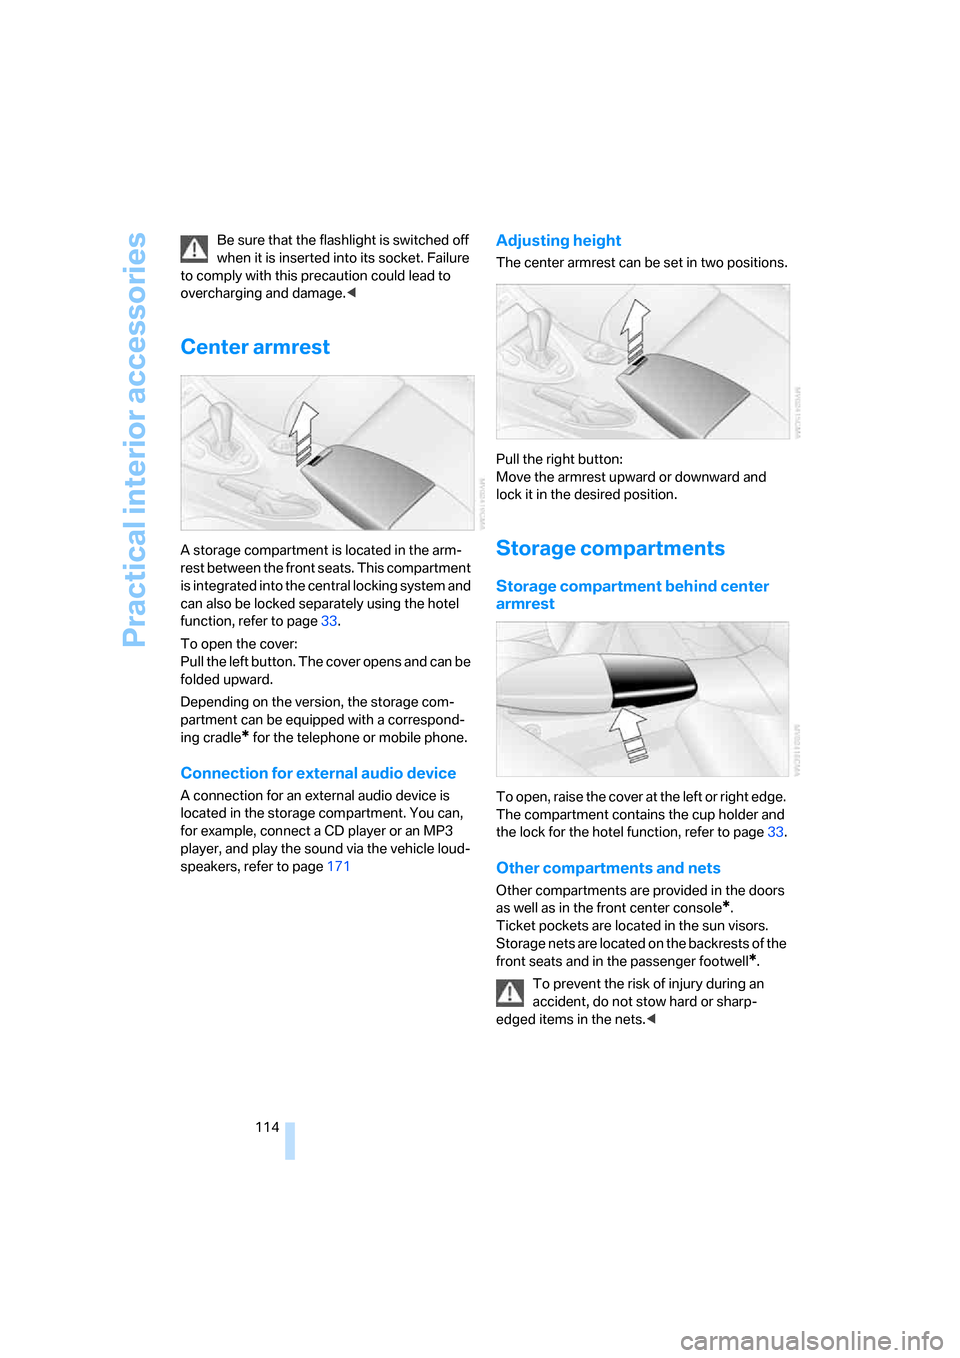
Center armrest
A storage compartment is located in the arm-
rest between the front seats. This compartment
is integrated into the central locking system and
can also be locked separately using the hotel
function, refer to page33.
To open the cover:
Pull the left button. The cover opens and can be
folded upward.
Depending on the version, the storage com-
partment can be equipped with a correspond-
ing cradle
* for the telephone or mobile phone.
Connection for external audio device
A connection for an external audio device is
located in the storage compartment. You can,
for example, connect a CD player or an MP3
player, and play the sound via the vehicle loud-
speakers, refer to page171
Adjusting height
The center armrest can be set in two positions.
Pull the right button:
Move the armrest upward or downward and
lock it in the desired position.
Storage compartments
Storage compartment behind center
armrest
To open, raise the cover at the left or right edge.
The compartment contains the cup holder
and
the lock for the hotel function, refer to page33.
Other compartments and nets
Other compartments are provided in the doors
as well as in the front center console
*.
Ticket pockets are located in the sun visors.
Storage nets are located on the backrests of the
front seats and in the passenger footwell
*.
To prevent the risk of injury during an
accident, do not stow hard or sharp-
edged items in the nets.<
Page 200 of 254

Refueling
198
Refueling
Switch off the engine before refueling,
otherwise no fuel can be filled into the
tank and a message is displayed.<
When handling fuel, always observe all
applicable precautionary measures and
regulations. Never transport reserve fuel con-
tainers in the vehicle. They can leak and cause
an explosion or a fire in an accident.<
Fuel filler door
To open and close: briefly press the rear edge of
the fuel filler door.
Unlocking manually
In the event of an electrical malfunction, you can
release the fuel filler door manually:
In the luggage compartment, pull the knob with
the gas pump symbol on the right side panel.
Observe the following when refueling
When handling fuels always follow any
safety guidelines posted at the gas sta-
tion.<
Place the fuel filler cap in the bracket attached
to the fuel filler door.
When refueling, insert the filler nozzle com-
pletely into the filler pipe. Avoid raising the filler
nozzle during refueling, otherwise this
>results in premature pump shutoff
>can lead to reduced efficiency in the fuel-
vapor recovery system
The fuel tank is full when the filler nozzle clicks
off the first time.
Fuel tank capacity
Approx. 18.5 US gal/70 liters, including the
reserve capacity of approx. 2.6 US gal/10 liters.
Refuel as soon as possible once your
cruising range falls below 30 miles/
50 km, otherwise engine functions are not
ensured and damage can occur.<
Fuel filler cap
Closing
Insert the cap and turn it clockwise until there is
a clearly audible click.
Do not jam the strap attached to the fuel
filler cap between the fuel filler cap and
the vehicle. A message
* is displayed if the cap
is loose or missing.<
Page 232 of 254

Short commands of voice command system
230
Climate
menu
FunctionCommand
To open "Vent settings"108{Vent settings}
To open "Automatic programs"107{Automatic programs}
To open "Parked car ventilation"110{Parked car operation}
To open "Automatic ventilation"110{Automatic ventilation}
To display the activation times110{Activation time}
FunctionCommand
To open the menu{Settings menu}
"Display off"21{Display off}
To open "Info sources"{Info sources}
To open "Settings"{Settings}
To open "Door locks"30, 32{Door locks}
To open "Steering wheel buttons"55{Steering wheel buttons}
To open "Lighting"65, 102{Lighting}
To open "Service requirements"78, 191{Service requirements}
To open "Service"78, 191{Service}
To open "BMW Service settings" settings193{BMW service settings}
To display "Check Control messages"80{Check Control messages}
To open "Head-Up Display"98{Head-up display}
To adjust the brightness of the Control
Display84{Brightness}
To open "Units"85{Units}
To open "Languages"85, 126{Language}
To open "Time"83{Time}
To open "Date"84{Date}
To open "PDC"87{PDC}
To open "FTM"90{
FTM}
To open "TPM"92{TPM}
To display "Bluetooth"175{Bluetooth}
To activate BMW Night Vision100{Night Vision on}
To deactivate BMW Night Vision100{Night Vision off}
To display settings for BMW Night Vision100{Night Vision settings}
Page 234 of 254

Everything from A to Z
232
Everything from A to Z
Index
"..." Identifies Control Display
texts used to select
individual functions, and
indicates where to find them
in the text.
A
ABS Antilock Brake
System87
– indicator/warning lamp89
ACC, refer to Active cruise
control68
Acceleration assistant with
SMG65
Accepted calls182
Accessories6
Accident, refer to Emergency
call217
Activated-charcoal filter for
automatic climate
control110
Activating hour signal84
"Activation time" for parked-
car ventilation110
Active cruise control68
– indicator lamp71
– radar sensor72
– selecting distance70
– warning lamps71
Active steering94
– warning lamp94
Adapter for spare key28
Adaptive brake lamps, refer to
Brake force display94
Adaptive Head Light103
"Add digits" for mobile
phone182
Additives
– coolant209
– engine oil, refer to Approved
engine oils208"Address book" for navigation
system136
Address for navigation
– deleting137
– entering128,131
– selecting136
– storing136
– storing current position136
"Add to address book"135
"Add to destination
list"131,133
Adjusting interior
temperature107
Adjusting thigh support49
Adjusting tone in audio mode,
refer to Tone control153
"After door opened"51
"After unlocking"51
Airbags94
– deactivating, refer to
Exception for front
passenger seat57
– indicator/warning lamp96
– indicator lamp for front
passenger airbags95
– sitting safely48
Air distribution
– automatic107
– manual108
Airing, refer to Ventilation109
Air outlets, refer to
Ventilation109
Air recirculation, refer to AUC
Automatic recirculated-air
control109
"Air recirculation on / off"56
Air supply, automatic climate
control106
Air volume108
AKI, refer to Fuel
specifications199Alarm system35
– avoiding unintentional
alarms36
– interior motion sensor36
– switching off alarm36
– switching off tilt alarm
sensor and interior motion
sensor36
– tilt alarm sensor36
"All channels"163
"All doors"30
All-season tires, refer to
Winter tires205
"All stations", calling up with
radio156,159
Alterations, technical, refer to
For your own safety6
"AM", reception
range152,156
Antenna, refer to Caring for
your vehicle brochure
Antenna for mobile phone174
Antifreeze
– coolant209
– washer fluid67
Antilock Brake System
ABS87
– indicator/warning lamp89
Anti-theft alarm system, refer
to Alarm system35
Anti-theft system, refer to
Central locking system30
Approved axle loads, refer to
Weights226
Approved engine oils208
Approved gross vehicle
weight, refer to Weights226
Armrest, refer to Center
armrest114
Around the center console14
Around the steering wheel10
Page 235 of 254

Reference 233
At a glance
Controls
Driving tips
Communications
Navigation
Entertainment
Mobility
Arrival time
– refer to Computer77
– refer to Starting destination
guidance140
"Arrow display" for navigation
system141
Artificial leather, refer to
Caring for your vehicle
brochure
Ashtray115
Assist, refer to
BMW Assist189
Assistance systems, refer to
Driving stability control
systems87
Assistance window20
"Assist. window off"21
AUC Automatic recirculated-
air control109
"Audio"153,155,160
Audio152
– controls152
– switching on/off152
– tone control153
– volume153
Audio device, external114
Automatic
– air distribution107
– air volume107
– cruise control67,68
– headlamp control102
– recirculated-air control
AUC109
– service notification191
– steering wheel
adjustment50
– storing stations157
Automatic car washes122
– also refer to Caring for your
vehicle brochure
– also refer to Comfort
access38
Automatic climate control106
– automatic air
distribution107
– convertible program107
– switching on and off109
– ventilation with vehicle
parked110Automatic closing of doors,
refer to Automatic soft
closing34
Automatic curb monitor54
Automatic lighting
– refer to Automatic headlamp
control102
– refer to Daytime running
lamps103
– refer to Interior lamps104
– refer to Pathway lighting102
"Automatic programs"107
Automatic soft closing34
Automatic station search157
Automatic transmission with
Steptronic63
– deactivating selector lever
interlock64
– Dynamic Driving Control64
– interlock63
– kick-down64
– selector lever lock,
interlock63
– shiftlock63
– towing220
– tow-starting221
– with comfort access38
"Automatic ventilation"110
AUTO program with
automatic climate
control107
"Autostore" on the
radio156,158
"AUX"152,171
AUX-In connection114,171
Average fuel consumption76
– setting units85
Average speed76
"Avoid ferries" for navigation
system139
"Avoid highways" for
navigation system138
Avoiding freeways for
navigation138
Avoiding unintentional
alarms36
"Avoid tollroads" for
navigation system139Axle loads, refer to
Weights226
"A - Z"182
B
Backrest contour, refer to
Lumbar support49
Backrests, refer to Seats49
Backup lamps, replacing
bulbs, refer to Tail
lamps214
"Balance", refer to Tone
control154
Band-aids, refer to First-aid
kit218
Bass, refer to Tone
control153
"Bass", tone control153
Battery
– jump starting218
– refer to Vehicle battery215
Battery replacement, remote
control for comfort
access38
BC button, refer to
Computer76
Being towed220
Belts, refer to Safety belts53
Beverage holder, refer to Cup
holders115
Blower, refer to Air
volume108
"Bluetooth"176
"BMW Assist"190
BMW Assist189
– activating194
– breakdown assistance190
– contacting BMW Customer
Relations192
– displaying vehicle data195
– information service192
– services offered189
– TeleService191
– updating193
"BMW Contact"184
"BMW Contact
Numbers"184