2007 BMW 650I CONVERTIBLE reset
[x] Cancel search: resetPage 94 of 254
Technology for comfort, convenience and safety
92
One wheel is yellow
Flat tire or a major drop in inflation pressure in
the indicated tire. A message appears on the
Control Display.
All wheels are yellow
Flat tire or a major drop in inflation pressure in
several tires. A message appears on the Control
Display.
Gray
The system cannot detect a flat tire.
Reasons for this can be:
>TPM is being reset
>Temporary interference due to systems or
devices which use the same radio fre-
quency
>Malfunction
Resetting system
Reset the system again after each correc-
tion of the tire inflation pressure and after
every tire or wheel change.<
Resetting finishes during driving, which can be
interrupted at any time. When driving resumes,
resetting is continued automatically.
iDrive, for explanation of principle, refer to
page16.
1.Press the button.
This opens the start menu.
2.Press the controller to open the menu.
3.Select "Settings" and press the controller.
4.Select "Vehicle / Tires" and press the con-
troller.
5.Change to upper field if necessary. Turn the
controller until "TPM" is selected and press
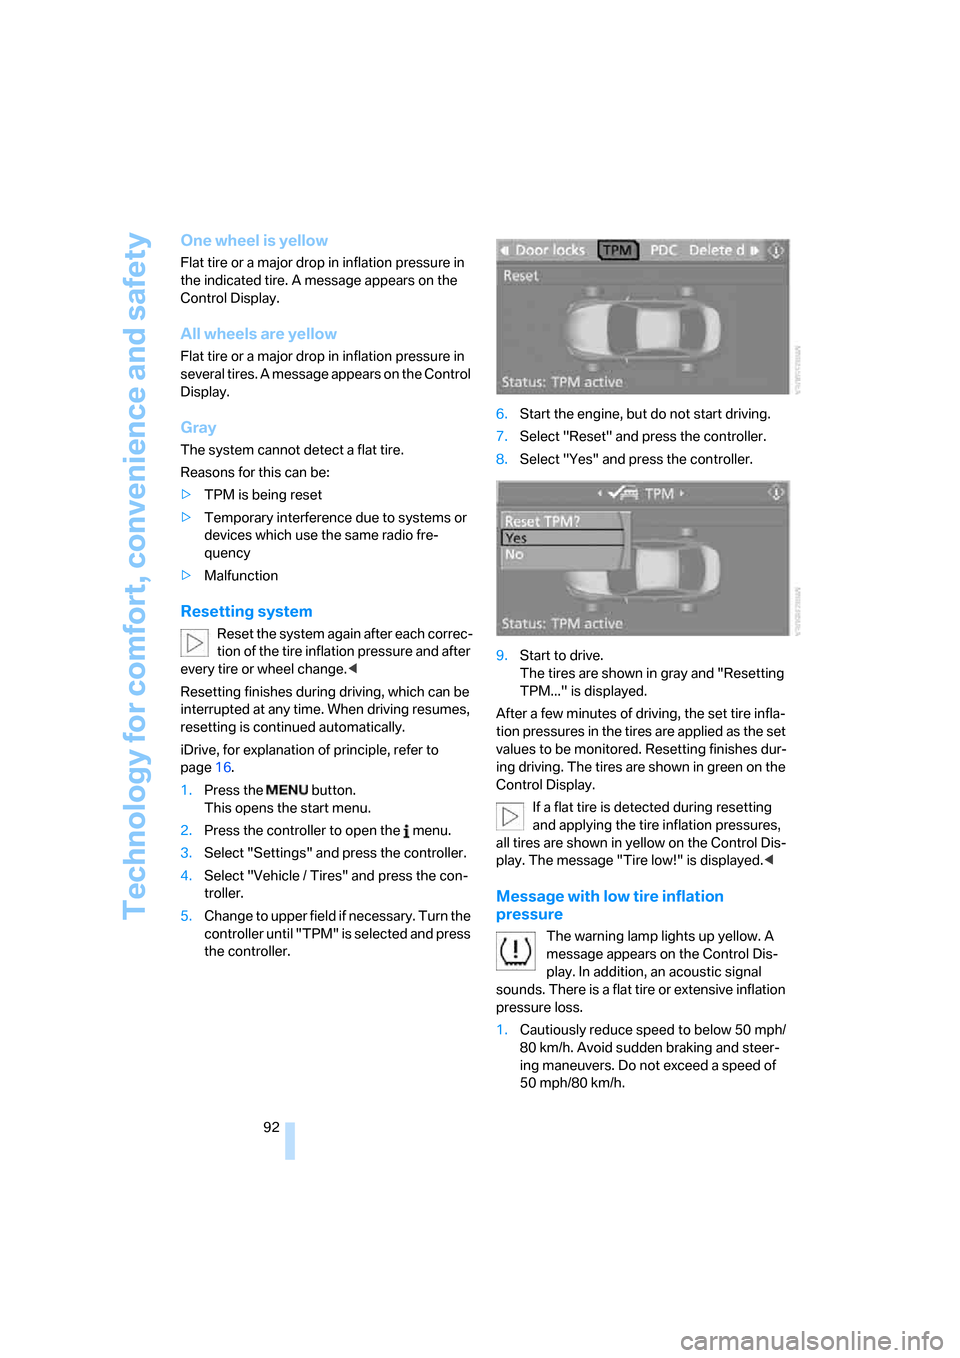
the controller.6.Start the engine, but do not start driving.
7.Select "Reset" and press the controller.
8.Select "Yes" and press the controller.
9.Start to drive.
The tires are shown in gray and "Resetting
TPM..." is displayed.
After a few minutes of driving, the set tire infla-
tion pressures in the tires are applied as the set
values to be monitored. Resetting finishes dur-
ing driving. The tires are shown in green on the
Control Display.
If a flat tire is detected during resetting
and applying the tire inflation pressures,
all tires are shown in yellow on the Control Dis-
play. The message "Tire low!" is displayed.<
Message with low tire inflation
pressure
The warning lamp lights up yellow. A
message appears on the Control Dis-
play. In addition, an acoustic signal
sounds. There is a flat tire or extensive inflation
pressure loss.
1.Cautiously reduce speed to below 50 mph/
80 km/h. Avoid sudden braking and steer-
ing maneuvers. Do not exceed a speed of
50 mph/80 km/h.
Page 157 of 254
Navigation
Entertainment
Driving tips
155Reference
At a glance
Controls
Communications
Mobility
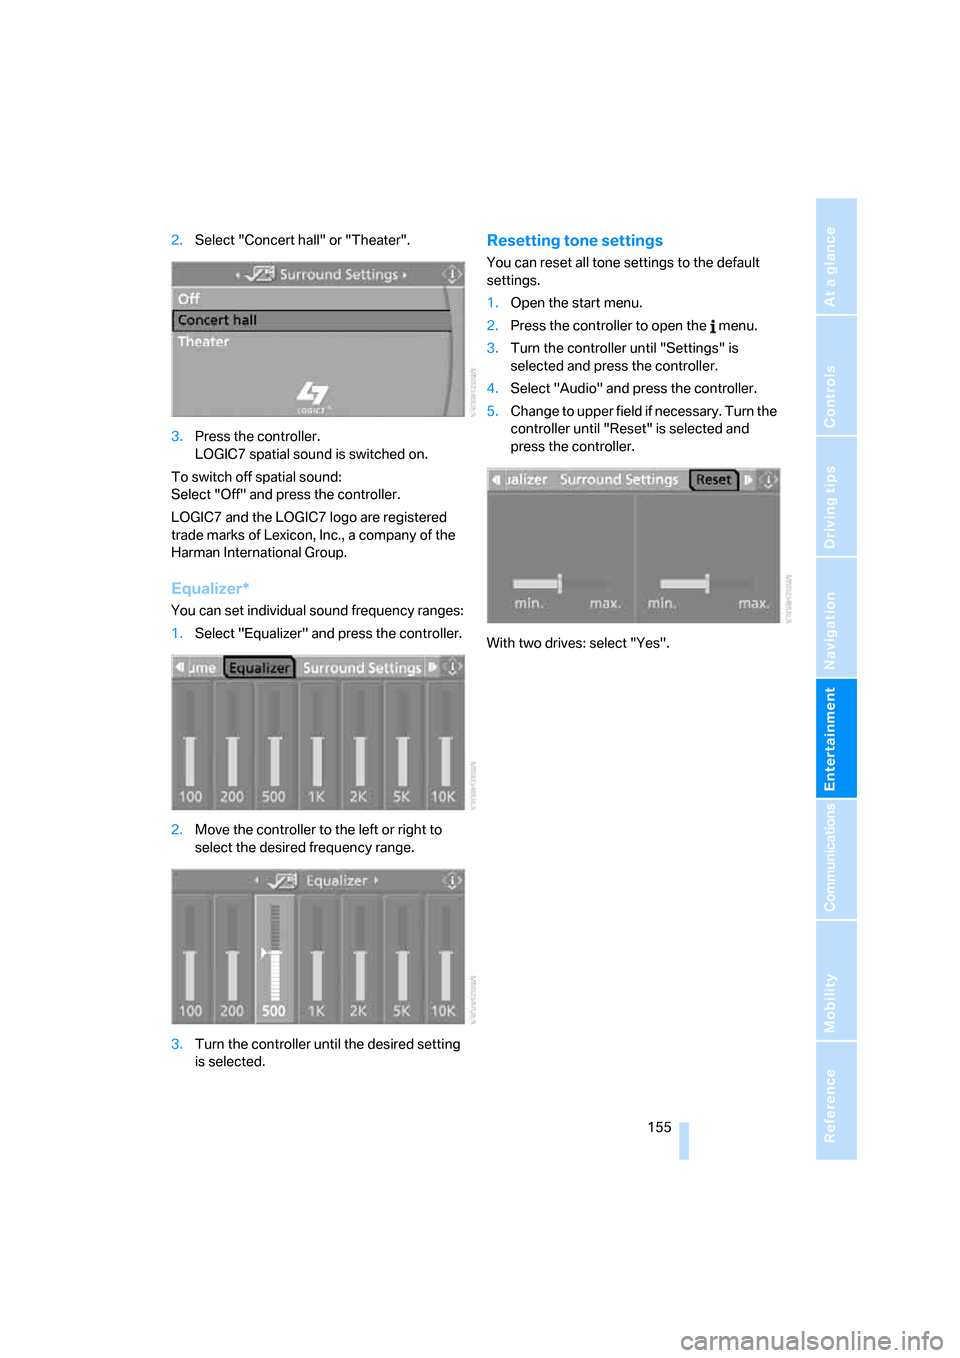
2.Select "Concert hall" or "Theater".
3.Press the controller.
LOGIC7 spatial sound is switched on.
To switch off spatial sound:
Select "Off" and press the controller.
LOGIC7 and the LOGIC7 logo are registered
trade marks of Lexicon, Inc., a company of the
Harman International Group.
Equalizer*
You can set individual sound frequency ranges:
1.Select "Equalizer" and press the controller.
2.Move the controller to the left or right to
select the desired frequency range.
3.Turn the controller until the desired setting
is selected.
Resetting tone settings
You can reset all tone settings to the default
settings.
1.Open the start menu.
2.Press the controller to open the menu.
3.Turn the controller until "Settings" is
selected and press the controller.
4.Select "Audio" and press the controller.
5.Change to upper field if necessary. Turn the
controller until "Reset" is selected and
press the controller.
With two drives: select "Yes".
Page 158 of 254
Radio
156
Radio
Your radio provides reception of the FM and AM
wavebands.
Listening to radio
Press the button if the sound output is switched
off.
1.Press the button.
This opens the start menu.
2.Move the controller backwards to call up
"Entertainment".
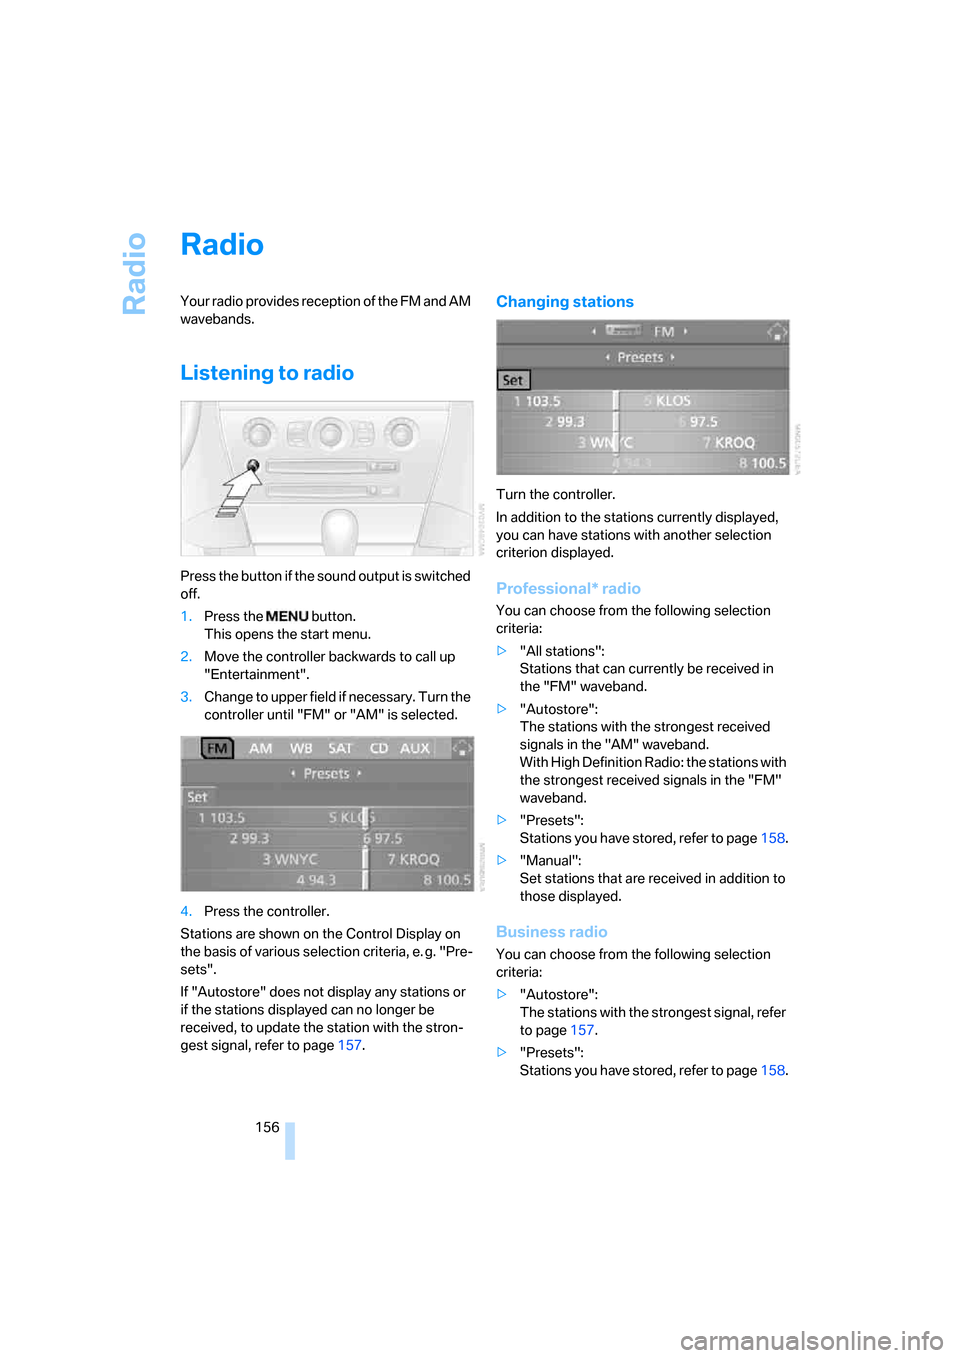
3.Change to upper field if necessary. Turn the
controller until "FM" or "AM" is selected.
4.Press the controller.
Stations are shown on the Control Display on
the basis of various selection criteria, e. g. "Pre-
sets".
If "Autostore" does not display any stations or
if the stations displayed can no longer be
received, to update the station with the stron-
gest signal, refer to page157.
Changing stations
Turn the controller.
In addition to the stations currently displayed,
you can have stations with another selection
criterion displayed.
Professional* radio
You can choose from the following selection
criteria:
>"All stations":
Stations that can currently be received in
the "FM" waveband.
>"Autostore":
The stations with the strongest received
signals in the "AM" waveband.
With High Definition Radio: the stations with
the strongest received signals in the "FM"
waveband.
>"Presets":
Stations you have stored, refer to page158.
>"Manual":
Set stations that are received in addition to
those displayed.
Business radio
You can choose from the following selection
criteria:
>"Autostore":
The stations with the strongest signal, refer
to page157.
>"Presets":
Stations you have stored, refer to page158.
Page 160 of 254
Radio
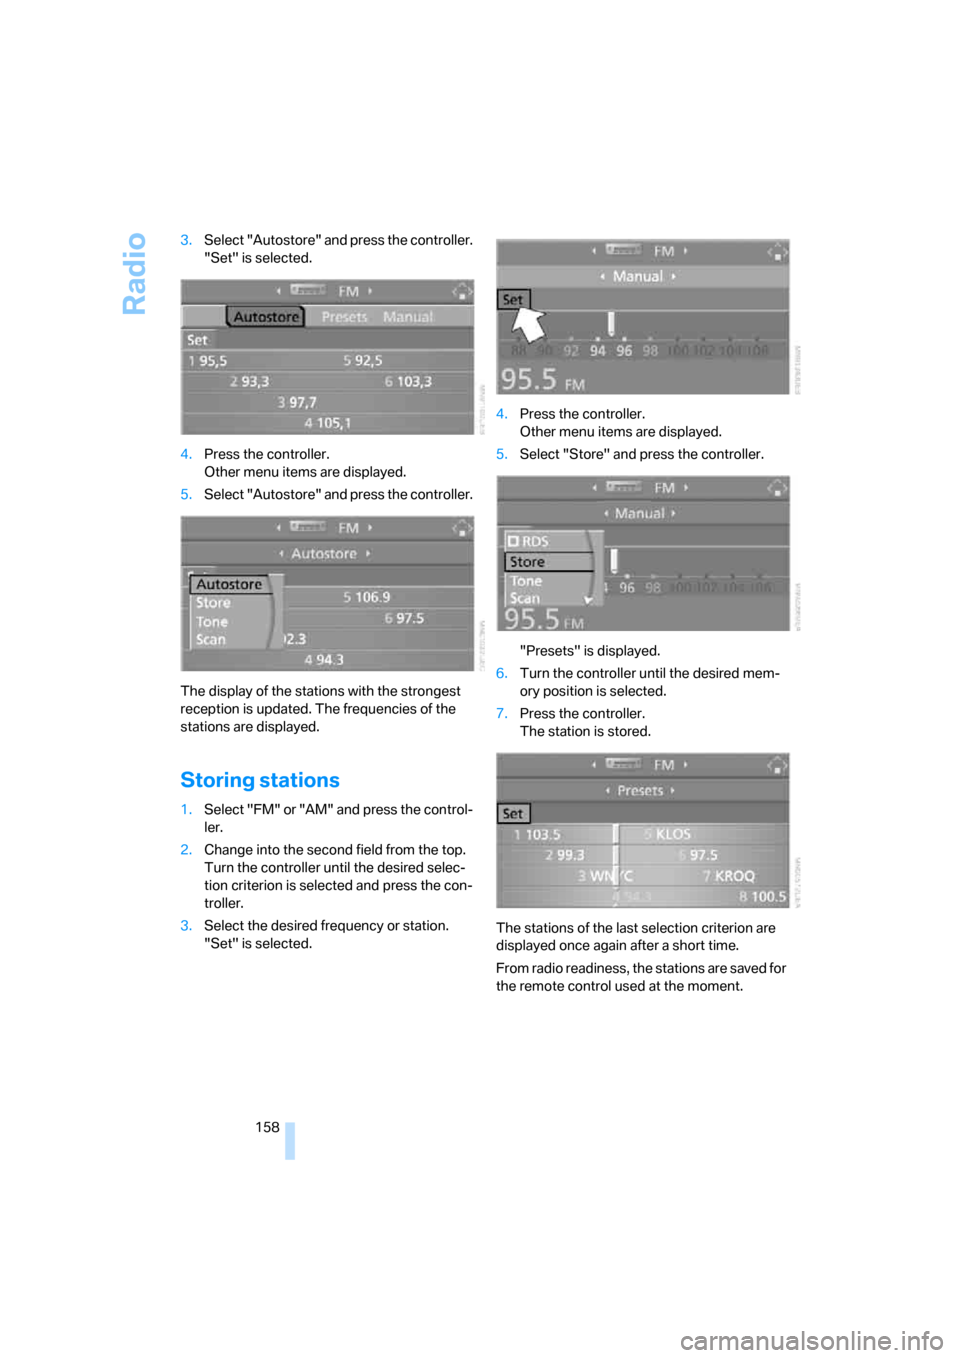
158 3.Select "Autostore" and press the controller.
"Set" is selected.
4.Press the controller.
Other menu items are displayed.
5.Select "Autostore" and press the controller.
The display of the stations with the strongest
reception is updated. The frequencies of the
stations are displayed.
Storing stations
1.Select "FM" or "AM" and press the control-
ler.
2.Change into the second field from the top.
Turn the controller until the desired selec-
tion criterion is selected and press the con-
troller.
3.Select the desired frequency or station.
"Set" is selected.4.Press the controller.
Other menu items are displayed.
5.Select "Store" and press the controller.
"Presets" is displayed.
6.Turn the controller until the desired mem-
ory position is selected.
7.Press the controller.
The station is stored.
The stations of the last selection criterion are
displayed once again after a short time.
From radio readiness, the stations are saved for
the remote control used at the moment.
Page 161 of 254
Navigation
Entertainment
Driving tips
159Reference
At a glance
Controls
Communications
Mobility
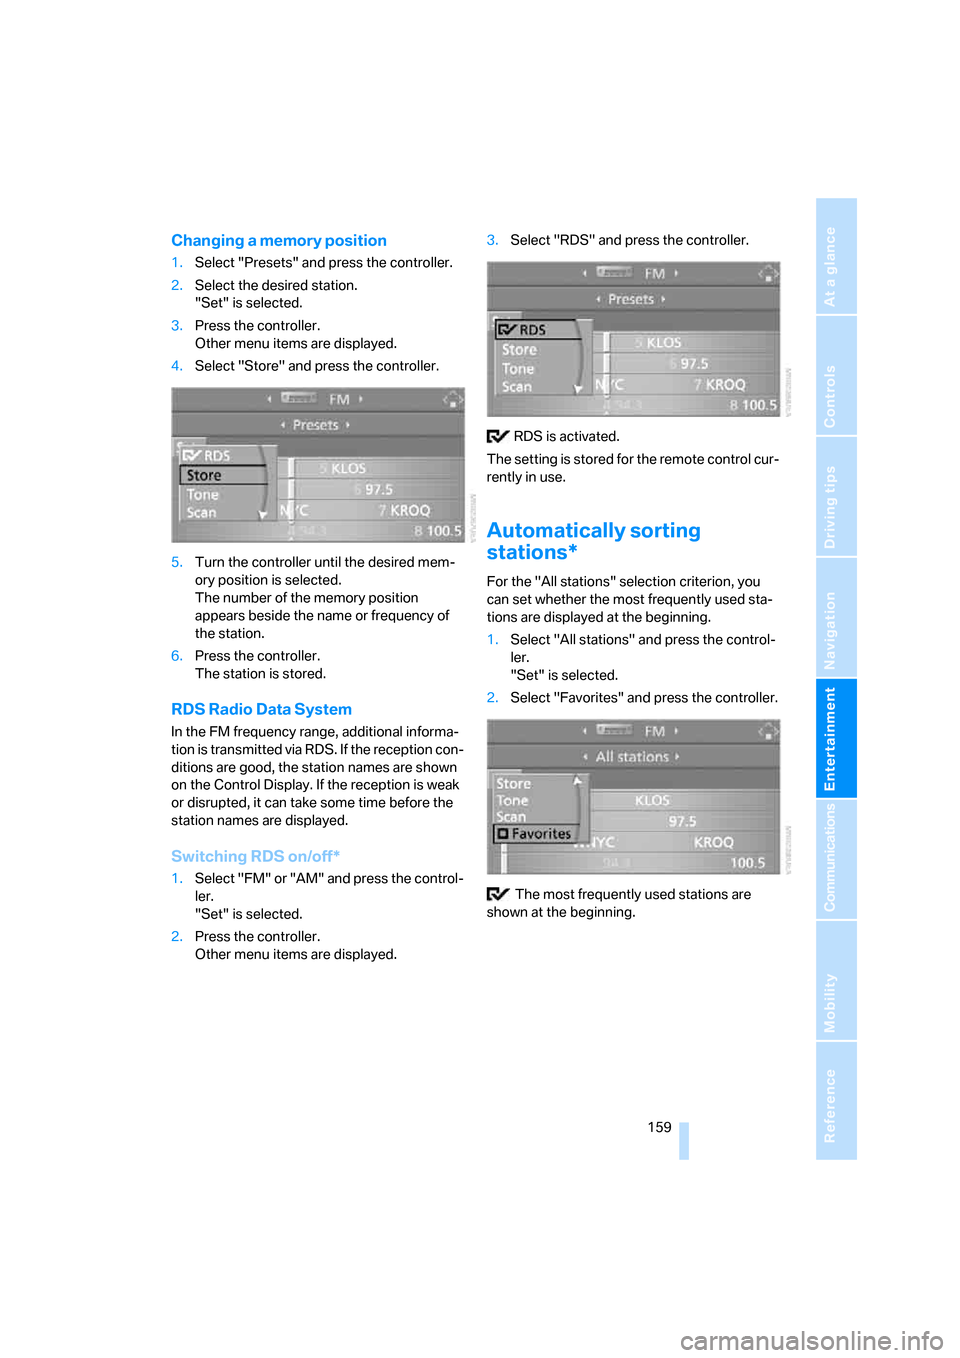
Changing a memory position
1.Select "Presets" and press the controller.
2.Select the desired station.
"Set" is selected.
3.Press the controller.
Other menu items are displayed.
4.Select "Store" and press the controller.
5.Turn the controller until the desired mem-
ory position is selected.
The number of the memory position
appears beside the name or frequency of
the station.
6.Press the controller.
The station is stored.
RDS Radio Data System
In the FM frequency range, additional informa-
tion is transmitted via RDS. If the reception con-
ditions are good, the station names are shown
on the Control Display. If the reception is weak
or disrupted, it can take some time before the
station names are displayed.
Switching RDS on/off*
1.Select "FM" or "AM" and press the control-
ler.
"Set" is selected.
2.Press the controller.
Other menu items are displayed.3.Select "RDS" and press the controller.
RDS is activated.
The setting is stored for the remote control cur-
rently in use.
Automatically sorting
stations*
For the "All stations" selection criterion, you
can set whether the most frequently used sta-
tions are displayed at the beginning.
1.Select "All stations" and press the control-
ler.
"Set" is selected.
2.Select "Favorites" and press the controller.
The most frequently used stations are
shown at the beginning.
Page 165 of 254
Navigation
Entertainment
Driving tips
163Reference
At a glance
Controls
Communications
Mobility
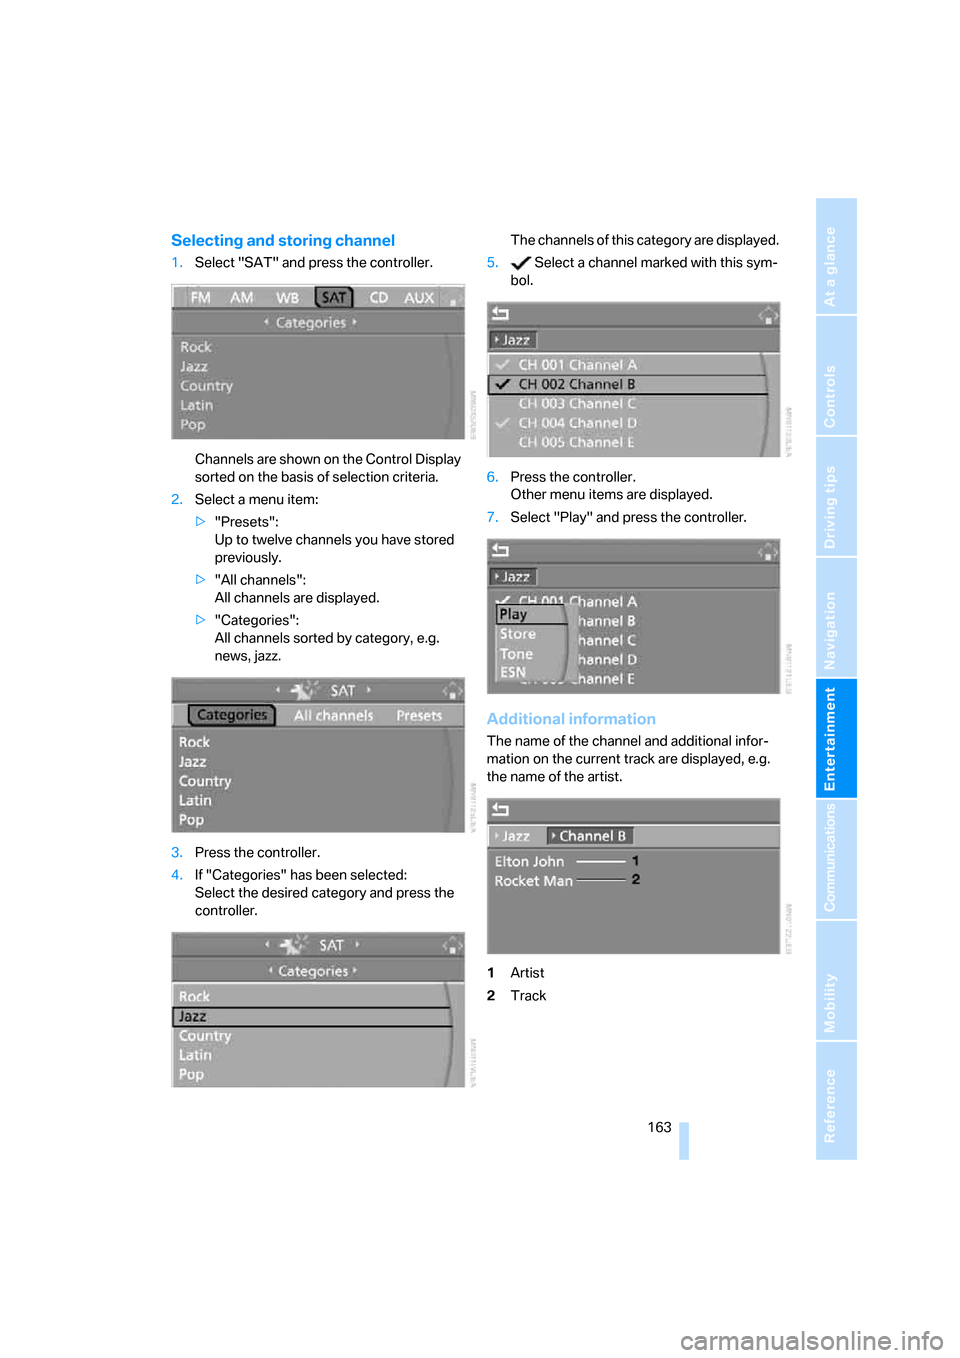
Selecting and storing channel
1.Select "SAT" and press the controller.
Channels are shown on the Control Display
sorted on the basis of selection criteria.
2.Select a menu item:
>"Presets":
Up to twelve channels you have stored
previously.
>"All channels":
All channels are displayed.
>"Categories":
All channels sorted by category, e.g.
news, jazz.
3.Press the controller.
4.If "Categories" has been selected:
Select the desired category and press the
controller.The channels of this category are displayed.
5. Select a channel marked with this sym-
bol.
6.Press the controller.
Other menu items are displayed.
7.Select "Play" and press the controller.
Additional information
The name of the channel and additional infor-
mation on the current track are displayed, e.g.
the name of the artist.
1Artist
2Track
Page 166 of 254
Radio
164
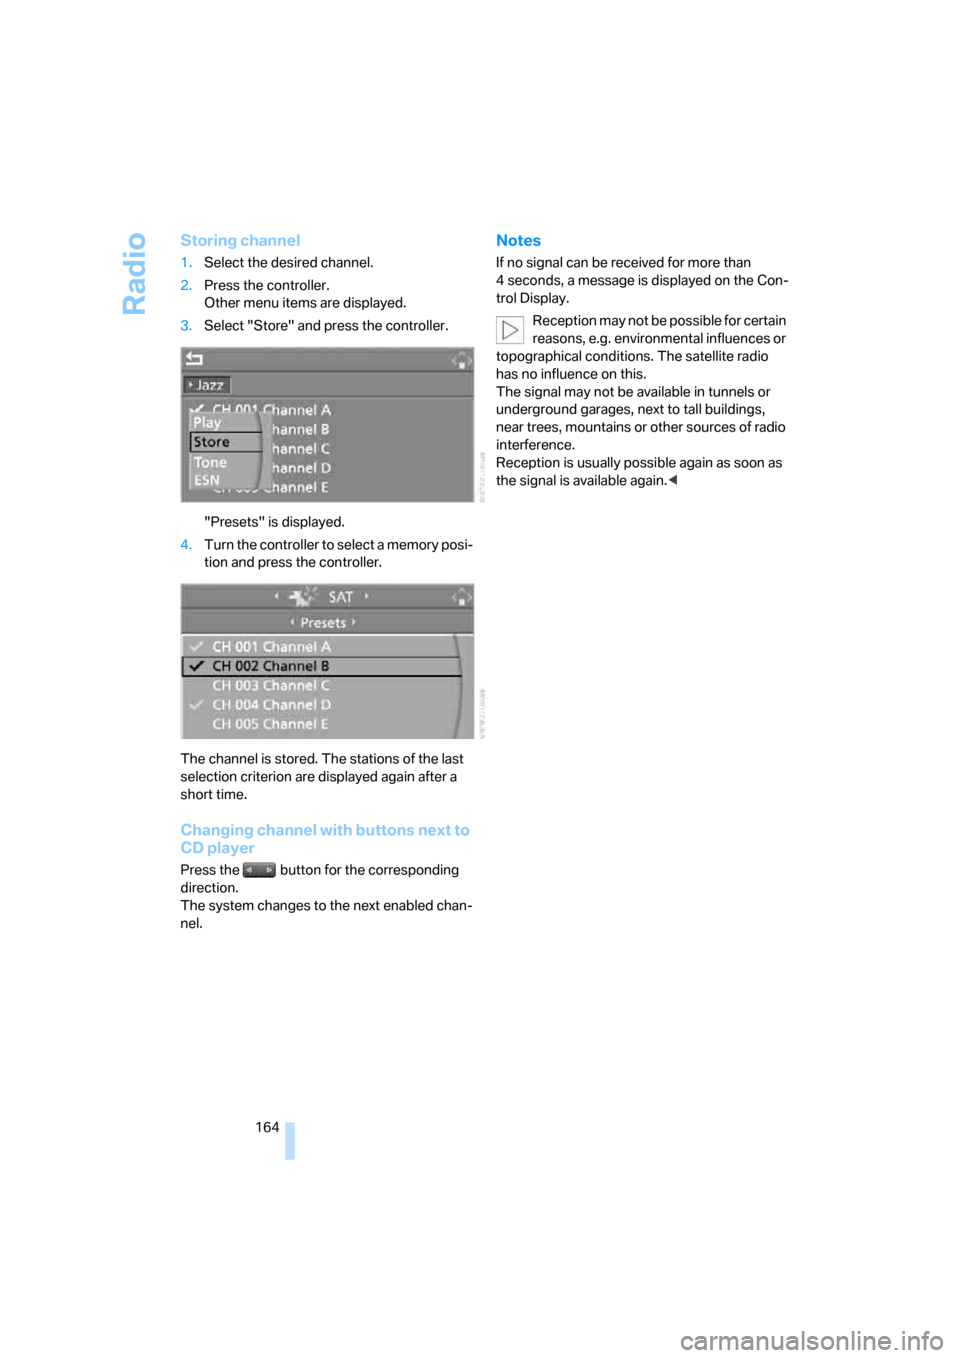
Storing channel
1.Select the desired channel.
2.Press the controller.
Other menu items are displayed.
3.Select "Store" and press the controller.
"Presets" is displayed.
4.Turn the controller to select a memory posi-
tion and press the controller.
The channel is stored. The stations of the last
selection criterion are displayed again after a
short time.
Changing channel with buttons next to
CD player
Press the button for the corresponding
direction.
The system changes to the next enabled chan-
nel.
Notes
If no signal can be received for more than
4 seconds, a message is displayed on the Con-
trol Display.
Reception may not be possible for certain
reasons, e.g. environmental influences or
topographical conditions. The satellite radio
has no influence on this.
The signal may not be available in tunnels or
underground garages, next to tall buildings,
near trees, mountains or other sources of radio
interference.
Reception is usually possible again as soon as
the signal is available again.<
Page 177 of 254
175
Entertainment
Reference
At a glance
Controls
Driving tips Communications
Navigation
Mobility
Operating options
You can operate the mobile phone* using:
>Buttons on steering wheel, refer to page11
>iDrive, refer to page16
>Voice commands, refer to page185
A mobile phone detected by the vehicle should
not be operated by the mobile phone's keypad;
otherwise malfunctions may occur.
Placing phone calls with BMW Assist
system*: BMW Assist calls
You can use the BMW Assist system via the
hands-free unit for BMW Assist calls.
When the status information "BMW Assist" or
"BMW Service" is displayed in "Communica-
tion", only BMW Assist calls are possible.
It may not be possible to establish a telephone
connection using the mobile phone while a con-
nection is being established to BMW Assist
or while a call to BMW Assist is already in
progress. If this happens, you must unpair the
mobile phone and the vehicle if you wish to
place a call with the mobile phone.
Initial operation
Pairing mobile phone in vehicle
The following prerequisites must be met:
>Suitable mobile phone: the mobile phone is
supported by the full mobile phone prepara-
tion package. Information on this subject is
also provided on the Internet at:
www.bmw.com
>The mobile phone is ready to operate.
>The Bluetooth links of the vehicle, refer to
page179, and the mobile phone are active.
>Depending on the mobile phone, presets in
the mobile phone are required: e.g. via the
following menu items:
>Bluetooth activated
>Connection not with confirmation
>Reconnect>Depending on the mobile phone model, the
setting energy saving mode can, for exam-
ple, result in vehicle failing to detect the
paired mobile phone.
>Specify any desired number as the Blue-
tooth passkey, e.g. 1, for pairing. This Blue-
tooth passkey is no longer required follow-
ing successful pairing.
>The ignition is switched on.
Only pair the mobile phone with the vehi-
cle stopped; otherwise you may become
distracted and inadvertently endanger your
passengers and other road users.<
Switching on ignition
1.Insert the remote control as far as possible
into the ignition lock.
2.Switch on the ignition by pressing the Start/
Stop button without depressing the brake
or clutch pedal.
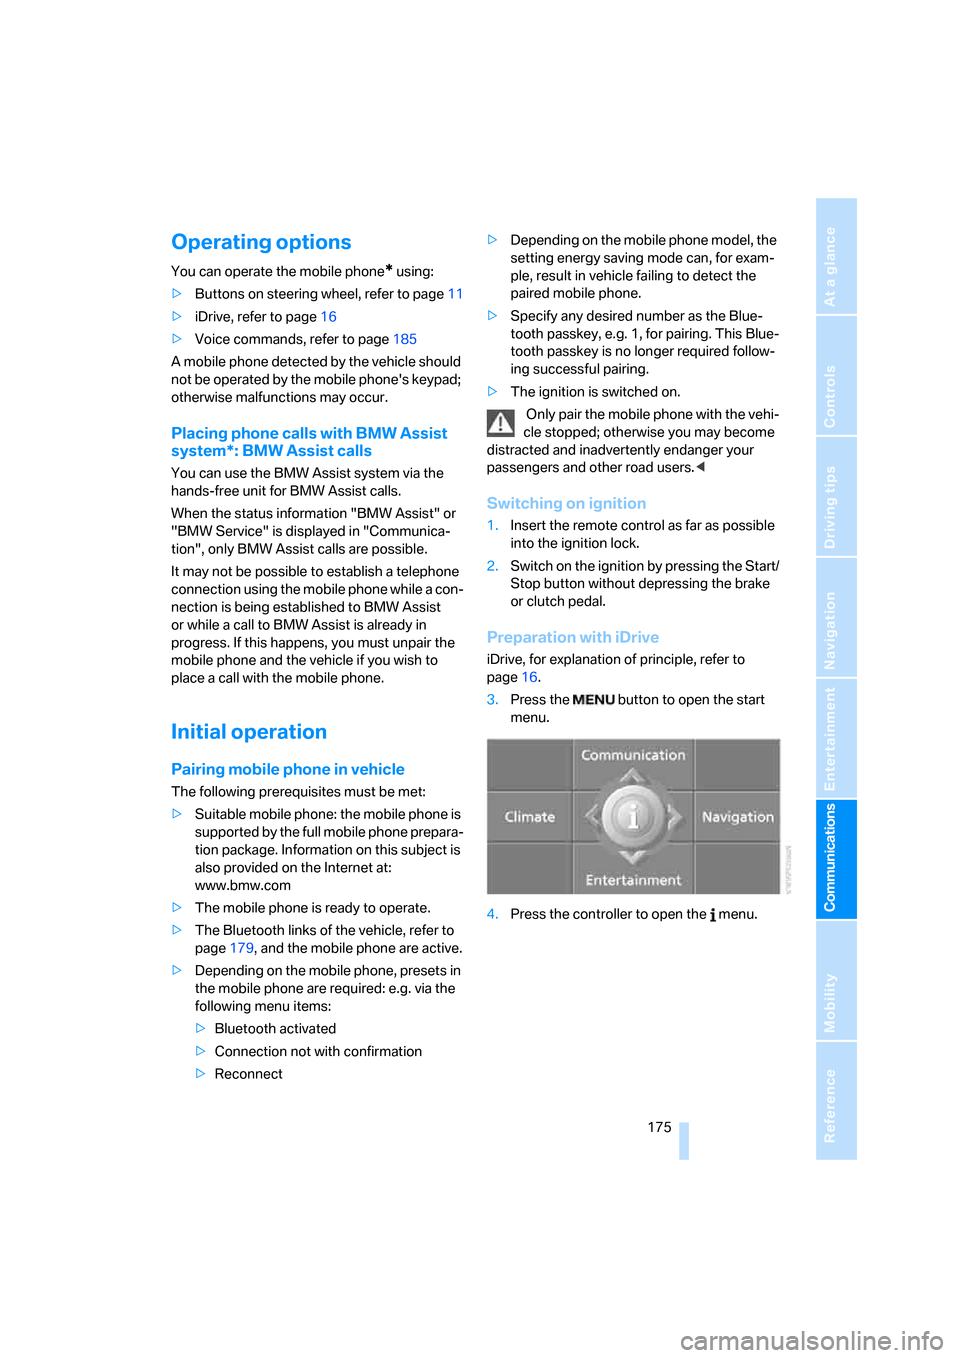
Preparation with iDrive
iDrive, for explanation of principle, refer to
page16.
3.Press the button to open the start
menu.
4.Press the controller to open the menu.