2007 BMW 550I navigation
[x] Cancel search: navigationPage 203 of 273
201
Entertainment
Reference
At a glance
Controls
Driving tips Communications
Navigation
Mobility
Blocking services*
If you block the services, the connection to
BMW Assist is deactivated.
1.Press the button.
This opens the start menu.
2.Press the controller to open the menu.
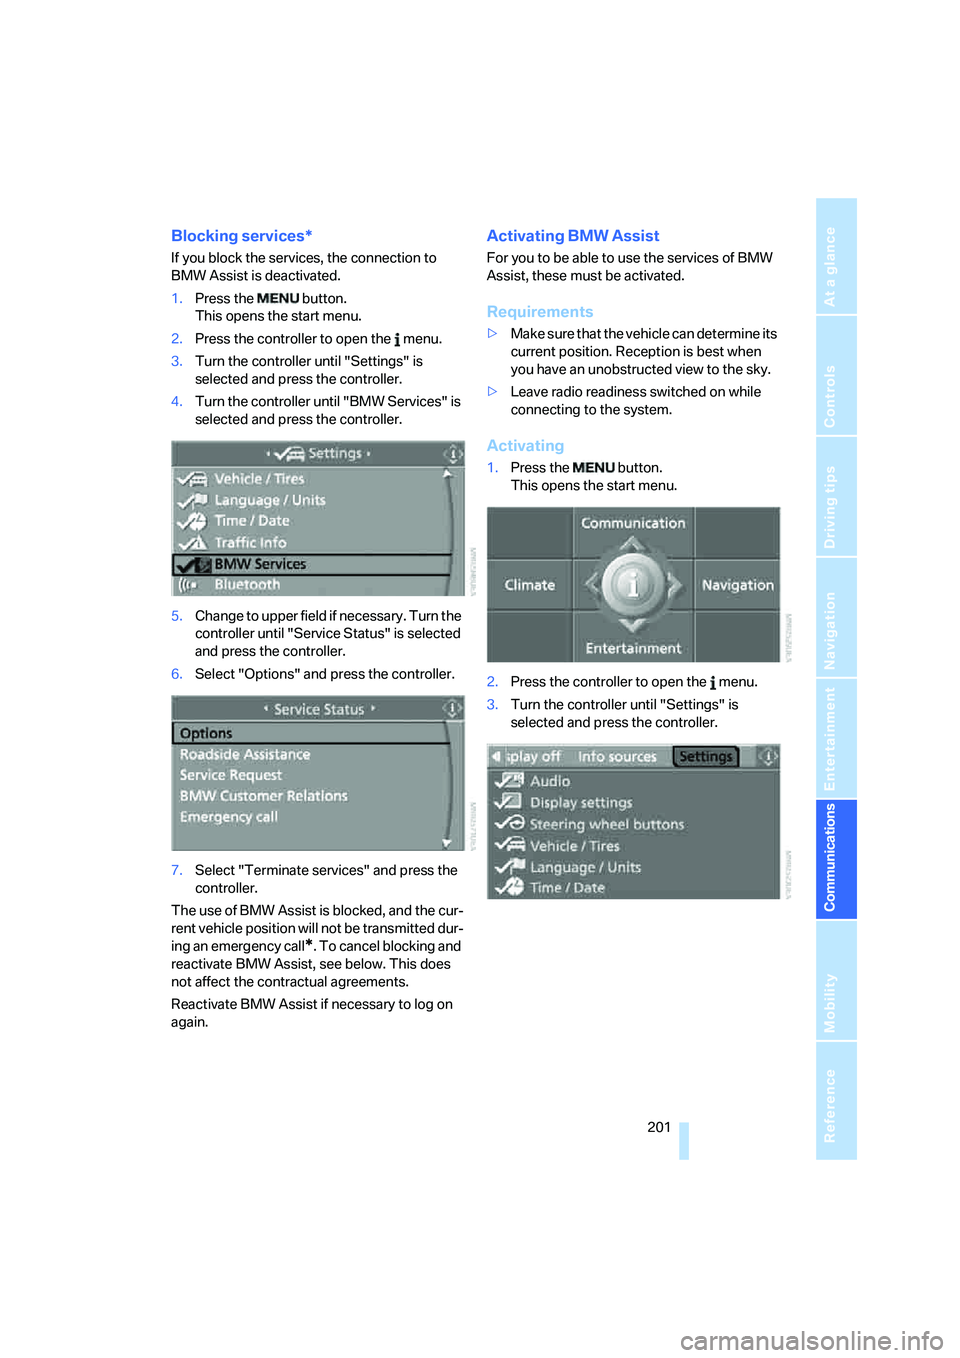
3.Turn the controller until "Settings" is
selected and press the controller.
4.Turn the controller until "BMW Services" is
selected and press the controller.
5.Change to upper field if necessary. Turn the
controller until "Service Status" is selected
and press the controller.
6.Select "Options" and press the controller.
7.Select "Terminate services" and press the
controller.
The use of BMW Assist is blocked, and the cur-
rent vehicle position will not be transmitted dur-
ing an emergency call
*. To cancel blocking and
reactivate BMW Assist, see below. This does
not affect the contractual agreements.
Reactivate BMW Assist if necessary to log on
again.
Activating BMW Assist
For you to be able to use the services of BMW
Assist, these must be activated.
Requirements
>Make sure that the vehicle can determine its
current position. Reception is best when
you have an unobstructed view to the sky.
>Leave radio readiness switched on while
connecting to the system.
Activating
1.Press the button.
This opens the start menu.
2.Press the controller to open the menu.
3.Turn the controller until "Settings" is
selected and press the controller.
Page 205 of 273

203
Entertainment
Reference
At a glance
Controls
Driving tips Communications
Navigation
Mobility
Page 209 of 273
Mobility
207Reference
At a glance
Controls
Driving tips
Communications
Navigation
Entertainment
When refueling, insert the filler nozzle com-
pletely into the filler pipe. Avoid raising the filler
nozzle during refueling, otherwise this leads to
>premature pump shutoff
>a reduced efficiency of the fuel-vapor
recovery system.
The fuel tank is full when the filler nozzle clicks
off the first time.
Fuel tank capacity
Approx. 18.5 gallons/70 liters, including the
reserve capacity of approx. 2.1 gallons/8 liters.
550i: approx. 2.6 gallons/10 liters reserve
capacity.
Refuel as soon as possible once your
cruising range falls below 30 miles/
50 km, otherwise engine functions are not
ensured and damage can occur.<
Fuel filler cap
Closing
Fit the cap and turn it clockwise until you clearly
hear a click.
Do not jam the strap attached to the fuel
filler cap between the fuel filler cap and
the vehicle. A message
* is displayed if the cap
is loose or missing.<
Fuel specifications
Do not use leaded gasoline, otherwise
permanent damage to the catalytic con-
verter will result.
Do not use E85, i.e. fuel that consists of 85%
ethanol, or Flex Fuel. Otherwise permanent
damage to the engine and the fuel supply sys-
tem will result.<
Required fuel
Super Premium Gasoline/AKI 91
This gasoline is highly recommended.
However, you may also use gasoline with less
AKI. The minimum AKI Rating is 87.
If you use gasoline with this minimum AKI Rat-
ing, the engine may produce knocking sounds
when starting at high outside temperatures.
This has no affect on the engine life.
Do not use gasoline below the specified
minimum quality, otherwise engine dam-
age can result.<
Use high-quality brands
Field experience has indicated significant dif-
ferences in fuel quality: volatility, composition,
additives, etc., among gasolines offered for sale
in the United States and Canada. Fuels contain-
ing up to and including 10 % ethanol or other
oxygenates with up to 2.8 % oxygen by weight,
that is, 15 % MTBE or 3 % methanol plus an
equivalent amount of co-solvent, will not void
the applicable warranties with respect to
defects in materials or workmanship.
The use of poor-quality fuels may result in
drivability, starting and stalling problems
especially under certain environmental condi-
tions such as high ambient temperature and
high altitude.
Should you encounter drivability problems
which you suspect could be related to the fuel
you are using, we recommend that you respond
by switching to a recognized high-quality brand
such as gasoline that is advertised as Top Tier
Detergent Gasoline.
Failure to comply with these recommendations
may also result in unscheduled maintenance.<
Page 211 of 273
Mobility
209Reference
At a glance
Controls
Driving tips
Communications
Navigation
Entertainment
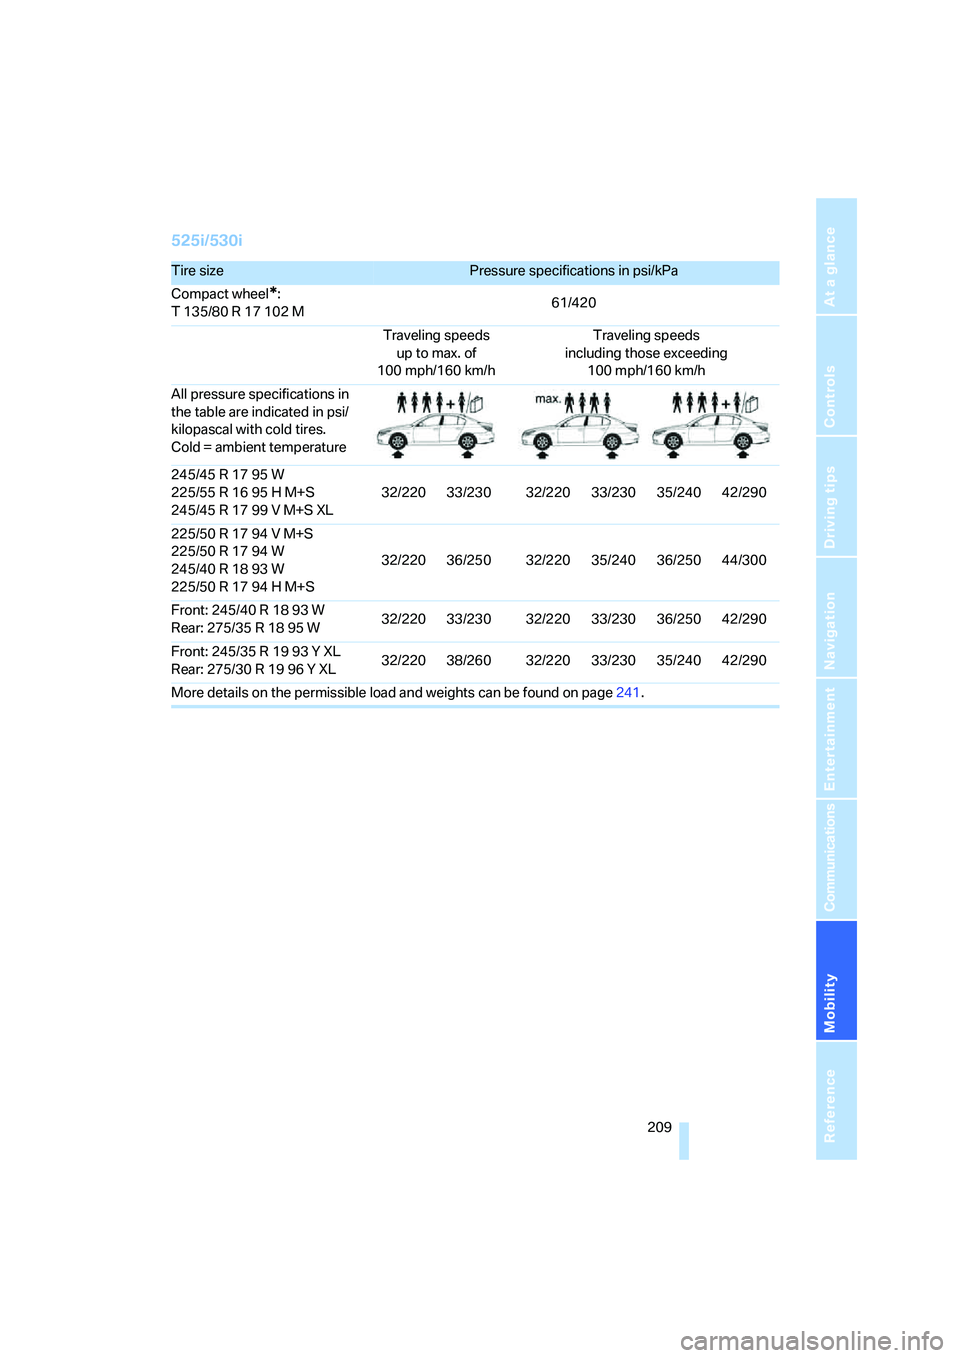
525i/530i
Tire sizePressure specifications in psi/kPa
Compact wheel
*:
T 135/80 R 17 102 M61/420
Traveling speeds
up to max. of
100 mph/160 km/hTraveling speeds
including those exceeding
100 mph/160 km/h
All pressure specifications in
the table are indicated in psi/
kilopascal with cold tires.
Cold = ambient temperature
245/45 R 17 95 W
225/55 R 16 95 H M+S
245/45 R 17 99 V M+S XL32/220 33/230 32/220 33/230 35/240 42/290
225/50 R 17 94 V M+S
225/50 R 17 94 W
245/40 R 18 93 W
225/50 R 17 94 H M+S32/220 36/250 32/220 35/240 36/250 44/300
Front: 245/40 R 18 93 W
Rear: 275/35R1895W32/220 33/230 32/220 33/230 36/250 42/290
Front: 245/35 R 19 93 Y XL
Rear: 275/30R1996YXL32/220 38/260 32/220 33/230 35/240 42/290
More details on the permissible load and weights can be found on page241.
Page 213 of 273
Mobility
211Reference
At a glance
Controls
Driving tips
Communications
Navigation
Entertainment
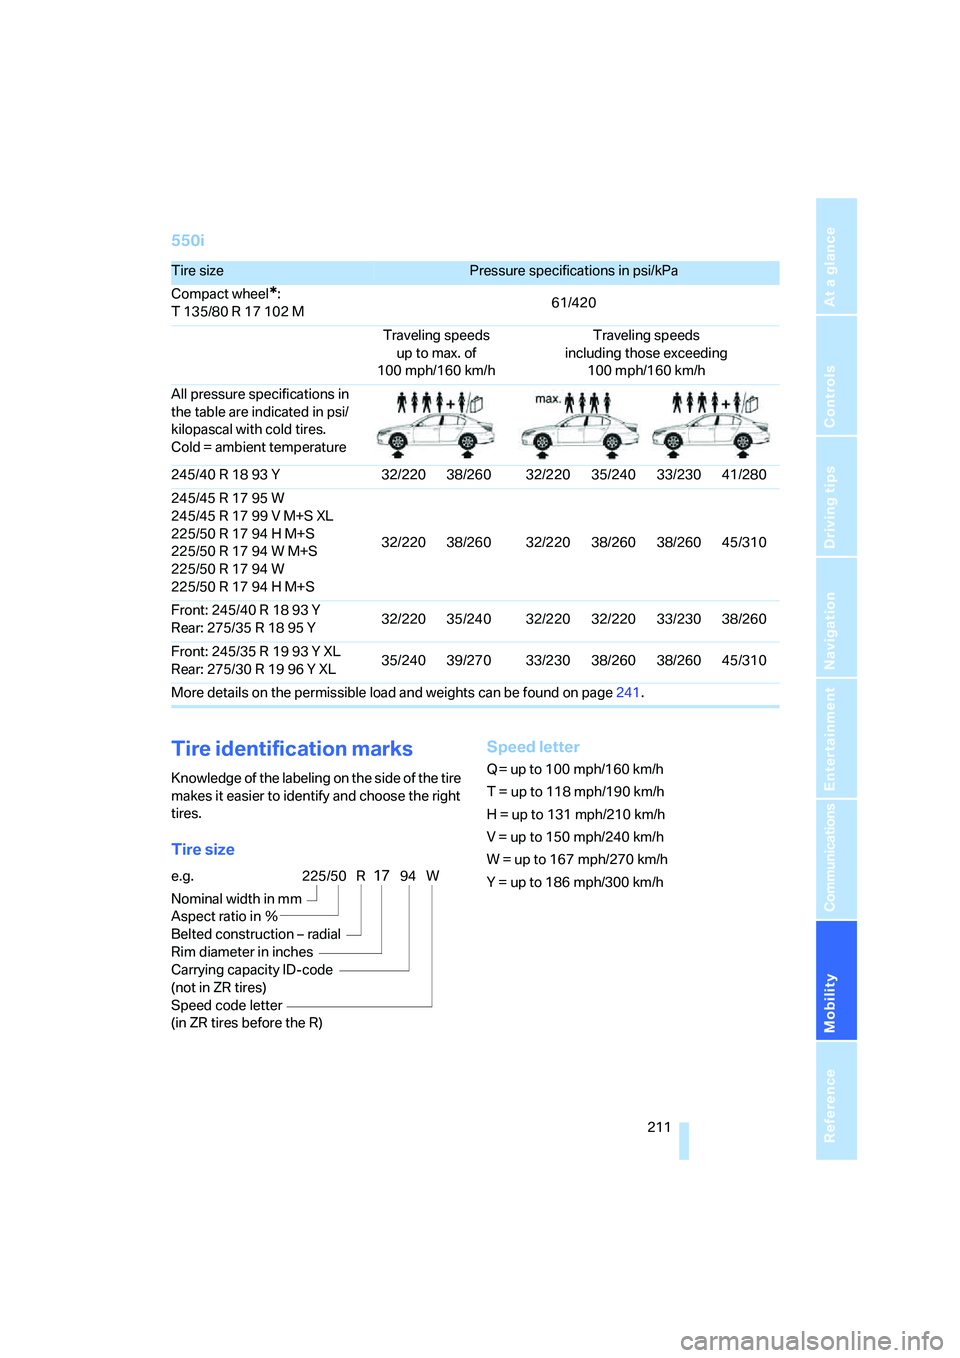
550i
Tire identification marks
Knowledge of the labeling on the side of the tire
makes it easier to identify and choose the right
tires.
Tire sizeSpeed letter
Q = up to 100 mph/160 km/h
T = up to 118 mph/190 km/h
H = up to 131 mph/210 km/h
V = up to 150 mph/240 km/h
W = up to 167 mph/270 km/h
Y = up to 186 mph/300 km/h
Tire sizePressure specifications in psi/kPa
Compact wheel
*:
T 135/80 R 17 102 M61/420
Traveling speeds
up to max. of
100 mph/160 km/hTraveling speeds
including those exceeding
100 mph/160 km/h
All pressure specifications in
the table are indicated in psi/
kilopascal with cold tires.
Cold = ambient temperature
245/40 R 18 93 Y 32/220 38/260 32/220 35/240 33/230 41/280
245/45 R 17 95 W
245/45 R 17 99 V M+S XL
225/50 R 17 94 H M+S
225/50 R 17 94 W M+S
225/50 R 17 94 W
225/50 R 17 94 H M+S32/220 38/260 32/220 38/260 38/260 45/310
Front: 245/40 R 18 93 Y
Rear: 275/35R1895Y32/220 35/240 32/220 32/220 33/230 38/260
Front: 245/35 R 19 93 Y XL
Rear: 275/30R1996YXL35/240 39/270 33/230 38/260 38/260 45/310
More details on the permissible load and weights can be found on page241.
e.g.
Nominal width in mm
Aspect ratio in Ξ
Belted construction – radial
Rim diameter in inches
Carrying capacity ID-code
(not in ZR tires)
Speed code letter
(in ZR tires before the R)225/50 R1794 W
Page 215 of 273
Mobility
213Reference
At a glance
Controls
Driving tips
Communications
Navigation
Entertainment
M+S
Winter and all-season tires.
These have better winter properties than sum-
mer tires.
XL
Indicates specially reinforced tires.
Tire condition
Inspect your tires frequently for tread wear,
signs of damage and for foreign objects lodged
in the tread. Check the tread depth.
Minimum tread depth
The tread depth should not drop below 0.12 in/
3 mm, although, for example, European legisla-
tion only specifies a minimum tread depth of
0.063 in/1.6 mm. At tread depths below 0.12 in/
3 mm there is an increased risk of high-speed
hydroplaning, even when only small amounts of
water are present on the road surface.
When winter tires wear down past a tread depth
of 0.16 in/4 mm, they become perceptibly less
suitable for winter conditions. For the sake of
safety, new tires should be installed.
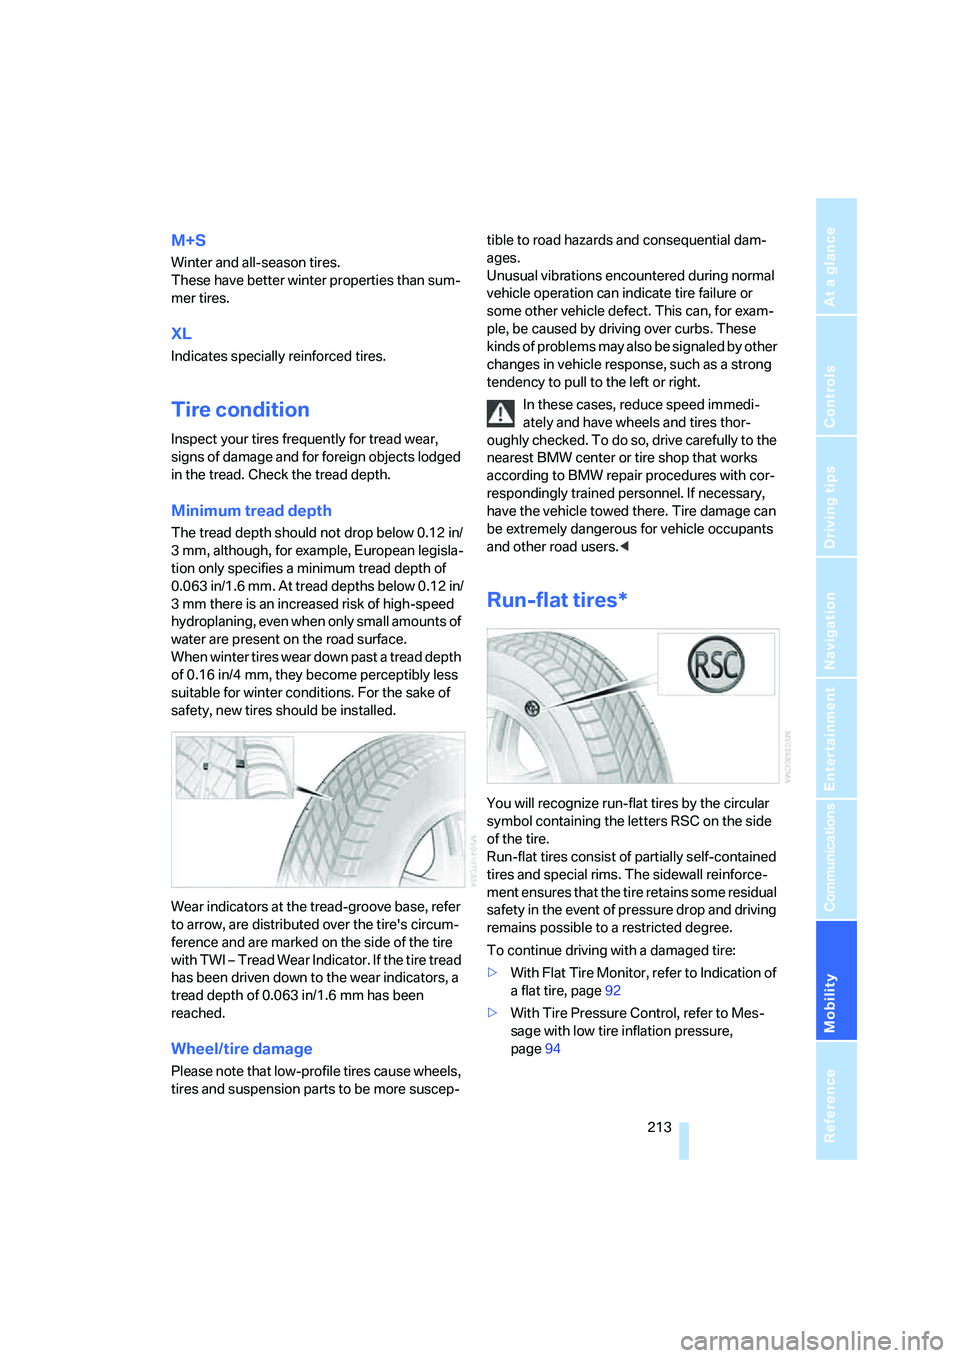
Wear indicators at the tread-groove base, refer
to arrow, are distributed over the tire's circum-
ference and are marked on the side of the tire
with TWI – Tread Wear Indicator. If the tire tread
has been driven down to the wear indicators, a
tread depth of 0.063 in/1.6 mm has been
reached.
Wheel/tire damage
Please note that low-profile tires cause wheels,
tires and suspension parts to be more suscep-tible to road hazards and consequential dam-
ages.
Unusual vibrations encountered during normal
vehicle operation can indicate tire failure or
some other vehicle defect. This can, for exam-
ple, be caused by driving over curbs. These
kinds of problems may also be signaled by other
changes in vehicle response, such as a strong
tendency to pull to the left or right.
In these cases, reduce speed immedi-
ately and have wheels and tires thor-
oughly checked. To do so, drive carefully to the
nearest BMW center or tire shop that works
according to BMW repair procedures with cor-
respondingly trained personnel. If necessary,
have the vehicle towed there. Tire damage can
be extremely dangerous for vehicle occupants
and other road users.<
Run-flat tires*
You will recognize run-flat tires by the circular
symbol containing the letters RSC on the side
of the tire.
Run-flat tires consist of partially self-contained
tires and special rims. The sidewall reinforce-
ment ensures that the tire retains some residual
safety in the event of pressure drop and driving
remains possible to a restricted degree.
To continue driving with a damaged tire:
>With Flat Tire Monitor, refer to Indication of
a flat tire, page92
>With Tire Pressure Control, refer to Mes-
sage with low tire inflation pressure,
page94
Page 217 of 273
Mobility
215Reference
At a glance
Controls
Driving tips
Communications
Navigation
Entertainment
Pay attention to speed
Always observe the maximum permissi-
ble speed for the winter tires, otherwise
tire damage may occur, which can result in acci-
dents.<
Storage
Store wheels and tires in a cool, dry place with
as little exposure to light as possible. Always
protect tires against all contact with oil, grease
and fuels. Do not exceed the maximum tire
inflation pressure indicated on the side wall of
the tire.
Rotating wheels between axles
BMW does not recommend moving the front
wheels to the rear or vice versa, as otherwise
the handling characteristics may be impaired.
Snow chains*
BMW only tests certain fine-link snow chains,
classifies them as road-safe and recommends
them. Consult your BMW center for more infor-
mation.
Use is only permissible in pairs on the rear
wheels.
Observe the manufacturer's instructions when
mounting snow chains. Do not exceed a speed
of 30 mph/50 km/h with the chains mounted.
After mounting snow chains, do not ini-
tialize the Flat Tire Monitor, otherwise
incorrect displays can occur.
When driving with snow chains, it may be prac-
tical to briefly activate DTC, refer to page88.<
Page 219 of 273
Mobility
217Reference
At a glance
Controls
Driving tips
Communications
Navigation
Entertainment
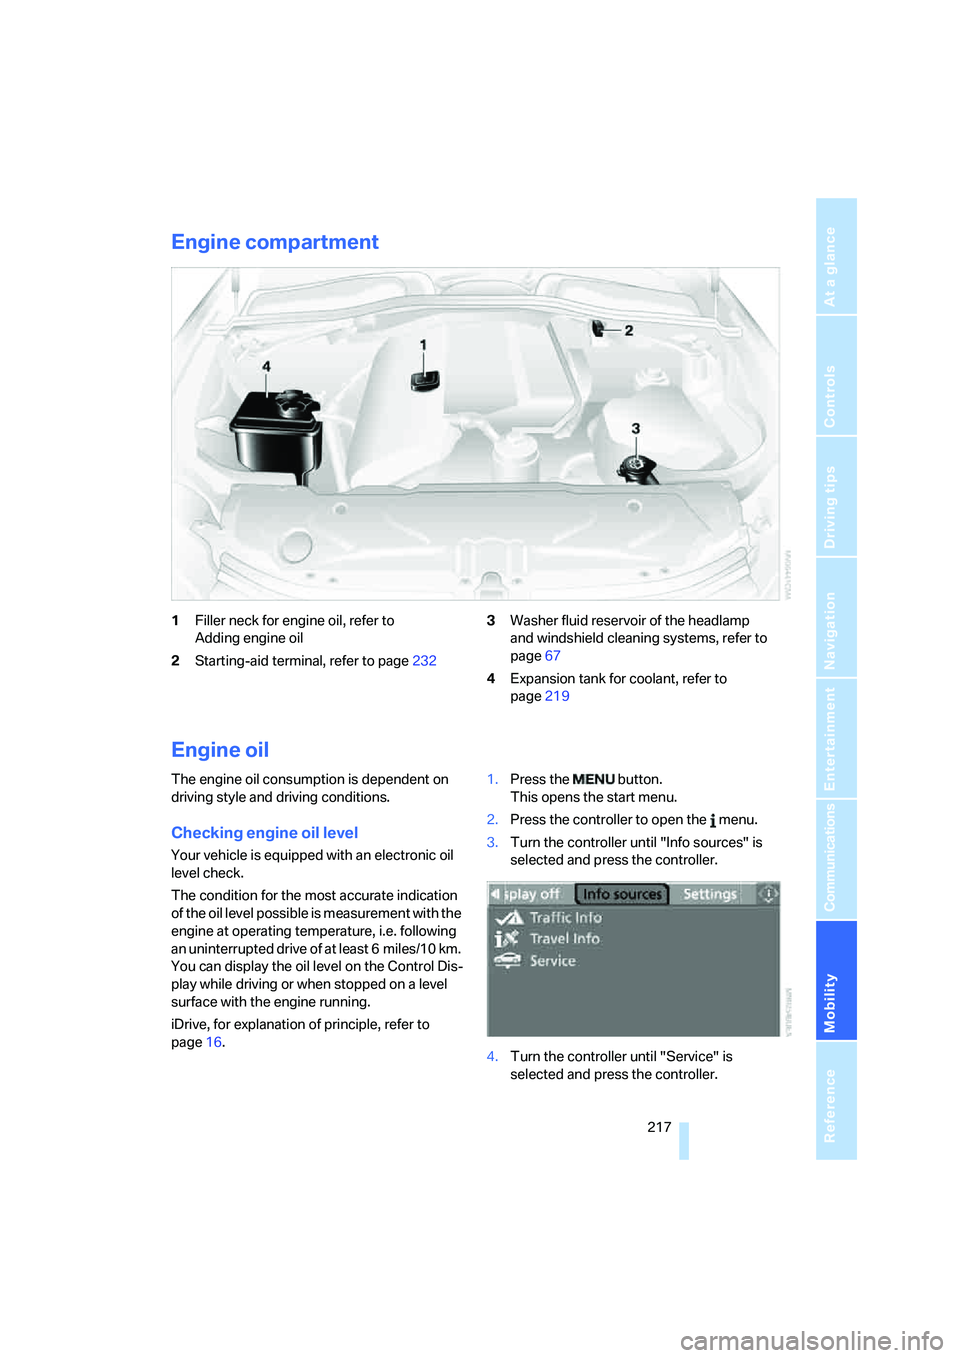
Engine compartment
1Filler neck for engine oil, refer to
Adding engine oil
2Starting-aid terminal, refer to page2323Washer fluid reservoir of the headlamp
and windshield cleaning systems, refer to
page67
4Expansion tank for coolant, refer to
page219
Engine oil
The engine oil consumption is dependent on
driving style and driving conditions.
Checking engine oil level
Your vehicle is equipped with an electronic oil
level check.
The condition for the most accurate indication
of the oil level possible is measurement with the
engine at operating temperature, i.e. following
an uninterrupted drive of at least 6 miles/10 km.
You can display the oil level on the Control Dis-
play while driving or when stopped on a level
surface with the engine running.
iDrive, for explanation of principle, refer to
page16.1.Press the button.
This opens the start menu.
2.Press the controller to open the menu.
3.Turn the controller until "Info sources" is
selected and press the controller.
4.Turn the controller until "Service" is
selected and press the controller.