2007 BMW 535XI SEDAN warning
[x] Cancel search: warningPage 107 of 286

Controls
105Reference
At a glance
Driving tips
Communications
Navigation
Entertainment
Mobility
3.Select the menu item and press the control-
ler:
>"Night Vision off":
Deactivate BMW Night Vision.
>"Zoom":
At higher speeds, the image is zoomed
in.
>"Curve mode":
Depending on the steering angle and
other parameters, the image sections
follows the course of the road to some
degree.
>"Full screen":
The image is shown on the entire Con-
trol Display.
>"Contrast":
The contrast of the screen can be
adjusted.
>"Brightness":
The brightness of the screen can be
adjusted.
"Curve mode" can only be activated with
the "Zoom" function switched on. With
"Full screen" activated, "Curve mode" and
"Zoom" cannot be selected.<
The settings are stored for the remote control
currently in use.
To exit the menu:
The image will automatically disappear after
approx. 5 seconds.
Cleaning camera
The function of the camera may be affected by
heavy rain and fog, dirt, snow or ice on the lens.
When this occurs, the displayed image on the
Control Display may become gray.To minimize icing, the camera lens is automati-
cally heated. However, it may be necessary to
clean the camera lens manually under severe
weather conditions. When doing so, cautiously
remove any debris, ice or snow. To avoid dam-
age to the lens, do not use sharp or abrasive
instruments to clean ice, snow, or dirt off the
lens.
When the windshield is cleaned with the head-
lamps on, the camera lens area is automatically
sprayed as well. Refer to page67.
Leaving lane warning*
The concept
This system warns you from a speed of approx.
45 mph/70 km/h when the vehicle is leaving the
lane you are currently in on roads with lane limit
lines. You feel this due to a slight vibration of the
steering wheel.
The system does not warn you if you signal
before leaving the lane.
It is best to use the system on well-developed
roads and freeways.
Switching on/off
Press the button on the steering wheel.
>The two lines1 indicate that the system is
activated.
>The two arrows2 mean that the system has
detected one or two lane limit lines from a
speed of approx. 45 mph/70 km/h and
warns accordingly.
If you activate the system below a speed of
approx. 45 mph/70 km/h, a message will appear
Page 108 of 286
Technology for comfort, convenience and safety
106 stating that the system is not active until this
speed is reached.
A warning will be canceled:
>after approx. 3 seconds
>if you return to your lane
>if you brake heavily
>if you signal
System limits
The leaving lane warning cannot serve as
a substitute for your personal judgment in
determining the course of the road.
If the system issues a warning, do not move the
steering wheel with unnecessary severity, as
otherwise you could loose control of the vehi-
cle.<
The function of the system may be limited in the
following example situations:
>in heavy fog, rain or snowfall
>with worn-away, poorly visible limit lines, or
lines that run together or apart or are
unclear, e.g. in road construction areas
>when limit lines are covered by snow, ice,
dirt or a great deal of water
>in tight curves or on narrow roads
>when limit lines are not white
>when limit lines are covered by objects
>when driving up close behind a vehicle driv-
ing ahead
>with bright counter light
>when the windshield is fogged up, dirty or
covered with stickers, vignettes etc. in the
area of the inside rearview mirror
Page 127 of 286
Controls
125Reference
At a glance
Driving tips
Communications
Navigation
Entertainment
Mobility
wise the payload or the roll-up cover may be
damaged.<
Expanding cargo bay
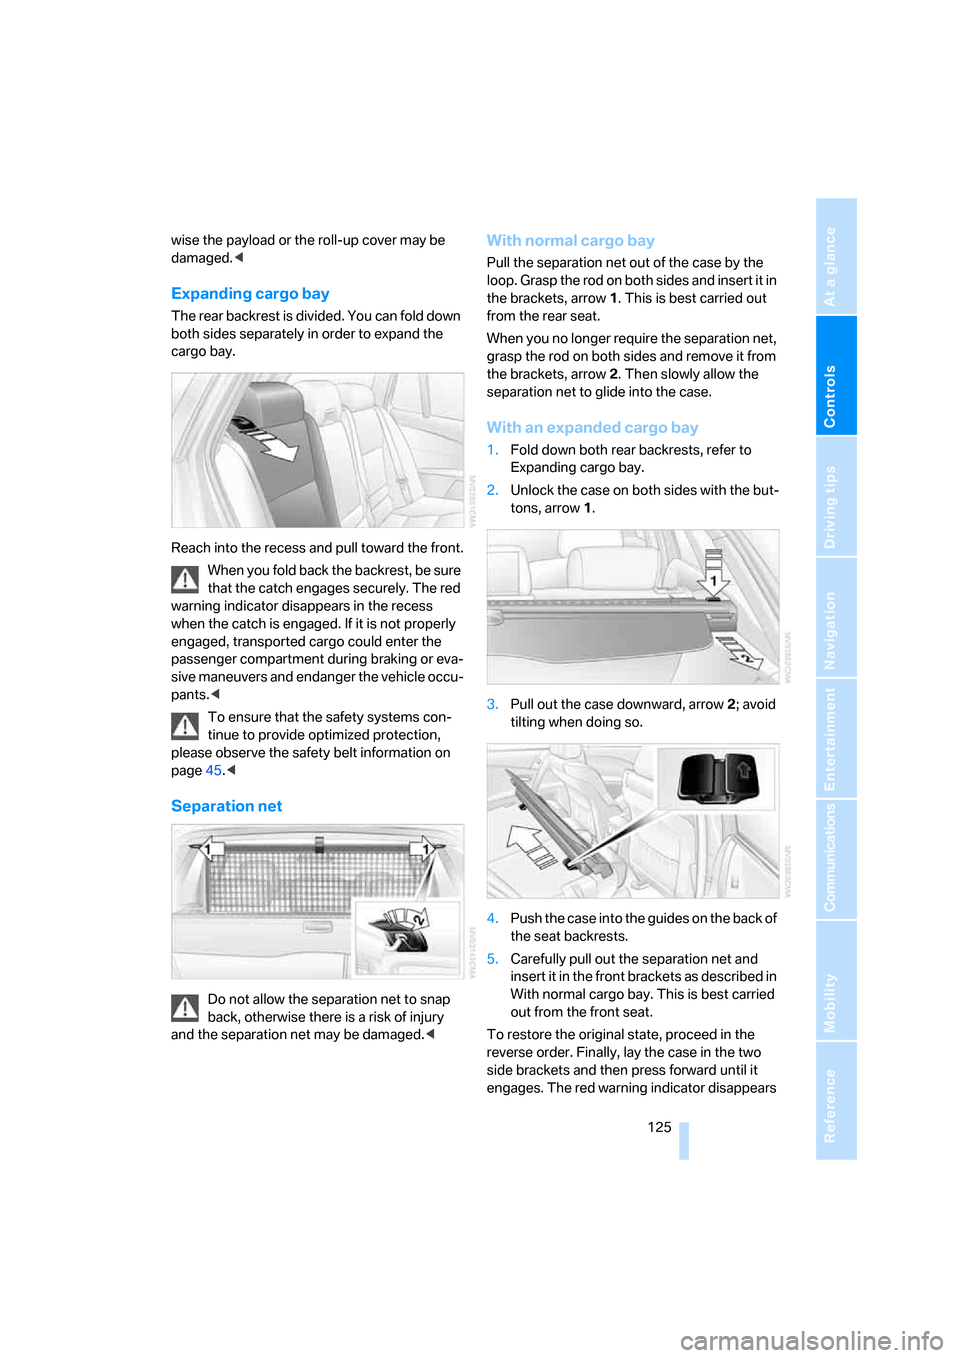
The rear backrest is divided. You can fold down
both sides separately in order to expand the
cargo bay.
Reach into the recess and pull toward the front.
When you fold back the backrest, be sure
that the catch engages securely. The red
warning indicator disappears in the recess
when the catch is engaged. If it is not properly
engaged, transported cargo could enter the
passenger compartment during braking or eva-
sive maneuvers and endanger the vehicle occu-
pants.<
To ensure that the safety systems con-
tinue to provide optimized protection,
please observe the safety belt information on
page45.<
Separation net
Do not allow the separation net to snap
back, otherwise there is a risk of injury
and the separation net may be damaged.<
With normal cargo bay
Pull the separation net out of the case by the
loop. Grasp the rod on both sides and insert it in
the brackets, arrow1. This is best carried out
from the rear seat.
When you no longer require the separation net,
grasp the rod on both sides and remove it from
the brackets, arrow2. Then slowly allow the
separation net to glide into the case.
With an expanded cargo bay
1.Fold down both rear backrests, refer to
Expanding cargo bay.
2.Unlock the case on both sides with the but-
tons, arrow1.
3.Pull out the case downward, arrow2; avoid
tilting when doing so.
4.Push the case into the guides on the back of
the seat backrests.
5.Carefully pull out the separation net and
insert it in the front brackets as described in
With normal cargo bay. This is best carried
out from the front seat.
To restore the original state, proceed in the
reverse order. Finally, lay the case in the two
side brackets and then press forward until it
engages. The red warning indicator disappears
Page 160 of 286

Destination guidance
158
Repeating and canceling voice
instructions
With the programmable buttons on the steering
wheel you can also make the following settings,
refer to page54:
>Repeat the voice instruction:
Press button.
>Switch voice instructions on/off:
Press button longer.
Setting volume of voice instructions
The volume can only be adjusted while a voice
instruction is being output.
1.Repeat the last voice instruction, if neces-
sary.
2.Turn the knob during the voice instruction
to select the desired volume.
This volume is independent of the volume of the
audio sources.
The setting is stored for the remote control cur-
rently in use.
Bypassing route sections
During destination guidance, you can revise the
navigation system's route recommendations to
avoid particular stretches of road. Enter the
number of miles/kilometers that you want to
travel before returning to the original route.1.Select "Navigation" and press the control-
ler.
2.Change into the third field from the top.
Turn the controller until "New route" is
selected and press the controller.
3.Turn the controller to enter the desired
number and press the controller.
The route is recalculated.
To exit from the menu without changing the
route:
Select the arrow and press the controller.
Traffic information*
In population centers you can display traffic
information from radio stations that transmit
information of the Traffic Info traffic warning
service. This information of the traffic warning
services is constantly updated using measuring
data from traffic routing centers and information
from traffic congestion indicators.
During destination guidance the traffic informa-
tion located near you on the route is automati-
cally displayed. Regardless of whether the des-
tination guidance is active, you can display the
traffic information in the map view or in a list.
Switching reception of traffic
information on/off
iDrive, for explanation of principle, refer to
page16.
1.Press the button.
This opens the start menu.
2.Press the controller to open the menu.
Page 176 of 286
Radio
174 The most frequently used stations are
shown at the beginning.
Weather news flashes*
Weather Radio is a service of the National Oce-
anic and Atmospheric Administration (NOAA)
of the US Department of Trade. Weather news
flashes are repeated every 4 to 6 minutes and
are routinely updated at intervals of 1 to
3 hours, and more often when necessary. Most
stations operate 24 hours a day. In case of a
storm, the National Weather Service interrupts
the routine weather news and transmits special
warning messages instead. If you have a ques-
tion about NOAA Weather Radio, please con-
tact the nearest office of the National Weather
Service. Details are also provided on the Inter-
net at www.nws.noaa.gov.
Calling up weather news flashes
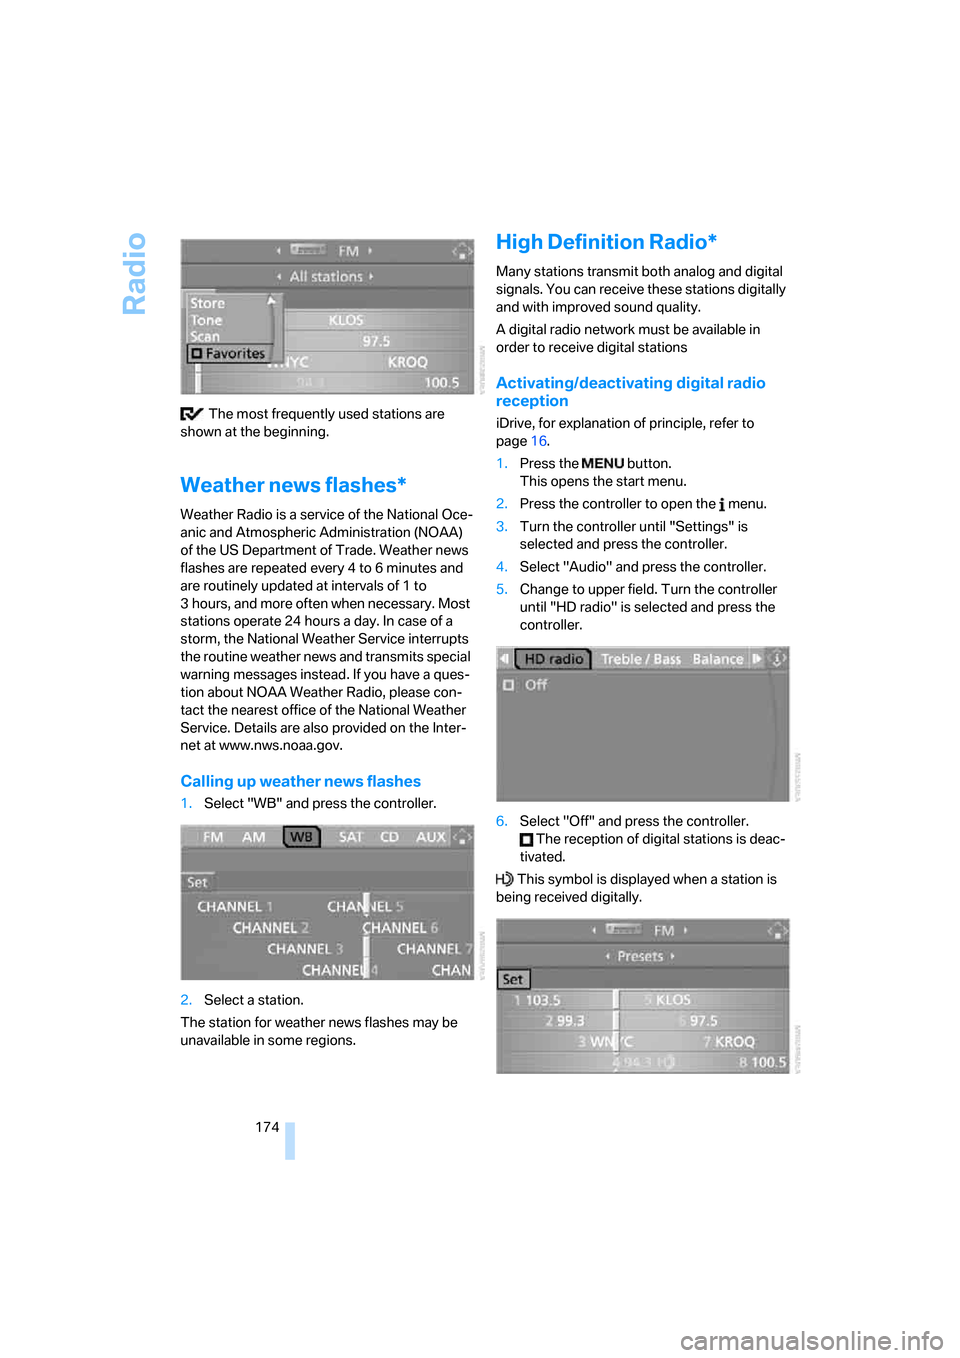
1.Select "WB" and press the controller.
2.Select a station.
The station for weather news flashes may be
unavailable in some regions.
High Definition Radio*
Many stations transmit both analog and digital
signals. You can receive these stations digitally
and with improved sound quality.
A digital radio network must be available in
order to receive digital stations
Activating/deactivating digital radio
reception
iDrive, for explanation of principle, refer to
page16.
1.Press the button.
This opens the start menu.
2.Press the controller to open the menu.
3.Turn the controller until "Settings" is
selected and press the controller.
4.Select "Audio" and press the controller.
5.Change to upper field. Turn the controller
until "HD radio" is selected and press the
controller.
6.Select "Off" and press the controller.
The reception of digital stations is deac-
tivated.
This symbol is displayed when a station is
being received digitally.
Page 232 of 286
Under the hood
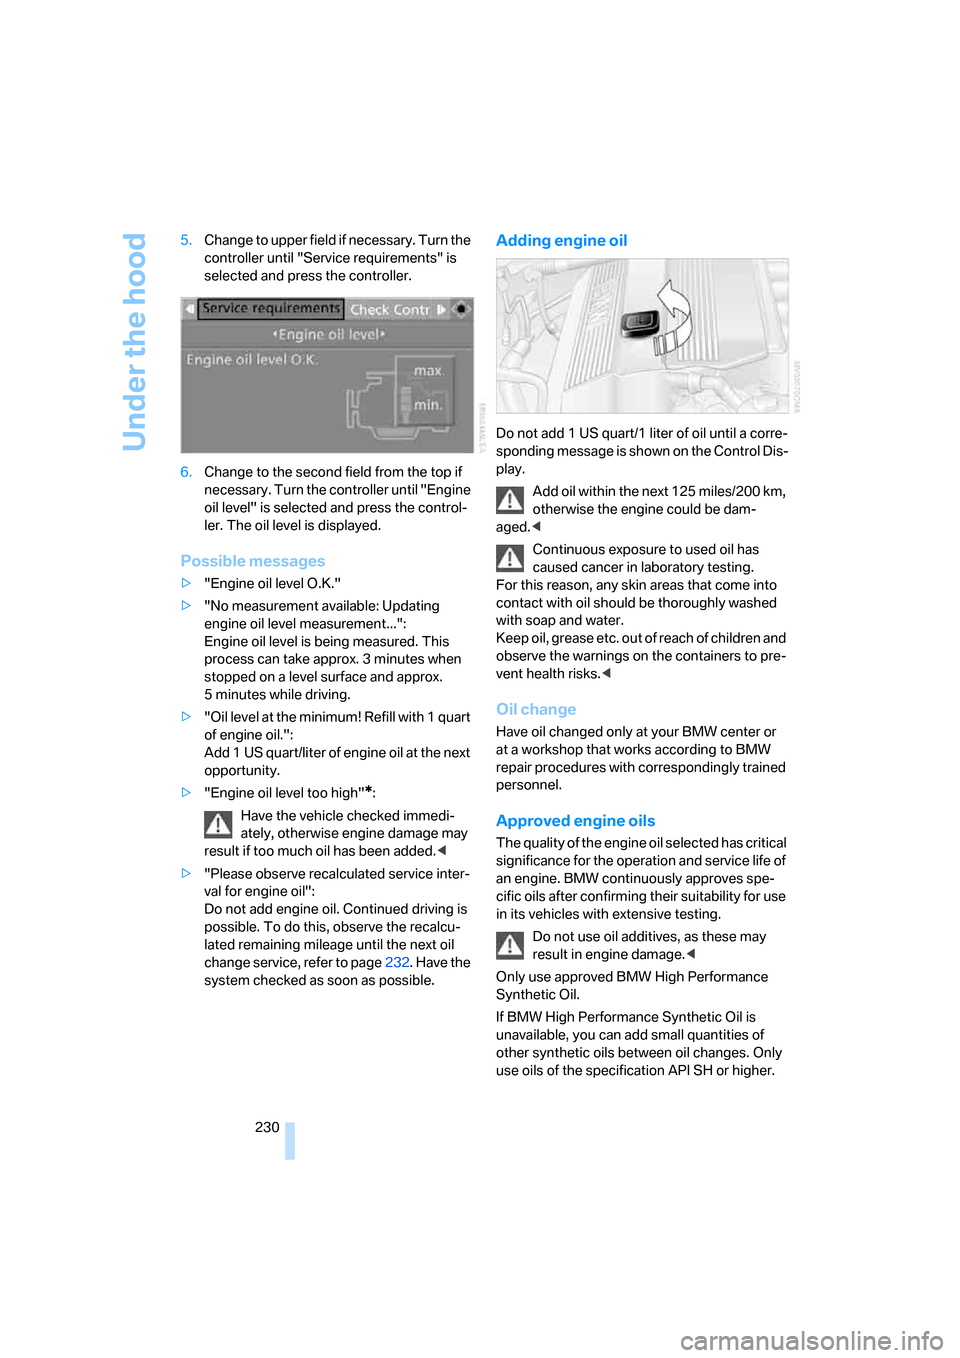
230 5.Change to upper field if necessary. Turn the
controller until "Service requirements" is
selected and press the controller.
6.Change to the second field from the top if
necessary. Turn the controller until "Engine
oil level" is selected and press the control-
ler. The oil level is displayed.
Possible messages
>"Engine oil level O.K."
>"No measurement available: Updating
engine oil level measurement...":
Engine oil level is being measured. This
process can take approx. 3 minutes when
stopped on a level surface and approx.
5 minutes while driving.
>"Oil level at the minimum! Refill with 1 quart
of engine oil.":
Add 1 US quart/liter of engine oil at the next
opportunity.
>"Engine oil level too high"
*:
Have the vehicle checked immedi-
ately, otherwise engine damage may
result if too much oil has been added.<
>"Please observe recalculated service inter-
val for engine oil":
Do not add engine oil. Continued driving is
possible. To do this, observe the recalcu-
lated remaining mileage until the next oil
change service, refer to page232. Have the
system checked as soon as possible.
Adding engine oil
Do not add 1 US quart/1 liter of oil until a corre-
sponding message is shown on the Control Dis-
play.
Add oil within the next 125 miles/200 km,
otherwise the engine could be dam-
aged.<
Continuous exposure to used oil has
caused cancer in laboratory testing.
For this reason, any skin areas that come into
contact with oil should be thoroughly washed
with soap and water.
Keep oil, grease etc. out of reach of children and
observe the warnings on the containers to pre-
vent health risks.<
Oil change
Have oil changed only at your BMW center or
at a workshop that works according to BMW
repair procedures with correspondingly trained
personnel.
Approved engine oils
The quality of the engine oil selected has critical
significance for the operation and service life of
an engine. BMW continuously approves spe-
cific oils after confirming their suitability for use
in its vehicles with extensive testing.
Do not use oil additives, as these may
result in engine damage.<
Only use approved BMW High Performance
Synthetic Oil.
If BMW High Performance Synthetic Oil is
unavailable, you can add small quantities of
other synthetic oils between oil changes. Only
use oils of the specification API SH or higher.
Page 235 of 286

Mobility
233Reference
At a glance
Controls
Driving tips
Communications
Navigation
Entertainment
Socket for OBD Onboard
Diagnostics interface
Components which are decisive for the
exhaust-gas composition can be checked via
the OBD socket with a device.
This socket is located to the left on the driver's
side, on the underside of the instrument panel
under a cover.
Exhaust-gas values
The warning lamp lights up. The
exhaust-gas values worsen. Have the
vehicle checked as soon as possible.
Display of the previously described
malfunction in Canadian models.
The lamp flashes under certain conditions. This
is a sign of excessive misfiring of the engine. In
this case you should reduce speed and drive to
the nearest BMW center as soon as possible.
Heavy engine misfiring causes serious damage
to the emission-relevant components, espe-
cially the catalytic converter, within a short time.
If the fuel filler cap is not properly tight-
ened, the OBD system will assume that
fuel vapor escapes. Then a display lights up. If
the cap is then tightened, the display will go out
within a few days.<
Event Data Recorders
Your vehicle may be equipped with one or sev-
eral measuring and diagnosis modules, or with
a device for recording or transmitting certain
vehicle data or information. If you have also
signed a contract of participation for BMW
Assist, certain vehicle data can be transmitted
or recorded to enable corresponding services.
Care
Important information on the care and mainte-
nance of your BMW is contained in the Caring
for your vehicle brochure.
Page 241 of 286
Mobility
239Reference
At a glance
Controls
Driving tips
Communications
Navigation
Entertainment
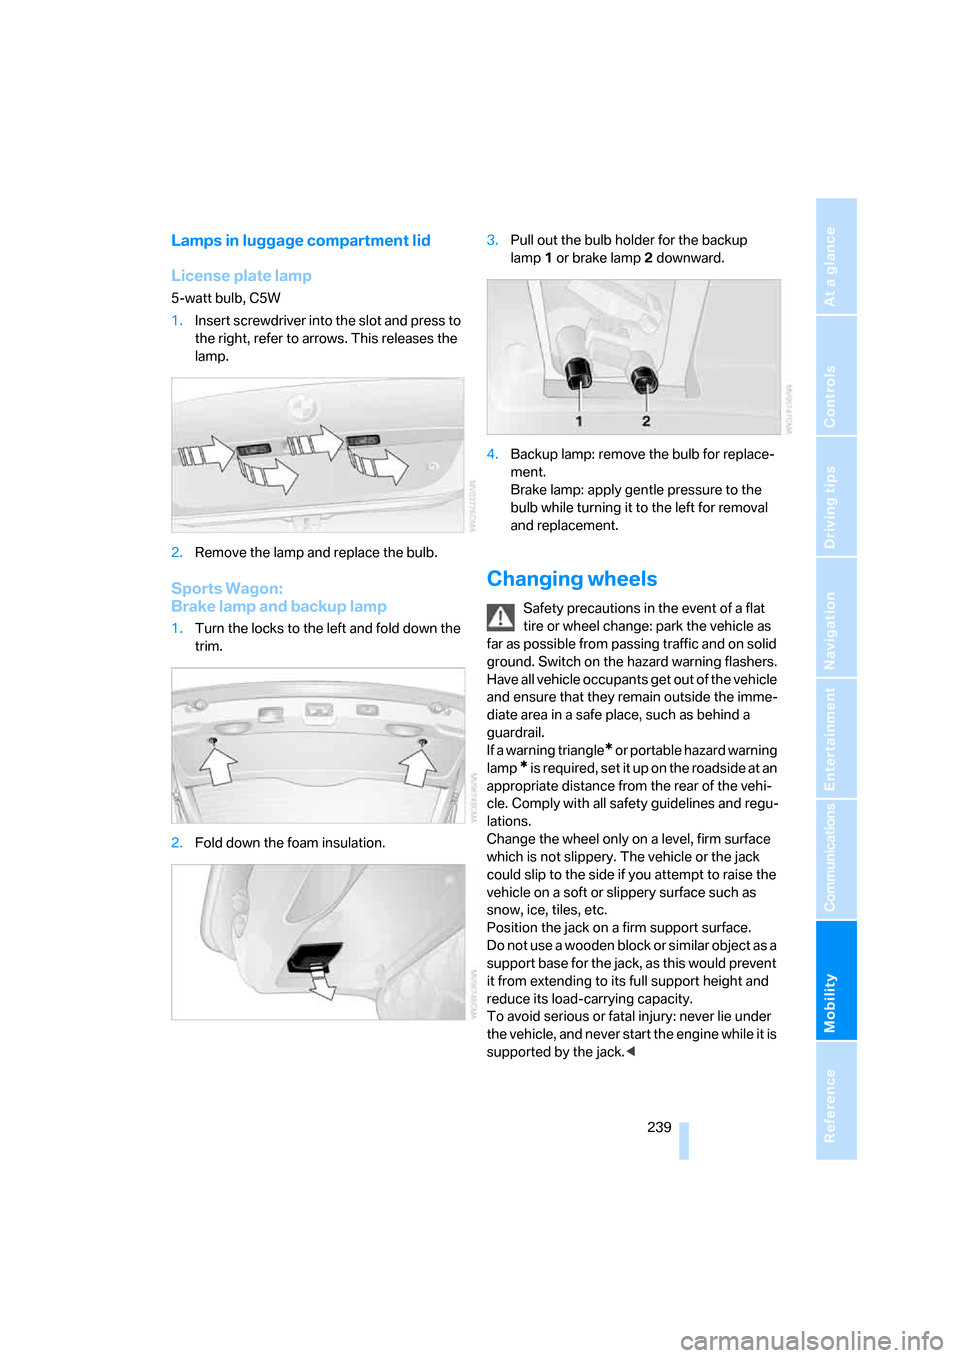
Lamps in luggage compartment lid
License plate lamp
5-watt bulb, C5W
1.Insert screwdriver into the slot and press to
the right, refer to arrows. This releases the
lamp.
2.Remove the lamp and replace the bulb.
Sports Wagon:
Brake lamp and backup lamp
1.Turn the locks to the left and fold down the
trim.
2.Fold down the foam insulation.3.Pull out the bulb holder for the backup
lamp1 or brake lamp2 downward.
4.Backup lamp: remove the bulb for replace-
ment.
Brake lamp: apply gentle pressure to the
bulb while turning it to the left for removal
and replacement.
Changing wheels
Safety precautions in the event of a flat
tire or wheel change: park the vehicle as
far as possible from passing traffic and on solid
ground. Switch on the hazard warning flashers.
Have all vehicle occupants get out of the vehicle
and ensure that they remain outside the imme-
diate area in a safe place, such as behind a
guardrail.
If a warning triangle
* or portable hazard warning
lamp
* is required, set it up on the roadside at an
appropriate distance from the rear of the vehi-
cle. Comply with all safety guidelines and regu-
lations.
Change the wheel only on a level, firm surface
which is not slippery. The vehicle or the jack
could slip to the side if you attempt to raise the
vehicle on a soft or slippery surface such as
snow, ice, tiles, etc.
Position the jack on a firm support surface.
Do not use a wooden block or similar object as a
support base for the jack, as this would prevent
it from extending to its full support height and
reduce its load-carrying capacity.
To avoid serious or fatal injury: never lie under
the vehicle, and never start the engine while it is
supported by the jack.<