2007 BMW 535XI SEDAN roof
[x] Cancel search: roofPage 45 of 286
Controls
43Reference
At a glance
Driving tips
Communications
Navigation
Entertainment
Mobility
Moving manually
In the event of an electrical malfunction, you can
move the glass sunroof manually.
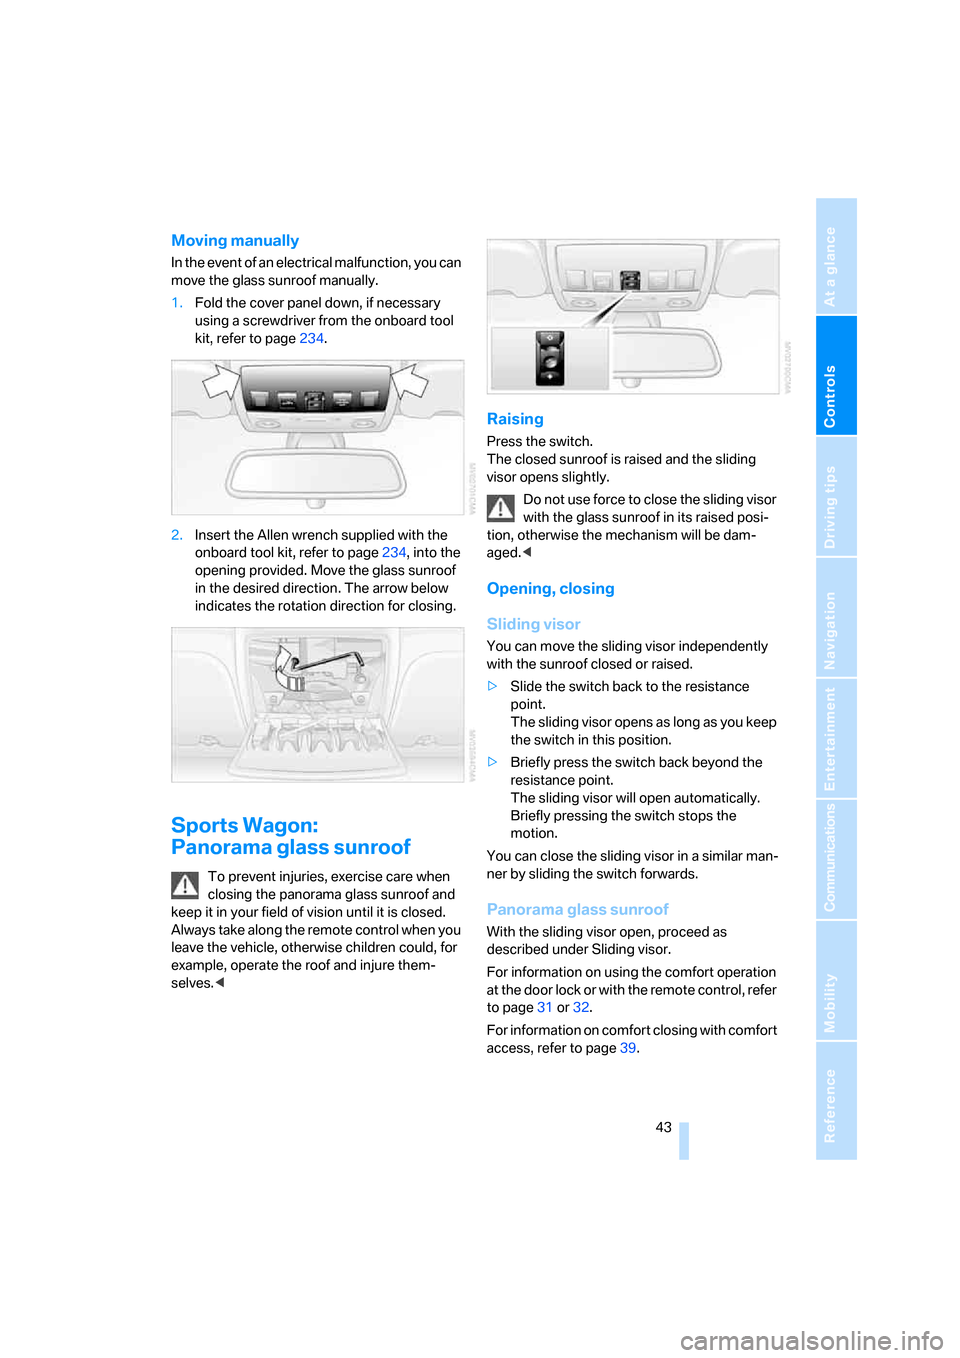
1.Fold the cover panel down, if necessary
using a screwdriver from the onboard tool
kit, refer to page234.
2.Insert the Allen wrench supplied with the
onboard tool kit, refer to page234, into the
opening provided. Move the glass sunroof
in the desired direction. The arrow below
indicates the rotation direction for closing.
Sports Wagon:
Panorama glass sunroof
To prevent injuries, exercise care when
closing the panorama glass sunroof and
keep it in your field of vision until it is closed.
Always take along the remote control when you
leave the vehicle, otherwise children could, for
example, operate the roof and injure them-
selves.<
Raising
Press the switch.
The closed sunroof is raised and the sliding
visor opens slightly.
Do not use force to close the sliding visor
with the glass sunroof in its raised posi-
tion, otherwise the mechanism will be dam-
aged.<
Opening, closing
Sliding visor
You can move the sliding visor independently
with the sunroof closed or raised.
>Slide the switch back to the resistance
point.
The sliding visor opens as long as you keep
the switch in this position.
>Briefly press the switch back beyond the
resistance point.
The sliding visor will open automatically.
Briefly pressing the switch stops the
motion.
You can close the sliding visor in a similar man-
ner by sliding the switch forwards.
Panorama glass sunroof
With the sliding visor open, proceed as
described under Sliding visor.
For information on using the comfort operation
at the door lock or with the remote control, refer
to page31 or32.
For information on comfort closing with comfort
access, refer to page39.
Page 46 of 286

Opening and closing
44
Opening and closing sunroof and
sliding visor together
Briefly press the switch beyond the resistance
point twice consecutively.
Briefly pressing the switch stops the motion.
Comfort modes
>Press the switch twice with the sunroof
open:
The sunroof is raised.
>When the sunroof is raised, briefly press the
switch twice in the opening direction:
The sunroof is opened all the way.
Comfort position
The sunroof is not completely open in the com-
fort position. This reduces the wind noises in
the interior.
Each time the panorama glass sunroof is com-
pletely opened or closed, it stops in the comfort
position. If desired, continue the motion follow-
ing this with the switch.
After switching off ignition
You can still operate the sunroof with the
remote control removed or the ignition
switched off for approx. 1 minute, as long as
neither of the front doors has been opened.
Pinch protection system
If the panorama glass sunroof or sliding visor
encounter resistance when closing from
roughly one third of the sunroof opening or
when closing from the raised position, the clos-
ing action is interrupted and the panorama
glass sunroof and sliding visor reopen a little.
Despite the pinch protection system,
inspect the sunroof's travel path prior to
closing it, as the safety system might fail to
detect certain kinds of obstructions, such as
very thin objects, and the sunroof would con-
tinue closing.<
Closing without pinch protection
system
In case of danger from outside, slide the switch
forward beyond the resistance point and hold.
The roof closes without the pinch protection
system.
Following interruptions in electrical
power supply
After a power loss, the sunroof may only
respond to the raise command. Then have the
system initialized. BMW recommends having
this work done by your BMW center.
Moving manually
In the event of an electrical malfunction, you can
move the sunroof manually.
1.Fold back the cover, using the screwdriver
from the toolkit at the points indicated if
necessary, refer to page234.
2.Remove the Allen key from the mounting
next to the toolkit and insert it in the open-
ing provided. Move the sunroof in the
desired direction. The arrow below indi-
cates the rotation direction for closing.
Page 101 of 286
Controls
99Reference
At a glance
Driving tips
Communications
Navigation
Entertainment
Mobility
tively to steering wheel movements. The stabil-
ity-promoting intervention can also be deacti-
vated. Proceed cautiously and drive
defensively. Have the system checked.Brake force display
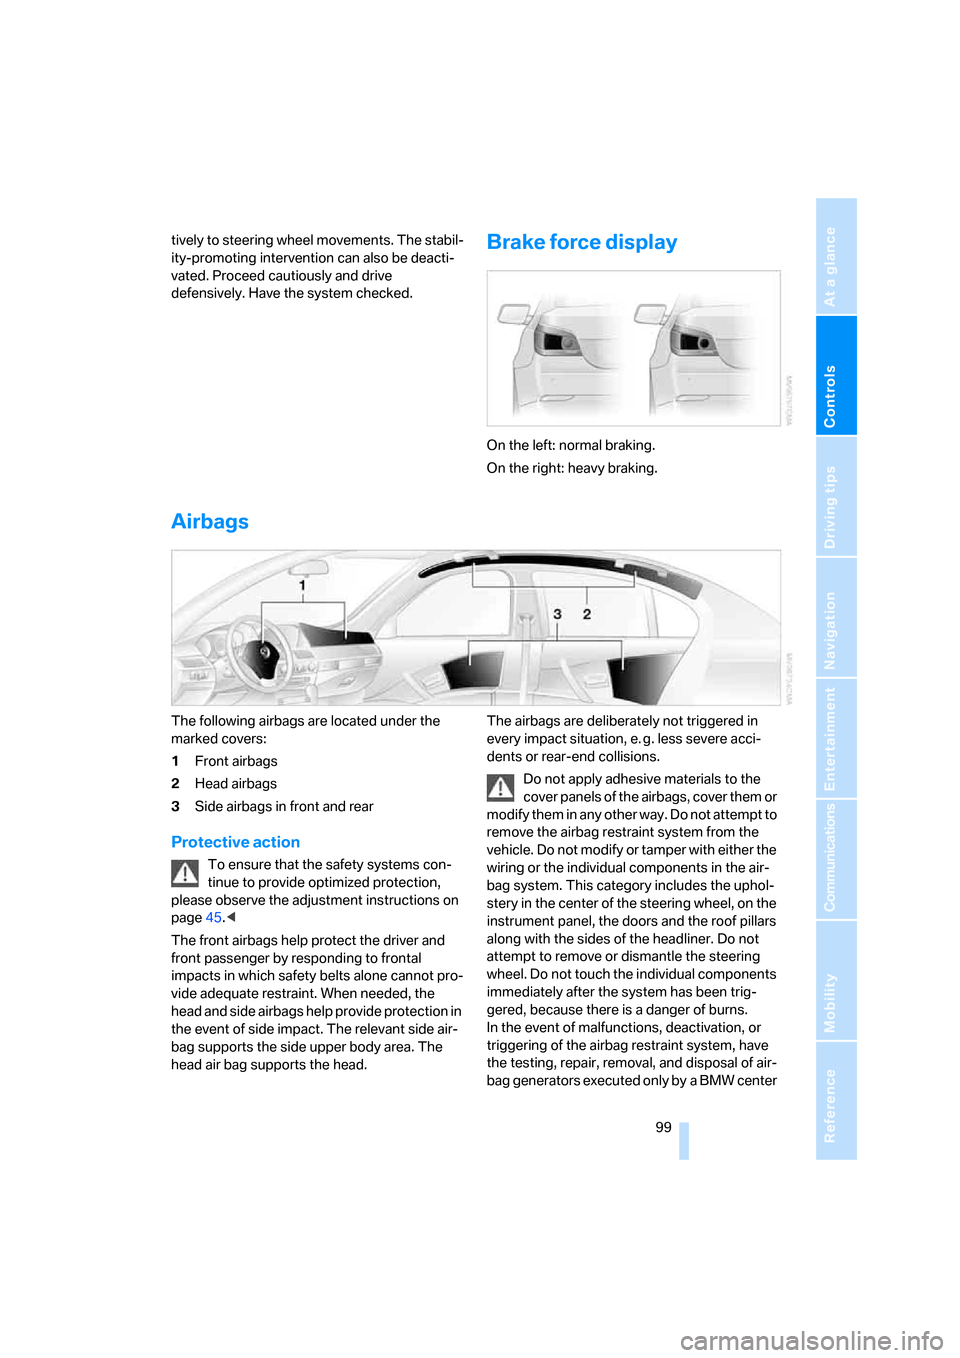
On the left: normal braking.
On the right: heavy braking.
Airbags
The following airbags are located under the
marked covers:
1Front airbags
2Head airbags
3Side airbags in front and rear
Protective action
To ensure that the safety systems con-
tinue to provide optimized protection,
please observe the adjustment instructions on
page45.<
The front airbags help protect the driver and
front passenger by responding to frontal
impacts in which safety belts alone cannot pro-
vide adequate restraint. When needed, the
head and side airbags help provide protection in
the event of side impact. The relevant side air-
bag supports the side upper body area. The
head air bag supports the head.The airbags are deliberately not triggered in
every impact situation, e. g. less severe acci-
dents or rear-end collisions.
Do not apply adhesive materials to the
cover panels of the airbags, cover them or
modify them in any other way. Do not attempt to
remove the airbag restraint system from the
vehicle. Do not modify or tamper with either the
wiring or the individual components in the air-
bag system. This category includes the uphol-
stery in the center of the steering wheel, on the
instrument panel, the doors and the roof pillars
along with the sides of the headliner. Do not
attempt to remove or dismantle the steering
wheel. Do not touch the individual components
immediately after the system has been trig-
gered, because there is a danger of burns.
In the event of malfunctions, deactivation, or
triggering of the airbag restraint system, have
the testing, repair, removal, and disposal of air-
bag generators executed only by a BMW center
Page 134 of 286
Things to remember when driving
132
Things to remember when driving
Break-in period
Moving parts need breaking-in time to adjust to
each other. To ensure that your vehicle contin-
ues to provide optimized economy of operation
throughout an extended service life, we request
that you devote careful attention to the follow-
ing section.
Engine and differential
Always obey all official speed limits.
Up to 1,200 miles/2,000 km
Drive at changing engine and driving speeds,
however do not exceed 4,500 rpm or 100 mph/
160 km/h.
Avoid full-throttle operation and use of the
transmission's kick-down mode during these
initial miles.
From 1,200 miles/2,000 km
The engine and vehicle speed can gradually be
increased.
Tires
Due to technical factors associated with their
manufacture, tires do not achieve their full trac-
tion potential until after an initial break-in
period. Therefore, drive reservedly during the
first 200 miles/300 km.
Brake system
Brakes require an initial break-in period of
approx. 300 miles/500 km to achieve optimized
contact and wear patterns between brake pads
and rotors. Drive in a reserved manner during
this break-in period.
Clutch
The function of the clutch is only at its opti-
mized level after a distance driven of approx.
300 miles/500 km. During this break-in period,
engage the clutch gently.
Following part replacement
Observe the break-in instructions again if com-
ponents mentioned above must be replaced
after subsequent driving operation.
General driving notes
Closing luggage compartment lid/
tailgate
Operate the vehicle only when the lug-
gage compartment lid/tailgate is com-
pletely closed. Otherwise, exhaust fumes could
enter the interior of the vehicle.<
If special circumstances should make it abso-
lutely necessary to operate the vehicle with the
luggage compartment lid/tailgate open:
1.Close all windows and the glass sunroof or
panorama glass sunroof.
2.Increase the air volume of the automatic cli-
mate control to a high level, refer to
page113.
Hot exhaust system
As in all vehicles, extremely high temper-
atures are generated on the exhaust sys-
tem. Do not remove the heat shields installed
adjacent to it, and never apply undercoating to
them. When driving, standing at idle and while
parking take care to avoid possible contact
between the hot exhaust system and any highly
flammable materials such as hay, leaves, grass,
etc. Such contact could lead to a fire, and with it
the risk of serious property damage as well as
personal injury. Do not touch hot exhaust tail
pipes. Otherwise there is a risk of burns.<
Mobile communications devices in
vehicle
BMW discourages the use of mobile
communications devices, e. g. mobile
phones, inside the vehicle without a direct con-
nection to an outside antenna. Otherwise, the
Page 138 of 286
Things to remember when driving
136
Roof-mounted luggage rack*
A special rack system is available as an option
for your BMW. Please comply with the precau-
tions included with the installation instructions.
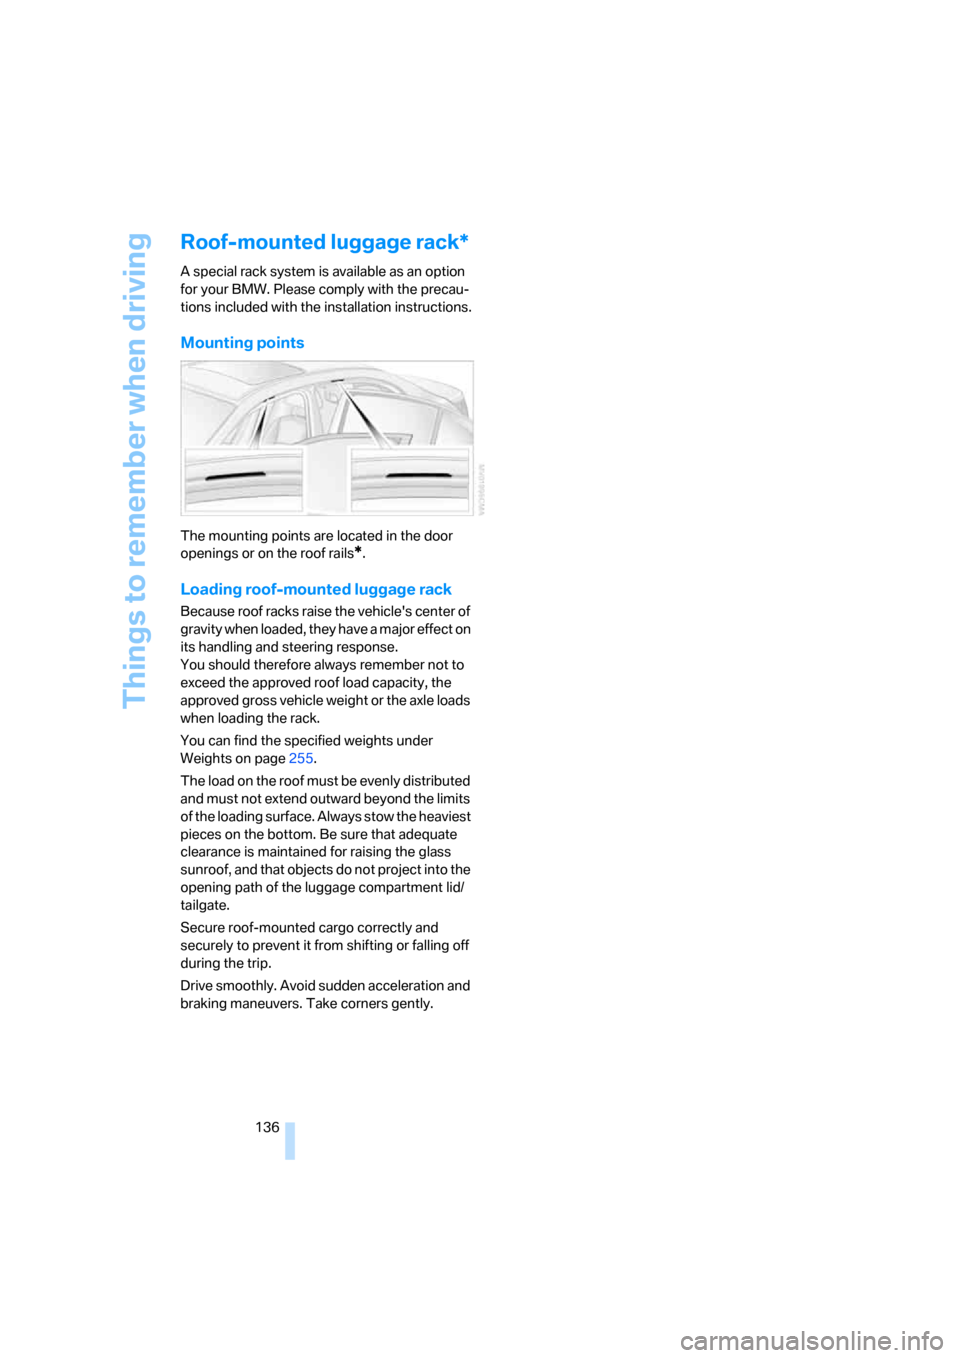
Mounting points
The mounting points are located in the door
openings or on the roof rails
*.
Loading roof-mounted luggage rack
Because roof racks raise the vehicle's center of
gravity when loaded, they have a major effect on
its handling and steering response.
You should therefore always remember not to
exceed the approved roof load capacity, the
approved gross vehicle weight or the axle loads
when loading the rack.
You can find the specified weights under
Weights on page255.
The load on the roof must be evenly distributed
and must not extend outward beyond the limits
of the loading surface. Always stow the heaviest
pieces on the bottom. Be sure that adequate
clearance is maintained for raising the glass
sunroof, and that objects do not project into the
opening path of the luggage compartment lid/
tailgate.
Secure roof-mounted cargo correctly and
securely to prevent it from shifting or falling off
during the trip.
Drive smoothly. Avoid sudden acceleration and
braking maneuvers. Take corners gently.
Page 207 of 286
205
Entertainment
Reference
At a glance
Controls
Driving tips Communications
Navigation
Mobility
Creating and editing voice phone
book*
Store entry:
An entry always consists of a name and phone
number.
Delete entry:
You can delete any entry from the voice phone
book.
Delete all entries:
{Delete phone book} deletes all entries in the
phone book.
Have entries read aloud and select:
You can have all the entries of your voice phone
book read aloud in the order of input and select
a certain entry to establish a connection:
Selecting an entry
The connection to the phone number of the
selected entry is established.
Redialing
The {Redial} command calls "Redial".
Notes
Important for voice commands
For voice commands, keep the following in
mind:
>Issue the commands smoothly and at nor-
mal volume, avoiding excessive emphasis
and pauses.
>Keep the doors, windows and glass sunroof
closed to prevent interference from ambi-
ent noise.
>Avoid making other noise in the vehicle
while speaking.
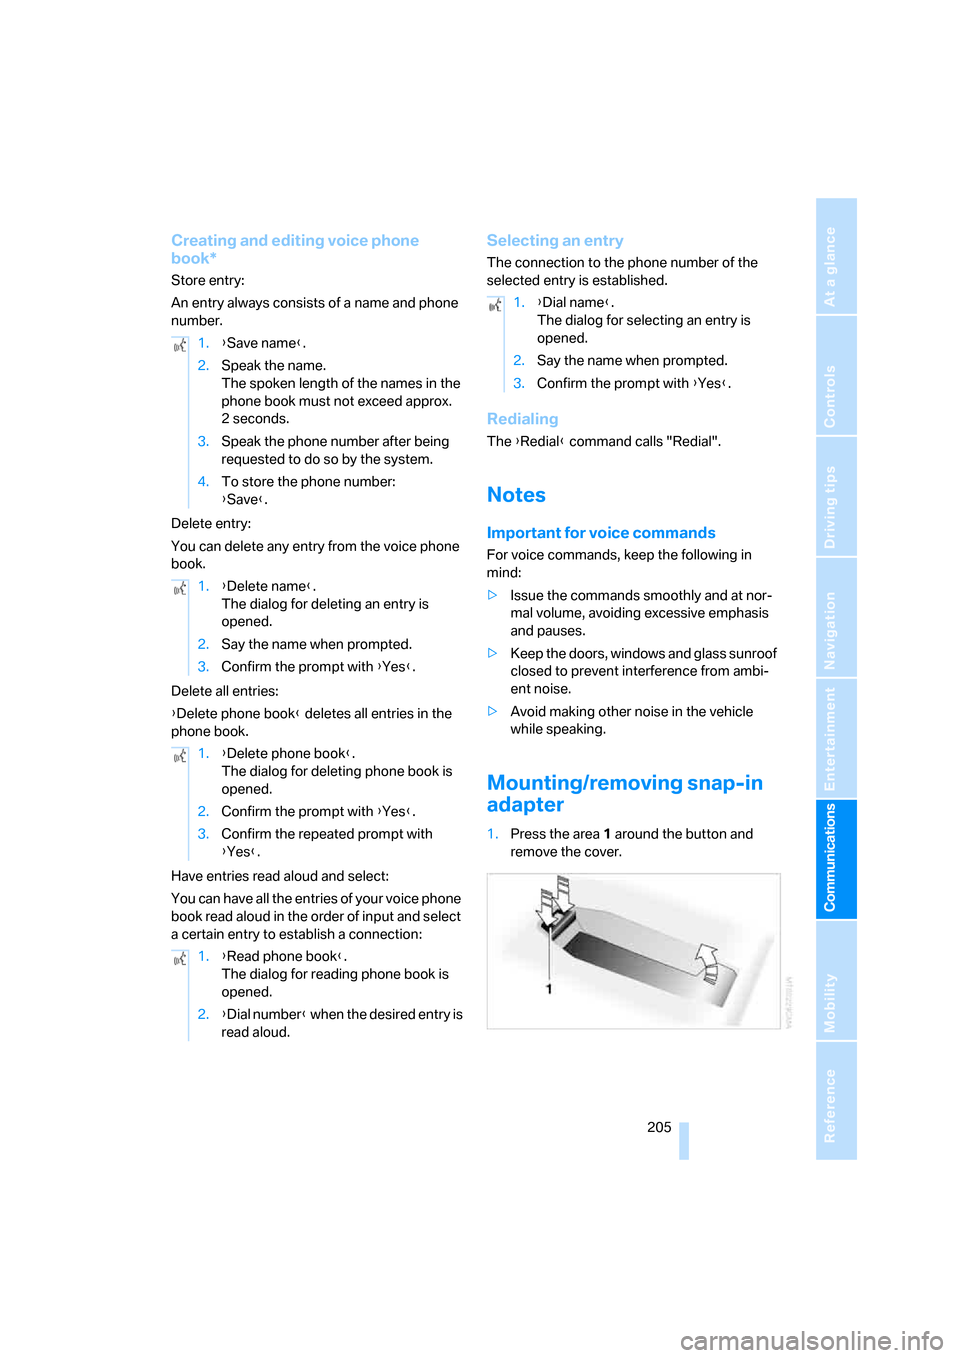
Mounting/removing snap-in
adapter
1.Press the area 1 around the button and
remove the cover. 1.{Save name}.
2.Speak the name.
The spoken length of the names in the
phone book must not exceed approx.
2seconds.
3.Speak the phone number after being
requested to do so by the system.
4.To store the phone number:
{Save}.
1.{Delete name}.
The dialog for deleting an entry is
opened.
2.Say the name when prompted.
3.Confirm the prompt with {Yes}.
1.{Delete phone book}.
The dialog for deleting phone book is
opened.
2.Confirm the prompt with {Yes}.
3.Confirm the repeated prompt with
{Yes}.
1.{Read phone book}.
The dialog for reading phone book is
opened.
2.{Dial number} when the desired entry is
read aloud.
1.{Dial name}.
The dialog for selecting an entry is
opened.
2.Say the name when prompted.
3.Confirm the prompt with {Yes}.
Page 257 of 286
Reference 255
At a glance
Controls
Driving tips
Communications
Navigation
Entertainment
Mobility
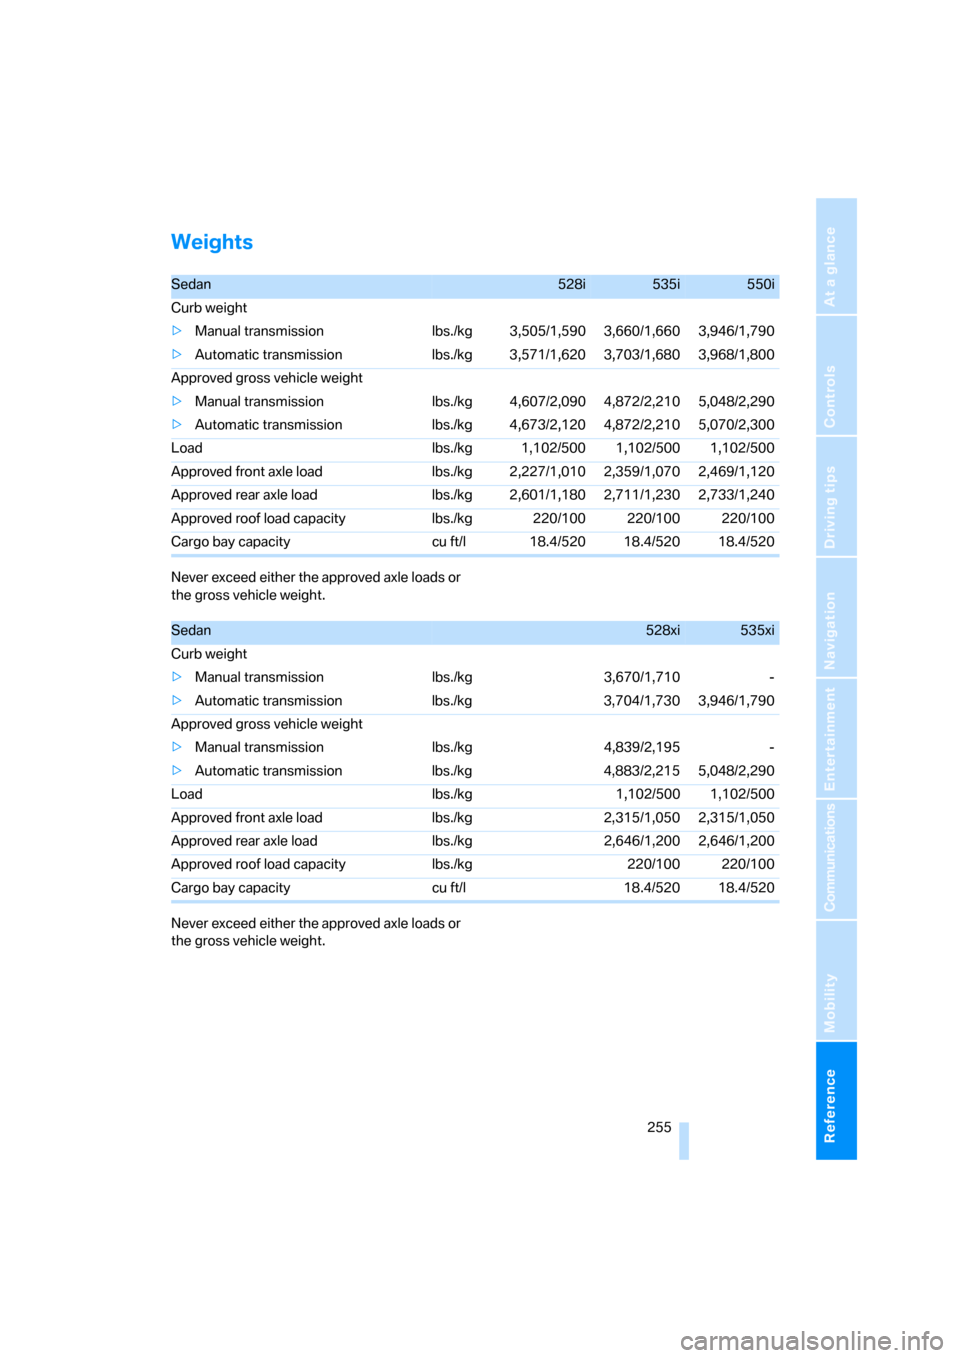
Weights
Never exceed either the approved axle loads or
the gross vehicle weight.
Never exceed either the approved axle loads or
the gross vehicle weight.
Sedan528i535i550i
Curb weight
>Manual transmission lbs./kg 3,505/1,590 3,660/1,660 3,946/1,790
>Automatic transmission lbs./kg 3,571/1,620 3,703/1,680 3,968/1,800
Approved gross vehicle weight
>Manual transmission lbs./kg 4,607/2,090 4,872/2,210 5,048/2,290
>Automatic transmission lbs./kg 4,673/2,120 4,872/2,210 5,070/2,300
Load lbs./kg 1,102/500 1,102/500 1,102/500
Approved front axle load lbs./kg 2,227/1,010 2,359/1,070 2,469/1,120
Approved rear axle load lbs./kg 2,601/1,180 2,711/1,230 2,733/1,240
Approved roof load capacity lbs./kg 220/100 220/100 220/100
Cargo bay capacity cu ft/l 18.4/520 18.4/520 18.4/520
Sedan528xi535xi
Curb weight
>Manual transmission lbs./kg 3,670/1,710 -
>Automatic transmission lbs./kg 3,704/1,730 3,946/1,790
Approved gross vehicle weight
>Manual transmission lbs./kg 4,839/2,195 -
>Automatic transmission lbs./kg 4,883/2,215 5,048/2,290
Load lbs./kg 1,102/500 1,102/500
Approved front axle load lbs./kg 2,315/1,050 2,315/1,050
Approved rear axle load lbs./kg 2,646/1,200 2,646/1,200
Approved roof load capacity lbs./kg 220/100 220/100
Cargo bay capacity cu ft/l 18.4/520 18.4/520
Page 258 of 286

Technical data
256 Never exceed either the approved axle loads or
the gross vehicle weight.
Capacities
Sports Wagon535xi
Curb weight
>Manual transmission lbs./kg 4,100/1,860
>Automatic transmission lbs./kg 4,144/1,880
Approved gross vehicle weight
>Manual transmission lbs./kg 5,291/2,400
>Automatic transmission lbs./kg 5,335/2,420
Load lbs./kg 1,190/540
Approved front axle load lbs./kg 2,381/1,080
Approved rear axle load lbs./kg 2,866/1,300
Approved roof load capacity lbs./kg 220/100
Cargo bay capacity cu ft/l 17.7-58.3/500-1,650
Notes
Fuel tank US gal/liters approx. 18.5/70 Fuel grade: page217
of that reserve US gal/liters approx. 2.1/8
550i US gal/liters approx. 2.6/10
Window cleaning system For more details: page68
>Sedan US quarts/liters approx. 3.2/3
>with headlamp cleaning system US quarts/liters approx. 5.3/5
>Sports Wagon US quarts/liters approx. 5.3/5