2007 BMW 530XI TOURING change time
[x] Cancel search: change timePage 21 of 286

At a glance
19Reference
Controls
Driving tips
Communications
Navigation
Entertainment
Mobility
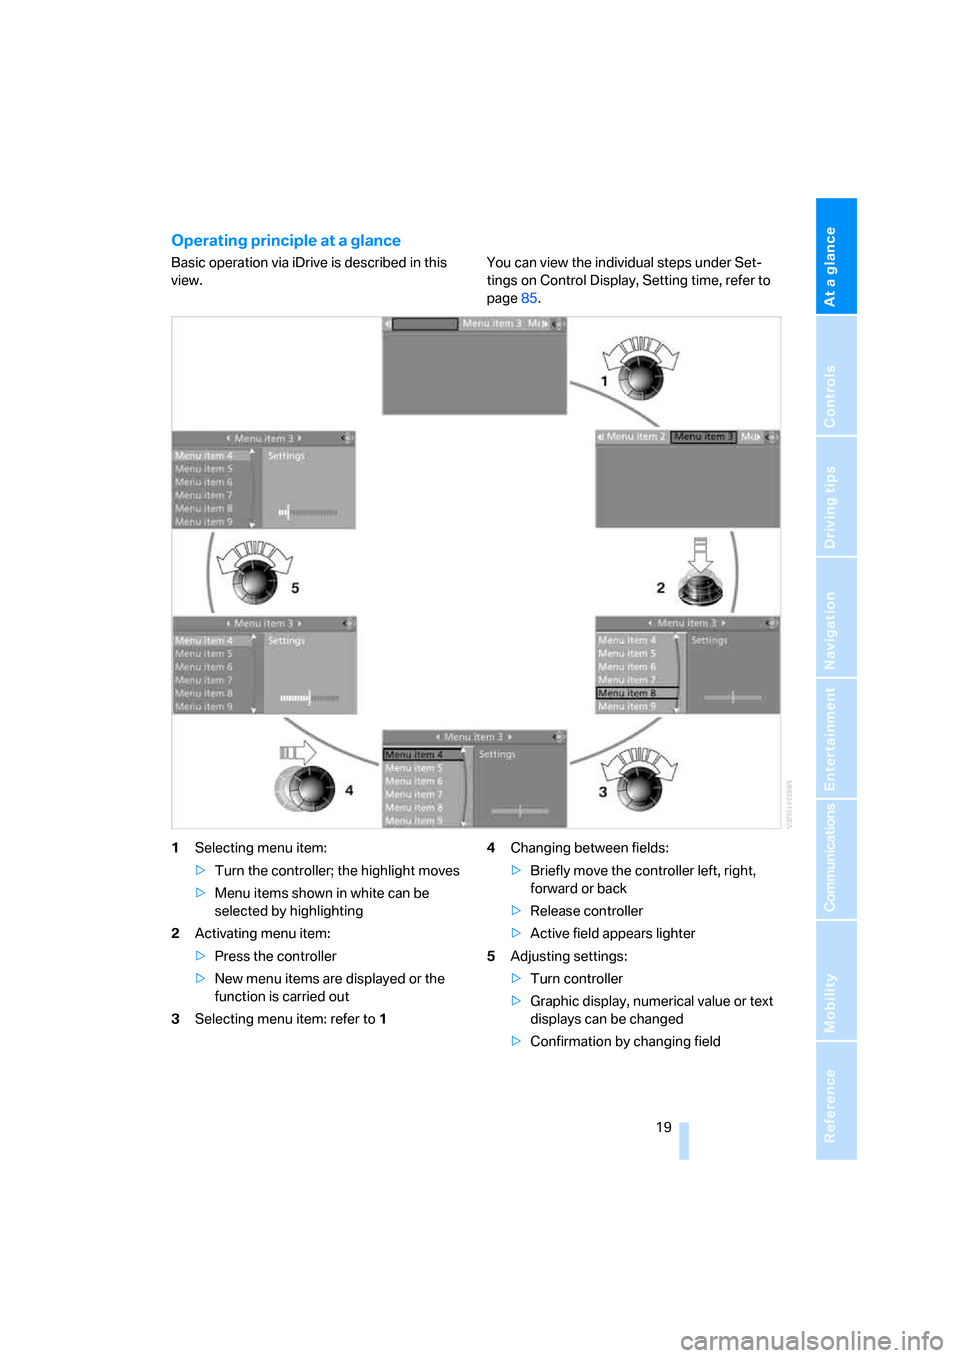
Operating principle at a glance
Basic operation via iDrive is described in this
view.You can view the individual steps under Set-
tings on Control Display, Setting time, refer to
page85.
1Selecting menu item:
>Turn the controller; the highlight moves
>Menu items shown in white can be
selected by highlighting
2Activating menu item:
>Press the controller
>New menu items are displayed or the
function is carried out
3Selecting menu item: refer to 14Changing between fields:
>Briefly move the controller left, right,
forward or back
>Release controller
>Active field appears lighter
5Adjusting settings:
>Turn controller
>Graphic display, numerical value or text
displays can be changed
>Confirmation by changing field
Page 22 of 286

iDrive
20
Status information
1Display for:
>Entertainment:
Radio, CD
>Telephone
* in "Communication":
Name of linked mobile phone, network
search or no network
>"BMW Assist"
*:
Existing voice connection with a service
from BMW Assist
2Entertainment sound output off
3Station that transmits traffic information is
received
*:
"TI":
Reception of traffic information for the nav-
igation system
is possible and activated
4Display for:
> New entries present in "Missed calls"
*
> Roaming active
5 Telephoning
* is possible if the mobile
phone is paired in the vehicle
Mobile phone network with strong
reception, dependent on mobile phone
6Time
Other displays:
The status information is temporarily hidden
when there are Check Control instructions or
inputs via the voice command system
*.
Assistance window*
Additional information appears in the assis-
tance window:
>The computer or the trip computer
*
>The arrow or map view with a navigation
system
*
>The current position
Selecting display
1.Move the controller to the right to change to
the assistance window and press the con-
troller.
2.Select a menu item.
3.Press the controller.
Page 32 of 286

Opening and closing
30 >Telephone, setting volume, refer to
pages198,204
>With programmable memory/direct selec-
tion buttons, selection of stored functions,
refer to page21
Central locking system
The concept
The central locking system is ready for opera-
tion whenever the driver's door is closed.
The system simultaneously engages and
releases the locks on the following:
>Doors
>Luggage compartment lid or tailgate and
rear window
>Fuel filler door
Operating from outside
>via the remote control
>via the door lock
>with comfort access
* via the door handles
At the same time, the anti-theft system is also
operated. It prevents the doors from being
unlocked using the lock buttons or door han-
dles. In addition, it the remote control is used,
the welcome lamps, the interior lamps and the
courtesy lamps
* are switched on or off. The
alarm system
is armed/disarmed at the same
time.
You can find more detailed information on the
alarm system
on page37.
Operating from inside
Via the button for central locking, refer to
page33. The fuel filler door is not locked.
In the event of a sufficiently severe accident, the
central locking system unlocks automatically. In
addition, the hazard warning flashers and inte-
rior lamps come on.
Opening and closing: from
outside
Using remote control
Persons or animals left unattended in a
parked vehicle can lock the doors from
the inside. Always take along the remote control
when leaving the vehicle so that the vehicle can
then be opened from the outside.<
Unlocking
Press the button.
The interior lamps, the courtesy lamps
* of the
doors and the welcome lamps are switched on.
You can set how the vehicle is unlocked. The
setting is stored for the remote control currently
in use.
iDrive, for explanation of principle, refer to
page16.
1.Press the button.
This opens the start menu.
2.Press the controller to open the menu.
3.Select "Settings" and press the controller.
4.Select "Vehicle / Tires" and press the con-
troller.
5.Change to upper field if necessary. Turn the
controller until "Door locks" is selected and
press the controller.
6.Select "Central locking" and press the con-
troller.
7.Select "Unlock button" and press the con-
troller.
Page 34 of 286

Opening and closing
32 5.Change to upper field if necessary. Turn the
controller until "Door locks" is selected and
press the controller.
6.Select "Confirmation" and press the con-
troller.
7.Select the desired signal.
8.Press the controller.
The signal is activated.
Malfunction
The remote control may malfunction due to
local radio waves. Should the remote control fail
to operate due to interference of this kind,
unlock and lock the vehicle via the door lock
using a key.
If it is no longer possible to lock the vehicle
using the remote control, then the battery is
discharged. Use this remote control during an
extended drive; this will recharge the battery,
refer to page28.
For US owners only
The transmitter and receiver units comply with
part 15 of the FCC/Federal Communication
Commission regulations. Operation is gov-
erned by the following:
FCC ID:
LX8766S
LX8766E
LX8CAS
LX8CAS2
Compliance statement:
This device complies with part 15 of the FCC
Rules. Operation is subject to the following two
conditions:>This device must not cause harmful inter-
ference, and
>this device must accept any interference
received, including interference that may
cause undesired operation.
Any unauthorized modifications or
changes to these devices could void the
user's authority to operate this equipment.<
Using door lock
Do not lock the vehicle from the outside if
persons are inside, as unlocking from the
inside is not possible without special knowl-
edge.<
When unlocking
1.Turning the key once unlocks the driver's
door and the fuel filler door.
2.Turning the key a second time unlocks the
remaining doors and the luggage compart-
ment lid/tailgate.
Comfort operation
You also have the option of operating the win-
dows and the glass sunroof
* from the driver's
door lock.
Turn and hold the key in the positions for
unlocking or locking.
Watch during the closing process to be
sure that no one is injured. Releasing the
key stops the operation.<
Manual operation
In the event of an electrical malfunction, you can
turn a key all the way to the right or left in the
door lock to lock or unlock the driver's door.
Page 35 of 286

Controls
33Reference
At a glance
Driving tips
Communications
Navigation
Entertainment
Mobility
Opening and closing: from
inside
This button serves to unlock or lock doors and
the luggage compartment lid or tailgate and
rear window with the front doors closed, but
does not activate the anti-theft system. The fuel
filler door remains unlocked.
Automatic locking
iDrive, for explanation of principle, refer to
page16.
1.Press the button.
This opens the start menu.
2.Press the controller to open the menu.
3.Select "Settings" and press the controller.
4.Select "Vehicle / Tires" and press the con-
troller.
5.Change to upper field if necessary. Turn the
controller until "Door locks" is selected and
press the controller.
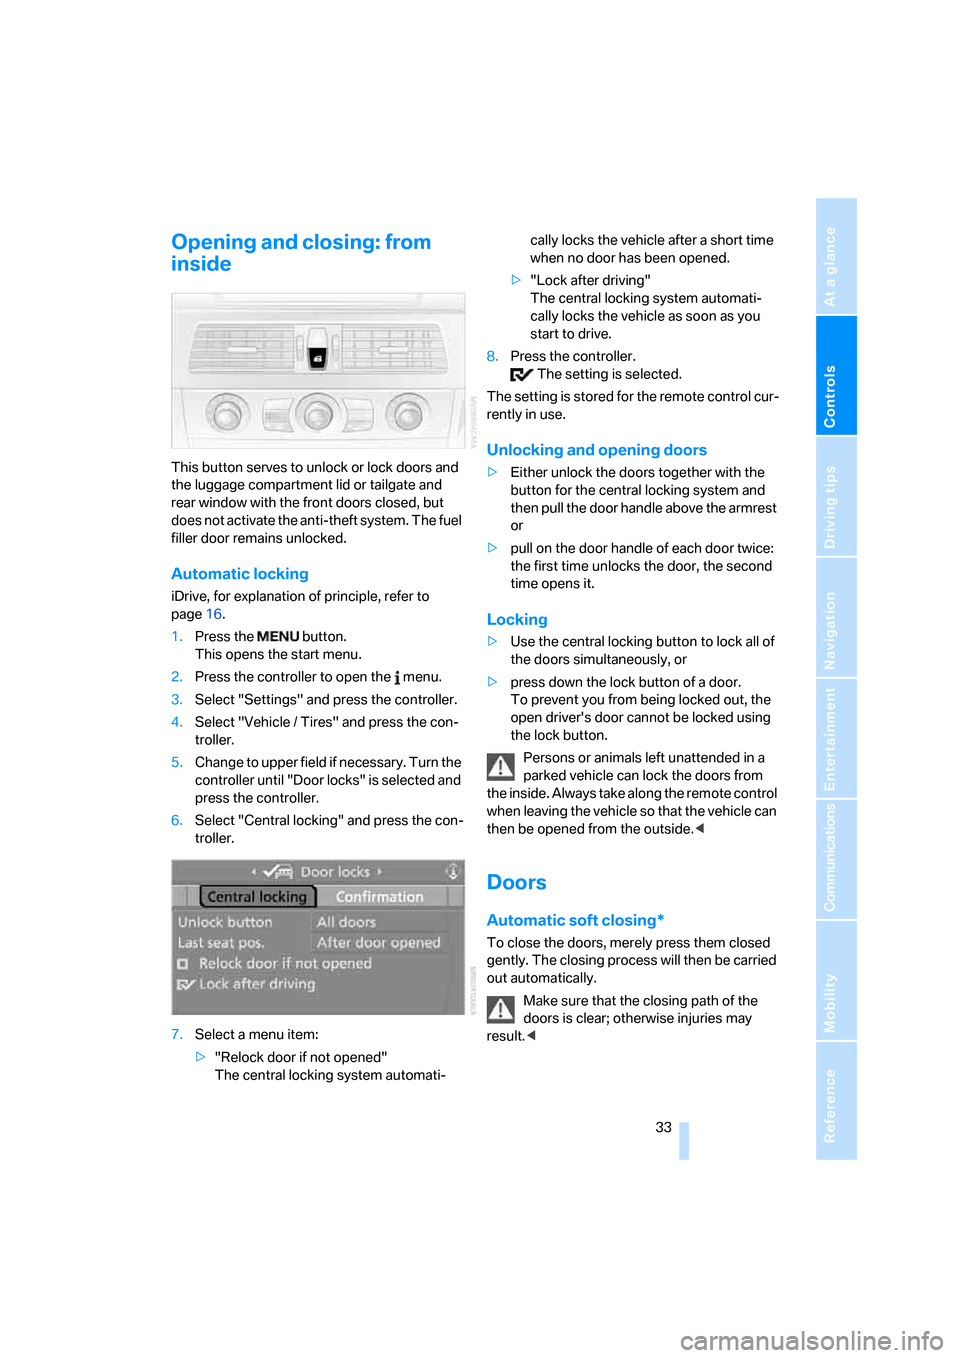
6.Select "Central locking" and press the con-
troller.
7.Select a menu item:
>"Relock door if not opened"
The central locking system automati-cally locks the vehicle after a short time
when no door has been opened.
>"Lock after driving"
The central locking system automati-
cally locks the vehicle as soon as you
start to drive.
8.Press the controller.
The setting is selected.
The setting is stored for the remote control cur-
rently in use.
Unlocking and opening doors
>Either unlock the doors together with the
button for the central locking system and
then pull the door handle above the armrest
or
>pull on the door handle of each door twice:
the first time unlocks the door, the second
time opens it.
Locking
>Use the central locking button to lock all of
the doors simultaneously, or
>press down the lock button of a door.
To prevent you from being locked out, the
open driver's door cannot be locked using
the lock button.
Persons or animals left unattended in a
parked vehicle can lock the doors from
the inside. Always take along the remote control
when leaving the vehicle so that the vehicle can
then be opened from the outside.<
Doors
Automatic soft closing*
To close the doors, merely press them closed
gently. The closing process will then be carried
out automatically.
Make sure that the closing path of the
doors is clear; otherwise injuries may
result.<
Page 68 of 286

Driving
66
Activating system
Press the SPORT button.
The LED in the button lights up and SPORT is
displayed in the instrument cluster.
Deactivating system
>Press the SPORT button again
>Engage reverse gear
>Switch off engine
The LED in the button and SPORT in the instru-
ment cluster go out.
Turn signals/
headlamp flasher
1High beams
2Headlamp flasher
3Turn signals
Using turn signals
Press the lever beyond the resistance point.
To turn off manually, press the lever to the
resistance point.
Atypically rapid flashing of the indicator
lamp indicates that a turn signal bulb
needs to be replaced.<
Signaling briefly
Press lever to resistance point and hold for as
long as you wish to signal.
Triple turn signal activation
Press the lever to the resistance point; the turn
signal flashes three times.
You can activate or deactivate this function.
iDrive, for explanation of principle, refer to
page16.
1.Open the start menu.
2.Press the controller to open the menu.
3.Select "Settings" and press the controller.
4.Select "Vehicle / Tires" and press the con-
troller.
5.Change to upper field if necessary. Turn the
controller until "Lighting" is selected and
press the controller.
6.Select "Triple turn signal" and press the
controller.
Triple turn signaling is activated.
The setting is stored for the remote control cur-
rently in use.
Page 71 of 286

Controls
69Reference
At a glance
Driving tips
Communications
Navigation
Entertainment
Mobility
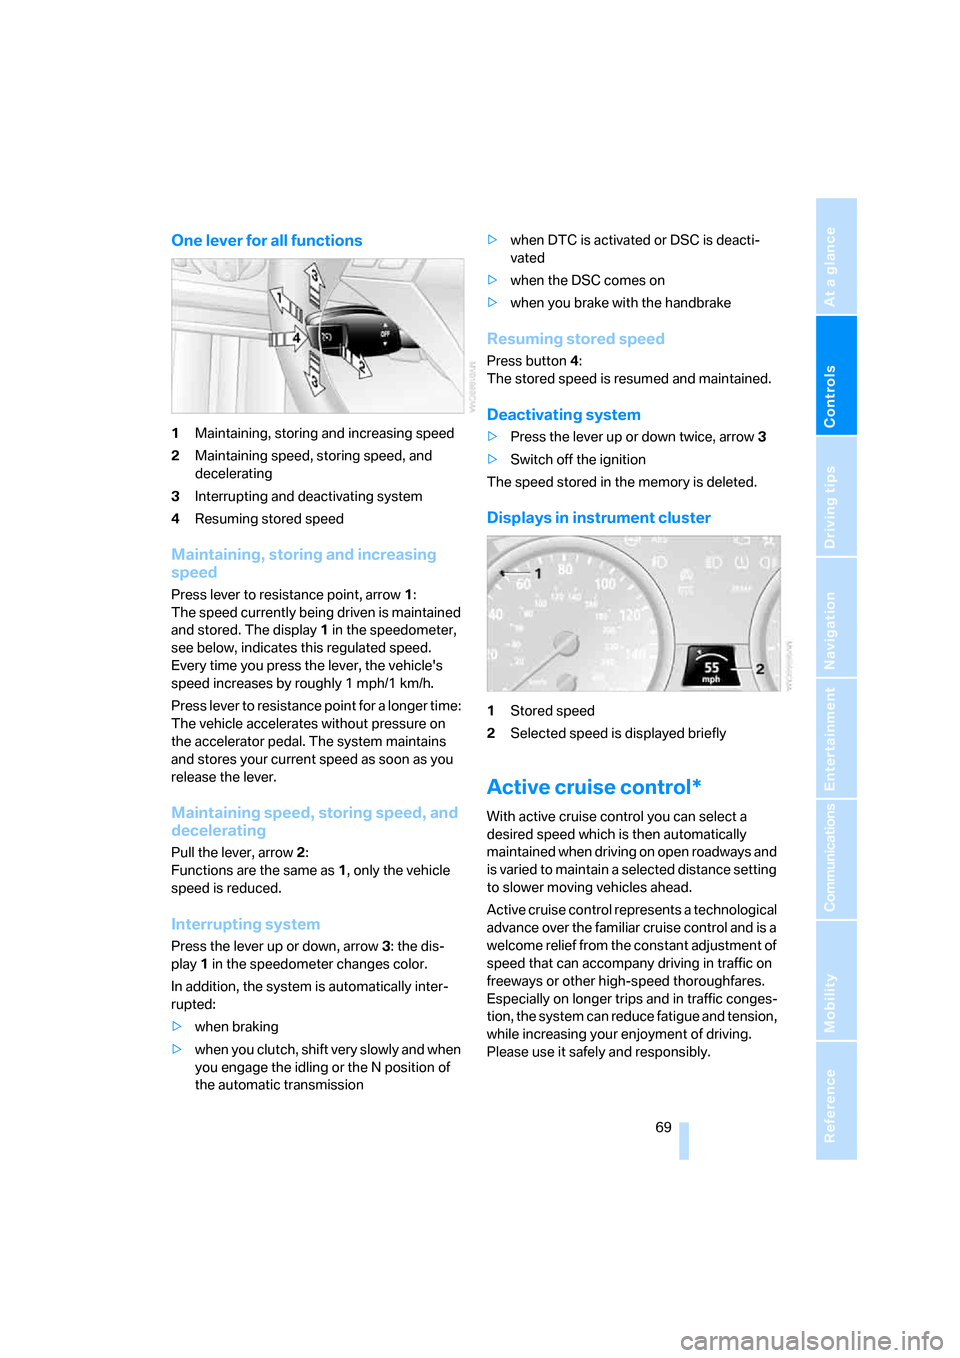
One lever for all functions
1Maintaining, storing and increasing speed
2Maintaining speed, storing speed, and
decelerating
3Interrupting and deactivating system
4Resuming stored speed
Maintaining, storing and increasing
speed
Press lever to resistance point, arrow 1:
The speed currently being driven is maintained
and stored. The display1 in the speedometer,
see below, indicates this regulated speed.
Every time you press the lever, the vehicle's
speed increases by roughly 1 mph/1 km/h.
Press lever to resistance point for a longer time:
The vehicle accelerates without pressure on
the accelerator pedal. The system maintains
and stores your current speed as soon as you
release the lever.
Maintaining speed, storing speed, and
decelerating
Pull the lever, arrow2:
Functions are the same as1, only the vehicle
speed is reduced.
Interrupting system
Press the lever up or down, arrow3: the dis-
play1 in the speedometer changes color.
In addition, the system is automatically inter-
rupted:
>when braking
>when you clutch, shift very slowly and when
you engage the idling or the N position of
the automatic transmission>when DTC is activated or DSC is deacti-
vated
>when the DSC comes on
>when you brake with the handbrake
Resuming stored speed
Press button4:
The stored speed is resumed and maintained.
Deactivating system
>Press the lever up or down twice, arrow3
>Switch off the ignition
The speed stored in the memory is deleted.
Displays in instrument cluster
1Stored speed
2Selected speed is displayed briefly
Active cruise control*
With active cruise control you can select a
desired speed which is then automatically
maintained when driving on open roadways and
is varied to maintain a selected distance setting
to slower moving vehicles ahead.
Active cruise control represents a technological
advance over the familiar cruise control and is a
welcome relief from the constant adjustment of
speed that can accompany driving in traffic on
freeways or other high-speed thoroughfares.
Especially on longer trips and in traffic conges-
tion, the system can reduce fatigue and tension,
while increasing your enjoyment of driving.
Please use it safely and responsibly.
Page 74 of 286

Driving
72 The selected distance is displayed in the instru-
ment cluster.
Use good judgment to select the appro-
priate following distance, given road con-
ditions, traffic, applicable laws and State driving
recommendations for safe following distance.
Otherwise, a violation of the law or risk of an
accident could result.<
Interrupting cruise control
Press the lever upward or downward, and with
the vehicle stopped also depress the brake
pedal. The marking in the speedometer
changes color and the distance indicator goes
out.
In addition, the system is automatically inter-
rupted:
>when you apply the vehicle brakes
>when you shift the transmission>when DTC is activated or DSC is deacti-
vated
>when DSC comes on
>when you apply the handbrake
>when you release the safety belt and open
the driver's door with the vehicle stopped
>when the system does not recognize any
objects for an extended period of time, e. g.
on infrequently traveled roads without a
shoulder or guard rails, or if the radar sensor
is covered with dirt, refer to page73
If the system is interrupted, then it is nec-
essary for the driver to actively intervene
by braking and steering. Otherwise, there is a
risk of an accident.<
Resuming stored desired speed and
distance
While driving
Press button4.
The displays appear in the instrument cluster.
While stopped
Before leaving the vehicle with the engine
running, engage position P of the auto-
matic transmission and apply the handbrake.
Otherwise the vehicle can roll.<
If a detected vehicle in front of you brakes to a
complete stop and your vehicle has also been
braked to a complete stop by the system:
>If the vehicle in front of you drives off while
the marking1 for the desired speed in the
speedometer is green, your vehicle will
accelerate without you having to do any-
thing.
>If the vehicle in front of you drives off while
the marking1 is orange, you briefly depress
the accelerator pedal or press button4.
Rolling bars in the distance indicator3
mean that the vehicle in front of you has
driven off. Distance 1, closest
Distance 2
Distance 3
Distance 4, furthest
This distance is always set when
you activate the system.