2007 BMW 530I TOURING button
[x] Cancel search: buttonPage 120 of 286

Practical interior accessories
118
Practical interior accessories
Integrated universal remote
control*
The concept
The integrated universal remote control can
replace as many as three hand-held transmit-
ters for various remote-controlled accessories,
such as garage and gate or lighting systems.
The integrated universal remote control regis-
ters and stores signals from the original hand-
held transmitters.
The signal of an original hand-held transmitter
can be programmed on one of the three mem-
ory buttons1. After this, the programmed
memory button1 will operate the system in
question. The LED2 flashes to confirm trans-
mission of the signal.
Should you sell your vehicle one day, be sure to
delete the stored programs beforehand for your
safety, refer to page119.
To prevent possible damage or injury,
before programming or using the inte-
grated universal remote control, always inspect
the immediate area to make certain that no peo-
ple, animals or objects are within the travel
range of the device. Also, comply with the
safety precautions of the original hand-held
transmitter.<
Checking compatibility
If you see this symbol on the packaging
or in the manual supplied with the orig-
inal hand-held transmitter, it is safe to
assume that it is compatible with the integrated
universal remote control.
If you have additional questions, please
contact your BMW center or call:
1-800-355-3515.
Information is also provided on the Internet at:
www.bmwusa.com or
www.homelink.com.
HomeLink is a registered trademark of Johnson
Controls, Inc.<
Programming
1Memory buttons
2LED
Fixed-code hand-held transmitters
1.Switch on ignition, refer to page60.
2.When starting operation for the first time:
Press the left and right-hand memory
button1 for approx. 20 seconds until the
LED2 flashes quickly. All stored programs
are deleted.
3.Hold the original hand-held transmitter at a
distance of approx. 4 in/10 cm to 12 in/
30 cm from the memory buttons1.
The required distance between the
hand-held transmitter and the mem-
ory buttons1 depends on the relevant sys-
tem of the original hand-held transmitter
used.<
4.Simultaneously press the transmit button
on the original hand-held transmitter and
the desired memory button 1 on the inte-
grated universal remote control. The LED 2
flashes slowly at first. As soon as the LED2
flashes rapidly, release both buttons. If the
LED2 does not flash rapidly after approx.
15 seconds, alter the distance and repeat
the step.
5.To program other original hand-held trans-
mitters, repeat steps 3 and 4.
The corresponding memory button 1 is now
programmed with the signal of the original
hand-held transmitter.
Page 121 of 286

Controls
119Reference
At a glance
Driving tips
Communications
Navigation
Entertainment
Mobility
You can operate the device when the engine is
running or when the ignition is switched on.
If the device fails to function even after
repeated programming, check whether
the original hand-held transmitter uses an alter-
nating-code system. To do so, either read the
instructions for the original hand-held transmit-
ter or hold down the programmed memory
button1 of the integrated universal remote
control. If the LED2 on the integrated universal
remote control flashes rapidly for a short time
and then remains lit for approx. 2 seconds, this
indicates that the original hand-held transmitter
uses an alternating-code system. In the case of
an alternating-code system, program the mem-
ory buttons1 as described at Alternating-code
hand-held transmitters.<
Alternating-code hand-held
transmitters
To program the integrated universal remote
control, consult the operating instructions for
the equipment to be set. You will find informa-
tion there on the possibilities for synchroniza-
tion.
When programming hand-held transmitters
that employ an alternating code, please observe
the following supplementary instructions:
P r o g ra m m in g w i ll b e ea s i er w it h t h e a i d o f
a second person.<
1.Park your vehicle within the range of the
remote-controlled device.
2.Program the integrated universal remote
control as described above in the section
Fixed-code hand-held transmitters.
3.Locate the button on the receiver of the
device to be set, e. g. on the drive unit.
4.Press the button on the receiver of the
device to be set. After step 4, you have
approx. 30 seconds for step 5.
5.Press the programmed memory button1
of the integrated universal remote control
three times.
The corresponding memory button 1 is now
programmed with the signal of the original
hand-held transmitter.If you have any additional questions,
please contact your BMW center.<
Deleting stored programs
Press the left and right-hand memory button1
for approx. 20 seconds until the LED2 flashes
quickly:
All stored programs are deleted.
Individual programs cannot be deleted.
Sun blinds*
Sun blind for rear window
Press the button on the driver's door.
Sun blinds for rear side windows
Pull the loop of the roller sun blind and hook
onto bracket.
Glove compartment
Opening
Pull the handle. The light in the glove compart-
ment switches on.
Page 122 of 286
Practical interior accessories
120 To prevent injury in the event of an acci-
dent while the vehicle is being driven,
close the glove compartment immediately after
use.<
Closing
Fold the cover up.
Locking
Lock with a key.
If you only hand over the remote control
without the integrated key, e.g. for valet
parking, refer to page28, the glove compart-
ment cannot be unlocked.<
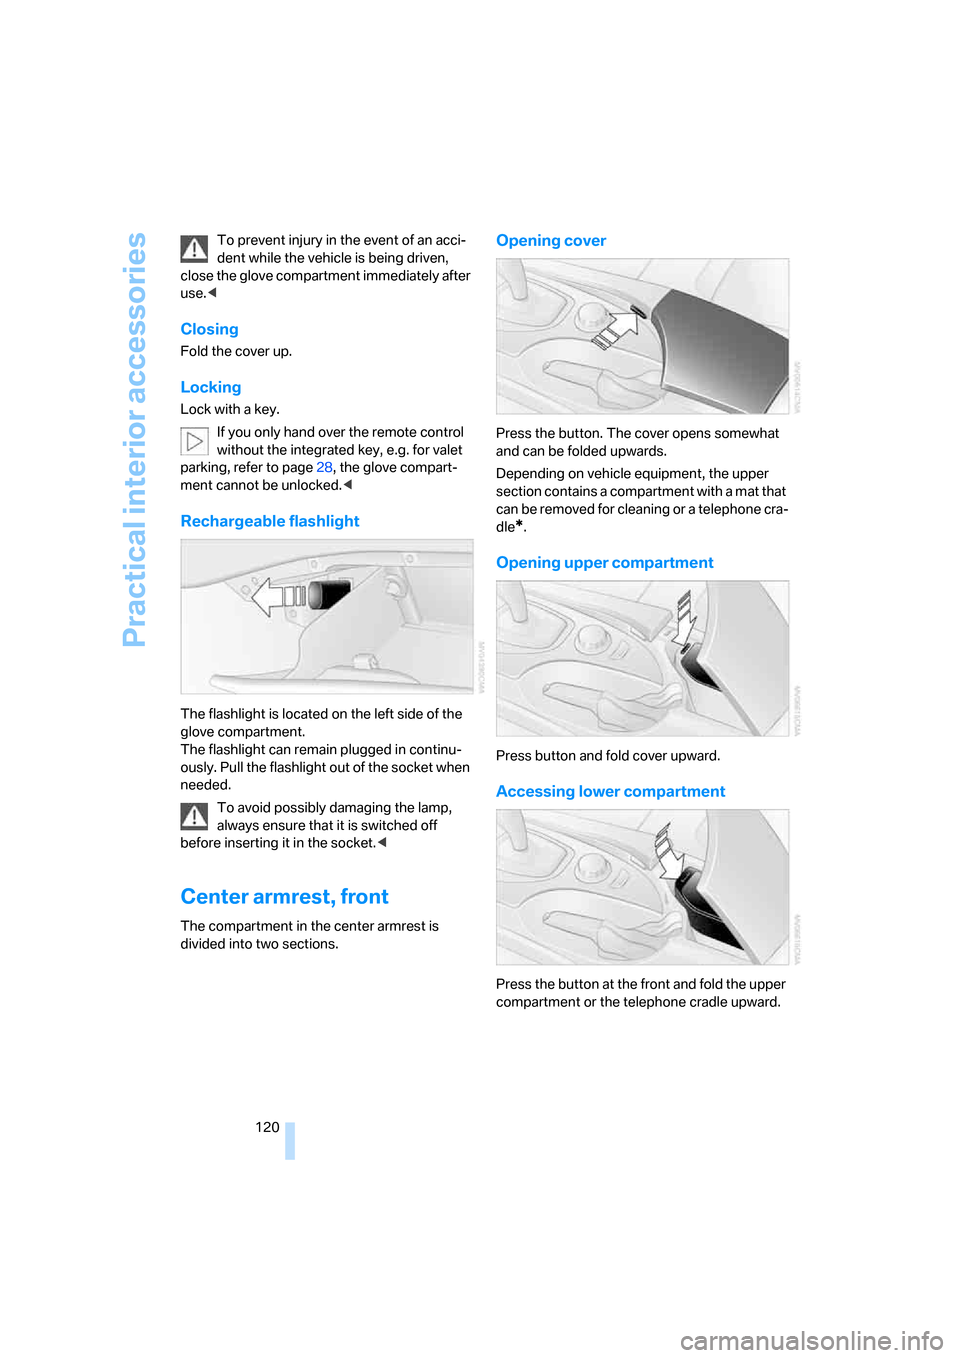
Rechargeable flashlight
The flashlight is located on the left side of the
glove compartment.
The flashlight can remain plugged in continu-
ously. Pull the flashlight out of the socket when
needed.
To avoid possibly damaging the lamp,
always ensure that it is switched off
before inserting it in the socket.<
Center armrest, front
The compartment in the center armrest is
divided into two sections.
Opening cover
Press the button. The cover opens somewhat
and can be folded upwards.
Depending on vehicle equipment, the upper
section contains a compartment with a mat that
can be removed for cleaning or a telephone cra-
dle
*.
Opening upper compartment
Press button and fold cover upward.
Accessing lower compartment
Press the button at the front and fold the upper
compartment or the telephone cradle upward.
Page 123 of 286

Controls
121Reference
At a glance
Driving tips
Communications
Navigation
Entertainment
Mobility
Ventilating lower compartment*
Push the slide in the lower compartment
upward.
Depending on the automatic climate con-
trol setting, the temperature inside the
ventilated compartment may be higher than in
the rest of the interior. Should this be the case,
push the slide downward to close off the venti-
lation.<
Adjusting
Push the illustrated section of the center arm-
rest into the desired position.
Connection for external audio device
You can connect an external audio device such
as a CD or MP3 player and play audio tracks
over the vehicle's loudspeaker system:
>AUX-In connection, refer to page185.
>USB/audio interface
*, refer to page186.
Storage compartments
Storage compartments are located on the
doors, in the front center console and in the
rear.
Storage nets are located on the backrests of the
front seats, and a net
* is provided in the front
passenger footwell.
Do not stow hard or sharp-edged objects
in the storage nets or the net, otherwise
there is an increased risk of injury in an acci-
dent.<
Clothes hooks
Clothes hooks are located near the grab han-
dles in the rear.
When hanging clothing on the hooks,
ensure that it will not obstruct the driver's
vision. Do not hang heavy objects on the hooks.
If you do so, they could cause personal injury to
occupants during braking or evasive maneu-
vers.<
Cup holders
Do not place containers made of glass in
the cup holders. This would lead to an
increased risk of injury in the event of an acci-
dent. Do not force containers that are too large
into the cup holders, otherwise damage could
result.<
Opening
Briefly press the button.
Closing
Press the cover in the center and push in the
cup holder.
Page 124 of 286
Practical interior accessories
122
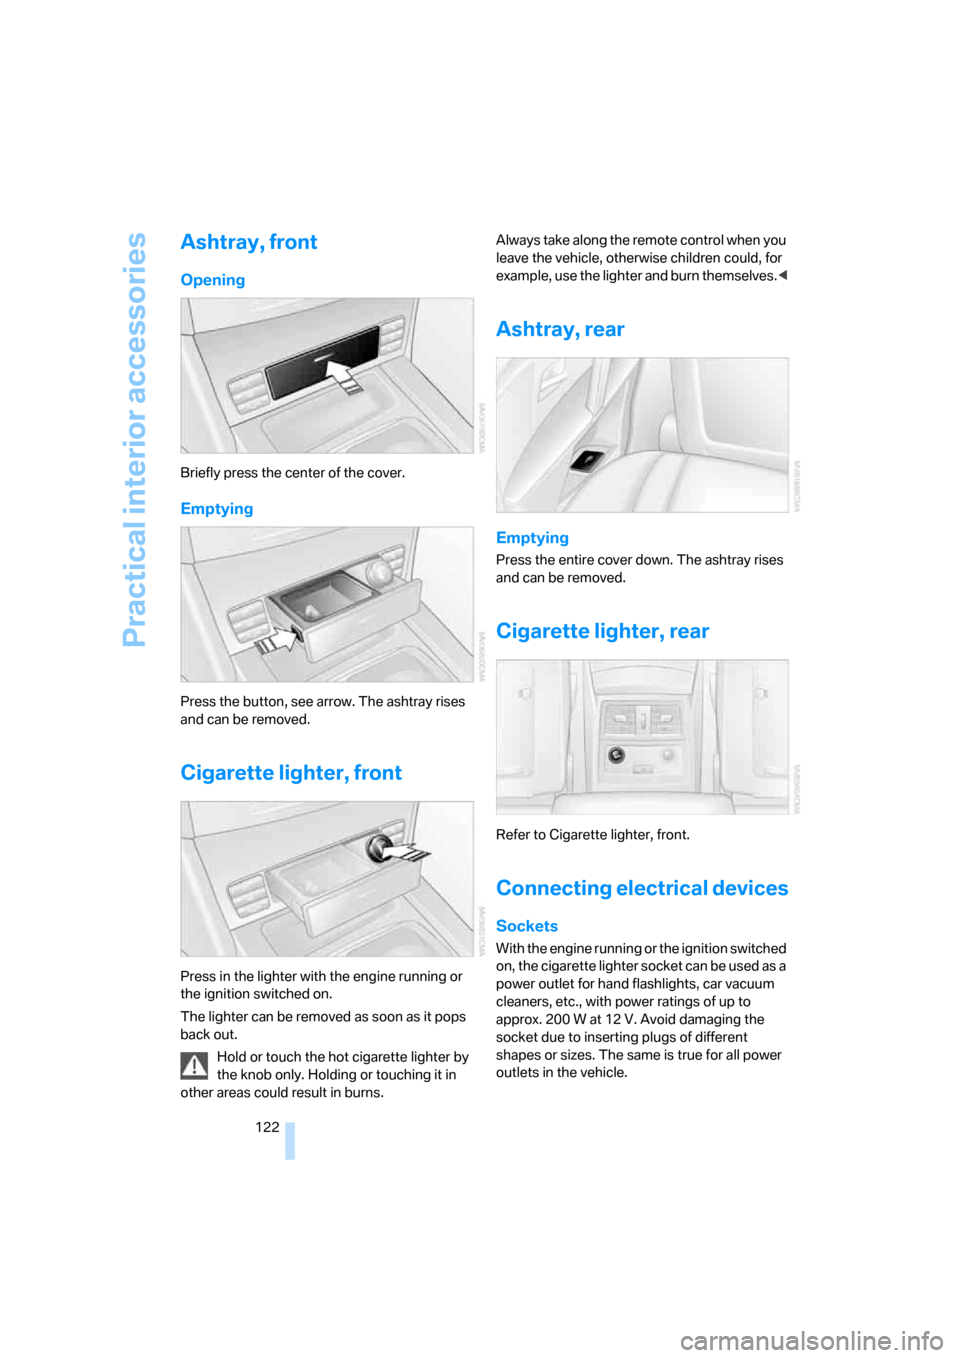
Ashtray, front
Opening
Briefly press the center of the cover.
Emptying
Press the button, see arrow. The ashtray rises
and can be removed.
Cigarette lighter, front
Press in the lighter with the engine running or
the ignition switched on.
The lighter can be removed as soon as it pops
back out.
Hold or touch the hot cigarette lighter by
the knob only. Holding or touching it in
other areas could result in burns. Always take along the remote control when you
leave the vehicle, otherwise children could, for
example, use the lighter and burn themselves.<
Ashtray, rear
Emptying
Press the entire cover down. The ashtray rises
and can be removed.
Cigarette lighter, rear
Refer to Cigarette lighter, front.
Connecting electrical devices
Sockets
With the engine running or the ignition switched
on, the cigarette lighter socket can be used as a
power outlet for hand flashlights, car vacuum
cleaners, etc., with power ratings of up to
approx. 200 W at 12 V. Avoid damaging the
socket due to inserting plugs of different
shapes or sizes. The same is true for all power
outlets in the vehicle.
Page 125 of 286
Controls
123Reference
At a glance
Driving tips
Communications
Navigation
Entertainment
Mobility
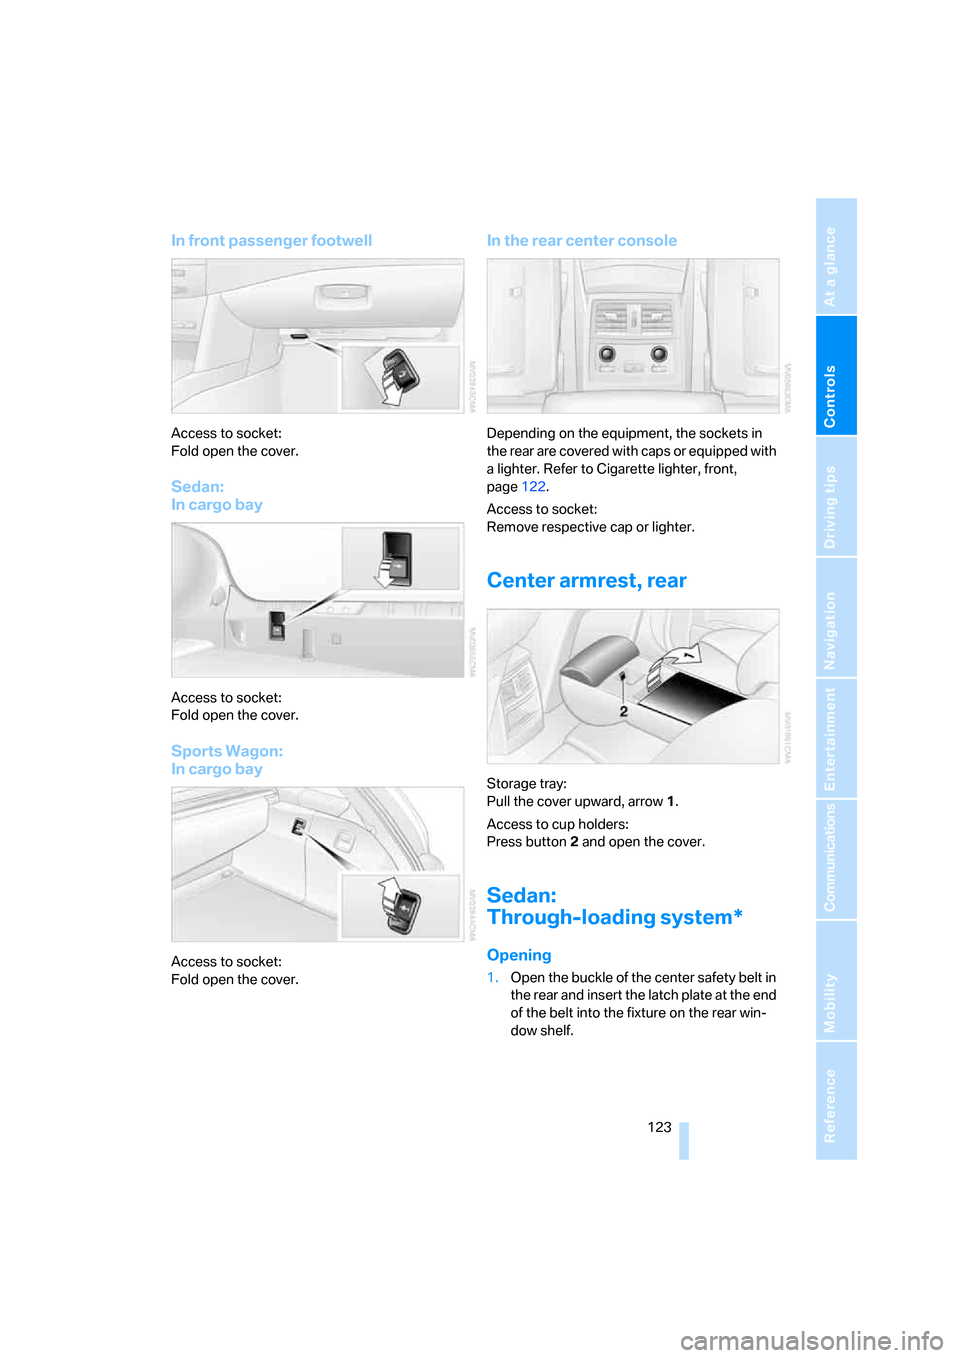
In front passenger footwell
Access to socket:
Fold open the cover.
Sedan:
In cargo bay
Access to socket:
Fold open the cover.
Sports Wagon:
In cargo bay
Access to socket:
Fold open the cover.
In the rear center console
Depending on the equipment, the sockets in
the rear are covered with caps or equipped with
a lighter. Refer to Cigarette lighter, front,
page122.
Access to socket:
Remove respective cap or lighter.
Center armrest, rear
Storage tray:
Pull the cover upward, arrow1.
Access to cup holders:
Press button2 and open the cover.
Sedan:
Through-loading system*
Opening
1.Open the buckle of the center safety belt in
the rear and insert the latch plate at the end
of the belt into the fixture on the rear win-
dow shelf.
Page 129 of 286
Controls
127Reference
At a glance
Driving tips
Communications
Navigation
Entertainment
Mobility
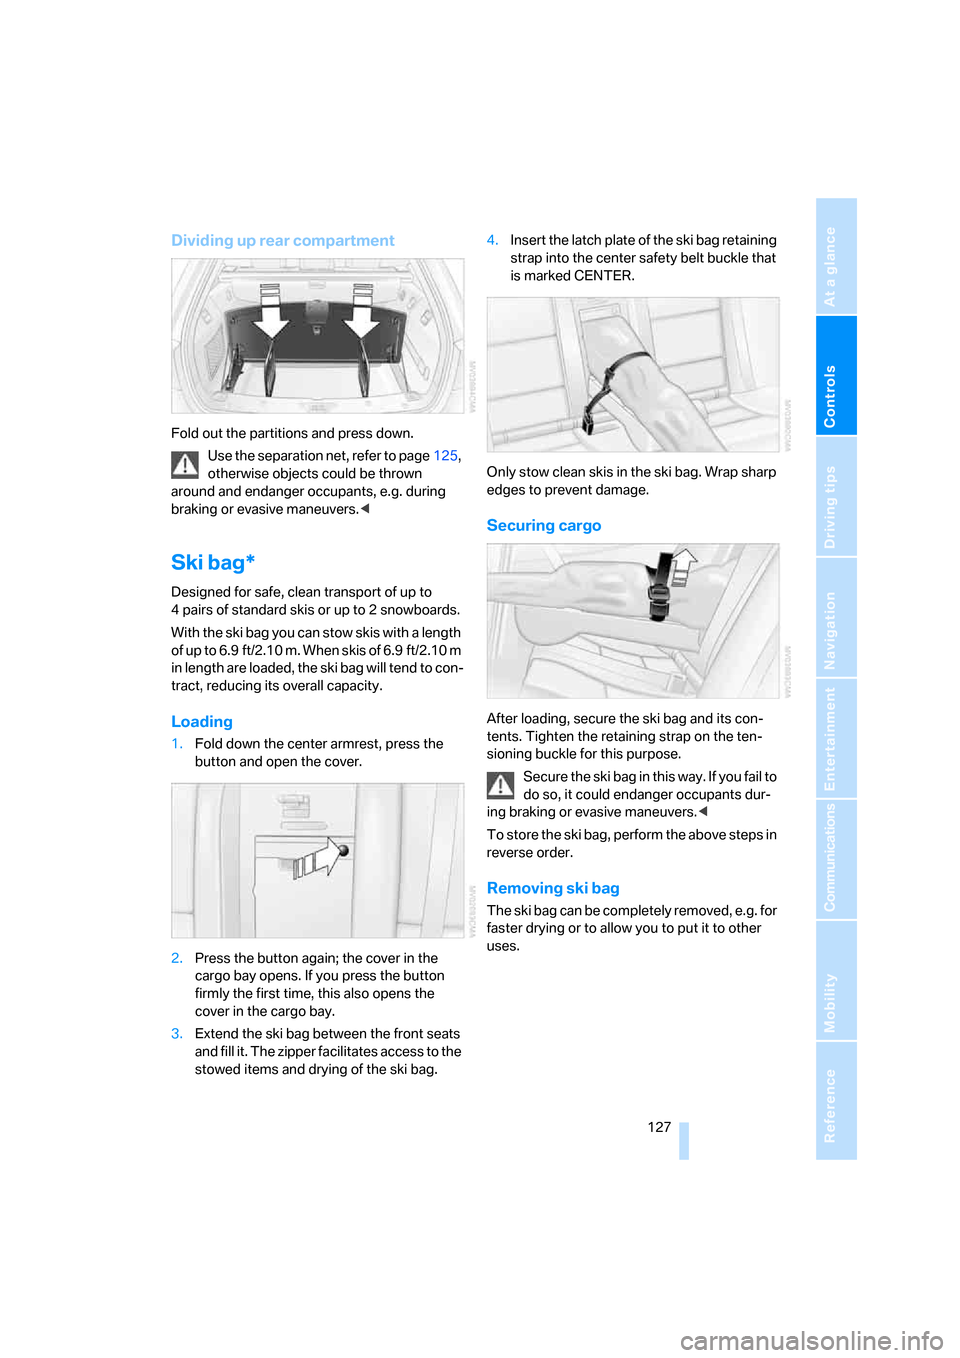
Dividing up rear compartment
Fold out the partitions and press down.
Use the separation net, refer to page125,
otherwise objects could be thrown
around and endanger occupants, e.g. during
braking or evasive maneuvers.<
Ski bag*
Designed for safe, clean transport of up to
4 pairs of standard skis or up to 2 snowboards.
With the ski bag you can stow skis with a length
of up to 6.9 ft/2.10 m. When skis of 6.9 ft/2.10 m
in length are loaded, the ski bag will tend to con-
tract, reducing its overall capacity.
Loading
1.Fold down the center armrest, press the
button and open the cover.
2.Press the button again; the cover in the
cargo bay opens. If you press the button
firmly the first time, this also opens the
cover in the cargo bay.
3.Extend the ski bag between the front seats
and fill it. The zipper facilitates access to the
stowed items and drying of the ski bag.4.Insert the latch plate of the ski bag retaining
strap into the center safety belt buckle that
is marked CENTER.
Only stow clean skis in the ski bag. Wrap sharp
edges to prevent damage.
Securing cargo
After loading, secure the ski bag and its con-
tents. Tighten the retaining strap on the ten-
sioning buckle for this purpose.
Secure the ski bag in this way. If you fail to
do so, it could endanger occupants dur-
ing braking or evasive maneuvers.<
To store the ski bag, perform the above steps in
reverse order.
Removing ski bag
The ski bag can be completely removed, e.g. for
faster drying or to allow you to put it to other
uses.
Page 142 of 286
Starting navigation system
140
Starting navigation system
Your navigation system can use satellites to
ascertain the precise position of your vehicle
and guide you reliably to any destination you
enter.
Navigation DVD
The navigation system requires a special navi-
gation DVD. The latest version is available at
your BMW center.
Inserting navigation DVD
1.Insert the navigation DVD with the labeled
side up. The navigation DVD is automati-
cally pulled in.
2.Allow several seconds for the system to
scan the data from the DVD.
Removing navigation DVD
1.Press button 1.
The DVD emerges slightly from the drive.
2.Remove the DVD.
If the DVD is not ejected from the drive, it is pos-
sible that it is blocked. In this case a message is
also shown on the Control Display.
Display in assistance window
You can display the route or the current position
in the assistance window. This display remains
visible even if you change to another applica-
tion.
1.Move the controller to the right to enter the
assistance window.
2.Press the controller.
Other menu items are displayed.
3.Select the desired route view or "Current
position".
4.Press the controller.
Displaying arrow view in map view
If the navigation system suggests a change of
direction, the arrow view is briefly displayed.
1.Press the button.
This opens the start menu.
2.Press the controller to open the menu.
3.Turn the controller until "Settings" is
selected and press the controller.
*