2007 BMW 525XI TOURING phone
[x] Cancel search: phonePage 25 of 286

At a glance
23Reference
Controls
Driving tips
Communications
Navigation
Entertainment
Mobility
Voice command system
The concept
The voice command system allows you to con-
trol operation of various vehicle systems with-
out ever removing your hands from the steering
wheel.
Individual menu items on the Control Display
can be spoken as commands. This frees you of
having to use the controller.
The voice command system transforms your
oral commands into control signals for the
selected systems and provides support in the
form of instructions or questions.
The voice command system uses a special
microphone located in the area of the interior
rearview mirror, refer to page14.
Precondition
Via iDrive, set the language that applies for the
voice command system in order to enable iden-
tification of the spoken commands. To set the
language of iDrive, refer to page87.
Symbols in Owner's Manual
Voice commands
Activating voice command system
1.Press the button.
This symbol on the Control Display and
an acoustic signal tell you that the voice
command system can respond to com-
mands.
2.Say the command.
The command is displayed on the Control
Display.
This symbol is shown on the Control Display
when you can input additional commands.
*
{...} Say the specified commands word for
word.
{{...}} Indicates responses of the voice
command system.
Page 27 of 286

At a glance
25Reference
Controls
Driving tips
Communications
Navigation
Entertainment
Mobility
Notes
The mobile phone can also be operated
with voice commands, refer to
page203.<
For voice commands, bear the following in
mind:
>Say the commands and numbers smoothly
and at normal volume, avoiding excessive
emphasis and pauses. This also applies to
spelling when entering the destination.
>Always issue commands in the language of
the voice command system.
>When selecting a radio station, use the
common pronunciation of the station name.
>For entries in the voice-activated phone
book, only use names in the language of the
voice command system and no abbrevia-
tions.
>Keep the doors, windows and glass sun-
roof
* or panorama glass sunroof* closed to
prevent interference from ambient noise.
>Avoid making other noise in the vehicle
while speaking.
Page 32 of 286

Opening and closing
30 >Telephone, setting volume, refer to
pages198,204
>With programmable memory/direct selec-
tion buttons, selection of stored functions,
refer to page21
Central locking system
The concept
The central locking system is ready for opera-
tion whenever the driver's door is closed.
The system simultaneously engages and
releases the locks on the following:
>Doors
>Luggage compartment lid or tailgate and
rear window
>Fuel filler door
Operating from outside
>via the remote control
>via the door lock
>with comfort access
* via the door handles
At the same time, the anti-theft system is also
operated. It prevents the doors from being
unlocked using the lock buttons or door han-
dles. In addition, it the remote control is used,
the welcome lamps, the interior lamps and the
courtesy lamps
* are switched on or off. The
alarm system
is armed/disarmed at the same
time.
You can find more detailed information on the
alarm system
on page37.
Operating from inside
Via the button for central locking, refer to
page33. The fuel filler door is not locked.
In the event of a sufficiently severe accident, the
central locking system unlocks automatically. In
addition, the hazard warning flashers and inte-
rior lamps come on.
Opening and closing: from
outside
Using remote control
Persons or animals left unattended in a
parked vehicle can lock the doors from
the inside. Always take along the remote control
when leaving the vehicle so that the vehicle can
then be opened from the outside.<
Unlocking
Press the button.
The interior lamps, the courtesy lamps
* of the
doors and the welcome lamps are switched on.
You can set how the vehicle is unlocked. The
setting is stored for the remote control currently
in use.
iDrive, for explanation of principle, refer to
page16.
1.Press the button.
This opens the start menu.
2.Press the controller to open the menu.
3.Select "Settings" and press the controller.
4.Select "Vehicle / Tires" and press the con-
troller.
5.Change to upper field if necessary. Turn the
controller until "Door locks" is selected and
press the controller.
6.Select "Central locking" and press the con-
troller.
7.Select "Unlock button" and press the con-
troller.
Page 57 of 286

Controls
55Reference
At a glance
Driving tips
Communications
Navigation
Entertainment
Mobility
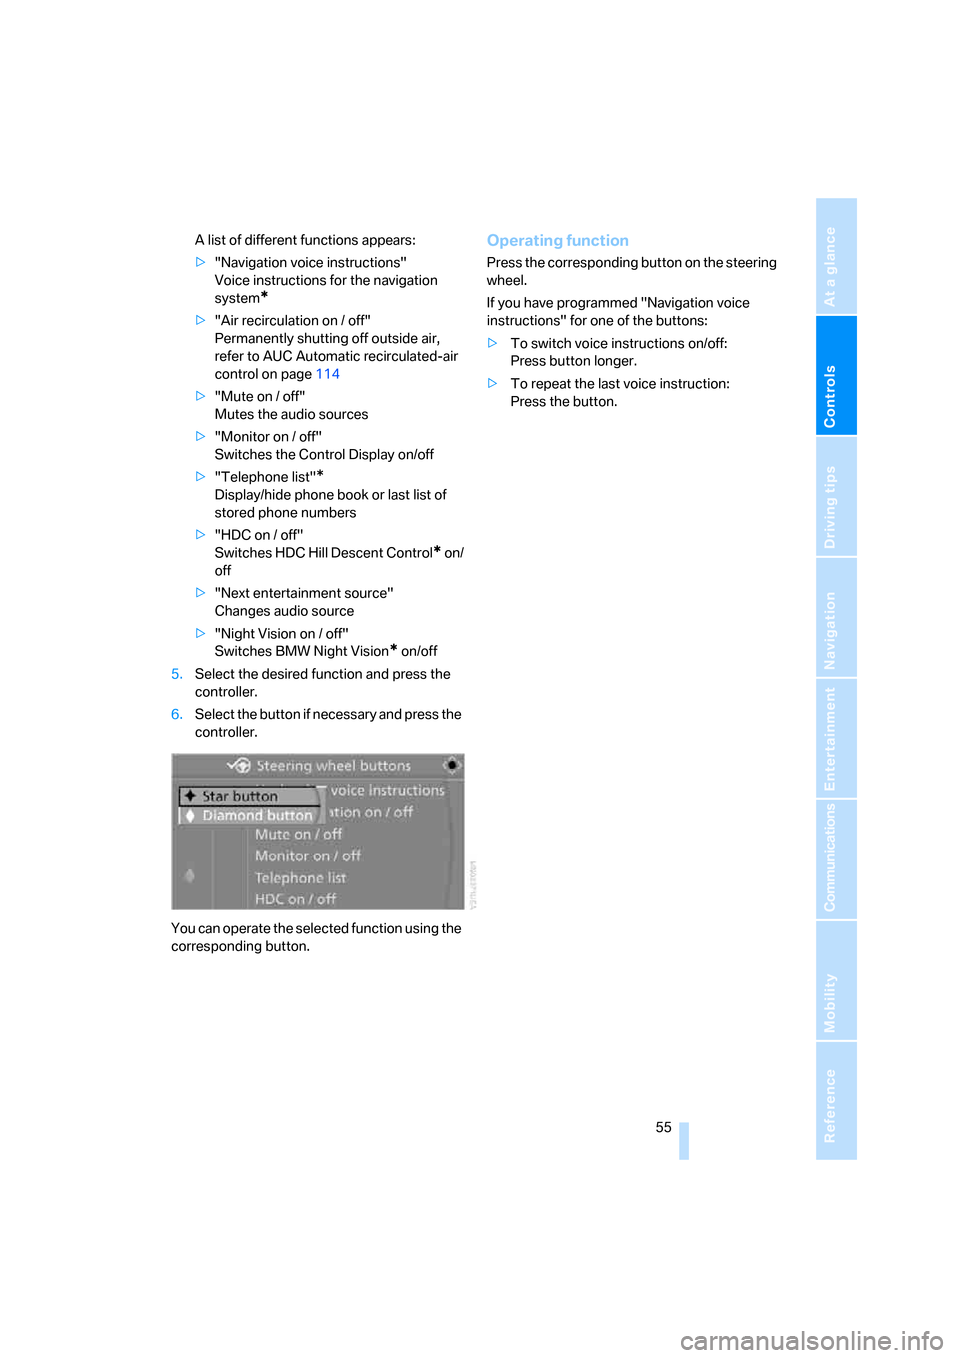
A list of different functions appears:
>"Navigation voice instructions"
Voice instructions for the navigation
system
*
>"Air recirculation on / off"
Permanently shutting off outside air,
refer to AUC Automatic recirculated-air
control on page114
>"Mute on / off"
Mutes the audio sources
>"Monitor on / off"
Switches the Control Display on/off
>"Telephone list"
*
Display/hide phone book or last list of
stored phone numbers
>"HDC on / off"
Switches HDC Hill Descent Control
* on/
off
>"Next entertainment source"
Changes audio source
>"Night Vision on / off"
Switches BMW Night Vision
* on/off
5.Select the desired function and press the
controller.
6.Select the button if necessary and press the
controller.
You can operate the selected function using the
corresponding button.
Operating function
Press the corresponding button on the steering
wheel.
If you have programmed "Navigation voice
instructions" for one of the buttons:
>To switch voice instructions on/off:
Press button longer.
>To repeat the last voice instruction:
Press the button.
Page 122 of 286

Practical interior accessories
120 To prevent injury in the event of an acci-
dent while the vehicle is being driven,
close the glove compartment immediately after
use.<
Closing
Fold the cover up.
Locking
Lock with a key.
If you only hand over the remote control
without the integrated key, e.g. for valet
parking, refer to page28, the glove compart-
ment cannot be unlocked.<
Rechargeable flashlight
The flashlight is located on the left side of the
glove compartment.
The flashlight can remain plugged in continu-
ously. Pull the flashlight out of the socket when
needed.
To avoid possibly damaging the lamp,
always ensure that it is switched off
before inserting it in the socket.<
Center armrest, front
The compartment in the center armrest is
divided into two sections.
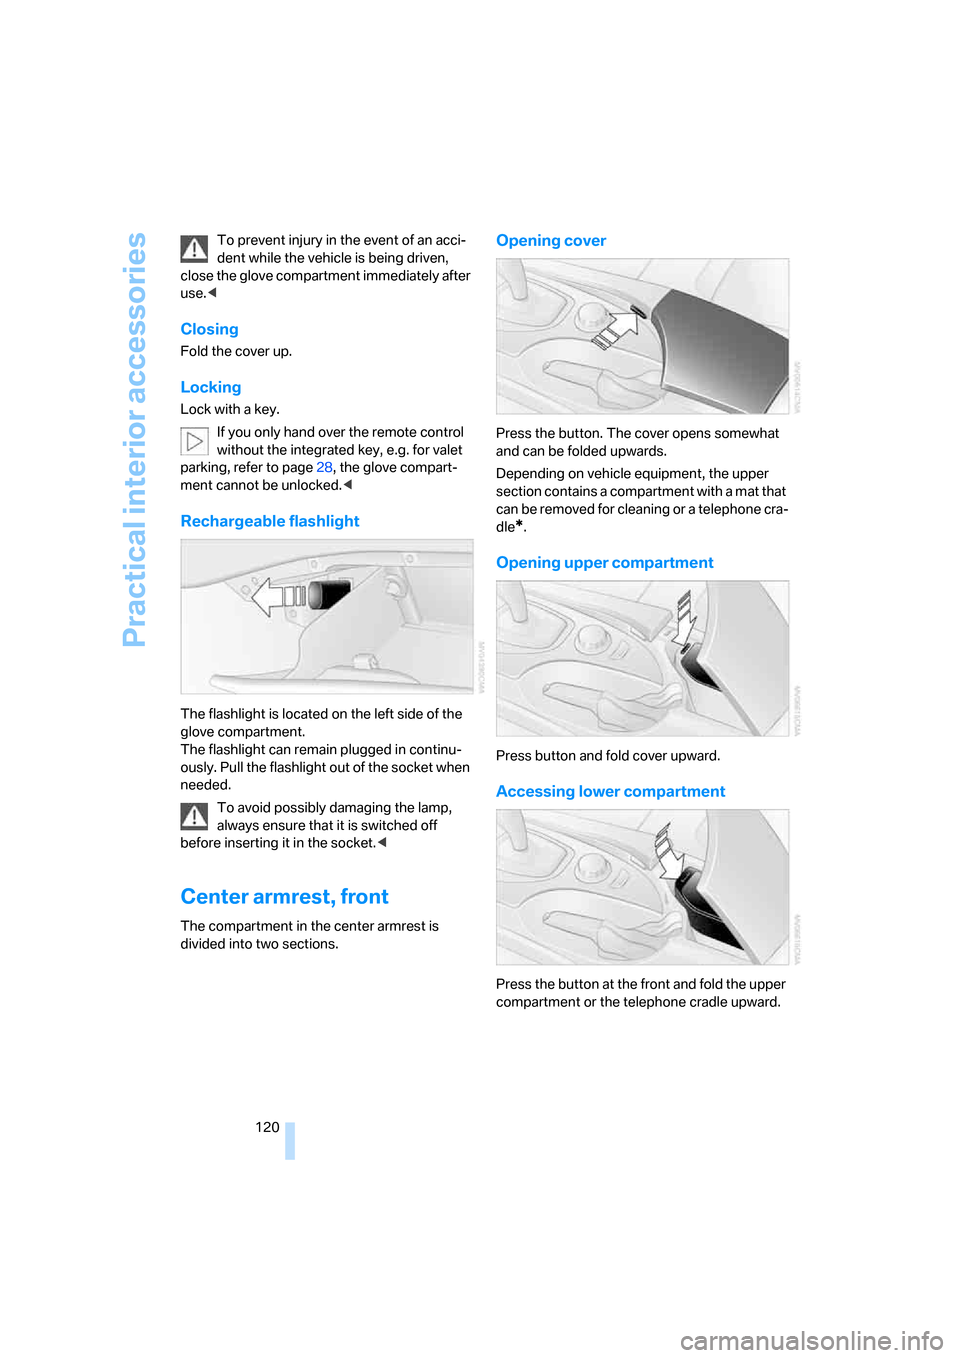
Opening cover
Press the button. The cover opens somewhat
and can be folded upwards.
Depending on vehicle equipment, the upper
section contains a compartment with a mat that
can be removed for cleaning or a telephone cra-
dle
*.
Opening upper compartment
Press button and fold cover upward.
Accessing lower compartment
Press the button at the front and fold the upper
compartment or the telephone cradle upward.
Page 134 of 286

Things to remember when driving
132
Things to remember when driving
Break-in period
Moving parts need breaking-in time to adjust to
each other. To ensure that your vehicle contin-
ues to provide optimized economy of operation
throughout an extended service life, we request
that you devote careful attention to the follow-
ing section.
Engine and differential
Always obey all official speed limits.
Up to 1,200 miles/2,000 km
Drive at changing engine and driving speeds,
however do not exceed 4,500 rpm or 100 mph/
160 km/h.
Avoid full-throttle operation and use of the
transmission's kick-down mode during these
initial miles.
From 1,200 miles/2,000 km
The engine and vehicle speed can gradually be
increased.
Tires
Due to technical factors associated with their
manufacture, tires do not achieve their full trac-
tion potential until after an initial break-in
period. Therefore, drive reservedly during the
first 200 miles/300 km.
Brake system
Brakes require an initial break-in period of
approx. 300 miles/500 km to achieve optimized
contact and wear patterns between brake pads
and rotors. Drive in a reserved manner during
this break-in period.
Clutch
The function of the clutch is only at its opti-
mized level after a distance driven of approx.
300 miles/500 km. During this break-in period,
engage the clutch gently.
Following part replacement
Observe the break-in instructions again if com-
ponents mentioned above must be replaced
after subsequent driving operation.
General driving notes
Closing luggage compartment lid/
tailgate
Operate the vehicle only when the lug-
gage compartment lid/tailgate is com-
pletely closed. Otherwise, exhaust fumes could
enter the interior of the vehicle.<
If special circumstances should make it abso-
lutely necessary to operate the vehicle with the
luggage compartment lid/tailgate open:
1.Close all windows and the glass sunroof or
panorama glass sunroof.
2.Increase the air volume of the automatic cli-
mate control to a high level, refer to
page113.
Hot exhaust system
As in all vehicles, extremely high temper-
atures are generated on the exhaust sys-
tem. Do not remove the heat shields installed
adjacent to it, and never apply undercoating to
them. When driving, standing at idle and while
parking take care to avoid possible contact
between the hot exhaust system and any highly
flammable materials such as hay, leaves, grass,
etc. Such contact could lead to a fire, and with it
the risk of serious property damage as well as
personal injury. Do not touch hot exhaust tail
pipes. Otherwise there is a risk of burns.<
Mobile communications devices in
vehicle
BMW discourages the use of mobile
communications devices, e. g. mobile
phones, inside the vehicle without a direct con-
nection to an outside antenna. Otherwise, the
Page 150 of 286

Destination entry
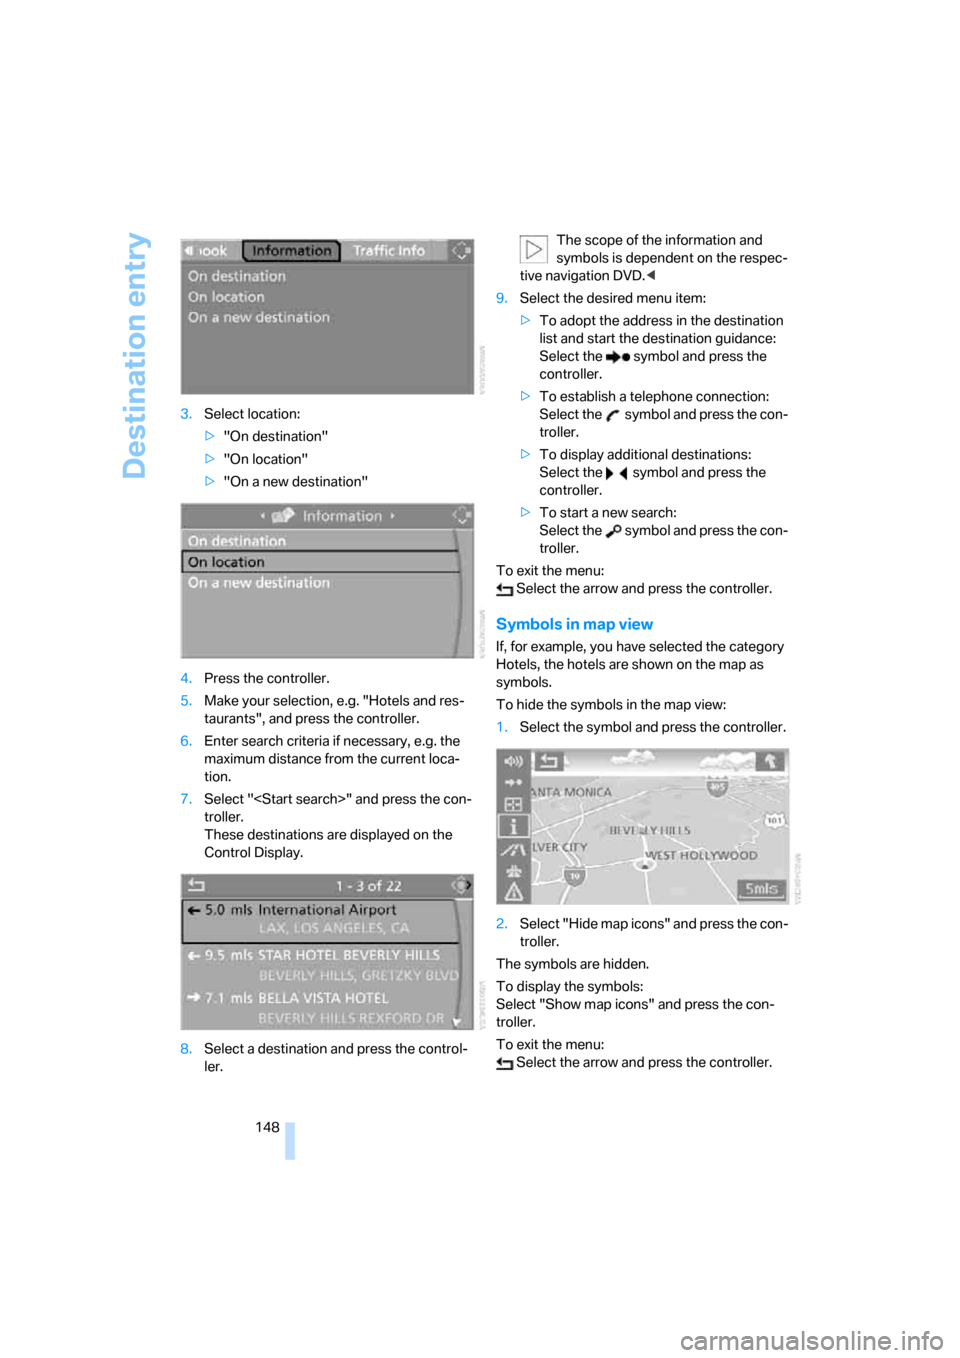
148 3.Select location:
>"On destination"
>"On location"
>"On a new destination"
4.Press the controller.
5.Make your selection, e.g. "Hotels and res-
taurants", and press the controller.
6.Enter search criteria if necessary, e.g. the
maximum distance from the current loca-
tion.
7.Select "
troller.
These destinations are displayed on the
Control Display.
8.Select a destination and press the control-
ler.The scope of the information and
symbols is dependent on the respec-
tive navigation DVD.<
9.Select the desired menu item:
>To adopt the address in the destination
list and start the destination guidance:
Select the symbol and press the
controller.
>To establish a telephone connection:
Select the symbol and press the con-
troller.
>To display additional destinations:
Select the symbol and press the
controller.
>To start a new search:
Select the symbol and press the con-
troller.
To exit the menu:
Select the arrow and press the controller.
Symbols in map view
If, for example, you have selected the category
Hotels, the hotels are shown on the map as
symbols.
To hide the symbols in the map view:
1.Select the symbol and press the controller.
2.Select "Hide map icons" and press the con-
troller.
The symbols are hidden.
To display the symbols:
Select "Show map icons" and press the con-
troller.
To exit the menu:
Select the arrow and press the controller.
Page 178 of 286

Radio
176
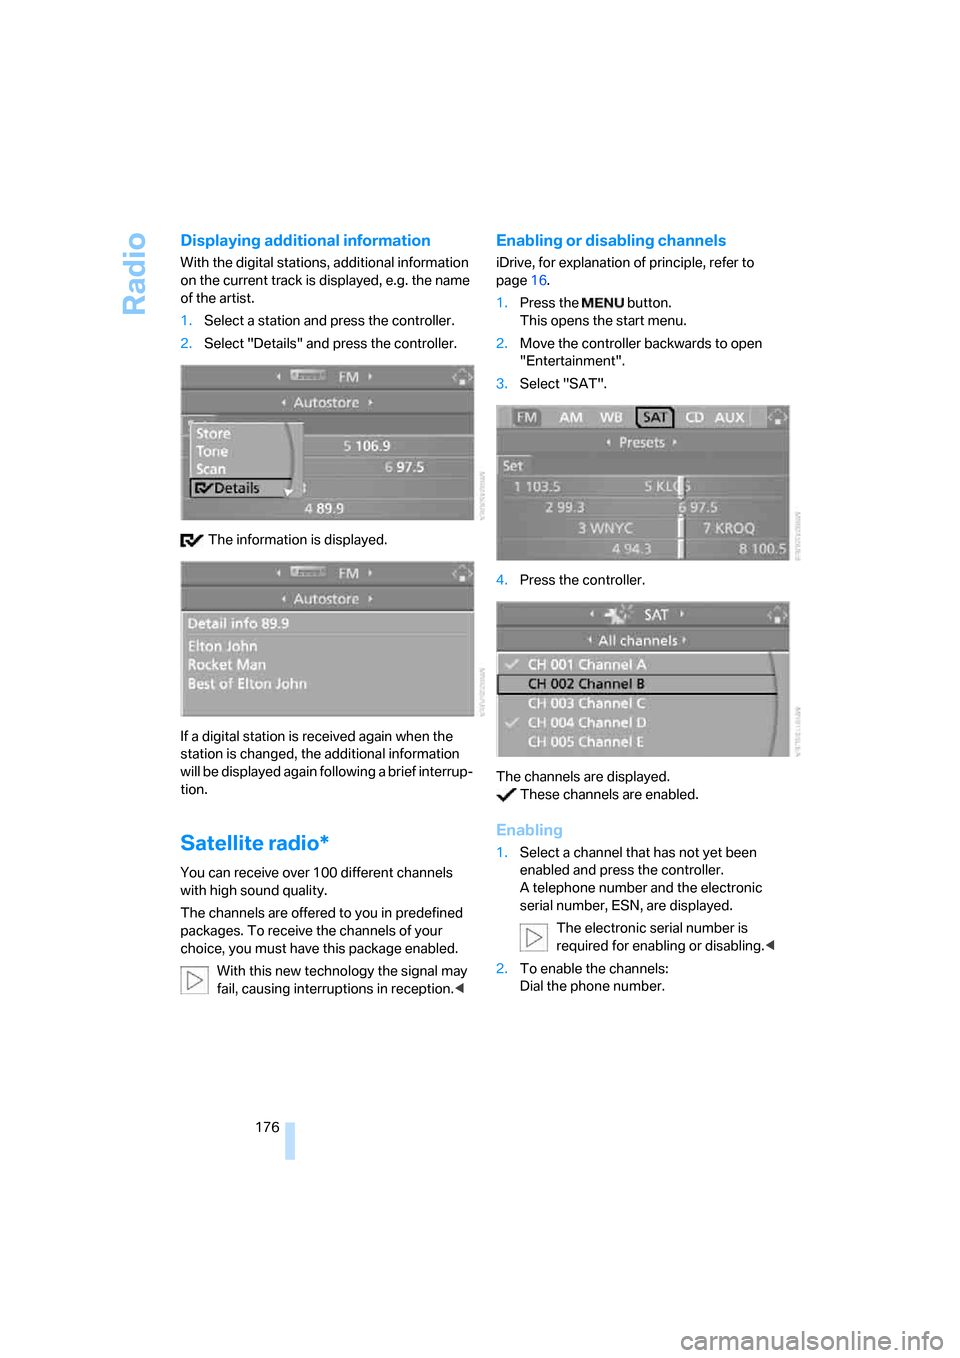
Displaying additional information
With the digital stations, additional information
on the current track is displayed, e.g. the name
of the artist.
1.Select a station and press the controller.
2.Select "Details" and press the controller.
The information is displayed.
If a digital station is received again when the
station is changed, the additional information
will be displayed again following a brief interrup-
tion.
Satellite radio*
You can receive over 100 different channels
with high sound quality.
The channels are offered to you in predefined
packages. To receive the channels of your
choice, you must have this package enabled.
With this new technology the signal may
fail, causing interruptions in reception.<
Enabling or disabling channels
iDrive, for explanation of principle, refer to
page16.
1.Press the button.
This opens the start menu.
2.Move the controller backwards to open
"Entertainment".
3.Select "SAT".
4.Press the controller.
The channels are displayed.
These channels are enabled.
Enabling
1.Select a channel that has not yet been
enabled and press the controller.
A telephone number and the electronic
serial number, ESN, are displayed.
The electronic serial number is
required for enabling or disabling.<
2.To enable the channels:
Dial the phone number.