2007 BMW 525XI tow
[x] Cancel search: towPage 190 of 273

Telephoning
188 To delete an incorrect character:
Move the controller toward the right to
select and press the controller.
4.Select "Dial number" and press the control-
ler.
For your phone number to be displayed to the
person you are calling, the display of phone
numbers must be enabled by your service pro-
vider.
Ending a call
1.Select the phone number and press the
controller.
2.Select "End call" and press the controller.
Dialing a phone number from phone
book or a phone number stored in a list
Phone numbers you have called, incoming calls
and the entries of the phone book are stored in
lists when the mobile phone is connected to the
vehicle via Bluetooth. If the caller is entered in
the phone book, the name of the entry is dis-
played instead of the phone number.
You can select the desired subscriber from the
list and establish the connection.
Five lists are available:
>"A - Z"
The entries of the mobile-phone phone
book, consisting of the name and phone
number, are sorted alphabetically.
>"Top 8"
The eight numbers called most frequently
from the phone book "A - Z" are automati-
cally stored in the Top 8 list. The list is
sorted according to frequency.
>"Redial"
The last eight phone numbers you have
dialed are automatically stored. The last
number dialed is at the top of the list.
>"Missed calls"
The phone numbers of the last eight calls
which were not accepted are stored. This
requires the telephone number of the caller
to have been sent.
>"Received calls"
The phone numbers of the last eight
accepted calls are stored. This requires the
telephone number of the caller to have been
sent.
Dialing phone numbers from phone
book
The list "A - Z" is available for you phone book
entries. The phone book entries appear on the
Control Display.
Page 197 of 273

195
Entertainment
Reference
At a glance
Controls
Driving tips Communications
Navigation
Mobility
Inserting mobile phone
1.Remove the protective cap from the mobile
phone's antenna connector if necessary, so
that the mobile phone can engage in the
snap-in adapter.
2.Push the mobile phone with the buttons
facing upward toward the electrical connec-
tions and press down until it engages.
The mobile phone's battery is charged from
radio readiness or with the steering unlocked.
To protect the vehicle's batteries, avoid
using the phone when the ignition is
switched off.<
Removing mobile phone
Press button.
Page 215 of 273

Mobility
213Reference
At a glance
Controls
Driving tips
Communications
Navigation
Entertainment
M+S
Winter and all-season tires.
These have better winter properties than sum-
mer tires.
XL
Indicates specially reinforced tires.
Tire condition
Inspect your tires frequently for tread wear,
signs of damage and for foreign objects lodged
in the tread. Check the tread depth.
Minimum tread depth
The tread depth should not drop below 0.12 in/
3 mm, although, for example, European legisla-
tion only specifies a minimum tread depth of
0.063 in/1.6 mm. At tread depths below 0.12 in/
3 mm there is an increased risk of high-speed
hydroplaning, even when only small amounts of
water are present on the road surface.
When winter tires wear down past a tread depth
of 0.16 in/4 mm, they become perceptibly less
suitable for winter conditions. For the sake of
safety, new tires should be installed.
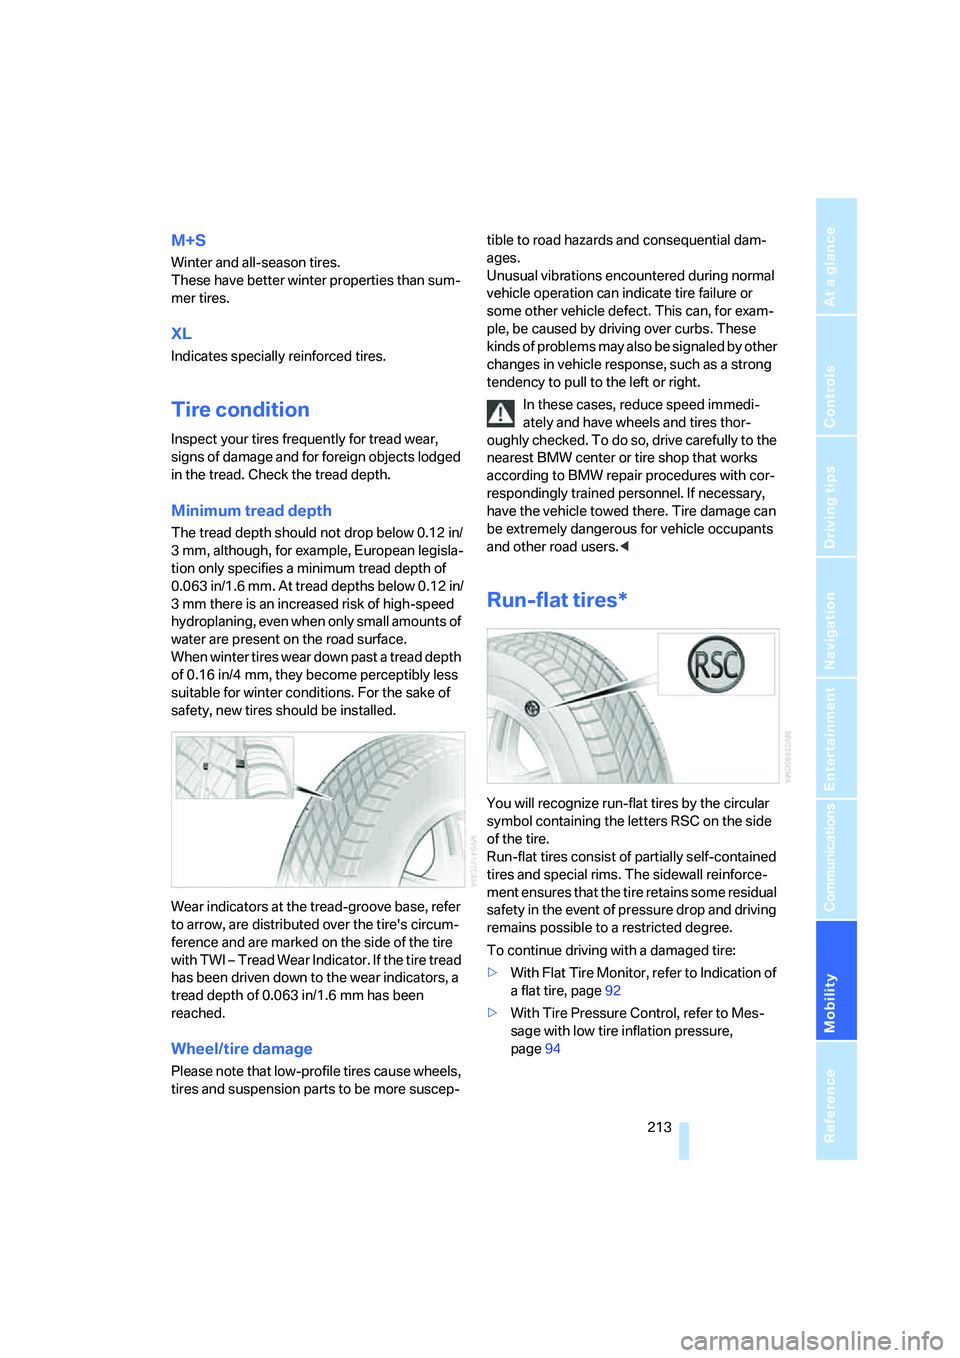
Wear indicators at the tread-groove base, refer
to arrow, are distributed over the tire's circum-
ference and are marked on the side of the tire
with TWI – Tread Wear Indicator. If the tire tread
has been driven down to the wear indicators, a
tread depth of 0.063 in/1.6 mm has been
reached.
Wheel/tire damage
Please note that low-profile tires cause wheels,
tires and suspension parts to be more suscep-tible to road hazards and consequential dam-
ages.
Unusual vibrations encountered during normal
vehicle operation can indicate tire failure or
some other vehicle defect. This can, for exam-
ple, be caused by driving over curbs. These
kinds of problems may also be signaled by other
changes in vehicle response, such as a strong
tendency to pull to the left or right.
In these cases, reduce speed immedi-
ately and have wheels and tires thor-
oughly checked. To do so, drive carefully to the
nearest BMW center or tire shop that works
according to BMW repair procedures with cor-
respondingly trained personnel. If necessary,
have the vehicle towed there. Tire damage can
be extremely dangerous for vehicle occupants
and other road users.<
Run-flat tires*
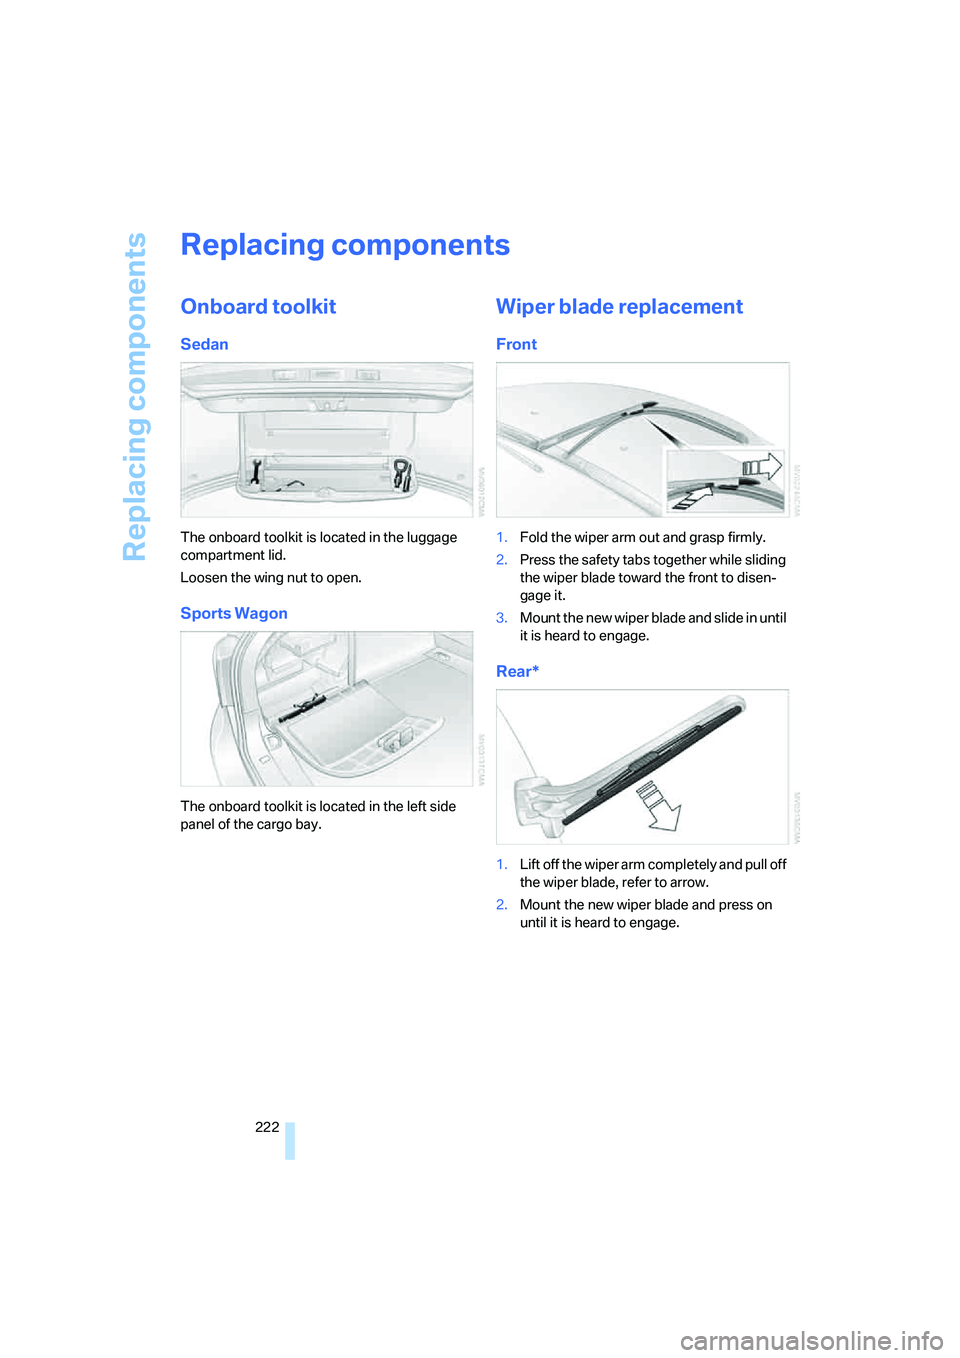
You will recognize run-flat tires by the circular
symbol containing the letters RSC on the side
of the tire.
Run-flat tires consist of partially self-contained
tires and special rims. The sidewall reinforce-
ment ensures that the tire retains some residual
safety in the event of pressure drop and driving
remains possible to a restricted degree.
To continue driving with a damaged tire:
>With Flat Tire Monitor, refer to Indication of
a flat tire, page92
>With Tire Pressure Control, refer to Mes-
sage with low tire inflation pressure,
page94
Page 224 of 273

Replacing components
222
Replacing components
Onboard toolkit
Sedan
The onboard toolkit is located in the luggage
compartment lid.
Loosen the wing nut to open.
Sports Wagon
The onboard toolkit is located in the left side
panel of the cargo bay.
Wiper blade replacement
Front
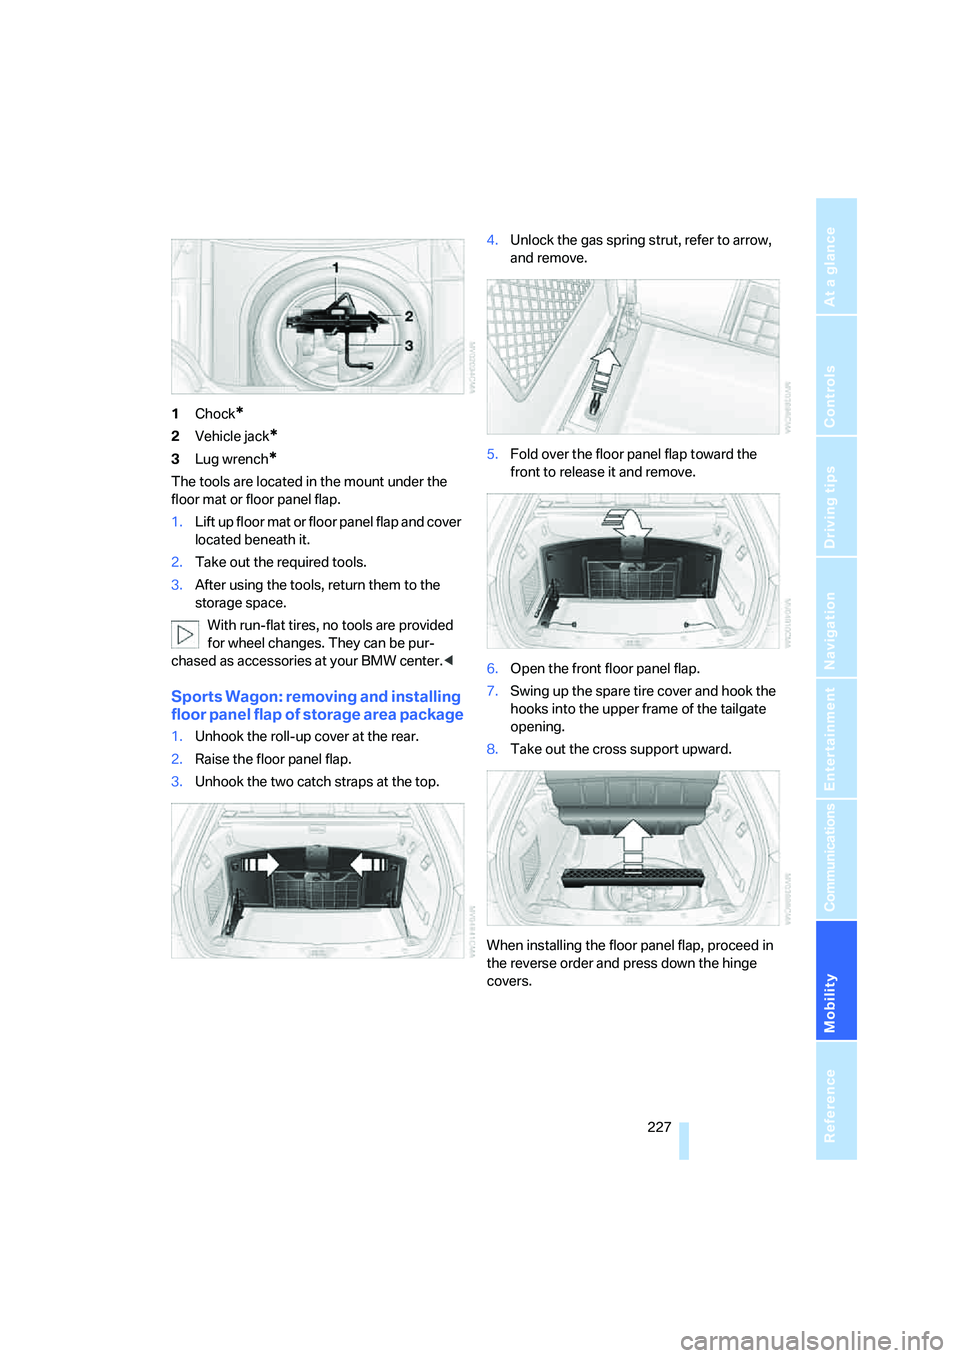
1.Fold the wiper arm out and grasp firmly.
2.Press the safety tabs together while sliding
the wiper blade toward the front to disen-
gage it.
3.Mount the new wiper blade and slide in until
it is heard to engage.
Rear*
1.Lift off the wiper arm completely and pull off
the wiper blade, refer to arrow.
2.Mount the new wiper blade and press on
until it is heard to engage.
Page 229 of 273

Mobility
227Reference
At a glance
Controls
Driving tips
Communications
Navigation
Entertainment
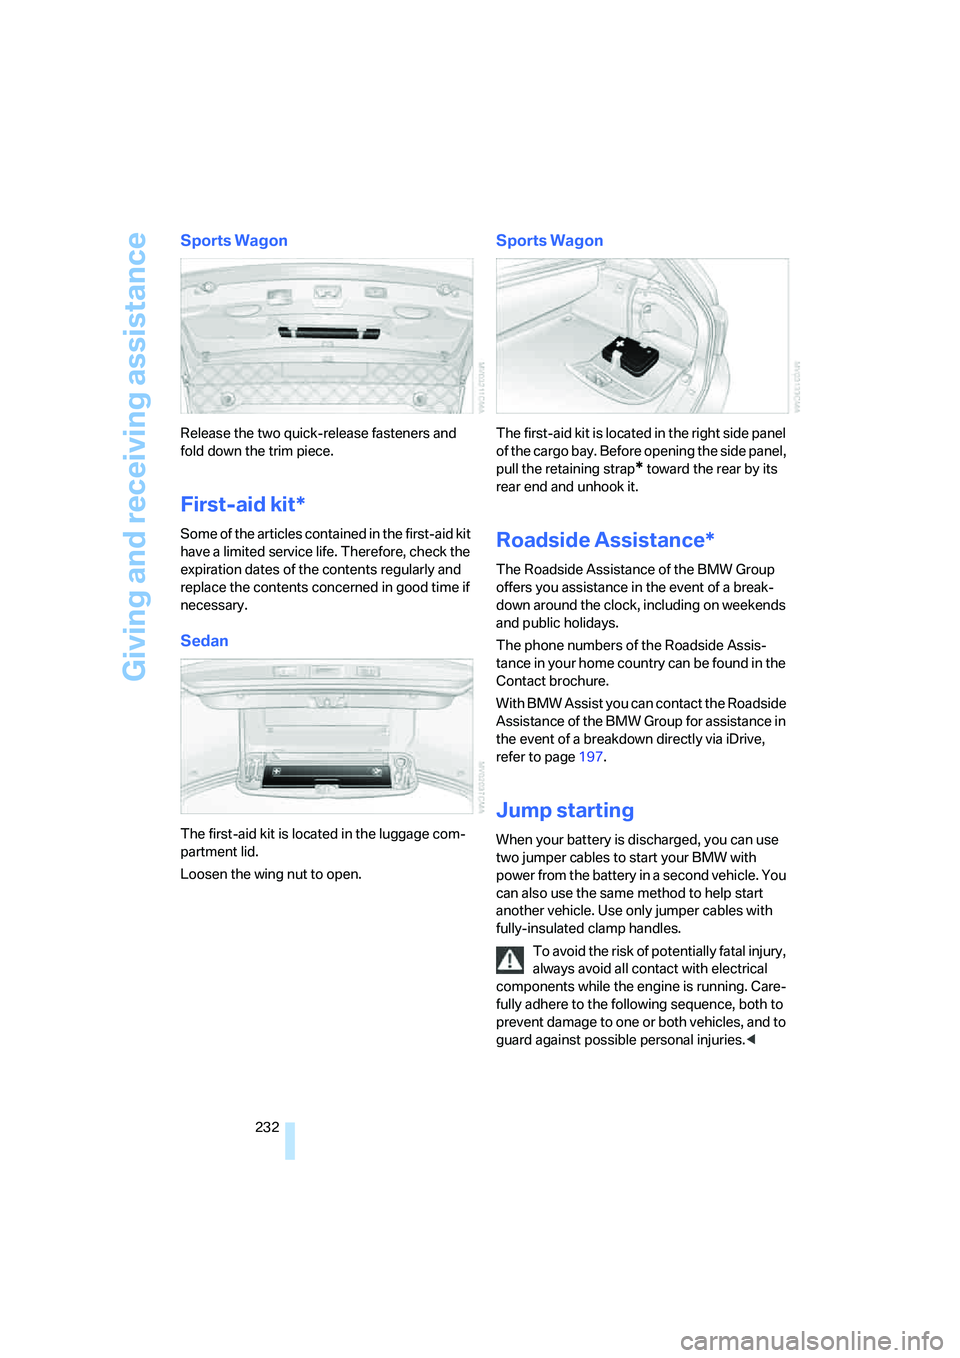
1Chock*
2Vehicle jack*
3Lug wrench*
The tools are located in the mount under the
floor mat or floor panel flap.
1.Lift up floor mat or floor panel flap and cover
located beneath it.
2.Take out the required tools.
3.After using the tools, return them to the
storage space.
With run-flat tires, no tools are provided
for wheel changes. They can be pur-
chased as accessories at your BMW center.<
Sports Wagon: removing and installing
floor panel flap of storage area package
1.Unhook the roll-up cover at the rear.
2.Raise the floor panel flap.
3.Unhook the two catch straps at the top.4.Unlock the gas spring strut, refer to arrow,
and remove.
5.Fold over the floor panel flap toward the
front to release it and remove.
6.Open the front floor panel flap.
7.Swing up the spare tire cover and hook the
hooks into the upper frame of the tailgate
opening.
8.Take out the cross support upward.
When installing the floor panel flap, proceed in
the reverse order and press down the hinge
covers.
Page 230 of 273

Replacing components
228
Compact wheel*
1.Unscrew the wing nut 1.
2.Remove the washer 2 laterally.
3.Take out the tool mounts 3.
4.Remove the compact wheel.
Preparing wheel change
1.Observe the safety precautions above.
2.Prevent the vehicle from rolling:
Place the chock behind the front wheel on
the other side of the vehicle, or on inclines,
in front of this wheel. On a steep grade, take
other steps to prevent the vehicle from roll-
ing.
3.Loosen the lug bolts a half turn.
Jacking up vehicle
1.Position the vehicle jack at the jacking point
closest to the wheel so that the entire sur-
face of the jack base rests on the ground
perpendicularly beneath the jacking point.
The vehicle jack is designed for
changing wheels only. Do not attempt
to raise another vehicle model with it or to
raise any load of any kind. To do so could
cause accidents and personal injury.<
2.Guide the jack head into the rectangular
recess of the jacking point when cranking
up, refer to illustration detail.3.Jack the vehicle up until the wheel you are
changing is raised from the ground.
Mounting a wheel
1.Unscrew the lug bolts and remove the
wheel.
2.Remove accumulations of mud or dirt from
the mounting surfaces of the wheel and
hub. Also clean the lug bolts.
3.Position the new wheel or compact wheel.
Secure the wheel by screwing at least two
lug bolts into opposite bolt holes.
When you mount wheels other than Genu-
ine BMW light-alloy wheels, different lug
bolts may also be required.
4.Screw in the remaining lug bolts. Tighten all
the bolts securely in a diagonal pattern.
5.Lower the vehicle and remove the jack from
beneath the vehicle.
After mounting
1.Tighten the lug bolts in a diagonal pattern.
To ensure safety, always have the
lug bolts checked with a calibrated
torque wrench as soon as possible to
ensure that they are tightened to the speci-
fied torque. The tightening torque is
88.5 lb ft/120 Nm.<
2.When stowing the wheel and tools in the
vehicle, execute these steps in the reverse
order.
3.Check and correct the tire inflation pressure
at the earliest opportunity.
Protect valve stems with valve stem
seal caps against dirt and contamina-
Page 234 of 273

Giving and receiving assistance
232
Sports Wagon
Release the two quick-release fasteners and
fold down the trim piece.
First-aid kit*
Some of the articles contained in the first-aid kit
have a limited service life. Therefore, check the
expiration dates of the contents regularly and
replace the contents concerned in good time if
necessary.
Sedan
The first-aid kit is located in the luggage com-
partment lid.
Loosen the wing nut to open.
Sports Wagon
The first-aid kit is located in the right side panel
of the cargo bay. Before opening the side panel,
pull the retaining strap
* toward the rear by its
rear end and unhook it.
Roadside Assistance*
The Roadside Assistance of the BMW Group
offers you assistance in the event of a break-
down around the clock, including on weekends
and public holidays.
The phone numbers of the Roadside Assis-
tance in your home country can be found in the
Contact brochure.
With BMW Assist you can contact the Roadside
Assistance of the BMW Group for assistance in
the event of a breakdown directly via iDrive,
refer to page197.
Jump starting
When your battery is discharged, you can use
two jumper cables to start your BMW with
power from the battery in a second vehicle. You
can also use the same method to help start
another vehicle. Use only jumper cables with
fully-insulated clamp handles.
To avoid the risk of potentially fatal injury,
always avoid all contact with electrical
components while the engine is running. Care-
fully adhere to the following sequence, both to
prevent damage to one or both vehicles, and to
guard against possible personal injuries.<
Page 235 of 273

Mobility
233Reference
At a glance
Controls
Driving tips
Communications
Navigation
Entertainment
Preparation
1.Check whether the battery of the other
vehicle has a voltage of 12 Volts and
approximately the same capacitance in Ah.
This information can be found on the bat-
tery.
2.Switch off the engine of the assisting vehi-
cle.
3.Switch off any electrical systems and com-
ponents in both vehicles.
There must not be any contact between
the bodies of the two vehicles, otherwise
there is a danger of shorting.<
Connecting jumper cables
To avoid personal injury from sparks, fol-
low this sequence when connecting
jumper cables.<
In your BMW, the so-called jump-starting termi-
nal in the engine compartment serves as a pos-
itive terminal for the battery, also refer to engine
compartment overview on page217. The cover
cap is marked with a +.
1.Fold open the cover of the BMW jump-
starting terminal. To do so, pull the tab.
2.Attach one end of the jumper cable plus/+
to the positive terminal of the battery or a
jump-starting terminal of the vehicle provid-
ing assistance.
3.Attach the second end of the cable to the
positive terminal of the battery or to a start-
ing-aid terminal of the vehicle to be started.
4.Attach one end of the jumper cable minus/–
to the negative terminal of the battery or to
an engine or body ground of the assisting
vehicle.Your BMW has a special nut as body ground
or negative terminal.
5.Attach the second end of the cable to the
negative terminal of the battery or to the
engine or body ground of the vehicle to be
started.Starting engine
1.Start the engine on the assisting vehicle
and allow it to run at idle for several minutes
at slightly increased speed.
2.Start the engine on the other vehicle in the
usual way.
If the first starting attempt is not successful,
wait a few minutes before another attempt
in order to allow the discharged battery to
recharge.
3.Let the engines run for a few minutes.
4.Disconnect the jumper cables by reversing
the connection sequence.
Check the battery and recharge if necessary.
Never use spray fluids to start the
engine.<
Tow-starting and towing
Observe applicable laws and regulations
for tow-starting and towing.<
Do not transport any passengers other
than the driver in a vehicle that is being
towed.<
Using tow fitting
The screw-in tow fitting must always be carried
in the vehicle. It can be screwed in at the front or
rear of the BMW.