2007 BMW 525XI belt
[x] Cancel search: beltPage 121 of 273
Controls
119Reference
At a glance
Driving tips
Communications
Navigation
Entertainment
Mobility
Sedan:
Through-loading system*
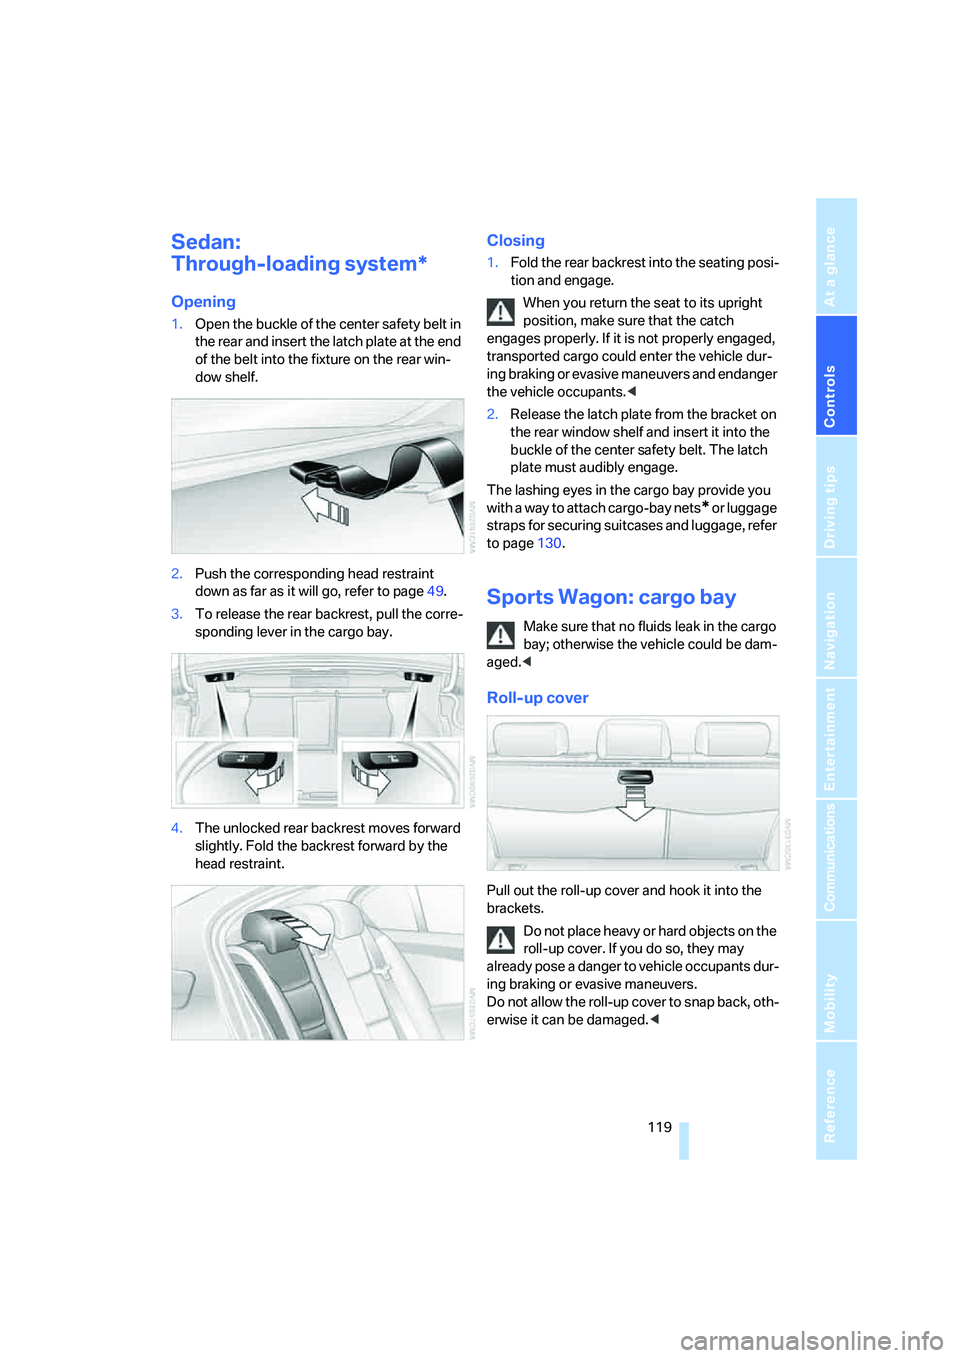
Opening
1.Open the buckle of the center safety belt in
the rear and insert the latch plate at the end
of the belt into the fixture on the rear win-
dow shelf.
2.Push the corresponding head restraint
down as far as it will go, refer to page49.
3.To release the rear backrest, pull the corre-
sponding lever in the cargo bay.
4.The unlocked rear backrest moves forward
slightly. Fold the backrest forward by the
head restraint.
Closing
1.Fold the rear backrest into the seating posi-
tion and engage.
When you return the seat to its upright
position, make sure that the catch
engages properly. If it is not properly engaged,
transported cargo could enter the vehicle dur-
ing braking or evasive maneuvers and endanger
the vehicle occupants.<
2.Release the latch plate from the bracket on
the rear window shelf and insert it into the
buckle of the center safety belt. The latch
plate must audibly engage.
The lashing eyes in the cargo bay provide you
with a way to attach cargo-bay nets
* or luggage
straps for securing suitcases and luggage, refer
to page130.
Sports Wagon: cargo bay
Make sure that no fluids leak in the cargo
bay; otherwise the vehicle could be dam-
aged.<
Roll-up cover
Pull out the roll-up cover and hook it into the
brackets.
Do not place heavy or hard objects on the
roll-up cover. If you do so, they may
already pose a danger to vehicle occupants dur-
ing braking or evasive maneuvers.
Do not allow the roll-up cover to snap back, oth-
erwise it can be damaged.<
Page 122 of 273
Practical interior accessories
120
Manual roll-up cover
When opening the tailgate or rear window, the
roll-up cover is raised. Before closing the tail-
gate and rear window, press down the roll-up
cover until it engages.
Automatic roll-up cover*
When the tailgate or rear window are opened,
the roll-up cover is raised, and when the tailgate
and rear window are closed, it is lowered.
Make sure that the closing area of the roll-
up cover is clear of obstructions, other-
wise the payload or the roll-up cover may be
damaged.<
Expanding cargo bay
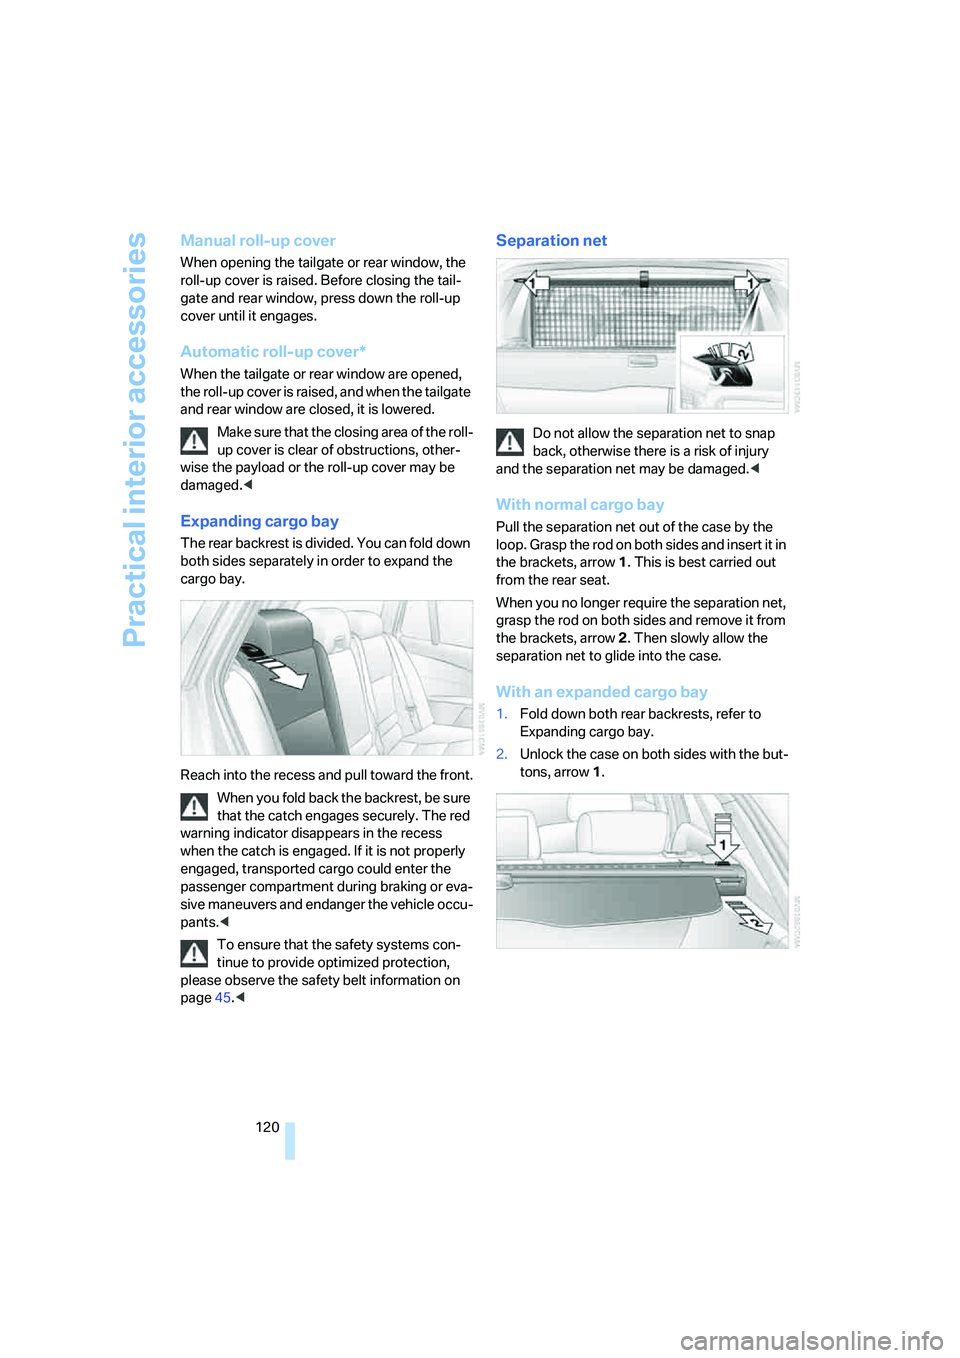
The rear backrest is divided. You can fold down
both sides separately in order to expand the
cargo bay.
Reach into the recess and pull toward the front.
When you fold back the backrest, be sure
that the catch engages securely. The red
warning indicator disappears in the recess
when the catch is engaged. If it is not properly
engaged, transported cargo could enter the
passenger compartment during braking or eva-
sive maneuvers and endanger the vehicle occu-
pants.<
To ensure that the safety systems con-
tinue to provide optimized protection,
please observe the safety belt information on
page45.<
Separation net
Do not allow the separation net to snap
back, otherwise there is a risk of injury
and the separation net may be damaged.<
With normal cargo bay
Pull the separation net out of the case by the
loop. Grasp the rod on both sides and insert it in
the brackets, arrow1. This is best carried out
from the rear seat.
When you no longer require the separation net,
grasp the rod on both sides and remove it from
the brackets, arrow2. Then slowly allow the
separation net to glide into the case.
With an expanded cargo bay
1.Fold down both rear backrests, refer to
Expanding cargo bay.
2.Unlock the case on both sides with the but-
tons, arrow1.
Page 124 of 273
Practical interior accessories
122
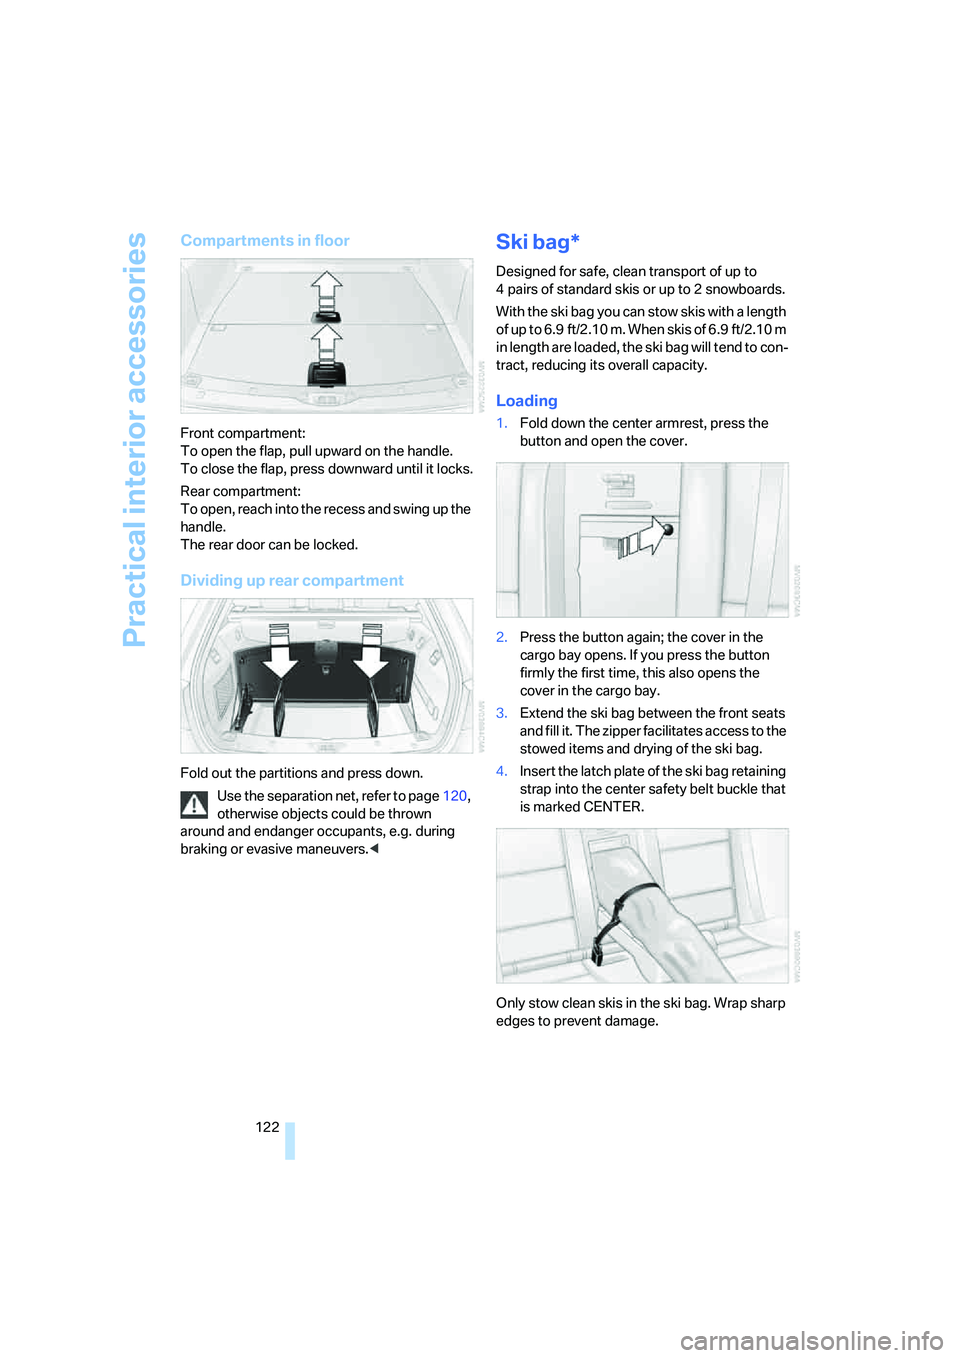
Compartments in floor
Front compartment:
To open the flap, pull upward on the handle.
To close the flap, press downward until it locks.
Rear compartment:
To open, reach into the recess and swing up the
handle.
The rear door can be locked.
Dividing up rear compartment
Fold out the partitions and press down.
Use the separation net, refer to page120,
otherwise objects could be thrown
around and endanger occupants, e.g. during
braking or evasive maneuvers.<
Ski bag*
Designed for safe, clean transport of up to
4 pairs of standard skis or up to 2 snowboards.
With the ski bag you can stow skis with a length
o f u p t o 6 . 9 f t / 2 . 1 0 m . W h e n s k i s o f 6 . 9 f t / 2 . 1 0 m
in length are loaded, the ski bag will tend to con-
tract, reducing its overall capacity.
Loading
1.Fold down the center armrest, press the
button and open the cover.
2.Press the button again; the cover in the
cargo bay opens. If you press the button
firmly the first time, this also opens the
cover in the cargo bay.
3.Extend the ski bag between the front seats
and fill it. The zipper facilitates access to the
stowed items and drying of the ski bag.
4.Insert the latch plate of the ski bag retaining
strap into the center safety belt buckle that
is marked CENTER.
Only stow clean skis in the ski bag. Wrap sharp
edges to prevent damage.
Page 131 of 273
Driving tips
129Reference
At a glance
Controls
Communications
Navigation
Entertainment
Mobility
1,400 lbs. and there will be five 150-lb. pas-
sengers in your vehicle, the amount of avail-
able cargo and luggage load capacity is
650 lbs.:
1,400 lbs. minus 750 lbs. = 650 lbs.
5.Determine the combined weight of luggage
and cargo being loaded on the vehicle. That
weight may not safely exceed the available
cargo and luggage load capacity calculated
in step 4.
6.If your vehicle will be towing a trailer, part of
the load from your trailer will be transferred
to your vehicle. Consult the manual for
transporting a trailer to determine how this
may reduce the available cargo and luggage
load capacity of your vehicle.
Load
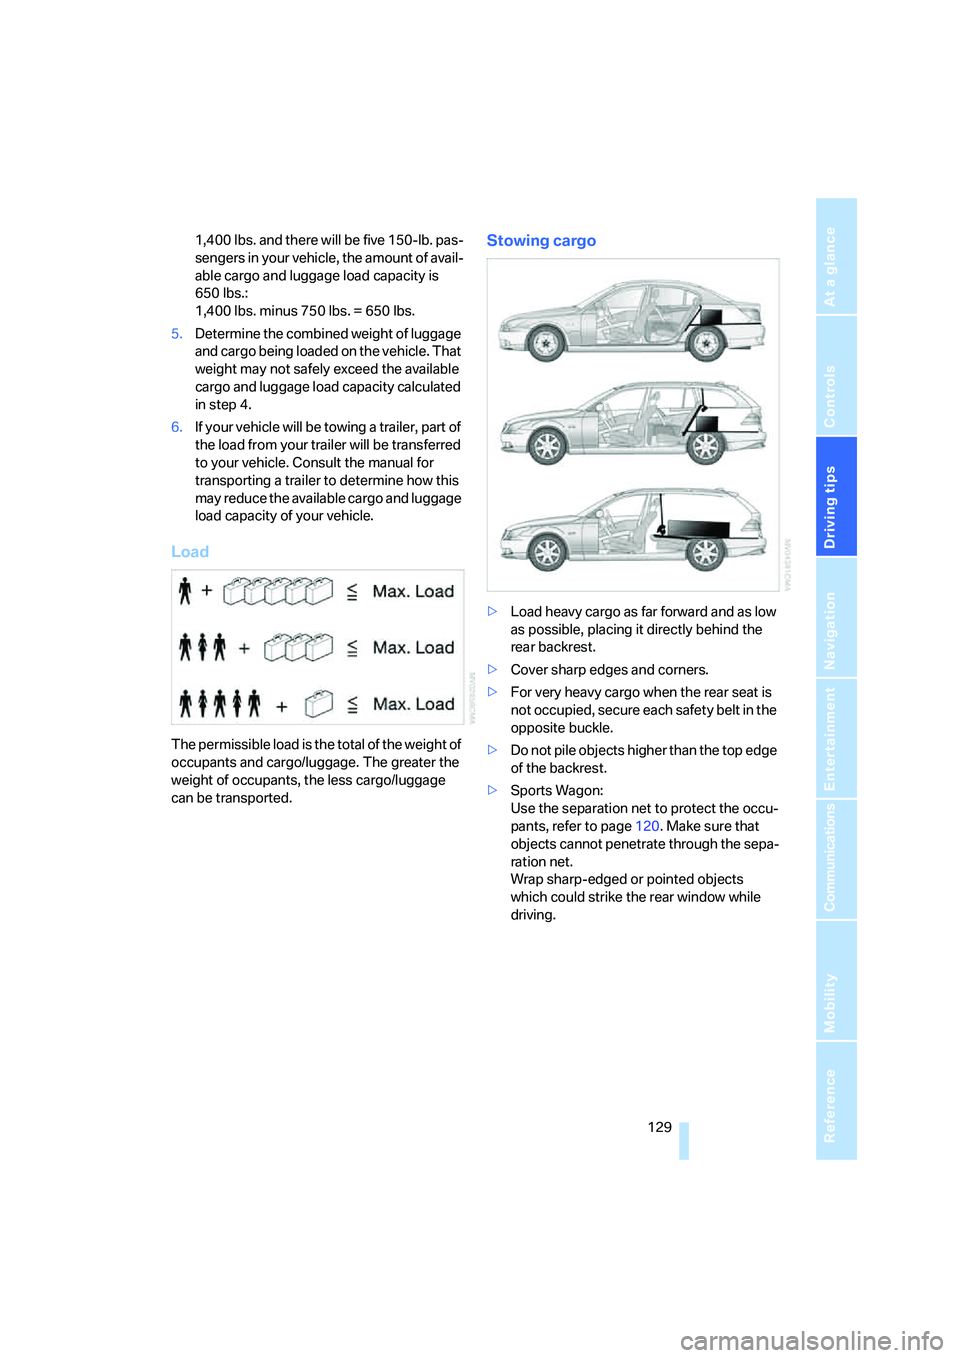
The permissible load is the total of the weight of
occupants and cargo/luggage. The greater the
weight of occupants, the less cargo/luggage
can be transported.
Stowing cargo
>Load heavy cargo as far forward and as low
as possible, placing it directly behind the
rear backrest.
>Cover sharp edges and corners.
>For very heavy cargo when the rear seat is
not occupied, secure each safety belt in the
opposite buckle.
>Do not pile objects higher than the top edge
of the backrest.
>Sports Wagon:
Use the separation net to protect the occu-
pants, refer to page120. Make sure that
objects cannot penetrate through the sepa-
ration net.
Wrap sharp-edged or pointed objects
which could strike the rear window while
driving.
Page 213 of 273
Mobility
211Reference
At a glance
Controls
Driving tips
Communications
Navigation
Entertainment
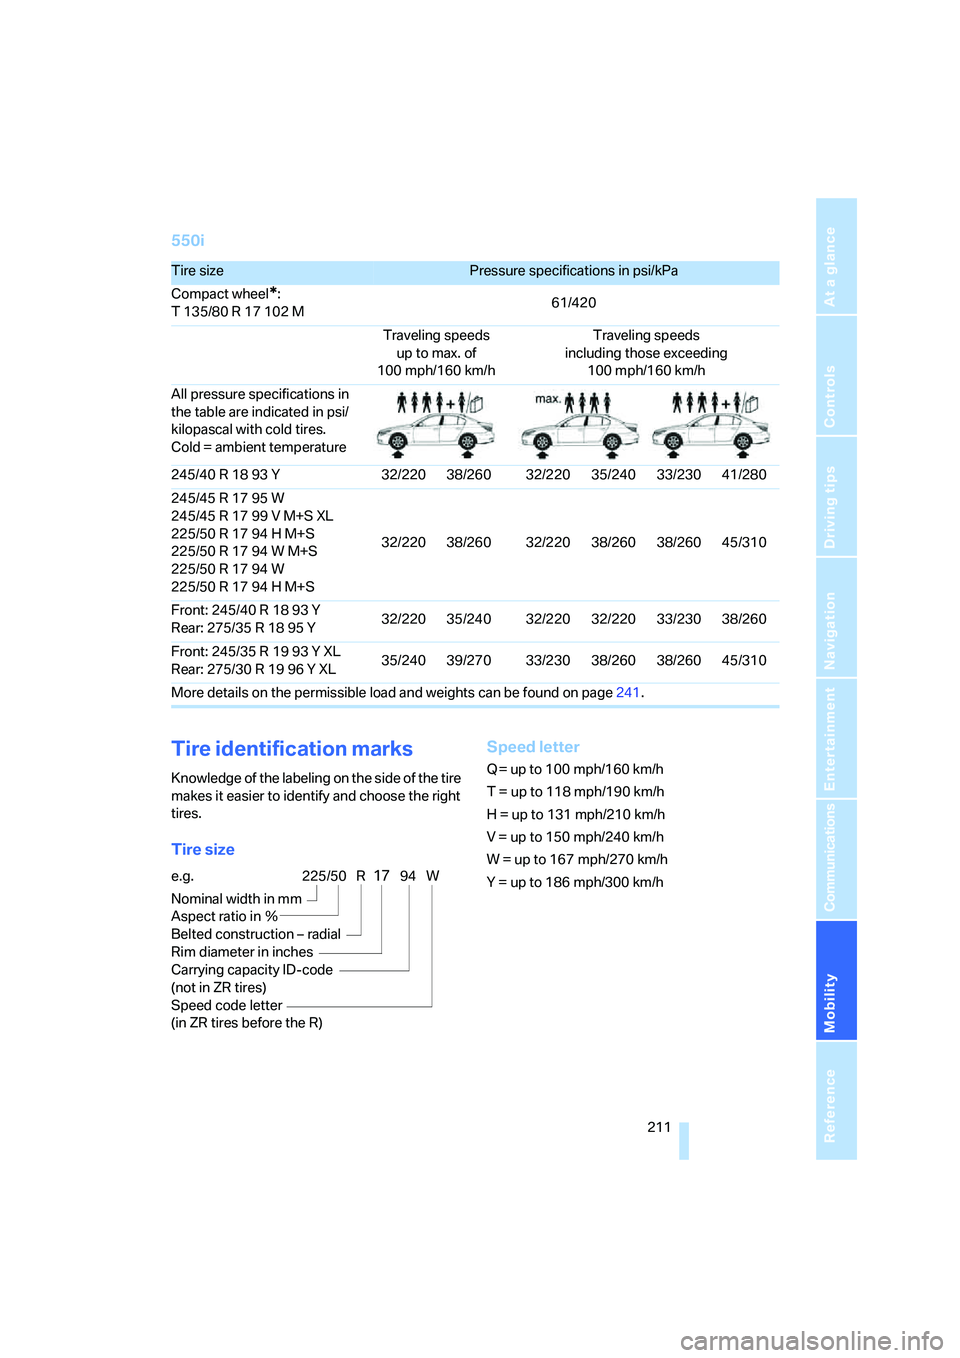
550i
Tire identification marks
Knowledge of the labeling on the side of the tire
makes it easier to identify and choose the right
tires.
Tire sizeSpeed letter
Q = up to 100 mph/160 km/h
T = up to 118 mph/190 km/h
H = up to 131 mph/210 km/h
V = up to 150 mph/240 km/h
W = up to 167 mph/270 km/h
Y = up to 186 mph/300 km/h
Tire sizePressure specifications in psi/kPa
Compact wheel
*:
T 135/80 R 17 102 M61/420
Traveling speeds
up to max. of
100 mph/160 km/hTraveling speeds
including those exceeding
100 mph/160 km/h
All pressure specifications in
the table are indicated in psi/
kilopascal with cold tires.
Cold = ambient temperature
245/40 R 18 93 Y 32/220 38/260 32/220 35/240 33/230 41/280
245/45 R 17 95 W
245/45 R 17 99 V M+S XL
225/50 R 17 94 H M+S
225/50 R 17 94 W M+S
225/50 R 17 94 W
225/50 R 17 94 H M+S32/220 38/260 32/220 38/260 38/260 45/310
Front: 245/40 R 18 93 Y
Rear: 275/35R1895Y32/220 35/240 32/220 32/220 33/230 38/260
Front: 245/35 R 19 93 Y XL
Rear: 275/30R1996YXL35/240 39/270 33/230 38/260 38/260 45/310
More details on the permissible load and weights can be found on page241.
e.g.
Nominal width in mm
Aspect ratio in Ξ
Belted construction – radial
Rim diameter in inches
Carrying capacity ID-code
(not in ZR tires)
Speed code letter
(in ZR tires before the R)225/50 R1794 W
Page 251 of 273
Reference 249
At a glance
Controls
Driving tips
Communications
Navigation
Entertainment
Mobility
Anti-theft system, refer to
Central locking system30
Approved axle loads, refer to
Weights241
Approved engine oils218
Approved gross vehicle
weight, refer to Weights241
Armrest, refer to Center
armrest, rear118
Around the center console14
Around the steering wheel10
Arrival time
– refer to Computer77
– refer to Starting destination
guidance147
"Arrow display" for
navigation148
Artificial leather, refer to
Caring for your vehicle
brochure
Ashtray
– front117
– rear117
Assist, refer to
BMW Assist196
Assistance systems, refer to
Driving stability control
systems87
Assistance window20
"Assist. window off"21
AUC Automatic recirculated-
air control110
"Audio"161,163,168
Audio160
– controls160
– switching on/off160
– tone control161
– volume161
Audio device, external116
Automatic
– air distribution108
– air volume108
– garage door opener113
– headlamp control103
– service notification198
– steering wheel
adjustment47
– storing stations165
– tailgate operation36Automatic car washes128
– also refer to Caring for your
vehicle brochure
Automatic climate control107
– automatic air
distribution108
– parked car ventilation111
– switching on and off110
– ventilation in rear111
Automatic closing of doors,
refer to Automatic soft
closing33
Automatic curb monitor52
Automatic lighting
– refer to Automatic headlamp
control103
– refer to Daytime running
lamps104
– refer to Interior lamps105
– refer to Pathway lighting103
"Automatic programs"108
Automatic roll-up cover,
Sports Wagon119
Automatic soft closing33
Automatic speed reduction for
descents, refer to HDC Hill
Descent Control89
Automatic station search165
Automatic transmission with
Steptronic64
– deactivating selector lever
interlock65
– interlock64
– kick-down65
– selector lever interlock64
– shiftlock64
– sport program65
– tow-starting234,235
– with comfort access40
"Automatic ventilation"111
AUTO program for automatic
climate control108
"Autostore" on the
radio164,166
"AUX"161
AUX-In
– connection116
– refer to External audio
device179"AUX" with external audio
device179
Average fuel consumption77
– setting units85
Average speed, refer to
Computer76
"Avoid ferries" for
navigation145
"Avoid highways" for
navigation145
Avoiding freeways for
navigation145
Avoiding unintentional
alarms38
"Avoid tollroads" for
navigation145
Axle loads, refer to
Weights241
"A - Z"188,189
B
Backrest contour, refer to
Lumbar support47
Backrests, refer to Seats46
Backrest width adjustment46
Back seats, refer to Rear seats
Backup lamps, replacing
bulbs225
"Balance", refer to Tone
control162
Band-aids, refer to First-aid
kit232
"Bass", refer to Tone
control162
Bass, refer to Tone
control161,162
Battery, refer to Vehicle
battery229
– jump starting232
Battery replacement
– remote control for comfort
access40
BC button, refer to
Computer76
Being towed234
Belts, refer to Safety belts50
Page 257 of 273

Reference 255
At a glance
Controls
Driving tips
Communications
Navigation
Entertainment
Mobility
External audio
device116,179
Eye for tow-starting and
towing, refer to Tow
fitting233
F
"Fader", refer to Tone
control162
Fader, refer to Tone
control162
Failure messages, refer to
Check Control80
False alarm
– refer to Avoiding
unintentional alarms38
– refer to Switching off
alarm38
Fastening safety belts, refer to
Safety belts50
– warning lamp50
Fastest route for
navigation145
"Fast route" for
navigation145
"Favorites" calling up with
radio167
Filter, refer to Microfilter/
activated-charcoal filter111
Fine wood, refer to Caring for
your vehicle brochure
First aid, refer to First-aid
kit232
First-aid kit232
Flashing
– during locking/unlocking,
refer to Setting confirmation
signals31
– Triple turn signal
activation66
Flashlight, refer to
Rechargeable flashlight115Flat tire
– changing wheels226
– compact wheel228
– Flat Tire Monitor91,92
– run-flat tires92,94,213
– TPM Tire Pressure
Monitor92
– warning lamp92,94
Flat tire, refer to Tire
condition213
Flat Tire Monitor91
– false alarms91
– initializing system91
– show chains215
– system limits91
– warning lamp92
Floor mat, refer to Caring for
your vehicle brochure
Floor mats/carpets, refer to
Caring for your vehicle
brochure
Fluid reservoir, refer to
Washer fluid reservoir67
"FM", reception
range161,164
FM, waveband164
Fog lamps105
– indicator lamp13,105
Folding rear backrest119
Folding rear backrest, Sports
Wagon120
Fold-over rear backrest119
Footbrake, refer to Braking
safely127
Footwell lamps, refer to
Interior lamps105
Forward, fast
– CD changer177
– CD player177
For your own safety5
4-wheel drive system, refer to
xDrive89
Freeway, refer to Route
criteria145
Front airbags96
Front armrest, refer to Center
armrest, front115Front passenger airbags,
deactivating97
Front seat adjustment46
FTM, refer to Flat Tire
Monitor91
Fuel207
– average consumption77
– display76
– high-quality brands207
– quality207
– specifications207
– tank contents, refer to
Capacities242
Fuel clock, refer to Fuel
gauge76
Fuel consumption display,
computer, average fuel
consumption77
Fuel display, refer to Fuel
gauge76
Fuel filler door206
– releasing in the event of
electrical malfunction206
Fuel-saving driving, refer to
Energy Control76
Full mobile phone preparation
package182
Full screen display, refer to
Switching assistance
window off21
"Full screen" with BMW Night
Vision102
Fuses229
G
Garage door opener, refer to
Integrated universal remote
control113
Gasoline, refer to Required
fuel207
Gasoline display, refer to Fuel
gauge76
Gear changes
– automatic transmission with
Steptronic64
– SMG Sequential Manual
Transmission63
Page 259 of 273

Reference 257
At a glance
Controls
Driving tips
Communications
Navigation
Entertainment
Mobility
iDrive16
– assistance window20
– automatic climate control
with expanded scope108
– changing date and time83
– changing language85
– changing menu page19
– changing settings83
– changing units of measure
and display type85
– confirming selection or
entry19
– controller16
– controls16
– displays, menus17
– operating principle17
– selecting menu item19
– setting brightness84
– start menu17
– status information20
– symbols18
Ignition59
– switched off60
– switched on59
Ignition key, refer to Keys/
remote control28
Ignition key position 1, refer to
Radio readiness59
Ignition key position 2, refer to
Ignition on59
Ignition lock59
– starting engine with comfort
access40
i menu17
Imprint2
Indicator/warning lamps
– ABS Antilock Brake
System90
– active steering96
– airbags98
– brake system90
– DSC13,88
– DTC13,88
– Flat Tire Monitor92
– fog lamps13
– safety belt warning50
– TPM Tire Pressure
Monitor94Indicator and warning
lamps13
Inflation pressure, refer to Tire
inflation pressure208
Inflation pressure monitoring,
refer to Flat Tire Monitor91
Inflation pressure monitoring,
refer to TPM Tire Pressure
Monitor92
Info menu17
Information
– on another location141
– on current position141
– on destination location141
"Information" for
navigation141
Information menu, refer to
imenu17
"Information on
destination"142
Information service199
"Info sources"78
Initializing
– Flat Tire Monitor91
– radio, refer to Storing
stations166
– refer to Power failure229
– refer to Setting time and
date83
– seat, mirror and steering
wheel memory47
"Input map"140
Installation location
– CD changer177
– drive for navigation DVD134
– mobile phone115
Instructions for navigation
system, refer to Voice
instructions150
Instrument cluster12
Instrument illumination, refer
to Instrument lighting105
Instrument lighting105
Instrument panel, refer to
Cockpit10
Instrument panel, refer to
Instrument cluster12
Integrated key28Integrated universal remote
control113
Interesting destination for
navigation141
"Interim time"83
Interior lamps105
– switching on with remote
control31
Interior motion sensor38
– switching off38
Interior rearview mirror52
– automatic dimming
feature53
Interlock on automatic
transmission64
Intermittent mode of the
wipers66
J
Jacking points228
Joystick, refer to iDrive16
Jumpering, refer to Jump
starting232
Jump starting232
K
Keyless-Go, refer to Comfort
access38
Keyless opening and closing,
refer to Comfort access38
Key Memory, refer to Personal
Profile29
"Keypad"191
Keys28
– key-related settings, refer to
Personal Profile29
– spare key28
Kick-down
– automatic transmission with
Steptronic65
– SMG Sequential Manual
Transmission63
Knock control207