2007 BMW 335XI lights
[x] Cancel search: lightsPage 40 of 268
Opening and closing
38
Before driving a vehicle with automatic
transmission into a car wash
1.Insert remote control into ignition switch.
2.Depress the brake.
3.Move the selector lever to position N.
4.Switch off the engine.
The vehicle can roll.
Malfunction
Convenient access may malfunction due to
local radio waves. If this happens, open or close
the vehicle via the buttons on the remote con-
trol or using the integrated key. To start the
engine afterward, insert the remote control into
the ignition switch.
Warning lamps
The warning lamp in the instrument
cluster lights up when you attempt to
start the engine: the engine cannot
be started. The remote control is not inside the
vehicle or is malfunctioning. Take the remote
control with you inside the vehicle or have it
checked. If necessary, insert another remote
control into the ignition switch.
The warning lamp in the instrument
cluster lights up while the engine is
running: the remote control is no
longer inside the vehicle. After the engine is
switched off, the engine can only be restarted
within approx. 10 seconds.
The indicator lamp in the instrument
cluster comes on and a message
appears on the Control Display:
replace the battery in the remote control.
Replacing the battery
The remote control for convenient access con-
tains a battery that will need to be replaced from
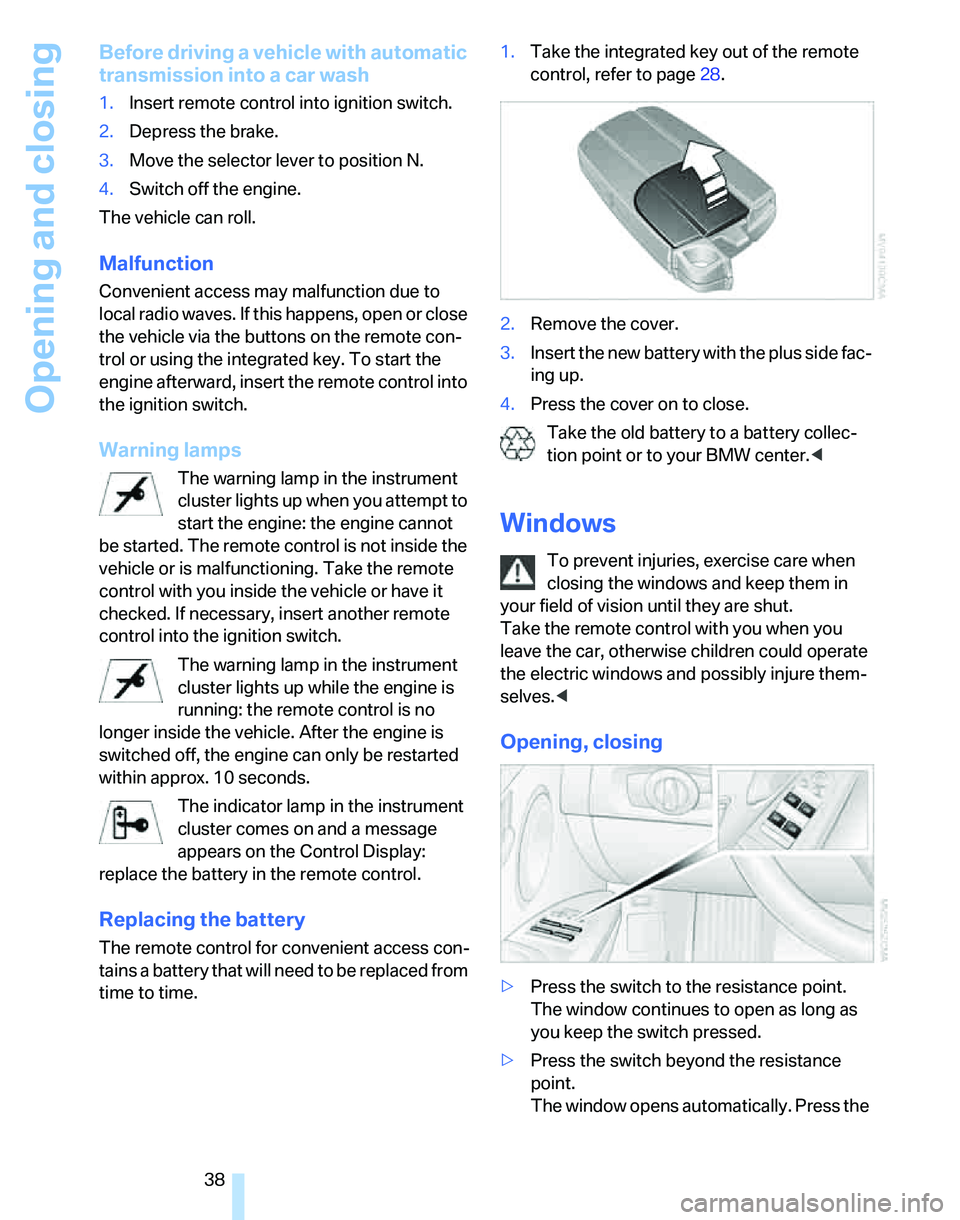
time to time.1.Take the integrated key out of the remote
control, refer to page28.
2.Remove the cover.
3.Insert the new battery with the plus side fac-
ing up.
4.Press the cover on to close.
Take the old battery to a battery collec-
tion point or to your BMW center.<
Windows
To prevent injuries, exercise care when
closing the windows and keep them in
your field of vision until they are shut.
Take the remote control with you when you
leave the car, otherwise children could operate
the electric windows and possibly injure them-
selves.<
Opening, closing
>Press the switch to the resistance point.
The window continues to open as long as
you keep the switch pressed.
>Press the switch beyond the resistance
point.
The window opens automatically. Press the
Page 50 of 268
Adjustments
48
Heated seats*
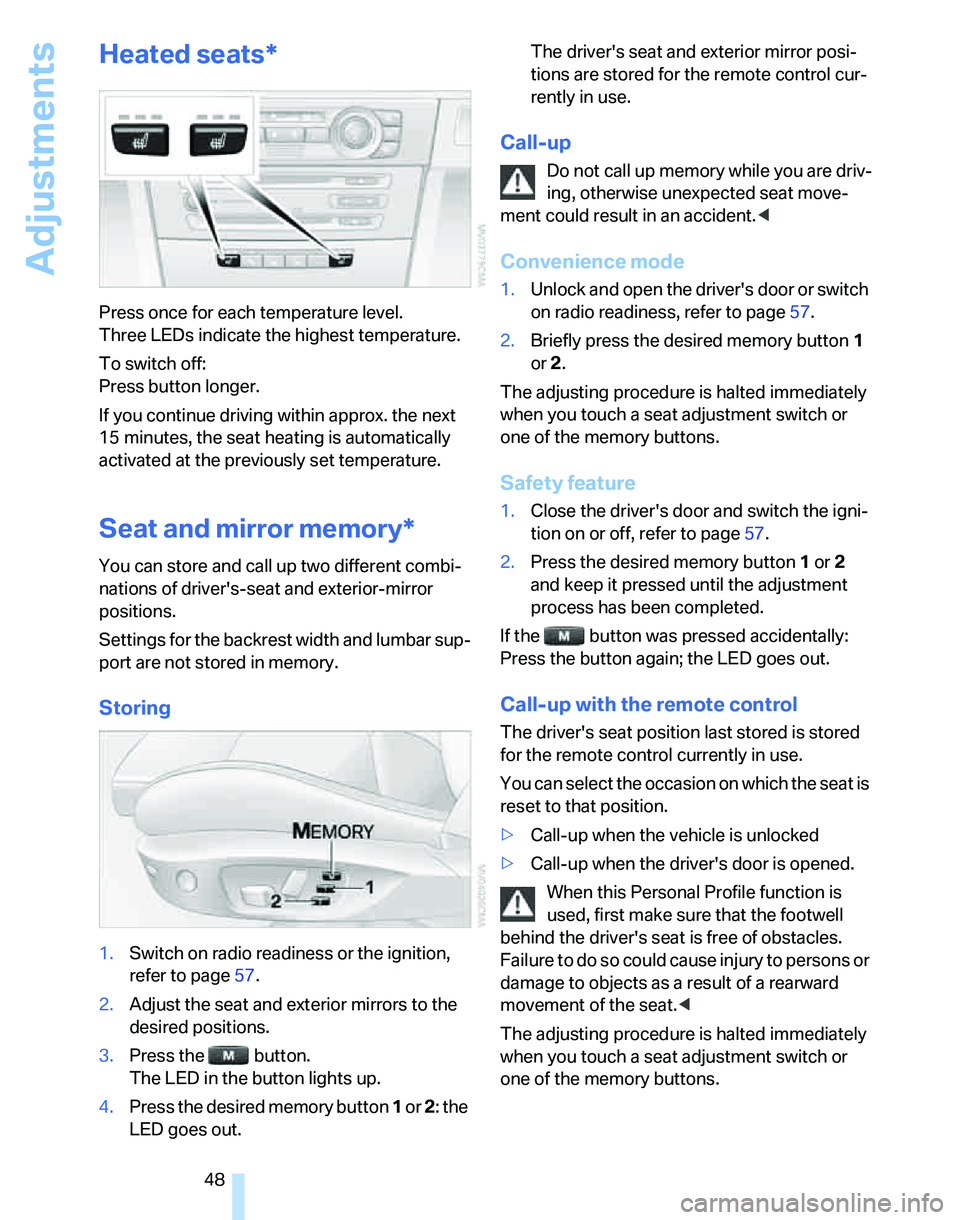
Press once for each temperature level.
Three LEDs indicate the highest temperature.
To switch off:
Press button longer.
If you continue driving within approx. the next
15 minutes, the seat heating is automatically
activated at the previously set temperature.
Seat and mirror memory*
You can store and call up two different combi-
nations of driver's-seat and exterior-mirror
positions.
Settings for the backrest width and lumbar sup-
port are not stored in memory.
Storing
1.Switch on radio readiness or the ignition,
refer to page57.
2.Adjust the seat and exterior mirrors to the
desired positions.
3.Press the button.
The LED in the button lights up.
4.Press the desired memory button 1 or 2: the
LED goes out.The driver's seat and exterior mirror posi-
tions are stored for the remote control cur-
rently in use.
Call-up
Do not call up memory while you are driv-
ing, otherwise unexpected seat move-
ment could result in an accident.<
Convenience mode
1.Unlock and open the driver's door or switch
on radio readiness, refer to page57.
2.Briefly press the desired memory button1
or 2.
The adjusting procedure is halted immediately
when you touch a seat adjustment switch or
one of the memory buttons.
Safety feature
1.Close the driver's door and switch the igni-
tion on or off, refer to page57.
2.Press the desired memory button1 or2
and keep it pressed until the adjustment
process has been completed.
If the button was pressed accidentally:
Press the button again; the LED goes out.
Call-up with the remote control
The driver's seat position last stored is stored
for the remote control currently in use.
You can select the occasion on which the seat is
reset to that position.
>Call-up when the vehicle is unlocked
>Call-up when the driver's door is opened.
When this Personal Profile function is
used, first make sure that the footwell
behind the driver's seat is free of obstacles.
Failure to do so could cause injury to persons or
damage to objects as a result of a rearward
movement of the seat.<
The adjusting procedure is halted immediately
when you touch a seat adjustment switch or
one of the memory buttons.
Page 65 of 268
Controls
63Reference
At a glance
Driving tips
Communications
Navigation
Entertainment
Mobility
Activating intermittent wipe or rain
sensor
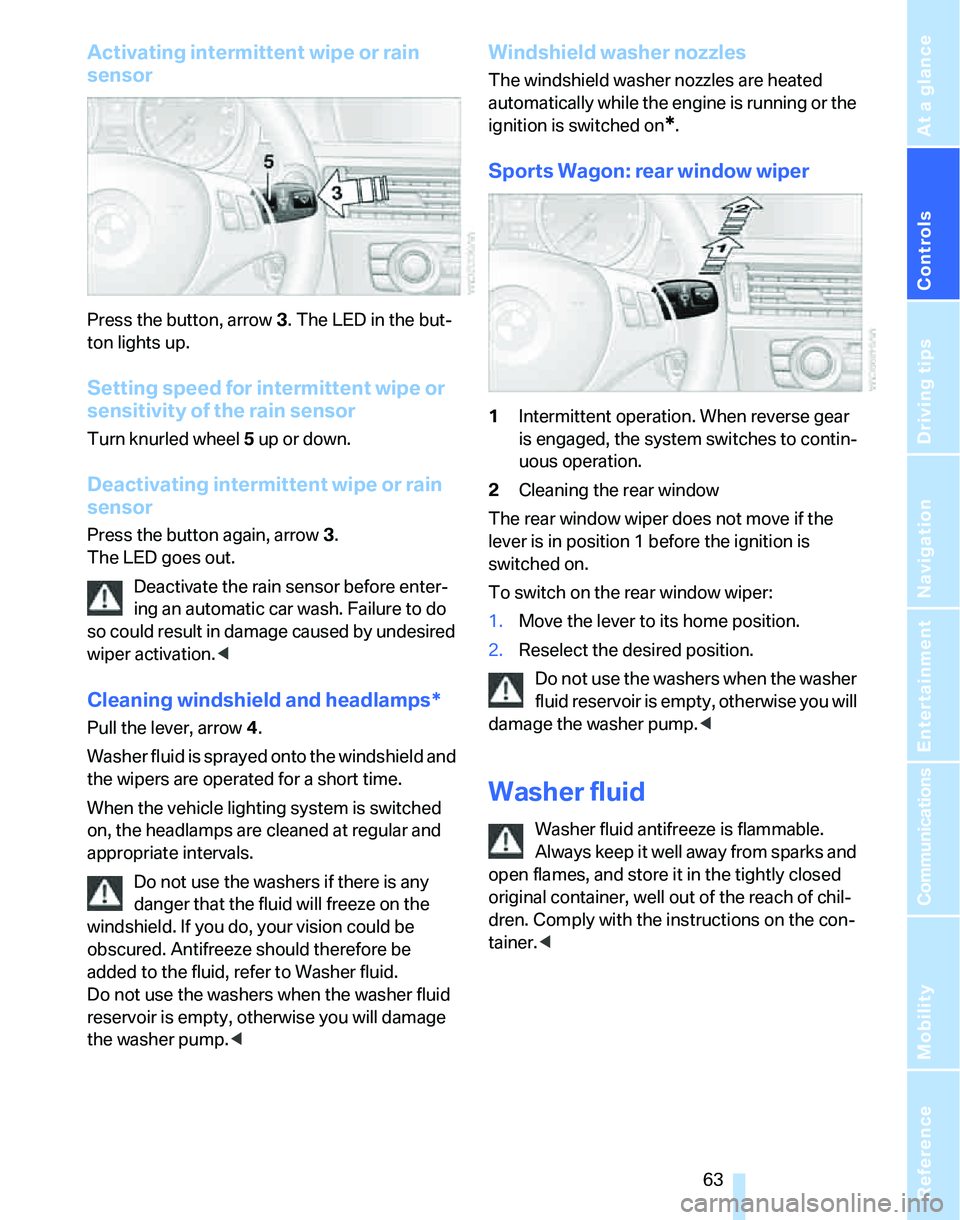
Press the button, arrow3. The LED in the but-
ton lights up.
Setting speed for intermittent wipe or
sensitivity of the rain sensor
Turn knurled wheel5 up or down.
Deactivating intermittent wipe or rain
sensor
Press the button again, arrow3.
The LED goes out.
Deactivate the rain sensor before enter-
ing an automatic car wash. Failure to do
so could result in damage caused by undesired
wiper activation.<
Cleaning windshield and headlamps*
Pull the lever, arrow 4.
Washer fluid is sprayed onto the windshield and
the wipers are operated for a short time.
When the vehicle lighting system is switched
on, the headlamps are cleaned at regular and
appropriate intervals.
Do not use the washers if there is any
danger that the fluid will freeze on the
windshield. If you do, your vision could be
obscured. Antifreeze should therefore be
added to the fluid, refer to Washer fluid.
Do not use the washers when the washer fluid
reservoir is empty, otherwise you will damage
the washer pump.<
Windshield washer nozzles
The windshield washer nozzles are heated
automatically while the engine is running or the
ignition is switched on
*.
Sports Wagon: rear window wiper
1Intermittent operation. When reverse gear
is engaged, the system switches to contin-
uous operation.
2Cleaning the rear window
The rear window wiper does not move if the
lever is in position 1 before the ignition is
switched on.
To switch on the rear window wiper:
1.Move the lever to its home position.
2.Reselect the desired position.
Do not use the washers when the washer
fluid reservoir is empty, otherwise you will
damage the washer pump.<
Washer fluid
Washer fluid antifreeze is flammable.
Always keep it well away from sparks and
open flames, and store it in the tightly closed
original container, well out of the reach of chil-
dren. Comply with the instructions on the con-
tainer.<
Page 70 of 268
Driving
68 Use good judgment to select the appro-
priate following distance given road con-
ditions, traffic, applicable laws and driving rec-
ommendations for safe following distance.
Otherwise, an accident risk could result.<
Deactivating cruise control
Press the lever upward or downward, arrow3.
The displays in the speedometer disappear.
In addition, the system is automatically deacti-
vated:
>When you brake the vehicle
>When the speed is reduced to below
20 mph or 30 km/h due to a traffic situation
>When you switch gears very slowly or shift
to idle in cars with manual transmission
>When you select the automatic transmis-
sion's neutral position N
>When you activate the Dynamic Traction
Control DTC
>When you deactivate the Dynamic Stability
Control DSC
>When DSC or ABS is intervening
>When the system does not recognize any
objects for a longer period of time, e.g. on
infrequently traveled roads without a shoul-
der or guard rails, or if the radar sensor is
covered with dirt, refer to page69
>When you apply the parking brake
When the system is deactivated, you
must brake the vehicle yourself and/or
maneuver as necessary, otherwise there is a
risk of accident.<
Warning lamp
The warning lamp comes on when
active cruise control has been auto-
matically deactivated due to a driving
speed below 20 mph or 30 km/h, an application
of the parking brake or a DSC intervention. A
message appears on the Control Display.
Resuming stored desired speed and
distance
Briefly press the button, arrow 4.
The stored speed and distance are regained
and maintained.
In the following instances, the stored speed is
deleted and can no longer be resumed:
>When driving stability control systems are
intervening
>In cars with ma nua l trans mis sio n: when you
shift gears very slowly or shift to idle posi-
tion
>In cars with automatic transmission: when
you engage selector lever position N
>When the ignition is switched off
Displays in the instrument cluster
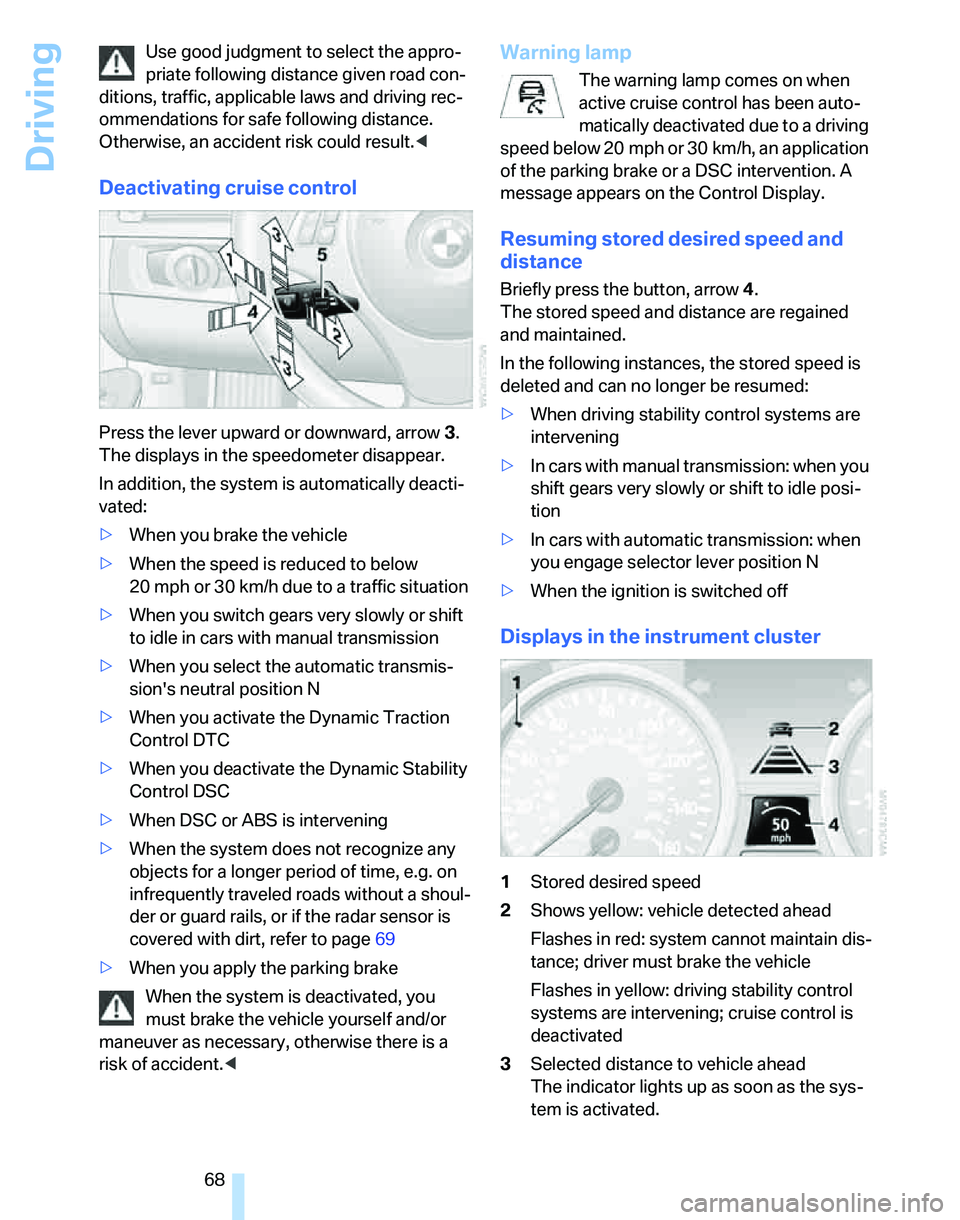
1Stored desired speed
2Shows yellow: vehicle detected ahead
Flashes in red: system cannot maintain dis-
tance; driver must brake the vehicle
Flashes in yellow: driving stability control
systems are intervening; cruise control is
deactivated
3Selected distance to vehicle ahead
The indicator lights up as soon as the sys-
tem is activated.
Page 74 of 268
Everything under control
72
Everything under control
Odometer, outside
temperature display, clock
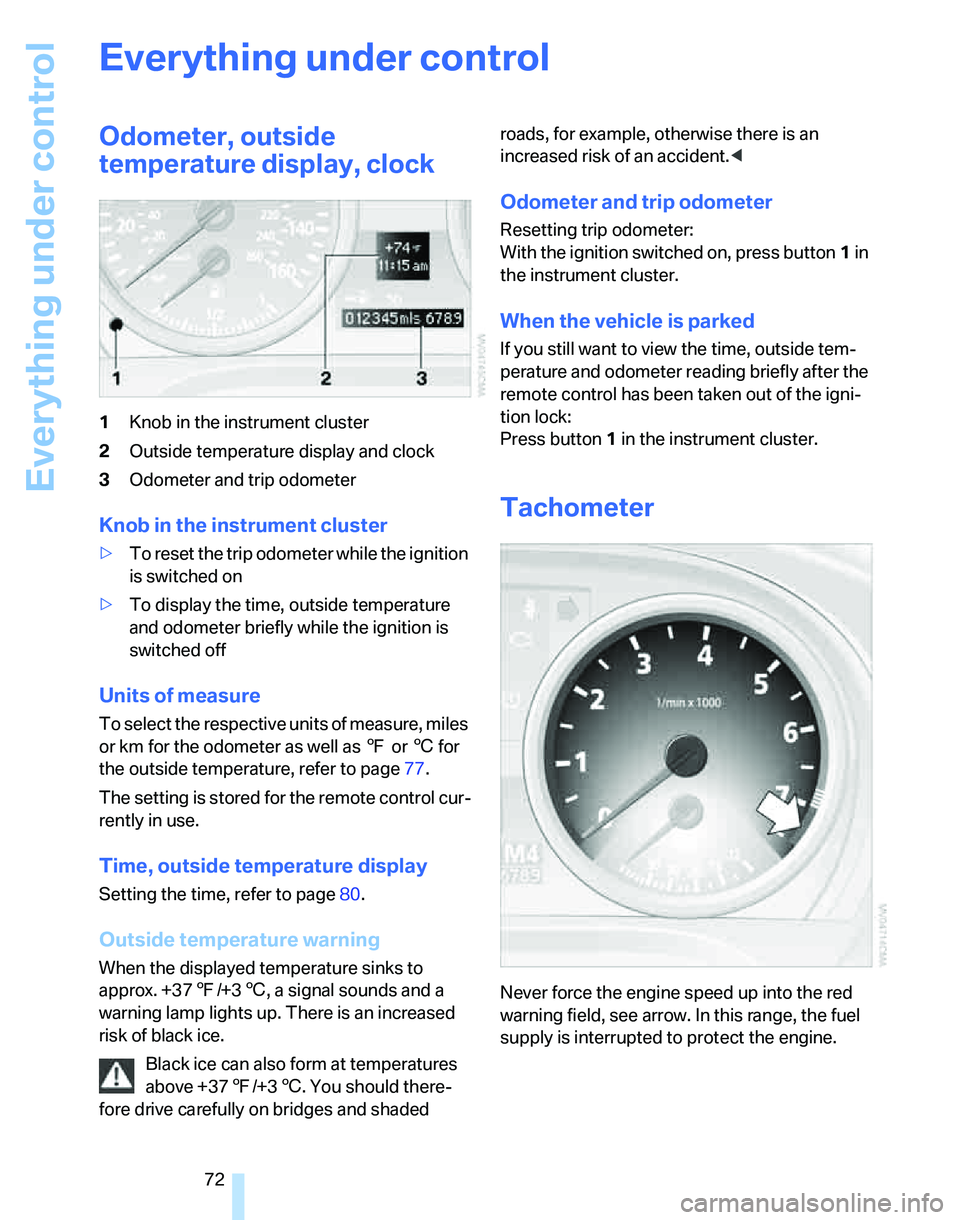
1Knob in the instrument cluster
2Outside temperature display and clock
3Odometer and trip odometer
Knob in the instrument cluster
>To reset the trip odometer while the ignition
is switched on
>To display the time, outside temperature
and odometer briefly while the ignition is
switched off
Units of measure
To select the respective units of measure, miles
or km for the odometer as well as 7 or 6 for
the outside temperature, refer to page77.
The setting is stored for the remote control cur-
rently in use.
Time, outside temperature display
Setting the time, refer to page80.
Outside temperature warning
When the displayed temperature sinks to
approx. +377/+36, a signal sounds and a
warning lamp lights up. There is an increased
risk of black ice.
Black ice can also form at temperatures
above +377/+36. You should there-
fore drive carefully on bridges and shaded roads, for example, otherwise there is an
increased risk of an accident.<
Odometer and trip odometer
Resetting trip odometer:
With the ignition switched on, press button1 in
the instrument cluster.
When the vehicle is parked
If you still want to view the time, outside tem-
perature and odometer reading briefly after the
remote control has been taken out of the igni-
tion lock:
Press button 1 in the instrument cluster.
Tachometer
Never force the engine speed up into the red
warning field, see arrow. In this range, the fuel
supply is interrupted to protect the engine.
Page 79 of 268
Controls
77Reference
At a glance
Driving tips
Communications
Navigation
Entertainment
Mobility
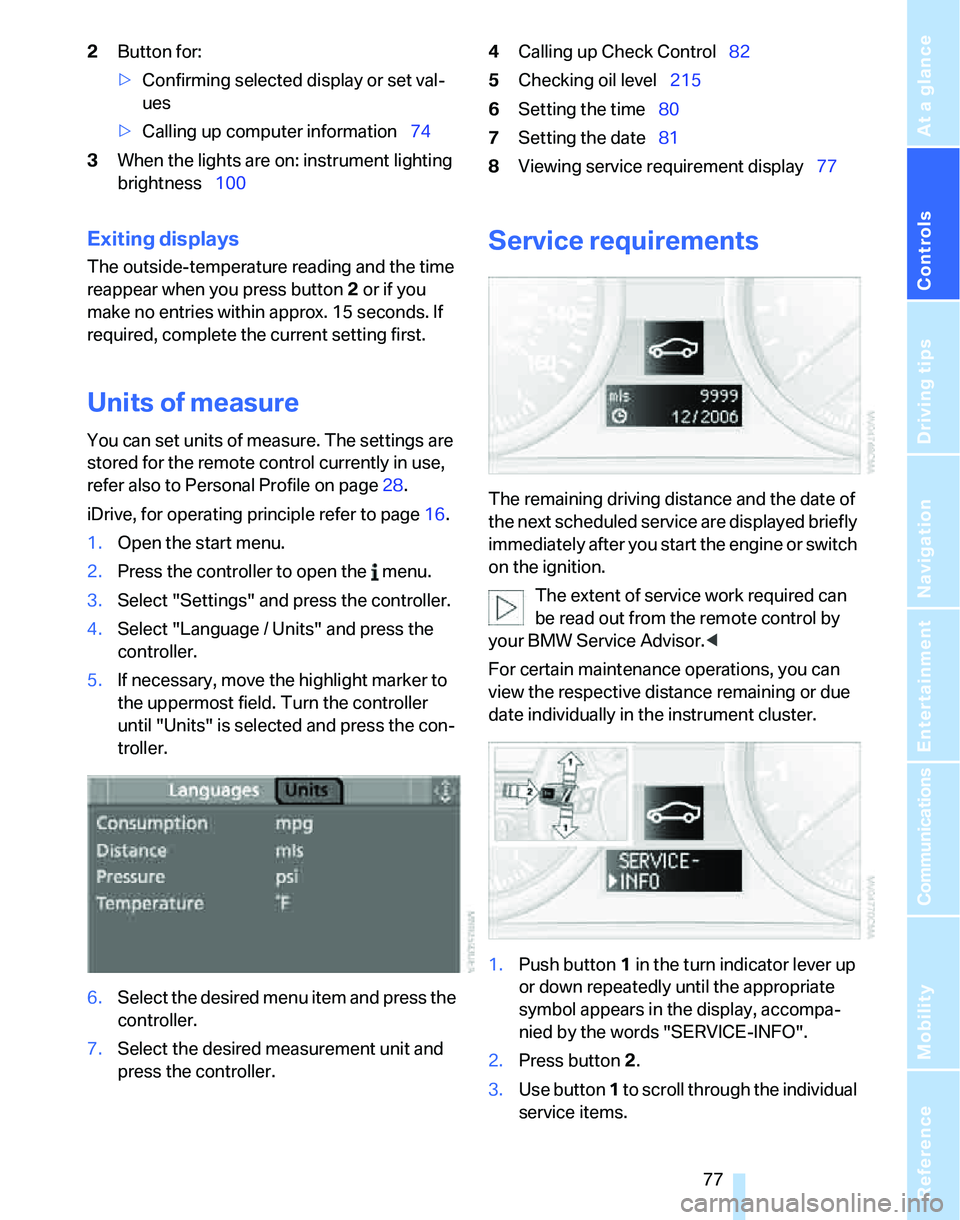
2Button for:
>Confirming selected display or set val-
ues
>Calling up computer information74
3When the lights are on: instrument lighting
brightness1004Calling up Check Control82
5Checking oil level215
6Setting the time80
7Setting the date81
8Viewing service requirement display77
Exiting displays
The outside-temperature reading and the time
reappear when you press button2 or if you
make no entries within approx. 15 seconds. If
required, complete the current setting first.
Units of measure
You can set units of measure. The settings are
stored for the remote control currently in use,
refer also to Personal Profile on page28.
iDrive, for operating principle refer to page16.
1.Open the start menu.
2.Press the controller to open the menu.
3.Select "Settings" and press the controller.
4.Select "Language / Units" and press the
controller.
5.If necessary, move the highlight marker to
the uppermost field. Turn the controller
until "Units" is selected and press the con-
troller.
6.Select the desired menu item and press the
controller.
7.Select the desired measurement unit and
press the controller.
Service requirements
The remaining driving distance and the date of
the next scheduled service are displayed briefly
immediately after you start the engine or switch
on the ignition.
The extent of service work required can
be read out from the remote control by
your BMW Service Advisor.<
For certain maintenance operations, you can
view the respective distance remaining or due
date individually in the instrument cluster.
1.Push button 1 in the turn indicator lever up
or down repeatedly until the appropriate
symbol appears in the display, accompa-
nied by the words "SERVICE-INFO".
2.Press button 2.
3.Use button 1 to scroll through the individual
service items.
Page 91 of 268
Controls
89Reference
At a glance
Driving tips
Communications
Navigation
Entertainment
Mobility
35 km/h, the vehicle's speed is automatically
reduced to slightly more than double walking
speed and maintained.
Increasing or decreasing speed
By accelerating or braking you can change the
speed within a range from approx. 3 to 15 mph,
approx. 5 to 25 km/h.
You can specify a target speed within the same
range using the cruise control lever.
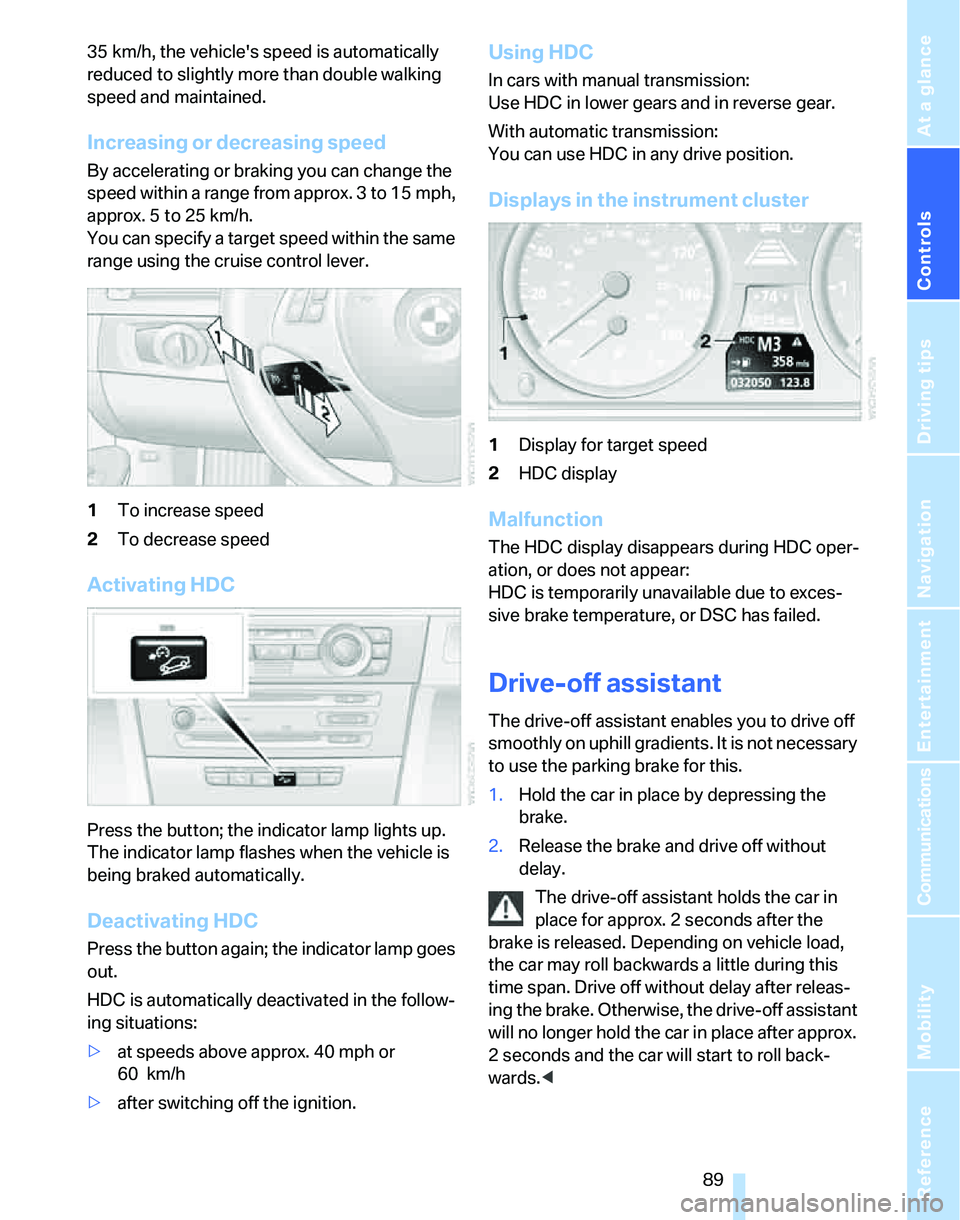
1To increase speed
2To decrease speed
Activating HDC
Press the button; the indicator lamp lights up.
The indicator lamp flashes when the vehicle is
being braked automatically.
Deactivating HDC
Press the button again; the indicator lamp goes
out.
HDC is automatically deactivated in the follow-
ing situations:
>at speeds above approx. 40 mph or
60 km/h
>after switching off the ignition.
Using HDC
In cars with manual transmission:
Use HDC in lower gears and in reverse gear.
With automatic transmission:
You can use HDC in any drive position.
Displays in the instrument cluster
1Display for target speed
2HDC display
Malfunction
The HDC display disappears during HDC oper-
ation, or does not appear:
HDC is temporarily unavailable due to exces-
sive brake temperature, or DSC has failed.
Drive-off assistant
The drive-off assistant enables you to drive off
smoothly on uphill gradients. It is not necessary
to use the parking brake for this.
1.Hold the car in place by depressing the
brake.
2.Release the brake and drive off without
delay.
The drive-off assistant holds the car in
place for approx. 2 seconds after the
brake is released. Depending on vehicle load,
the car may roll backwards a little during this
time span. Drive off without delay after releas-
ing the brake. Otherwise, the drive-off assistant
will no longer hold the car in place after approx.
2 seconds and the car will start to roll back-
wards.<
Page 95 of 268
Controls
93Reference
At a glance
Driving tips
Communications
Navigation
Entertainment
Mobility
rupted at any time. When driving resumes, the
reset is continued automatically. On the Control
Display, the tires are shown in green and "Sta-
tus: TPM active" is shown again.
If a flat tire is detected while the system is
resetting and determining the inflation
pressures, all tires on the Control Display are
displayed in yellow. The message "Tire low!" is
shown.<
Message for low tire inflation pressure
The warning lamps come on in yellow
and red. A message appears on the
Control Display. In addition, a signal
sounds. There is a flat tire or substan-
tial loss of tire pressure.
1.Cautiously reduce speed to below 50 mph/
80 km/h. Avoid sudden braking and steer-
ing maneuvers. Do not exceed a speed of
50 mph/80 km/h.
If the car is not equipped with Run-
Flat Tires, refer to page212, the stan-
dard equipment by design, do not continue
driving. Otherwise a severe accident could
result after a tire puncture if you continue
driving.<
2.In the event of complete pressure loss,
0 psi/0 kPa, you can estimate the possible
distance for continued driving on the basis
of the following guidelines:
>With a light load:
1 to 2 persons without luggage:
approx. 155 miles/250 km
>With a medium load:
2 persons, cargo bay full, or 4 persons
without luggage:
approx. 95 miles/150 km
>With a full load:
4 or more persons, cargo bay full:
approx. 30 miles/50 km
Drive cautiously and do not exceed a
speed of 50 mph/80 km/h. In the event of
pressure loss, vehicle handling changes. This
includes reduced tracking stability in braking,
extended braking distance and altered natural
steering characteristics.If unusual vibration or loud noises occur during
the journey, this may be an indication that the
damaged tire has finally failed. Reduce your
speed and pull over as soon as possible at a
suitable location. Otherwise parts of the tire
could come loose, resulting in an accident. Do
not continue driving. Instead, contact your
BMW center.<
Malfunction
The small warning lamp flashes in
yellow and then lights up continu-
ously; the larger warning lamp comes
on in yellow. On the Control Display,
the tires are shown in gray and a message
appears. No punctures can be detected.
his type of message is shown in the following
situations:
>If there is a malfunction
Have the system checked.
>If a wheel without TPM electronics has
been mounted
>If TPM is temporarily malfunctioning due to
other systems or devices using the same
radio frequency.
Message for unsuccessful system
reset
Both warning lamps come on in yel-
low. A message will appear on the
Control Display. The system is not
reset after a tire has been changed,
for example.
Check the tire inflation pressure and reset the
system, refer to page92.
Declaration according to NHTSA/
FMVSS 138
Tire Pressure Monitoring Systems
Each tire should be checked monthly when cold
and inflated to the inflation pressure recom-
mended by the vehicle manufacturer on the
vehicle placard or tire inflation pressure label. If
your vehicle has tires of a different size than the
size indicated on the vehicle placard or tire infla-
tion pressure label, you should determine the
proper tire inflation pressure for those tires. As