2007 BMW 335I SEDAN warning lamps
[x] Cancel search: warning lampsPage 14 of 268

Cockpit
12
Instrument cluster
1Speedometer
2Indicator lamps for turn signals
3Indicator and warning lamps13
4Displays for active cruise control
*66
5Tachometer72
6Energy Control
*73
Engine oil temperature
*73
7Display for
>Clock72
>Outside temperature72
>Indicator and warning lamps828Display for
>Position of automatic transmission
*59
>Computer74
>Date of next scheduled service, and
remaining distance to be driven77
>Odometer and trip odometer72
>Checking engine oil level
*215
>Settings and information76
> There is a Check Control
message82
9Fuel gauge73
10Resetting the trip odometer72
Page 15 of 268

At a glance
13Reference
Controls
Driving tips
Communications
Navigation
Entertainment
Mobility
Indicator and warning lamps
The concept
Indicator and warning lamps can light up in var-
ious combinations and colors in the indicator
area 1 or2.
Some lamps are checked for proper functioning
and thus come on briefly when the engine is
started or the ignition is switched on.
Explanatory text messages
Text messages at the lower edge of the Control
Display explain the meaning of the displayed
indicator and warning lamps.
You can call up more information, e.g. on the
cause of a malfunction and on how to respond,
via Check Control, refer to page82.In urgent cases, this information will be shown
as soon as the corresponding lamp comes on.
Indicator lamps without text messages
The following indicator lamps in the indicator
area1 signal that the associated functions are
activated:
High beams/headlamp flasher99
Fog lamps
*99
Lamp flashes:
DSC or DTC is regulating the propul-
sive forces in order to maintain driving
stability88
Parking brake applied59
Page 17 of 268

At a glance
15Reference
Controls
Driving tips
Communications
Navigation
Entertainment
Mobility
1Microphone for voice command system*
and for telephone in hands-free mode*
2SOS: initiating an Emergency Request
call
*229
3Reading lamps100
4Glass roof/panorama glass roof
*41
5Interior lamps100
6Passenger airbag status lamp
*96
7Control Display16
8Hazard warning flashers
9DTC Dynamic Traction Control88
10Central locking system32
11Automatic climate control
12Ejecting
>Audio CD156
>Navigation DVD13013Changing
>Radio station160
>Track167
15Controller16
Can be turned, pressed, or moved horizon-
tally in four directions
16Activating voice command system
*22
17Opening start menu on Control Display17
18Drive for navigation DVD130
19Switching audio sources on/off and adjust-
ing volume156
20Drive for audio CDs156 Air distribution to the
windshield102
Air distribution to the upper body
area102
Air distribution to the footwell102
Automatic air distribution and flow
rate103
Cooling function104
AUC Automatic recirculated-air
control103
Recirculated-air mode103
Maximum cooling103
Residual heat mode104
Air flow rate103
Defrosting windows104
Rear window defroster104
14
Heated seats*48
PDC Park Distance Control
*86
Sedan:
Roller sun blind
*110
Hill Descent Control HDC
*88
Page 31 of 268

Controls
29Reference
At a glance
Driving tips
Communications
Navigation
Entertainment
Mobility
>Date format, refer to page82
>Brightness of the Control Display, refer to
page85
>Language on the Control Display, refer to
page85
>Units of measure for fuel consumption, dis-
tance covered/remaining distances, and
temperature, refer to page77
>Show visual warning for Park Distance Con-
trol PDC
*, refer to page86
>Automatic climate control: AUTO program,
activating/deactivating cooling function and
automatic recirculated-air control, setting
temperature, air flow rate and distribution,
refer to page102 ff
>Audio volume, refer to page157
>Tone control, refer to page157
>Speed-dependent volume control, refer to
page157
Central locking system
The concept
The central locking system is ready for opera-
tion whenever the driver's door is closed.
The system simultaneously engages and
releases the locks on the following:
>Doors
>Luggage compartment lid/tailgate
>Fuel filler door
Operating from outside
>Via the remote control
>Via the door lock
>In cars with convenient access
*, via the
handles on the driver's and front passen-
ger's doors
The anti-theft system is also operated at the
same time. It prevents the doors from being
unlocked using the lock buttons or door han-
dles. In addition, if the remote control is used,
the interior lamps and the door's courtesy
lamps
* are also switched on or off. The alarm system
* is also armed or disarmed.
For further details of the alarm system,
refer to
page35.
Operating from inside
By means of the button for central locking, refer
to page32.
In the event of a sufficiently severe accident, the
central locking system unlocks automatically. In
addition, the hazard warning flashers and inte-
rior lamps come on.
Opening and closing: from
outside
Using the remote control
Persons or animals in a parked vehicle
could lock the doors from the inside. You
should therefore take the remote control with
you when you leave the vehicle so that the latter
can be opened from outside.<
Unlocking
Press the button.
The interior lamps and the courtesy lamps
*
come on. You can also set the way in which the
car is unlocked. The setting is stored for the
remote control currently in use.
iDrive, for operating principle refer to page16.
1.Press the button.
This opens the start menu.
2.Press the controller to open the menu.
3.Select "Settings" and press the controller.
4.Select "Vehicle / Tires" and press the con-
troller.
5.If necessary, move the highlight marker to
the uppermost field. Turn the controller
Page 40 of 268

Opening and closing
38
Before driving a vehicle with automatic
transmission into a car wash
1.Insert remote control into ignition switch.
2.Depress the brake.
3.Move the selector lever to position N.
4.Switch off the engine.
The vehicle can roll.
Malfunction
Convenient access may malfunction due to
local radio waves. If this happens, open or close
the vehicle via the buttons on the remote con-
trol or using the integrated key. To start the
engine afterward, insert the remote control into
the ignition switch.
Warning lamps
The warning lamp in the instrument
cluster lights up when you attempt to
start the engine: the engine cannot
be started. The remote control is not inside the
vehicle or is malfunctioning. Take the remote
control with you inside the vehicle or have it
checked. If necessary, insert another remote
control into the ignition switch.
The warning lamp in the instrument
cluster lights up while the engine is
running: the remote control is no
longer inside the vehicle. After the engine is
switched off, the engine can only be restarted
within approx. 10 seconds.
The indicator lamp in the instrument
cluster comes on and a message
appears on the Control Display:
replace the battery in the remote control.
Replacing the battery
The remote control for convenient access con-
tains a battery that will need to be replaced from
time to time.1.Take the integrated key out of the remote
control, refer to page28.
2.Remove the cover.
3.Insert the new battery with the plus side fac-
ing up.
4.Press the cover on to close.
Take the old battery to a battery collec-
tion point or to your BMW center.<
Windows
To prevent injuries, exercise care when
closing the windows and keep them in
your field of vision until they are shut.
Take the remote control with you when you
leave the car, otherwise children could operate
the electric windows and possibly injure them-
selves.<
Opening, closing
>Press the switch to the resistance point.
The window continues to open as long as
you keep the switch pressed.
>Press the switch beyond the resistance
point.
The window opens automatically. Press the
Page 59 of 268

Controls
57Reference
At a glance
Driving tips
Communications
Navigation
Entertainment
Mobility
Driving
Ignition lock
Insert the remote control all the way into the
ignition lock.
>Radio readiness switches on.
Individual electrical consumers can operate.
>The electric steering wheel lock disen-
gages audibly.
Insert the remote control into the ignition
lock before you move the vehicle, other-
wise the electric steering wheel lock will not dis-
engage and you will not be able to steer the
car.<
Removing the remote control from the
ignition lock
Press the remote control in briefly; it is ejected
part of the way.
At the same time:
>The ignition switches off if it was on before-
hand.
>The electric steering wheel lock engages
audibly.
Automatic transmission
You cannot take out the remote control unless
the selector lever is in the P position: interlock.
Start/stop button
Each time the start/stop button is briefly
pressed, radio readiness or the ignition is
switched on or off.
Briefly pressing the start/stop button
while the brake or clutch is depressed
starts the engine.<
Radio readiness
Individual electrical consumers can operate.
The time and the outside temperature are dis-
played in the instrument cluster, refer to
page72.
Radio readiness is switched off automatically:
>When the remote control is removed from
the ignition lock
>In cars with convenient access
*, by touch-
ing the surface above the door lock, refer to
Locking on page37
Ignition on
All electrical consumers can operate. The
odometer and trip odometer are displayed in
the instrument cluster, refer to page72.
W h e n t h e en g i n e is o f f , p l ea s e t u r n o f f t h e
ignition and any unnecessary electrical
consumers in order to preserve the battery.<
Radio readiness and ignition off
All indicator and warning lamps as well as dis-
plays in the instrument cluster go out.
Page 71 of 268

Controls
69Reference
At a glance
Driving tips
Communications
Navigation
Entertainment
Mobility
4Selected desired speed is temporarily dis-
played
If --- mph or --- km/h temporarily appears
in the instrument cluster display, it is pos-
sible that the system prerequisites for operation
are currently not met. Calling up Check Control
messages, refer to page83.<
Warning lamps
The indicator2 flashes in red; a
signal sounds.
The system indicates that you
must brake and/or maneuver the
vehicle yourself. Active cruise con-
trol cannot automatically restore the distance to
the vehicle ahead.
This indicator does not release you from your
responsibility to adapt your desired speed and
driving style to prevailing driving conditions.
The indicator 2 flashes in yellow.
The prerequisites for operating
active cruise control are not met,
e.g. as a result of ABS or DSC
interventions. Active cruise control
is deactivated. You can reactivate the system, if
desired, by tapping or pulling the lever when road and traffic conditions permit. It is not pos-
sible to resume a stored speed.
Radar sensor
The sensor's ability to detect vehicles ahead
may be restricted as a result of heavy rain, dirt,
snow or ice. If necessary, clean the radar sensor
located in the front bumper, see arrow. Be sure
to use particular care when removing any layers
of snow or ice from the sensor.
When the radar sensor is not properly posi-
tioned, active cruise control cannot be activated
at all.
Malfunction
The warning lamp comes on when
the system has failed. A message
appears on the Control Display. You
can find more information starting on page82.
System limitations
Always remember that the range and abil-
ity of the system does have physical limi-
tations. It will not apply the brakes or decelerate
your vehicle when there is a slow-moving vehi-
cle, stopped vehicle or stationary object ahead
of you, as for example, at a traffic light or a
parked vehicle. Also, the system does not react to oncoming traffic, pedestrians or other types
of potential traffic such as a rider on horseback.
It is also possible that the system may not
detect smaller moving objects such as motor-
cycles or bicycles. Be especially alert when
encountering any of these situations as the sys-
tem will neither automatically brake, nor provide
Page 84 of 268
Everything under control
82 6.Press button 2.
The system stores the new date.
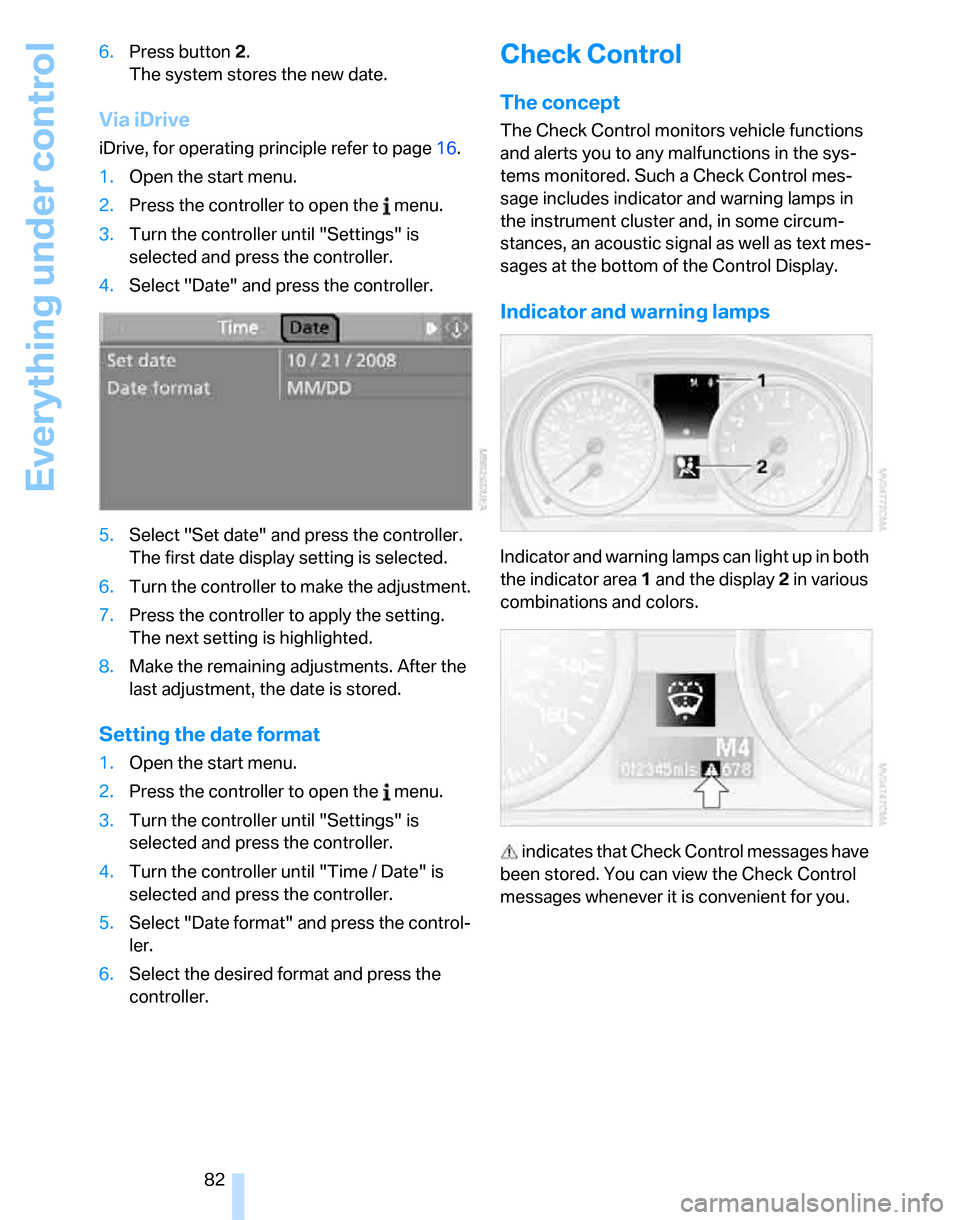
Via iDrive
iDrive, for operating principle refer to page16.
1.Open the start menu.
2.Press the controller to open the menu.
3.Turn the controller until "Settings" is
selected and press the controller.
4.Select "Date" and press the controller.
5.Select "Set date" and press the controller.
The first date display setting is selected.
6.Turn the controller to make the adjustment.
7.Press the controller to apply the setting.
The next setting is highlighted.
8.Make the remaining adjustments. After the
last adjustment, the date is stored.
Setting the date format
1.Open the start menu.
2.Press the controller to open the menu.
3.Turn the controller until "Settings" is
selected and press the controller.
4.Turn the controller until "Time / Date" is
selected and press the controller.
5.Select "Date format" and press the control-
ler.
6.Select the desired format and press the
controller.
Check Control
The concept
The Check Control monitors vehicle functions
and alerts you to any malfunctions in the sys-
tems monitored. Such a Check Control mes-
sage includes indicator and warning lamps in
the instrument cluster and, in some circum-
stances, an acoustic signal as well as text mes-
sages at the bottom of the Control Display.
Indicator and warning lamps
Indicator and warning lamps can light up in both
the indicator area 1 and the display 2 in various
combinations and colors.
indicates that Check Control messages have
been stored. You can view the Check Control
messages whenever it is convenient for you.