2007 BMW 335I seats
[x] Cancel search: seatsPage 58 of 268
Transporting children safely
56
Rear seats without through-loading
system
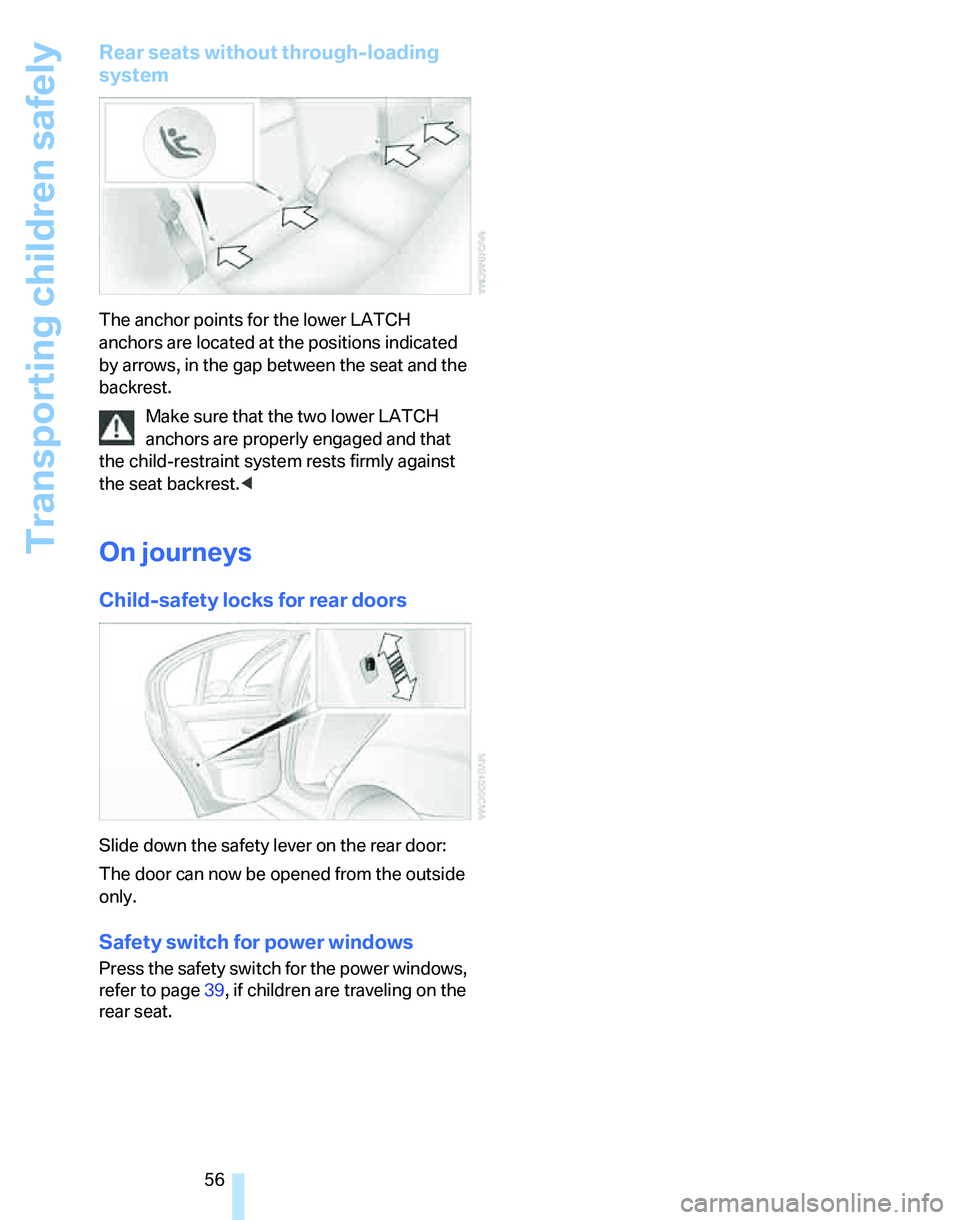
The anchor points for the lower LATCH
anchors are located at the positions indicated
by arrows, in the gap between the seat and the
backrest.
Make sure that the two lower LATCH
anchors are properly engaged and that
the child-restraint system rests firmly against
the seat backrest.<
On journeys
Child-safety locks for rear doors
Slide down the safety lever on the rear door:
The door can now be opened from the outside
only.
Safety switch for power windows
Press the safety switch for the power windows,
refer to page39, if children are traveling on the
rear seat.
Page 97 of 268
Controls
95Reference
At a glance
Driving tips
Communications
Navigation
Entertainment
Mobility
Airbags
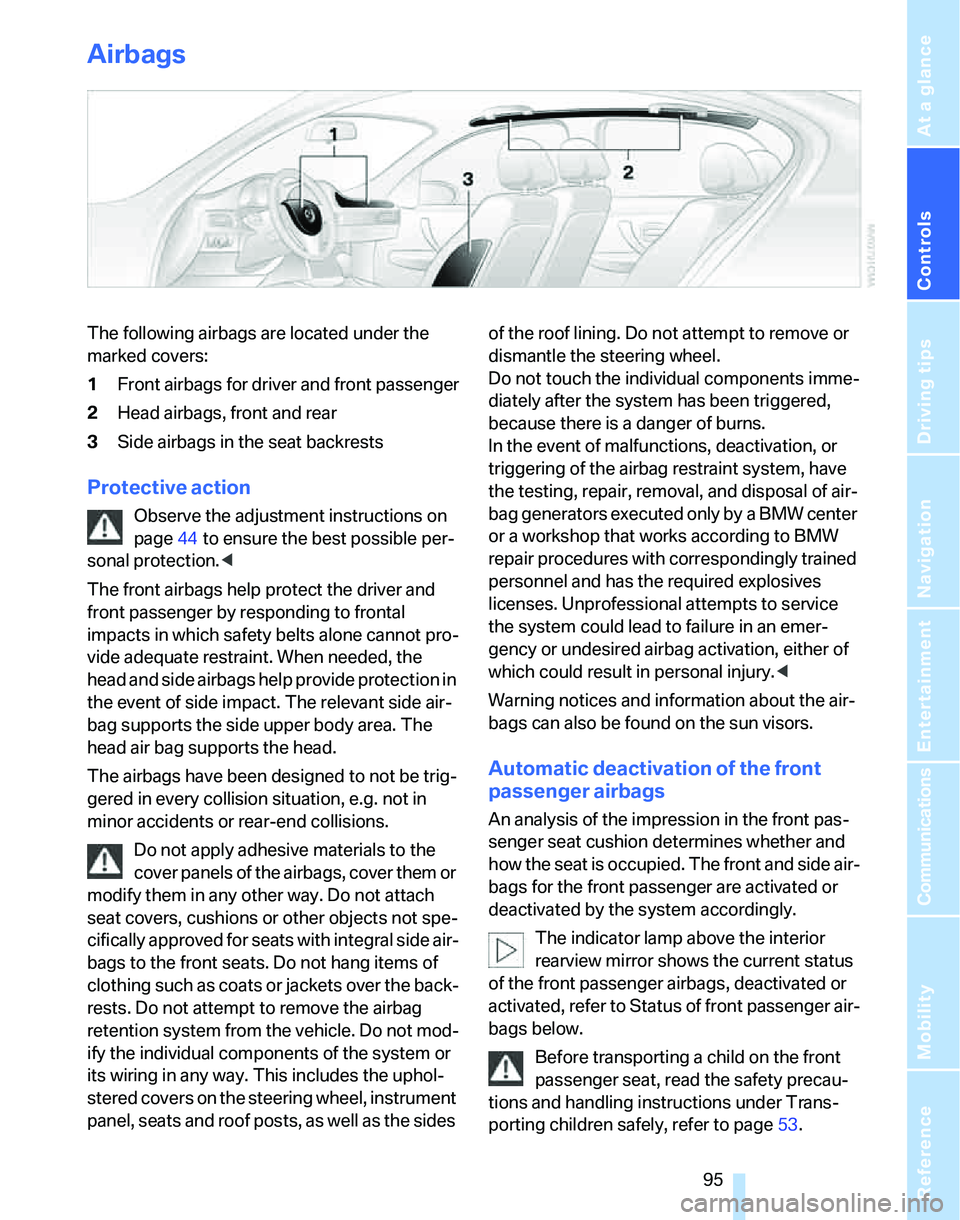
The following airbags are located under the
marked covers:
1Front airbags for driver and front passenger
2Head airbags, front and rear
3Side airbags in the seat backrests
Protective action
Observe the adjustment instructions on
page44 to ensure the best possible per-
sonal protection.<
The front airbags help protect the driver and
front passenger by responding to frontal
impacts in which safety belts alone cannot pro-
vide adequate restraint. When needed, the
head and side airbags help provide protection in
the event of side impact. The relevant side air-
bag supports the side upper body area. The
head air bag supports the head.
The airbags have been designed to not be trig-
gered in every collision situation, e.g. not in
minor accidents or rear-end collisions.
Do not apply adhesive materials to the
cover panels of the airbags, cover them or
modify them in any other way. Do not attach
seat covers, cushions or other objects not spe-
cifically approved for seats with integral side air-
bags to the front seats. Do not hang items of
clothing such as coats or jackets over the back-
rests. Do not attempt to remove the airbag
retention system from the vehicle. Do not mod-
ify the individual components of the system or
its wiring in any way. This includes the uphol-
stered covers on the steering wheel, instrument
panel, seats and roof posts, as well as the sides of the roof lining. Do not attempt to remove or
dismantle the steering wheel.
Do not touch the individual components imme-
diately after the system has been triggered,
because there is a danger of burns.
In the event of malfunctions, deactivation, or
triggering of the airbag restraint system, have
the testing, repair, removal, and disposal of air-
bag generators executed only by a BMW center
or a workshop that works according to BMW
repair procedures with correspondingly trained
personnel and has the required explosives
licenses. Unprofessional attempts to service
the system could lead to failure in an emer-
gency or undesired airbag activation, either of
which could result in personal injury.<
Warning notices and information about the air-
bags can also be found on the sun visors.
Automatic deactivation of the front
passenger airbags
An analysis of the impression in the front pas-
senger seat cushion determines whether and
how the seat is occupied. The front and side air-
bags for the front passenger are activated or
deactivated by the system accordingly.
The indicator lamp above the interior
rearview mirror shows the current status
of the front passenger airbags, deactivated or
activated, refer to Status of front passenger air-
bags below.
Before transporting a child on the front
passenger seat, read the safety precau-
tions and handling instructions under Trans-
porting children safely, refer to page53.
Page 112 of 268
Practical interior accessories
110
Roller sun blinds*
Rear window blind
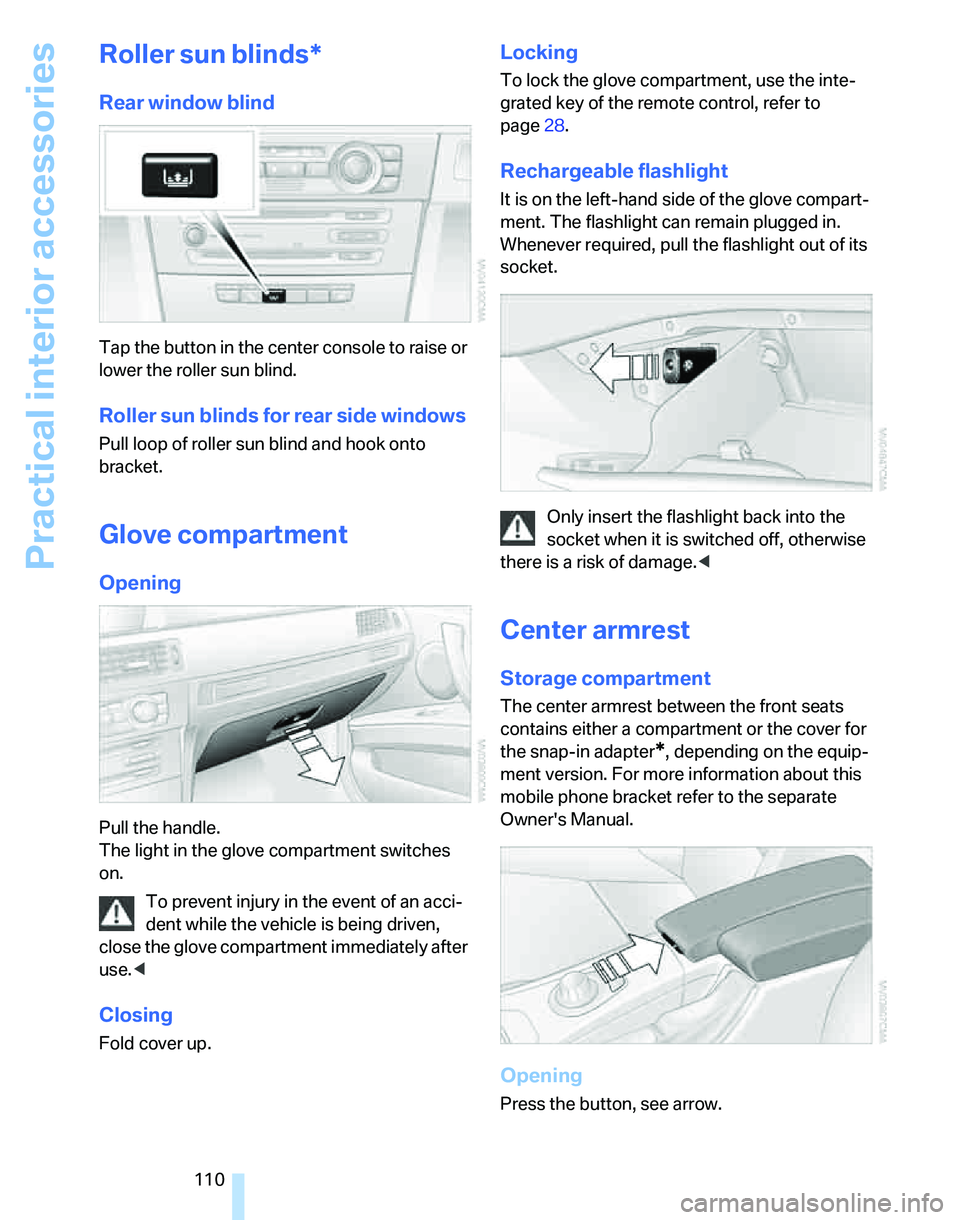
Tap the button in the center console to raise or
lower the roller sun blind.
Roller sun blinds for rear side windows
Pull loop of roller sun blind and hook onto
bracket.
Glove compartment
Opening
Pull the handle.
The light in the glove compartment switches
on.
To prevent injury in the event of an acci-
dent while the vehicle is being driven,
close the glove compartment immediately after
use.<
Closing
Fold cover up.
Locking
To lock the glove compartment, use the inte-
grated key of the remote control, refer to
page28.
Rechargeable flashlight
It is on the left-hand side of the glove compart-
ment. The flashlight can remain plugged in.
Whenever required, pull the flashlight out of its
socket.
Only insert the flashlight back into the
socket when it is switched off, otherwise
there is a risk of damage.<
Center armrest
Storage compartment
The center armrest between the front seats
contains either a compartment or the cover for
the snap-in adapter
*, depending on the equip-
ment version. For more information about this
mobile phone bracket refer to the separate
Owner's Manual.
Opening
Press the button, see arrow.
Page 117 of 268
Controls
115Reference
At a glance
Driving tips
Communications
Navigation
Entertainment
Mobility
Expanding the cargo bay
The rear seat backrest is divided. You can fold
down either division in order to expand the
cargo bay.
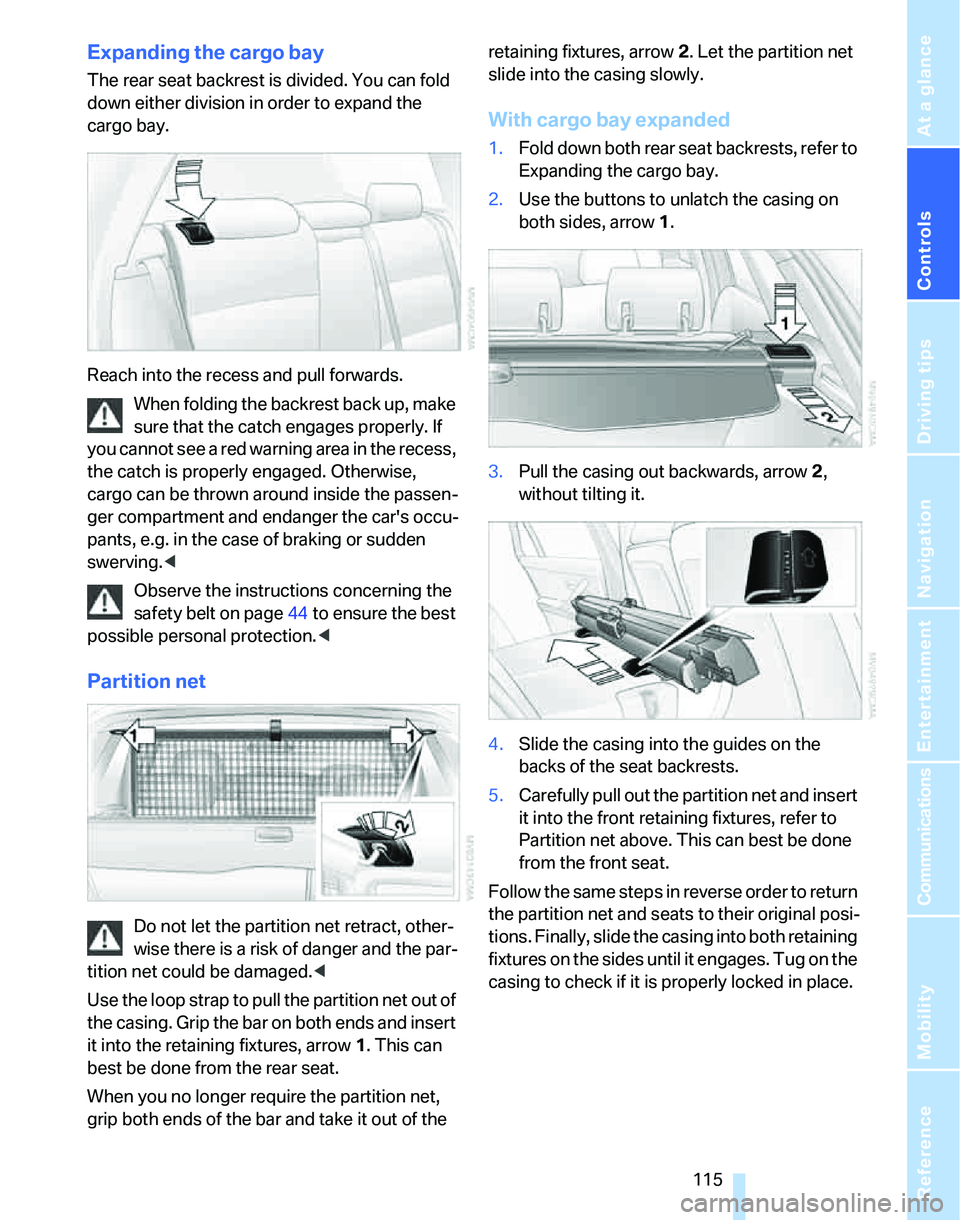
Reach into the recess and pull forwards.
When folding the backrest back up, make
sure that the catch engages properly. If
you cannot see a red warning area in the recess,
the catch is properly engaged. Otherwise,
cargo can be thrown around inside the passen-
ger compartment and endanger the car's occu-
pants, e.g. in the case of braking or sudden
swerving.<
Observe the instructions concerning the
safety belt on page44 to ensure the best
possible personal protection.<
Partition net
Do not let the partition net retract, other-
wise there is a risk of danger and the par-
tition net could be damaged.<
Use the loop strap to pull the partition net out of
the casing. Grip the bar on both ends and insert
it into the retaining fixtures, arrow 1. This can
best be done from the rear seat.
When you no longer require the partition net,
grip both ends of the bar and take it out of the retaining fixtures, arrow 2. Let the partition net
slide into the casing slowly.
With cargo bay expanded
1.Fold down both rear seat backrests, refer to
Expanding the cargo bay.
2.Use the buttons to unlatch the casing on
both sides, arrow 1.
3.Pull the casing out backwards, arrow 2,
without tilting it.
4.Slide the casing into the guides on the
backs of the seat backrests.
5.Carefully pull out the partition net and insert
it into the front retaining fixtures, refer to
Partition net above. This can best be done
from the front seat.
Follow the same steps in reverse order to return
the partition net and seats to their original posi-
tions. Finally, slide the casing into both retaining
fixtures on the sides until it engages. Tug on the
casing to check if it is properly locked in place.
Page 119 of 268
Controls
117Reference
At a glance
Driving tips
Communications
Navigation
Entertainment
Mobility
>Hooks for hanging up shopping bags or tote
bags, for example, on the left and right-hand
sides of the cargo bay
>Net for small objects on the right trim panel
of the cargo bay
>Storage compartment under the floor panel
Depending on your vehicle's equipment, other
storage spaces can be found in the cargo bay:
>Net
* for securing smaller objects, to be
attached to the fixtures on the floor panel
>Net
* on the left side trim of the cargo bay
instead of the rubber strap
>Reversible cargo area floor panel with inte-
grated plastic cover
* for cargo bay or
bumper
>Folding, removable box
* under the floor
panel, e.g. for wet or dirty items
>Insertable dividers
* and removable storage
tray for the storage compartment under the
floor panel
Folding up the floor panel
Do not exceed the maximum permissible
load of 55 lbs/25 kg for the storage com-
partment under the floor panel, otherwise dam-
age could result.<
Sedan
Press the floor panel against the ceiling of the
cargo bay; a locking device holds the floor panel
in place. To detach the floor panel, pull it out of
the locking device.
Equipment version with drawer:
Take the retaining strap on the right-hand side
of the drawer out of the bracket and use it to fix
the floor panel in place.
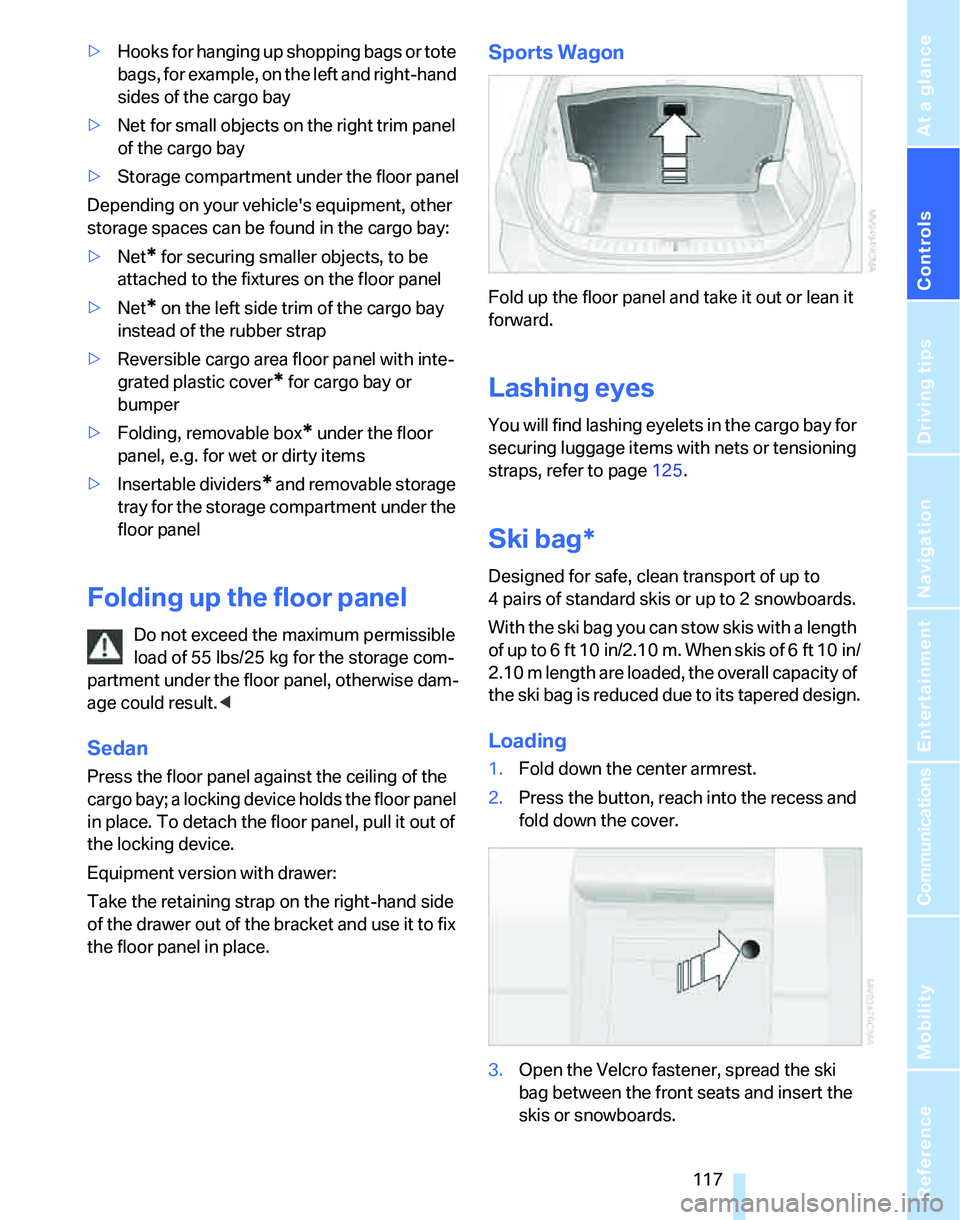
Sports Wagon
Fold up the floor panel and take it out or lean it
forward.
Lashing eyes
You will find lashing eyelets in the cargo bay for
securing luggage items with nets or tensioning
straps, refer to page125.
Ski bag*
Designed for safe, clean transport of up to
4 pairs of standard skis or up to 2 snowboards.
With the ski bag you can stow skis with a length
of up to 6ft 10in/2.10m. When skis of 6ft 10in/
2.10 m length are loaded, the overall capacity of
the ski bag is reduced due to its tapered design.
Loading
1.Fold down the center armrest.
2.Press the button, reach into the recess and
fold down the cover.
3.Open the Velcro fastener, spread the ski
bag between the front seats and insert the
skis or snowboards.
Page 249 of 268
Reference 247
At a glance
Controls
Driving tips
Communications
Navigation
Entertainment
Mobility
Audio156
– controls156
– switching on/off156
– tone control157
– volume157
"Audio", refer to Tone
control157
Audio device, external111
"Auto. headlamps"98
Automatic
– air distribution103
– air flow rate103
– cruise control64,66
– headlamp control97
– service notification192
– storing of stations161
Automatic climate control101
– automatic air
distribution103
– settings via iDrive102
Automatic curb monitor50
"Automatic programs" with
automatic climate
control103
Automatic recirculated-air
control AUC103
Automatic station search161
Automatic transmission with
Steptronic59
– interlock59,60
– overriding selector lever
lock61
– shiftlock, refer to Changing
selector lever position60
– sport program60
– towing231
– tow-starting231
"Automatic ventilation"105
AUTO program for automatic
climate control103
"Autostore"
– on the radio162
"AUX"156,173
"AUX" for external audio
device173
AUX-IN
– port111
AUX-In, refer to External audio
device173Average fuel consumption74
– setting the units77
Average speed74
"Avoid ferries" in
navigation142
"Avoid highways" in
navigation141
Avoid highways in
navigation141
Avoiding unintentional
alarms36
"Avoid tollroads" in
navigation142
Axle loads, refer to
Weights239
"A - Z"182
B
Backrest contour, refer to
Lumbar support46
Backrests, refer to Seat
adjustment45
Backrest width adjustment46
Back seats
– refer to Rear seats47
Backup lamps
– replacing bulbs225,226
Backup lamps, refer to Tail
lamps224
Balance, tone control157
Band-aids, refer to First-aid
pouch229
Bar, refer to Towing
methods232
Bass, tone control157
Bass sounds, refer to Tone
control157
Bass sounds, refer to Treble
and bass157
Battery227
– charging227
– disposal38,227
– jump starting230
– remote control28
– temporary power failure227
Battery renewal
– remote control38
– remote control for vehicle38Being towed232
Belts, refer to Safety belts49
Belt tensioner, refer to Safety
belts49
Beverage holders, refer to
Cup holders111
Blower, refer to Air flow
rate103
Bluetooth, refer to separate
Owner's Manual
"BMW Assist"191,192,193
BMW Assist
– activating195
– Concierge service193
– contacting BMW Customer
Relations193
– Roadside Assistance191
– services offered190
– TeleService192
"BMW Contact"184
"BMW Contact
Numbers"184
BMW Homepage4
BMW Maintenance
System219
"BMW
Services"194
,195,196
BMW webpage4
Bottle holders, refer to Cup
holders111
Bracket for telephone or
mobile phone
– refer to Snap-in adapter in
the center armrest storage
compartment110
Brake assist, refer to Dynamic
Brake Control DBC87
Brake fluid, refer to Service
requirements77
Brake Force Display94
Brake lamps
– replacing bulbs225,226
– two-stage94
Brake pads122
– breaking in122
Brake rotors123
– brakes122
– breaking in122
Page 251 of 268
Reference 249
At a glance
Controls
Driving tips
Communications
Navigation
Entertainment
Mobility
CD player166
– compressed audio files166
– controls156
– fast forward/reverse170
– playing a track168
– random order169
– repeating a track169
– selecting a track167
– switching on/off156
– tone control157
– volume157
Center armrest110
Center brake lamp
– replacing bulbs226
Center console, refer to
Around the center
console14
"Central locking"30
Central locking
– from inside32
– from outside29
Central locking system29
– convenient access36
– hotel function34
Changes, technical, refer to
For your own safety5
Changing bulbs, refer to
Lamps and bulbs222
Changing the language on the
Control Display85
Changing the measurement
units on the Control
Display77
Changing wheels227
Chassis number, refer to
Engine compartment215
Check Control82
"Check Control
messages"84
Check Gas Cap200
Child-restraint fixing system
LATCH55
Child-restraint systems53
Child-safety lock56
Child seats, refer to
Transporting children
safely53Chrome parts, care, refer to
Caring for your vehicle
brochure
Cigarette lighter, refer to
Lighter112
Cleaning, refer to Caring for
your vehicle brochure
Cleaning headlamps63
– washer fluid64
"Climate"102
Clock72
– 12h/24h mode81
– setting time80
Closing
– from inside32
– from outside
29
Clothes hooks111
Cockpit10
Cold start, refer to Starting the
engine58
Combined instrument, refer to
Instrument cluster12
Comfort access, refer to
Convenient access36
Comfort area, refer to Around
the center console14
"Communication"181,191,
192,193
Compact disc, refer to
– CD changer166
– CD player166
Compartment for remote
control, refer to Ignition
lock57
Compass108
Computer74
– displays on Control
Display74
– hour signal81
Computer, refer to iDrive16
"Concert hall" for Tone
control158
"Concierge"193
Concierge service193
Condensation, refer to When
the vehicle is parked124
Condition Based Service
CBS219Configuring settings, refer to
Personal Profile28
Confirmation signals for
locking/unlocking the
vehicle30
Connecting vacuum cleaner,
refer to Connecting
electrical appliances112
Consumption, refer to
Average consumption74
Consumption display
– average consumption74
Consumption indicator
– Energy Control73
"Continue guidance to
destination?"144
Control Center, refer to
iDrive16
Control Display
– brightness85
– changing the language85
– switching off/on21
Control Display, refer to
iDrive16
Controller, refer to iDrive16
Controls and displays10
Control unit, refer to iDrive16
Convenient access36
– replacing the battery
38
– what to observe before
entering a car wash38
Convenient operation
– glass sunroof30
– glass sunroof with
convenient access37
– windows30
– windows with convenient
access37
Coolant217
– checking level218
Coolant temperature73
Cooling, maximum103
Cooling fluid, refer to
Coolant217
Cooling system, refer to
Coolant217
Cornering lamps, refer to
Adaptive Head Light99
Correct tires212
Page 255 of 268
Reference 253
At a glance
Controls
Driving tips
Communications
Navigation
Entertainment
Mobility
General driving notes122
Glass sunroof, electric39
– closing after electrical
malfunction40
– convenient operation30,31
– initializing40
– opening, closing40
– operation with convenient
access37
– pinch protection system40
– power failure40
– raising39
– remote control30
Glove compartment110
– rechargeable flashlight110
GPS navigation, refer to
Navigation system130
Grills101
Gross vehicle weight, refer to
Weights239
H
Halogen lamps
– replacing bulbs222
Handbrake, refer to Parking
brake59
Hand lamp, refer to
Rechargeable flashlight110
Hands-free system14
Hazard warning flashers14
HDC Hill Descent Control88
Head airbags95
Headlamp control,
automatic97
Headlamp cover222
Headlamp flasher61
– indicator lamp11,13
Headlamps
– care, refer to Caring for your
vehicle brochure
– replacing bulbs222
Head restraints46
– front, removing47
– rear, removing47
– sitting safely44Heated
– mirrors50
– rear window104
– seats48
Heating
– mirrors50
– rear window104
– residual heat104
– seats48
Heating and ventilation, refer
to Climate101
Heating while at a standstill,
refer to Using residual
heat104
Heavy loads, refer to Stowing
cargo125
Height, refer to
Dimensions237
Height adjustment
– seats45
– steering wheel51
High beams99
– headlamp flasher99
– indicator lamp13
– replacing bulbs222
High water, refer to Driving
through water123
Highways, refer to Route
criteria141
Hill Descent Control HDC88
Hills123
Holders for cups111
Home address140
"Home address" in
navigation141
Homepage BMW4
Hood214
Hooks for shopping bags116
Horn10,11
Hotel function34
Hot exhaust system122
"Hour memo"81
"House number" in
destination entry134
Hydraulic brake assist, refer to
Dynamic Brake Control
DBC87
Hydroplaning123
I
Ice warning, refer to Outside
temperature
warning72
ID3 tag, refer to Information
about the track168
Identification marks
– Run-Flat Tires212
– tire coding210
iDrive16
– adjusting brightness85
– assistance window20
– automatic climate
control102
– changing language85
– changing units of measure
and display format77
– confirming selection or
entry19
– controls16
– displays, menus17
– menu guidance17
– operating principle16
– overview16
– selecting a menu item19
– setting the date and time80
– start menu17
– status information20
– switching menu pages19
– symbols18
iDrive operating principle16
Ignition57
– switched off57
– switched on57
Ignition key, refer to Remote
control with integrated
key28
Ignition key position 1, refer to
Radio readiness57
Ignition key position 2, refer to
Ignition on57
Ignition lock57
i menu18
Indicator and warning
lamps13
– Tire Pressure Monitor
TPM93
Individual air distribution102