2007 BMW 335I remote start
[x] Cancel search: remote startPage 82 of 268
Everything under control
80
Clock
The settings are stored for the remote control
currently in use, refer also to Personal Profile on
page28.
Setting the time
In the instrument cluster
To set the 12h/24h mode, refer to Setting the
time format below.
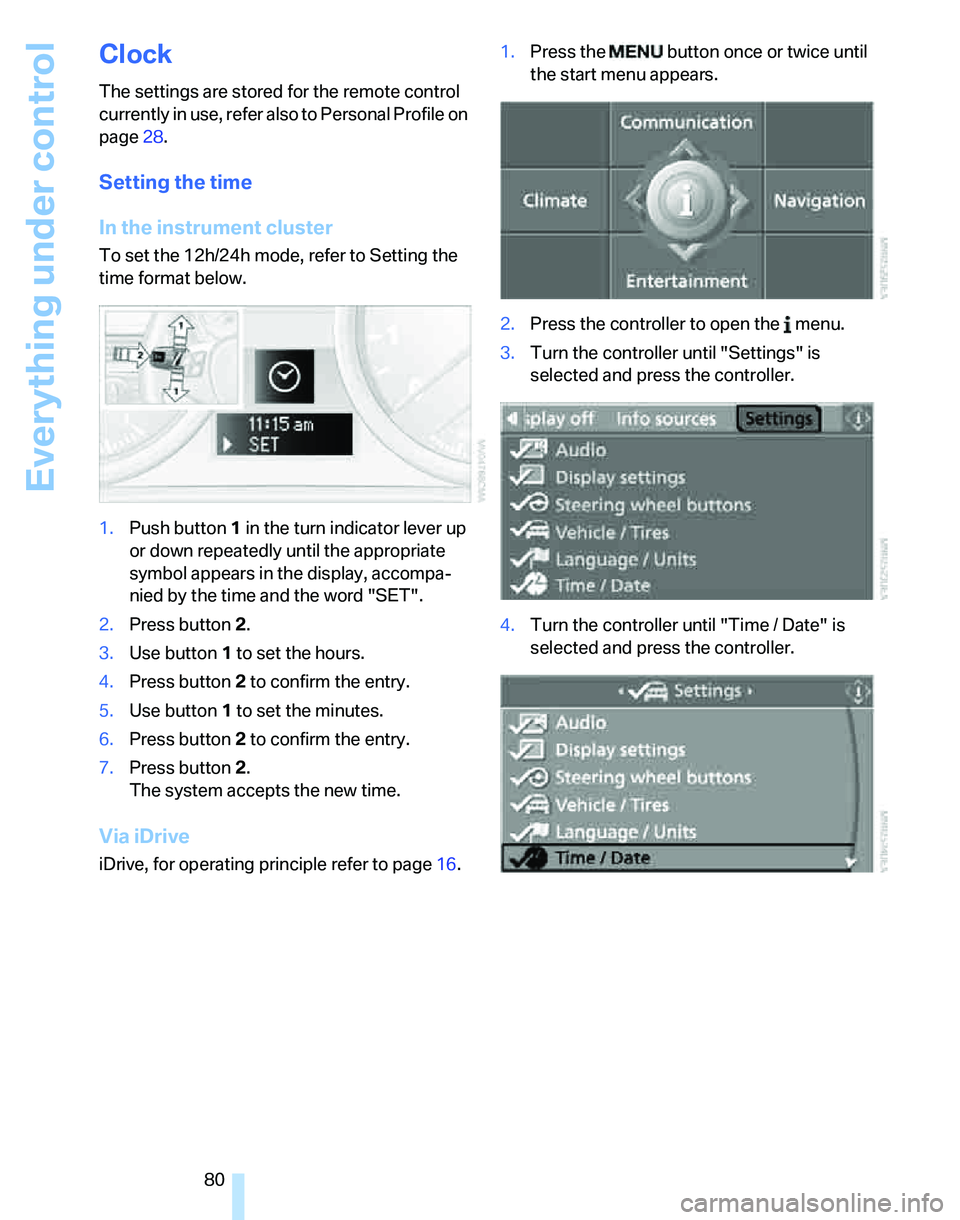
1.Push button 1 in the turn indicator lever up
or down repeatedly until the appropriate
symbol appears in the display, accompa-
nied by the time and the word "SET".
2.Press button 2.
3.Use button 1 to set the hours.
4.Press button 2 to confirm the entry.
5.Use button 1 to set the minutes.
6.Press button 2 to confirm the entry.
7.Press button 2.
The system accepts the new time.
Via iDrive
iDrive, for operating principle refer to page16.1.Press the button once or twice until
the start menu appears.
2.Press the controller to open the menu.
3.Turn the controller until "Settings" is
selected and press the controller.
4.Turn the controller until "Time / Date" is
selected and press the controller.
Page 83 of 268
Controls
81Reference
At a glance
Driving tips
Communications
Navigation
Entertainment
Mobility
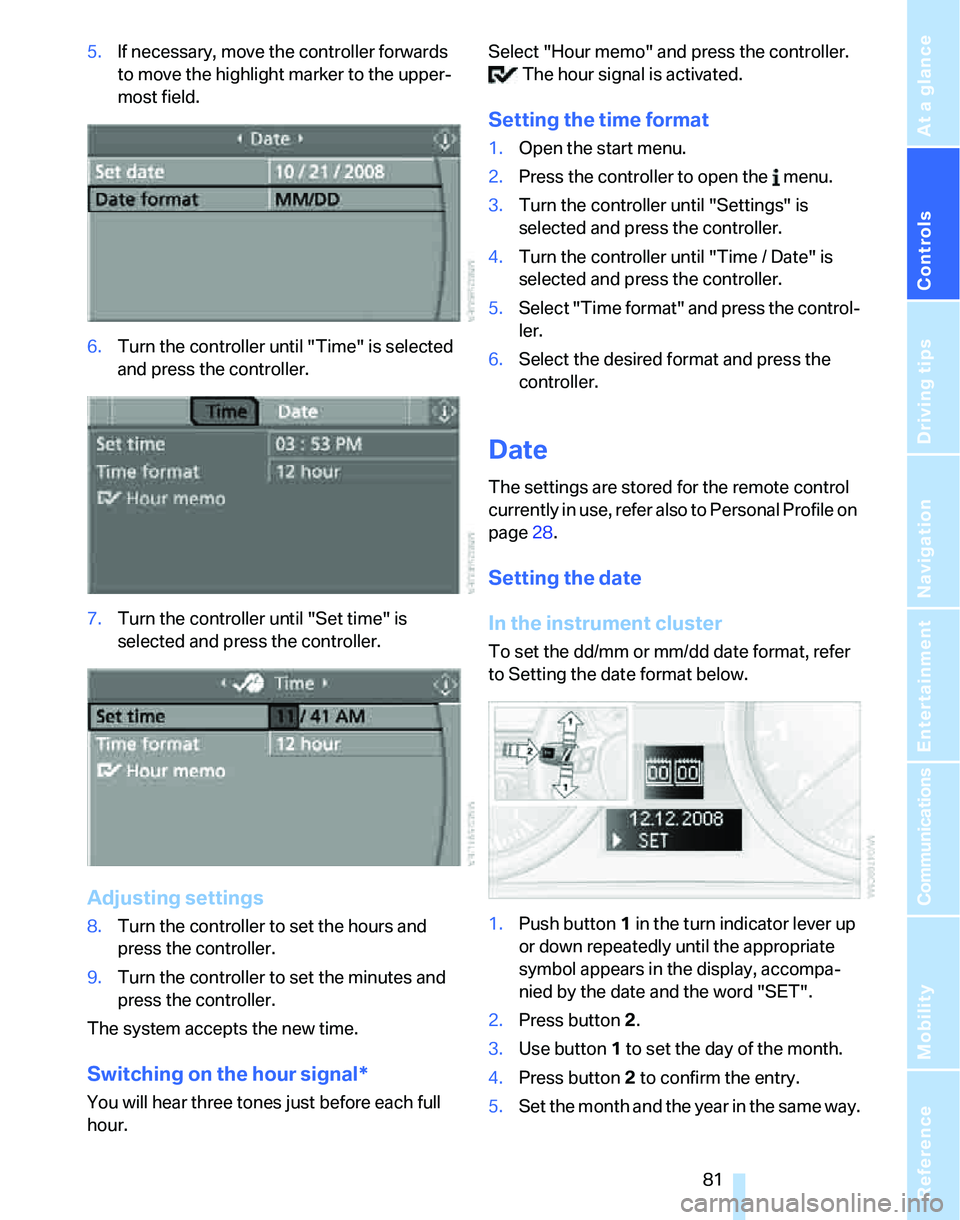
5.If necessary, move the controller forwards
to move the highlight marker to the upper-
most field.
6.Turn the controller until "Time" is selected
and press the controller.
7.Turn the controller until "Set time" is
selected and press the controller.
Adjusting settings
8.Turn the controller to set the hours and
press the controller.
9.Turn the controller to set the minutes and
press the controller.
The system accepts the new time.
Switching on the hour signal*
You will hear three tones just before each full
hour.Select "Hour memo" and press the controller.
The hour signal is activated.
Setting the time format
1.Open the start menu.
2.Press the controller to open the menu.
3.Turn the controller until "Settings" is
selected and press the controller.
4.Turn the controller until "Time / Date" is
selected and press the controller.
5.Select "Time format" and press the control-
ler.
6.Select the desired format and press the
controller.
Date
The settings are stored for the remote control
currently in use, refer also to Personal Profile on
page28.
Setting the date
In the instrument cluster
To set the dd/mm or mm/dd date format, refer
to Setting the date format below.
1.Push button 1 in the turn indicator lever up
or down repeatedly until the appropriate
symbol appears in the display, accompa-
nied by the date and the word "SET".
2.Press button 2.
3.Use button 1 to set the day of the month.
4.Press button 2 to confirm the entry.
5.Set the month and the year in the same way.
Page 87 of 268
Controls
85Reference
At a glance
Driving tips
Communications
Navigation
Entertainment
Mobility
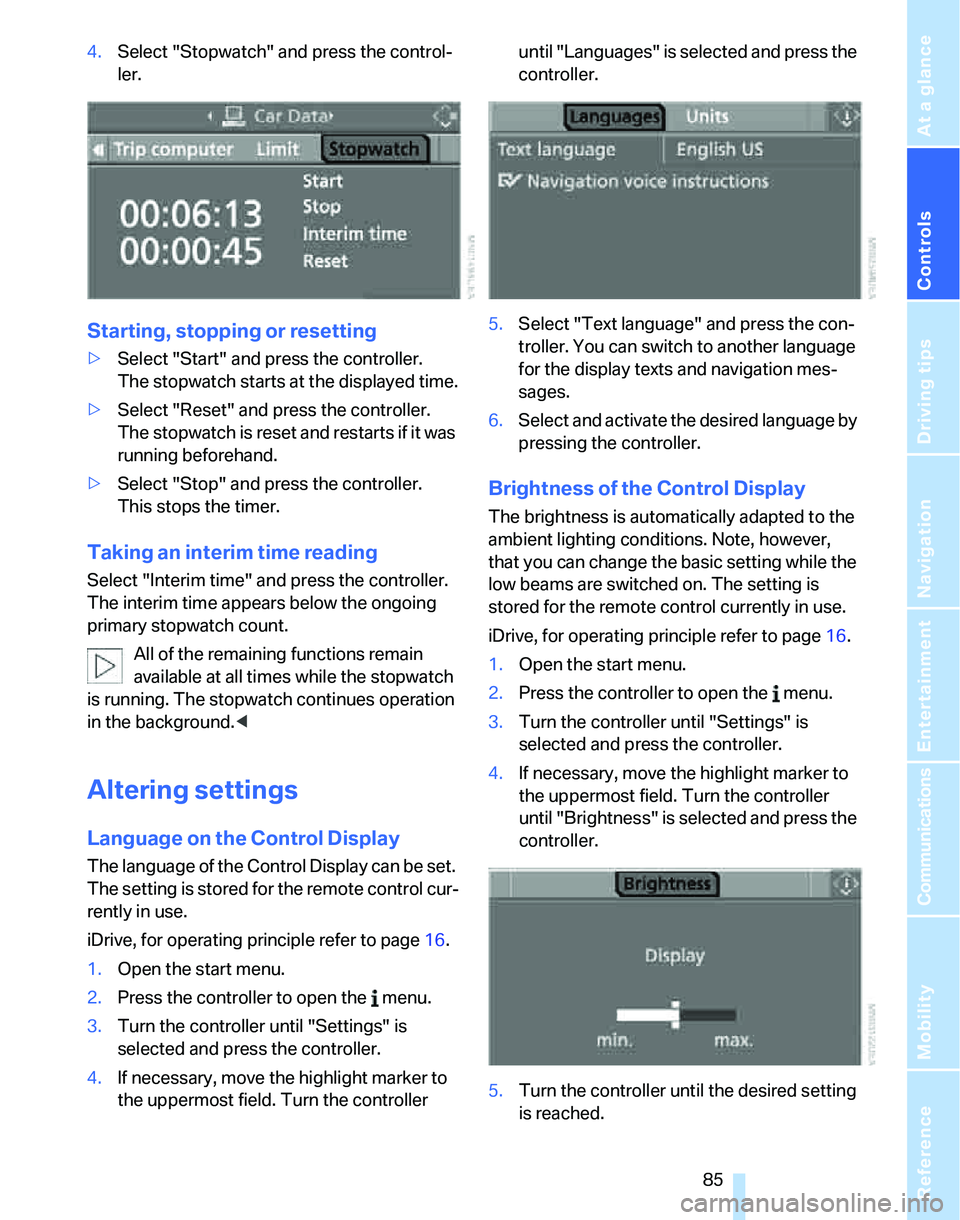
4.Select "Stopwatch" and press the control-
ler.
Starting, stopping or resetting
>Select "Start" and press the controller.
The stopwatch starts at the displayed time.
>Select "Reset" and press the controller.
The stopwatch is reset and restarts if it was
running beforehand.
>Select "Stop" and press the controller.
This stops the timer.
Taking an interim time reading
Select "Interim time" and press the controller.
The interim time appears below the ongoing
primary stopwatch count.
All of the remaining functions remain
available at all times while the stopwatch
is running. The stopwatch continues operation
in the background.<
Altering settings
Language on the Control Display
The language of the Control Display can be set.
The setting is stored for the remote control cur-
rently in use.
iDrive, for operating principle refer to page16.
1.Open the start menu.
2.Press the controller to open the menu.
3.Turn the controller until "Settings" is
selected and press the controller.
4.If necessary, move the highlight marker to
the uppermost field. Turn the controller until "Languages" is selected and press the
controller.
5.Select "Text language" and press the con-
troller. You can switch to another language
for the display texts and navigation mes-
sages.
6.Select and activate the desired language by
pressing the controller.
Brightness of the Control Display
The brightness is automatically adapted to the
ambient lighting conditions. Note, however,
that you can change the basic setting while the
low beams are switched on. The setting is
stored for the remote control currently in use.
iDrive, for operating principle refer to page16.
1.Open the start menu.
2.Press the controller to open the menu.
3.Turn the controller until "Settings" is
selected and press the controller.
4.If necessary, move the highlight marker to
the uppermost field. Turn the controller
until "Brightness" is selected and press the
controller.
5.Turn the controller until the desired setting
is reached.
Page 88 of 268

Technology for driving comfort and safety
86
Technology for driving comfort and safety
PDC Park Distance Control*
The concept
The PDC assists you with maneuvering in tight
parking spaces. Acoustic signals and a visual
indicator
warn you of the presence of an object
behind your vehicle. To measure the distance,
there are four ultrasonic sensors in either
bumper.
These sensors have a range of approx. 6.5 ft/
2 m. However, an acoustic warning does not
sound until an object is approx. 24 in/60 cm
from the corner sensors, or approx. 5 ft/1.50 m
from the center sensors.
PDC is a parking aid that can indicate
objects when they are approached
slowly, as is usually the case when parking.
Avoid approaching an object at high speed, oth-
erwise physical circumstances may lead to the
system warning being issued too late.<
Switching on automatically
With the engine running or the ignition switched
on, the system is activated automatically after
approx. 1 second when you engage reverse
gear or move the automatic transmission selec-
tor lever to position R. Wait this short period
before driving.
Signal tones
When nearing an object, its position is indicated
correspondingly by an interval tone. As the dis-
tance between vehicle and object decreases,
the intervals between the tones become
shorter. If the distance to the nearest object
falls to below roughly 1 ft/30 cm, then a contin-
uous tone sounds.
An interval tone is interrupted after approx.
3seconds
>if you remain in front of an object that has
been detected by only one of the corner
sensors
>if you are driving parallel to a wall.
Malfunction
The indicator lamp in the instrument
cluster comes on. PDC is malfunc-
tioning. A message appears on the
Control Display. Have the system checked.
To avoid this problem, keep the sensors clean
and free of ice or snow in order to ensure that
they will continue to operate effectively. When
using a high-pressure cleaner, do not spray the
sensors for extended periods of time and only
from a distance of at least 4 in/10 cm.
PDC with visual warning
You can also have the system show distances
to objects on the Control Display. The contours
of distant objects are shown on the Control Dis-
play even before the acoustic signal sounds.
The setting is stored for the remote control cur-
rently in use.
iDrive, for operating principle refer to page16.
1.Open the start menu.
2.Press the controller to open the menu.
3.Select "Settings" and press the controller.
4.Select "Vehicle / Tires" and press the con-
troller.
5.If necessary, move the highlight marker to
the uppermost field. Turn the controller
Page 104 of 268
Climate
102
Automatic climate control
Comfortable interior climate
AUTO program7 offers the ideal air distribution
and air flow rate for almost all conditions, refer
to AUTO program below. All you need to do is
select an interior temperature which is comfort-
able for you.
The following sections inform you in detail
about how to adjust the settings.
Most settings are stored for the remote control
currently in use, refer also to Personal Profile
settings on page28.
Adjusting air distribution manually
The air distribution can be
switched on and off manually. The
air is directed to the windshield, to
the upper body area and to the
footwell. Automatic air distribution adjustment
is deactivated.
You can switch the automatic air distribution
back on by pressing the AUTO button. This
automatically switches on the cooling function
as well.
Fine adjustments to manual air
distribution
You can set the rate of incoming airflow for
manual air distribution.
iDrive, for operating principle refer to page16.
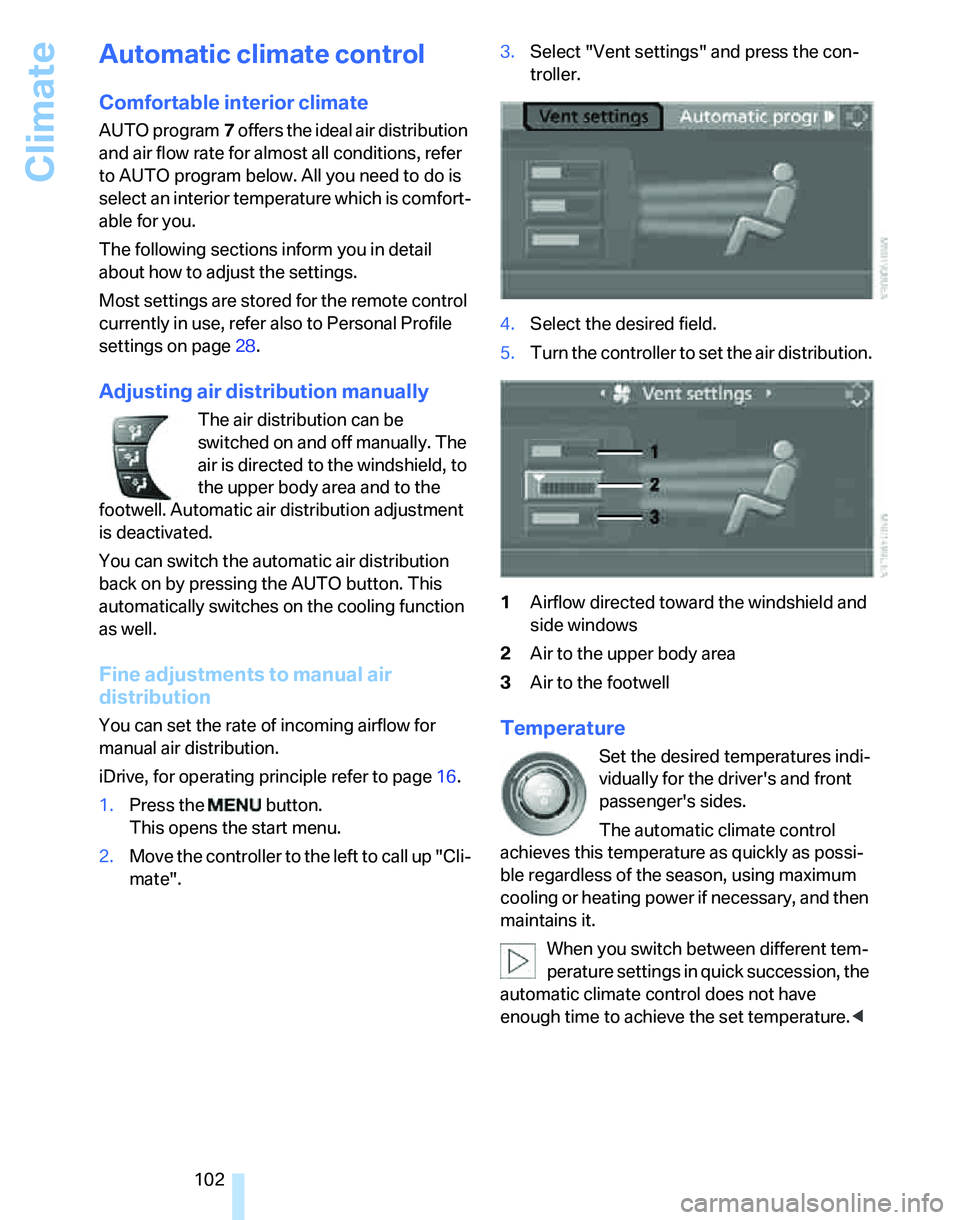
1.Press the button.
This opens the start menu.
2.Move the controller to the left to call up "Cli-
mate".3.Select "Vent settings" and press the con-
troller.
4.Select the desired field.
5.Turn the controller to set the air distribution.
1Airflow directed toward the windshield and
side windows
2Air to the upper body area
3Air to the footwellTemperature
Set the desired temperatures indi-
vidually for the driver's and front
passenger's sides.
The automatic climate control
achieves this temperature as quickly as possi-
ble regardless of the season, using maximum
cooling or heating power if necessary, and then
maintains it.
When you switch between different tem-
perature settings in quick succession, the
automatic climate control does not have
enough time to achieve the set temperature.<
Page 109 of 268
Controls
107Reference
At a glance
Driving tips
Communications
Navigation
Entertainment
Mobility
Practical interior accessories
Integrated universal remote
control*
The concept
The integrated universal remote control can
replace as many as three hand-held transmit-
ters for various remote-controlled devices,
such as door openers and house alarm sys-
tems. The integrated universal remote control
registers and stores signals from the original
hand-held transmitters.
The signal of an original hand-held transmitter
can be programmed on one of the three mem-
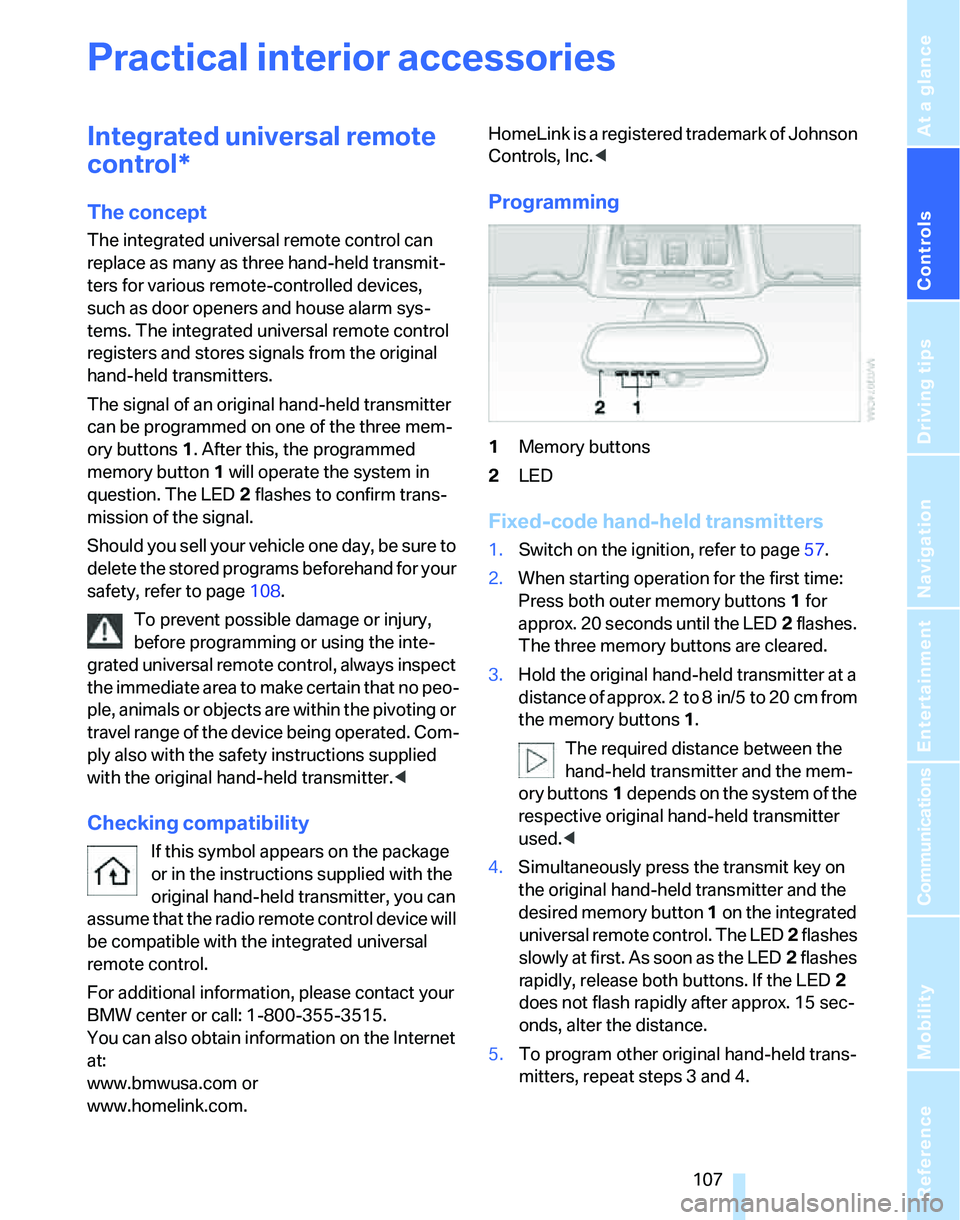
ory buttons1. After this, the programmed
memory button1 will operate the system in
question. The LED2 flashes to confirm trans-
mission of the signal.
Should you sell your vehicle one day, be sure to
delete the stored programs beforehand for your
safety, refer to page108.
To prevent possible damage or injury,
before programming or using the inte-
grated universal remote control, always inspect
the immediate area to make certain that no peo-
ple, animals or objects are within the pivoting or
travel range of the device being operated. Com-
ply also with the safety instructions supplied
with the original hand-held transmitter.<
Checking compatibility
If this symbol appears on the package
or in the instructions supplied with the
original hand-held transmitter, you can
assume that the radio remote control device will
be compatible with the integrated universal
remote control.
For additional information, please contact your
BMW center or call: 1-800-355-3515.
You can also obtain information on the Internet
at:
www.bmwusa.com or
www.homelink.com. HomeLink is a registered trademark of Johnson
Controls, Inc.<
Programming
1Memory buttons
2LED
Fixed-code hand-held transmitters
1.Switch on the ignition, refer to page57.
2.When starting operation for the first time:
Press both outer memory buttons1 for
approx. 20 seconds until the LED2 flashes.
The three memory buttons are cleared.
3.Hold the original hand-held transmitter at a
distance of approx. 2to 8in/5to 20cm from
the memory buttons1.
The required distance between the
hand-held transmitter and the mem-
ory buttons1 depends on the system of the
respective original hand-held transmitter
used.<
4.Simultaneously press the transmit key on
the original hand-held transmitter and the
desired memory button 1 on the integrated
universal remote control. The LED 2 flashes
slowly at first. As soon as the LED2 flashes
rapidly, release both buttons. If the LED2
does not flash rapidly after approx. 15 sec-
onds, alter the distance.
5.To program other original hand-held trans-
mitters, repeat steps 3 and 4.
Page 149 of 268
Navigation
Driving tips
147Reference
At a glance
Controls
Communications
Entertainment
Mobility
>Repeat the voice instruction:
Press the button.
>Switch voice instructions on/off:
Press the button for a longer period.
Adjusting volume of voice instructions
The volume can be adjusted only while a voice
instruction is being issued.
1.Have the last voice instruction repeated, if
necessary.
2.Turn the button during the voice instruction
to select the desired volume.
This volume is independent of the volume of the
audio sources.
The setting is stored for the remote control cur-
rently in use.
Changing a route
During destination guidance, you can revise the
navigation system's route recommendations to
avoid particular stretches of road. Enter the
number of miles/kilometers that you want to
travel before returning to the original route.1.Select "Navigation" and press the control-
ler.
2.Move the highlight marker to the third field
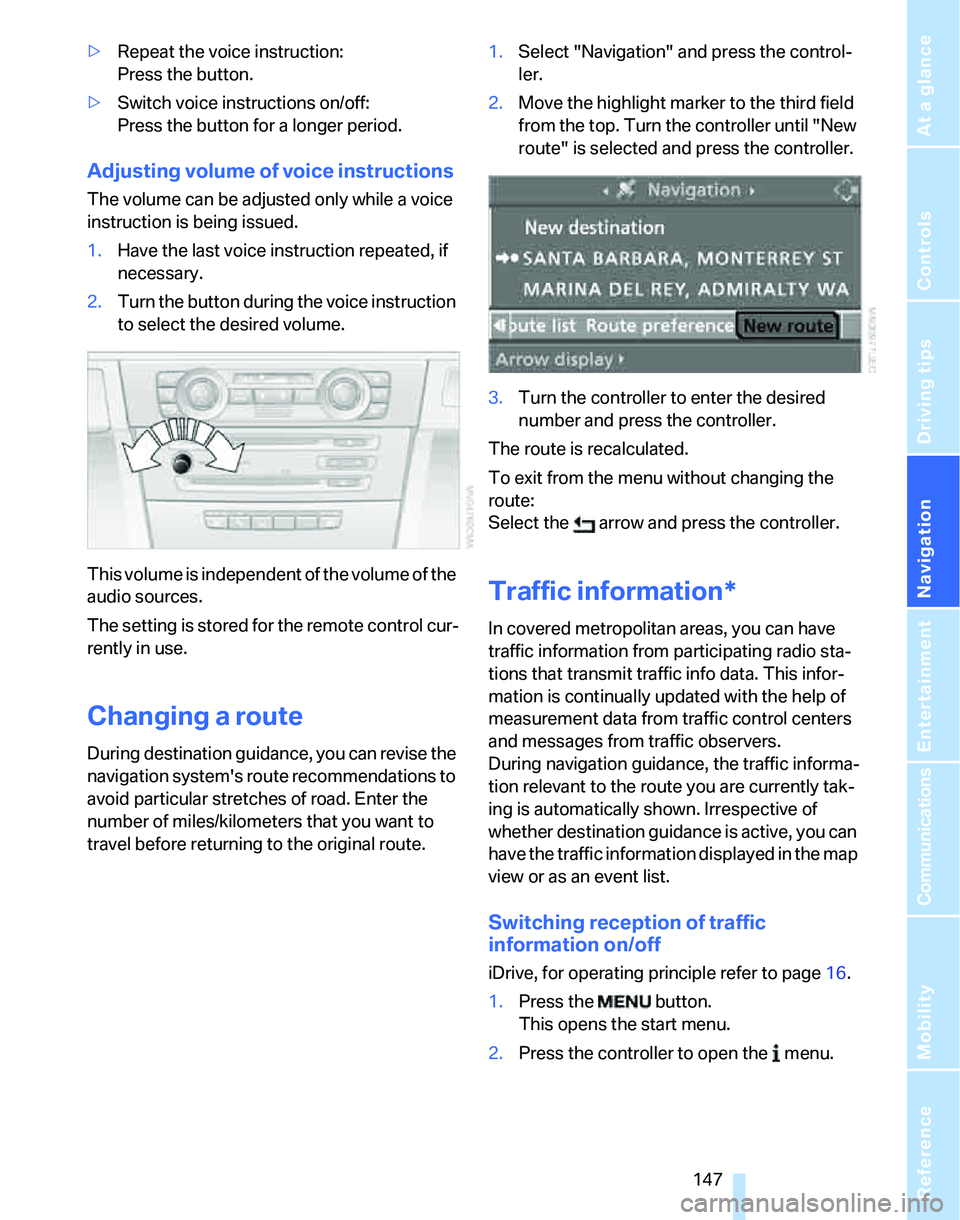
from the top. Turn the controller until "New
route" is selected and press the controller.
3.Turn the controller to enter the desired
number and press the controller.
The route is recalculated.
To exit from the menu without changing the
route:
Select the arrow and press the controller.
Traffic information*
In covered metropolitan areas, you can have
traffic information from participating radio sta-
tions that transmit traffic info data. This infor-
mation is continually updated with the help of
measurement data from traffic control centers
and messages from traffic observers.
During navigation guidance, the traffic informa-
tion relevant to the route you are currently tak-
ing is automatically shown. Irrespective of
whether destination guidance is active, you can
have the traffic information displayed in the map
view or as an event list.
Switching reception of traffic
information on/off
iDrive, for operating principle refer to page16.
1.Press the button.
This opens the start menu.
2.Press the controller to open the menu.
Page 158 of 268
On/off and settings
156
On/off and settings
The following audio sources have shared con-
trols and setting options:
>Radio
>CD player
>CD changer
*
Controls
The audio sources can be operated using:
>Buttons near the CD player
>iDrive
>Buttons
on the steering wheel, refer to
page11
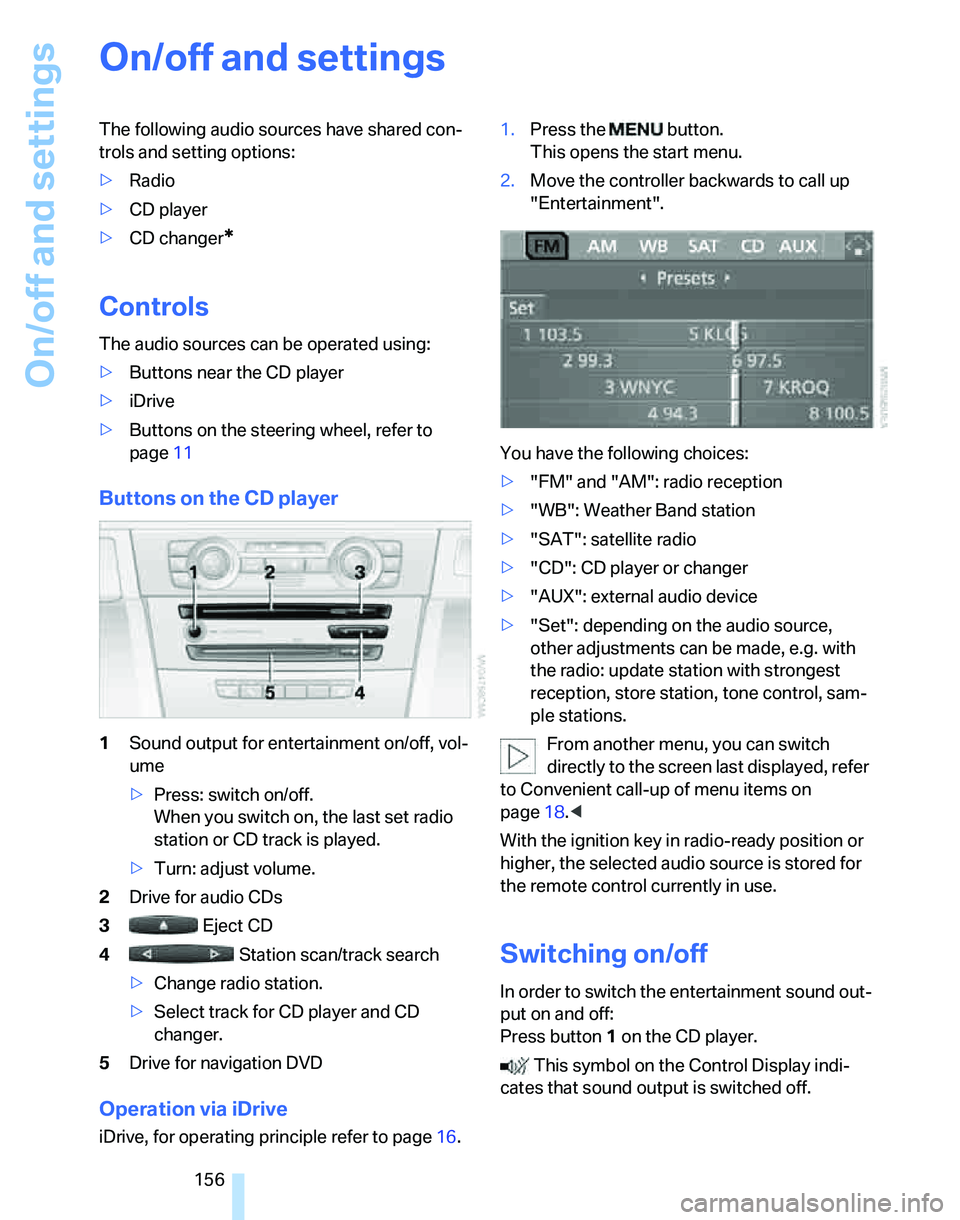
Buttons on the CD player
1Sound output for entertainment on/off, vol-
ume
>Press: switch on/off.
When you switch on, the last set radio
station or CD track is played.
>Turn: adjust volume.
2Drive for audio CDs
3 Eject CD
4 Station scan/track search
>Change radio station.
>Select track for CD player and CD
changer.
5Drive for navigation DVD
Operation via iDrive
iDrive, for operating principle refer to page16.1.Press the button.
This opens the start menu.
2.Move the controller backwards to call up
"Entertainment".
You have the following choices:
>"FM" and "AM": radio reception
>"WB": Weather Band station
>"SAT": satellite radio
>"CD": CD player or changer
>"AUX": external audio device
>"Set": depending on the audio source,
other adjustments can be made, e.g. with
the radio: update station with strongest
reception, store station, tone control, sam-
ple stations.
From another menu, you can switch
directly to the screen last displayed, refer
to Convenient call-up of menu items on
page18.<
With the ignition key in radio-ready position or
higher, the selected audio source is stored for
the remote control currently in use.
Switching on/off
In order to switch the entertainment sound out-
put on and off:
Press button1 on the CD player.
This symbol on the Control Display indi-
cates that sound output is switched off.