2007 BMW 328XI SEDAN belt
[x] Cancel search: beltPage 98 of 268

Technology for driving comfort and safety
96 The front and side airbags can also be deacti-
vated by adolescents and adults sitting in cer-
tain positions; the indicator lamp for the front
passenger airbags comes on. In such cases, the
passenger should change his or her sitting
position so that the front passenger airbags are
activated and the indicator lamp goes out. If the
desired airbag status cannot be achieved by
changing the sitting position, transport the rele-
vant passenger on a rear seat. Do not attach
seat covers, seat cushion padding, ball mats or
other items to the front passenger seat unless
they are specifically recommended by BMW.
Do not place any items under the seat which
could press against the seat from below. Other-
wise a correct analysis of the seat cushion is not
ensured.<
Status of front passenger airbags
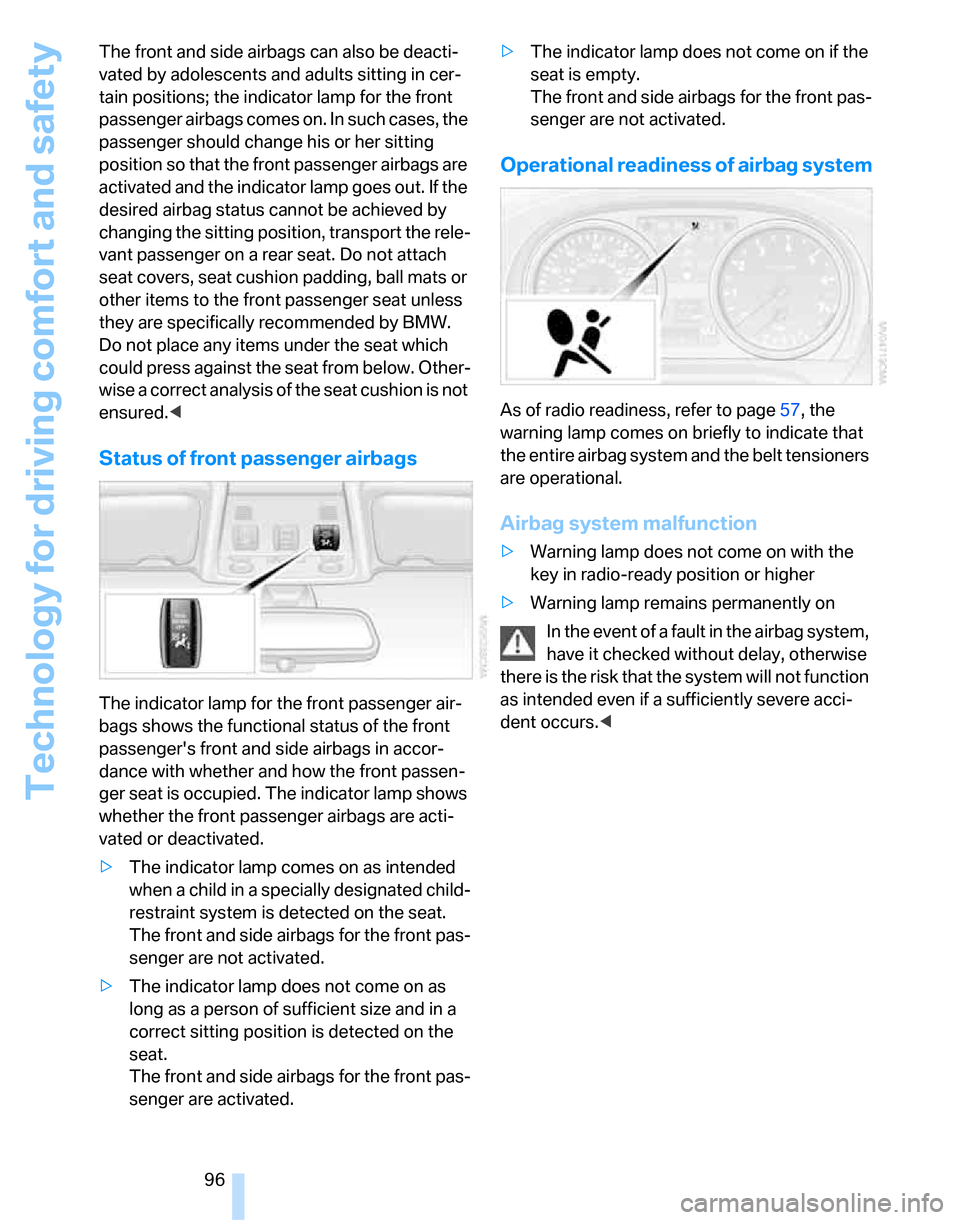
The indicator lamp for the front passenger air-
bags shows the functional status of the front
passenger's front and side airbags in accor-
dance with whether and how the front passen-
ger seat is occupied. The indicator lamp shows
whether the front passenger airbags are acti-
vated or deactivated.
>The indicator lamp comes on as intended
when a child in a specially designated child-
restraint system is detected on the seat.
The front and side airbags for the front pas-
senger are not activated.
>The indicator lamp does not come on as
long as a person of sufficient size and in a
correct sitting position is detected on the
seat.
The front and side airbags for the front pas-
senger are activated.>The indicator lamp does not come on if the
seat is empty.
The front and side airbags for the front pas-
senger are not activated.
Operational readiness of airbag system
As of radio readiness, refer to page57, the
warning lamp comes on briefly to indicate that
the entire airbag system and the belt tensioners
are operational.
Airbag system malfunction
>Warning lamp does not come on with the
key in radio-ready position or higher
>Warning lamp remains permanently on
In the event of a fault in the airbag system,
have it checked without delay, otherwise
there is the risk that the system will not function
as intended even if a sufficiently severe acci-
dent occurs.<
Page 115 of 268

Controls
113Reference
At a glance
Driving tips
Communications
Navigation
Entertainment
Mobility
Sockets in the rear center console*
Remove corresponding cover.
Socket in the cargo bay*
Sedan
Sports Wagon
Open the cap.
Sedan:
Through-loading system*
Opening
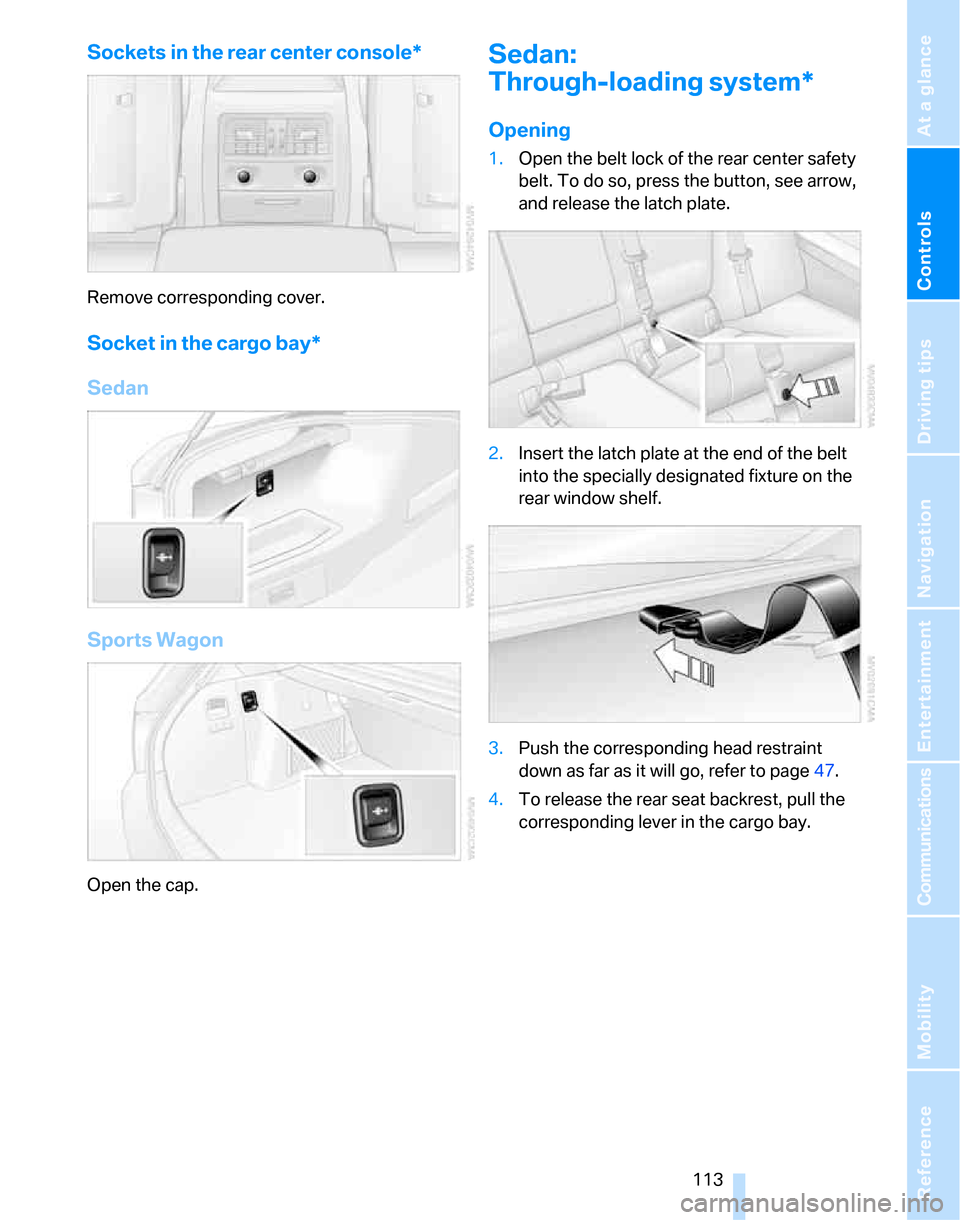
1.Open the belt lock of the rear center safety
belt. To do so, press the button, see arrow,
and release the latch plate.
2.Insert the latch plate at the end of the belt
into the specially designated fixture on the
rear window shelf.
3.Push the corresponding head restraint
down as far as it will go, refer to page47.
4.To release the rear seat backrest, pull the
corresponding lever in the cargo bay.
Page 116 of 268

Practical interior accessories
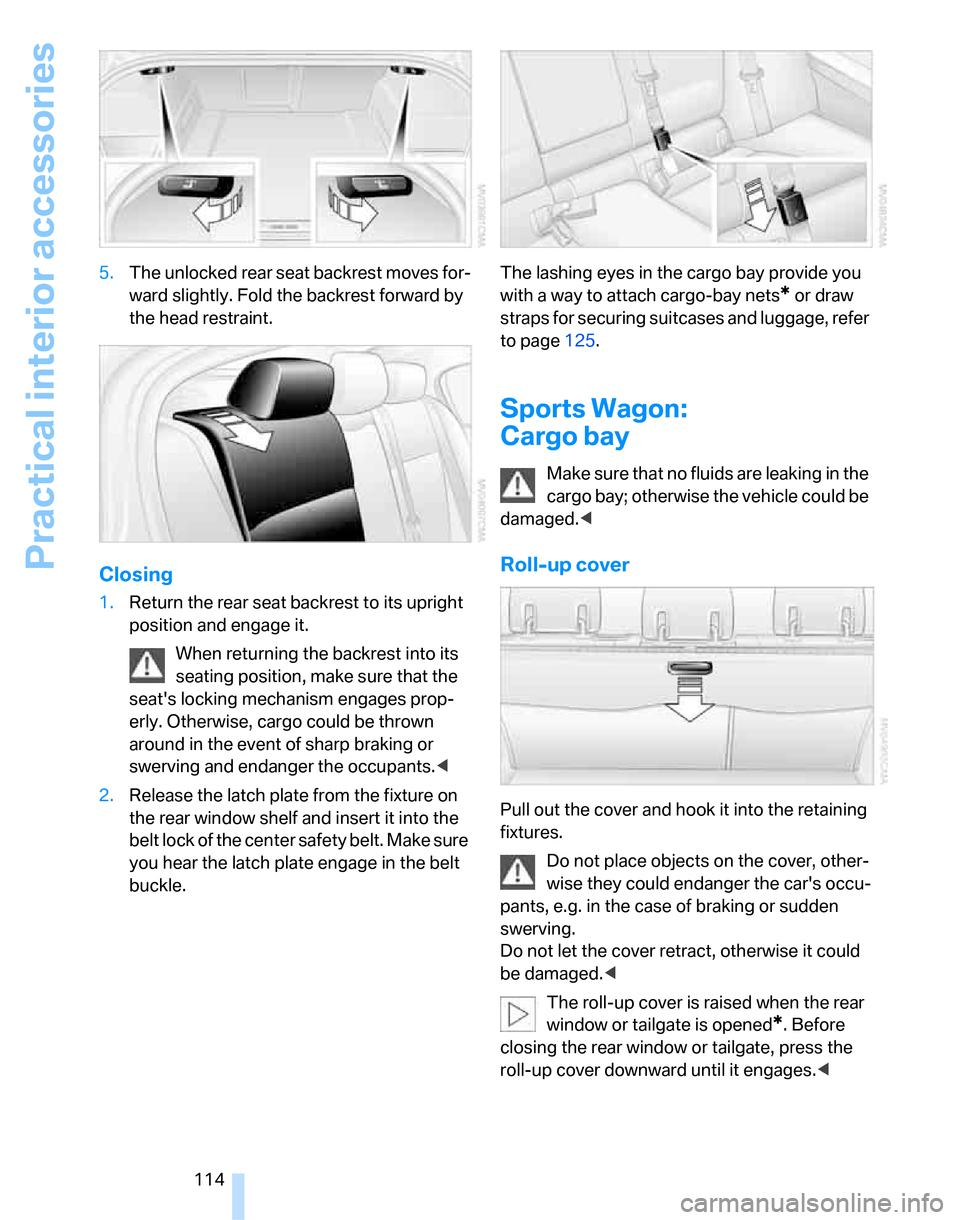
114 5.The unlocked rear seat backrest moves for-
ward slightly. Fold the backrest forward by
the head restraint.
Closing
1.Return the rear seat backrest to its upright
position and engage it.
When returning the backrest into its
seating position, make sure that the
seat's locking mechanism engages prop-
erly. Otherwise, cargo could be thrown
around in the event of sharp braking or
swerving and endanger the occupants.<
2.Release the latch plate from the fixture on
the rear window shelf and insert it into the
belt lock of the center safety belt. Make sure
you hear the latch plate engage in the belt
buckle.The lashing eyes in the cargo bay provide you
with a way to attach cargo-bay nets
* or draw
straps for securing suitcases and luggage, refer
to page125.
Sports Wagon:
Cargo bay
Ma ke sure tha t no fluids are leaking in the
cargo bay; otherwise the vehicle could be
damaged.<
Roll-up cover
Pull out the cover and hook it into the retaining
fixtures.
Do not place objects on the cover, other-
wise they could endanger the car's occu-
pants, e.g. in the case of braking or sudden
swerving.
Do not let the cover retract, otherwise it could
be damaged.<
The roll-up cover is raised when the rear
window or tailgate is opened
*. Before
closing the rear window or tailgate, press the
roll-up cover downward until it engages.<
Page 117 of 268

Controls
115Reference
At a glance
Driving tips
Communications
Navigation
Entertainment
Mobility
Expanding the cargo bay
The rear seat backrest is divided. You can fold
down either division in order to expand the
cargo bay.
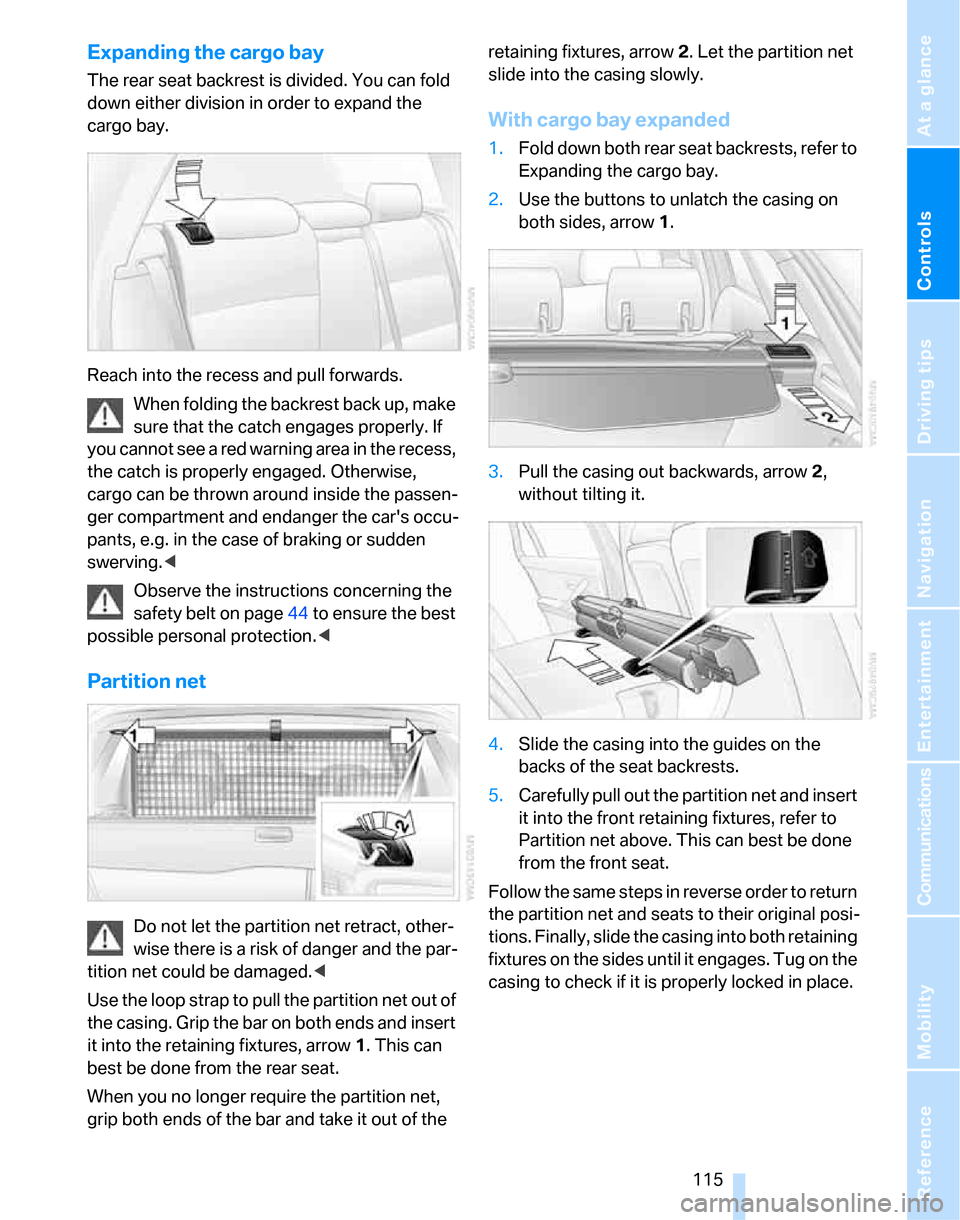
Reach into the recess and pull forwards.
When folding the backrest back up, make
sure that the catch engages properly. If
you cannot see a red warning area in the recess,
the catch is properly engaged. Otherwise,
cargo can be thrown around inside the passen-
ger compartment and endanger the car's occu-
pants, e.g. in the case of braking or sudden
swerving.<
Observe the instructions concerning the
safety belt on page44 to ensure the best
possible personal protection.<
Partition net
Do not let the partition net retract, other-
wise there is a risk of danger and the par-
tition net could be damaged.<
Use the loop strap to pull the partition net out of
the casing. Grip the bar on both ends and insert
it into the retaining fixtures, arrow 1. This can
best be done from the rear seat.
When you no longer require the partition net,
grip both ends of the bar and take it out of the retaining fixtures, arrow 2. Let the partition net
slide into the casing slowly.
With cargo bay expanded
1.Fold down both rear seat backrests, refer to
Expanding the cargo bay.
2.Use the buttons to unlatch the casing on
both sides, arrow 1.
3.Pull the casing out backwards, arrow 2,
without tilting it.
4.Slide the casing into the guides on the
backs of the seat backrests.
5.Carefully pull out the partition net and insert
it into the front retaining fixtures, refer to
Partition net above. This can best be done
from the front seat.
Follow the same steps in reverse order to return
the partition net and seats to their original posi-
tions. Finally, slide the casing into both retaining
fixtures on the sides until it engages. Tug on the
casing to check if it is properly locked in place.
Page 120 of 268

Practical interior accessories
118 The zip fastener makes objects in the ski
bag easier to reach.
4.Insert the latch plate of the ski bag's retain-
ing strap in the center belt buckle.
Only place clean skis in the ski bag. Wrap sharp
edges to prevent damage.
Securing cargo
After loading, secure the ski bag and its con-
tents. Tighten the retaining strap on the ten-
sioning buckle for this purpose.
Secure the ski bag in the manner
described, otherwise it could endanger
the car's occupants, e.g. in case of heavy brak-
ing or sudden swerving.<
To store the ski bag, perform the steps
described for loading in reverse order.
Removing the ski bag
The ski bag can be completely removed, e.g. for
faster drying or to allow you to use other inserts.1.Fold down the center panel in the rear seat
backrest.
2.Pull the handle, arrow1.
3.Pull out the insert, arrow 2.
For more information on the various
inserts available, contact your BMW cen-
ter.<
Page 127 of 268

Driving tips
125Reference
At a glance
Controls
Communications
Navigation
Entertainment
Mobility
Load
The permissible load is the total of the weight of
occupants and cargo/luggage. The greater the
weight of the occupants, the less cargo/lug-
gage can be transported.
Stowing cargo
>Position heavy objects as low and as far for-
ward as possible, ideally directly behind the
respective seat backrests.
>Cover sharp edges and corners.
>For very heavy cargo when the rear seat is
not occupied, secure each safety belt in the
opposite buckle.
Sedan
Sports Wagon
>Use the partition net to protect passengers,
refer to page115. Make sure that objects
cannot penetrate the partition net.
>Do not stack cargo higher than the upper
edge of the backrests.
>Place protective material around any
objects which could bump against the rear
window while the vehicle is in motion.
Securing cargo
>Secure smaller and lighter items using
retaining straps, a cargo-bay net
* or draw
straps
*.
>Heavy-duty cargo straps
* for securing
larger and heavier objects are available at
your BMW center. Four lashing eyes are
provided for attaching the cargo straps.
Two are located on the cargo-bay sidewalls
1, two more are on the rear cargo-bay panel
2.
Please comply with the information sup-
plied with the cargo straps.
Always position and secure the cargo as
described above, so that it cannot endan-
ger the car's occupants, for example if sudden
braking or swerves are necessary.
Never exceed either the approved gross vehicle
weight or either of the approved axle loads, refer
to page239, as excessive loads can pose a
safety hazard, and may also place you in viola-
tion of traffic safety laws.
Heavy or hard objects should not be carried
loose inside the car, since they could be thrown
around, for example as a result of heavy braking,
sudden swerves, etc., and endanger the occu-
pants.<
Page 212 of 268

Wheels and tires
210
Tire identification marks
Knowledge of the labeling on the side of the tire
makes it easier to identify and choose the right
tires.
Tire size
Speed code letter
Q = up to 100 mph or 160 km/h
T = up to 118 mph or 190 km/h
H = up to 131 mph or 210 km/h
V = up to 150 mph or 240 km/h
W = up to 167 mph or 270 km/h
Y = up to 186 mph or 300 km/h
Tire Identification Number
Tires with DOT codes meet the guidelines of
the US Department of Transport.
DOT code:
Tire age
The manufacturing date of tires is contained in
the tire coding: DOT … 3006 means that the
tire was manufactured in week 30 of 2006.
BMW recommends that you replace all tires
after 6 years at most, even if some tires may last
for 10 years.
Uniform Tire Quality Grading
Quality grades can be found where applicable
on the tire sidewall between tread shoulder and
maximum section width. For example:
Tread wear 200 Traction AA
Temperature A
DOT Quality Grades
Tread wear
Traction AA A B C
Temperature A B C
All passenger car tires must conform to
Federal Safety Requirements in addition
to these grades.<
Tread wear
The tread wear grade is a comparative rating
based on the wear rate of the tire when tested
under controlled conditions on a specified gov-
ernment test course. For example, a tire graded
150 would wear one and one-half (1γ) times as
well on the government course as a tire graded
100. The relative performance of tires depends
upon the actual conditions of their use, how-
ever, and may depart significantly from the
norm due to variations in driving habits, service
practices and differences in road characteris-
tics and climate.
Traction
The traction grades, from highest to lowest, are
AA, A, B, and C.
Those grades represent the tire's ability to stop
on wet pavement as measured under controlled
conditions on specified government test sur-
faces of asphalt and concrete. A tire marked C
may have poor traction performance.
The traction grade assigned to this tire is
based on straight-ahead braking traction
tests, and does not include acceleration, cor-
nering, hydroplaning, or peak traction charac-
teristics.< e.g.
Nominal width in mm
Aspect ratio in Ξ
Radial belt construction
Rim diameter in inches
Load rating,
not on ZR tires
Speed code letter, in
front of the R on ZR tires
225/45 R1791 V
e.g.
Manufacturer's code
for tire make
Tire size and
tire design
Tire ageDOT xxxx xxx 0705
Page 249 of 268

Reference 247
At a glance
Controls
Driving tips
Communications
Navigation
Entertainment
Mobility
Audio156
– controls156
– switching on/off156
– tone control157
– volume157
"Audio", refer to Tone
control157
Audio device, external111
"Auto. headlamps"98
Automatic
– air distribution103
– air flow rate103
– cruise control64,66
– headlamp control97
– service notification192
– storing of stations161
Automatic climate control101
– automatic air
distribution103
– settings via iDrive102
Automatic curb monitor50
"Automatic programs" with
automatic climate
control103
Automatic recirculated-air
control AUC103
Automatic station search161
Automatic transmission with
Steptronic59
– interlock59,60
– overriding selector lever
lock61
– shiftlock, refer to Changing
selector lever position60
– sport program60
– towing231
– tow-starting231
"Automatic ventilation"105
AUTO program for automatic
climate control103
"Autostore"
– on the radio162
"AUX"156,173
"AUX" for external audio
device173
AUX-IN
– port111
AUX-In, refer to External audio
device173Average fuel consumption74
– setting the units77
Average speed74
"Avoid ferries" in
navigation142
"Avoid highways" in
navigation141
Avoid highways in
navigation141
Avoiding unintentional
alarms36
"Avoid tollroads" in
navigation142
Axle loads, refer to
Weights239
"A - Z"182
B
Backrest contour, refer to
Lumbar support46
Backrests, refer to Seat
adjustment45
Backrest width adjustment46
Back seats
– refer to Rear seats47
Backup lamps
– replacing bulbs225,226
Backup lamps, refer to Tail
lamps224
Balance, tone control157
Band-aids, refer to First-aid
pouch229
Bar, refer to Towing
methods232
Bass, tone control157
Bass sounds, refer to Tone
control157
Bass sounds, refer to Treble
and bass157
Battery227
– charging227
– disposal38,227
– jump starting230
– remote control28
– temporary power failure227
Battery renewal
– remote control38
– remote control for vehicle38Being towed232
Belts, refer to Safety belts49
Belt tensioner, refer to Safety
belts49
Beverage holders, refer to
Cup holders111
Blower, refer to Air flow
rate103
Bluetooth, refer to separate
Owner's Manual
"BMW Assist"191,192,193
BMW Assist
– activating195
– Concierge service193
– contacting BMW Customer
Relations193
– Roadside Assistance191
– services offered190
– TeleService192
"BMW Contact"184
"BMW Contact
Numbers"184
BMW Homepage4
BMW Maintenance
System219
"BMW
Services"194
,195,196
BMW webpage4
Bottle holders, refer to Cup
holders111
Bracket for telephone or
mobile phone
– refer to Snap-in adapter in
the center armrest storage
compartment110
Brake assist, refer to Dynamic
Brake Control DBC87
Brake fluid, refer to Service
requirements77
Brake Force Display94
Brake lamps
– replacing bulbs225,226
– two-stage94
Brake pads122
– breaking in122
Brake rotors123
– brakes122
– breaking in122