2007 BMW 328XI navigation
[x] Cancel search: navigationPage 107 of 268
Controls
105Reference
At a glance
Driving tips
Communications
Navigation
Entertainment
Mobility
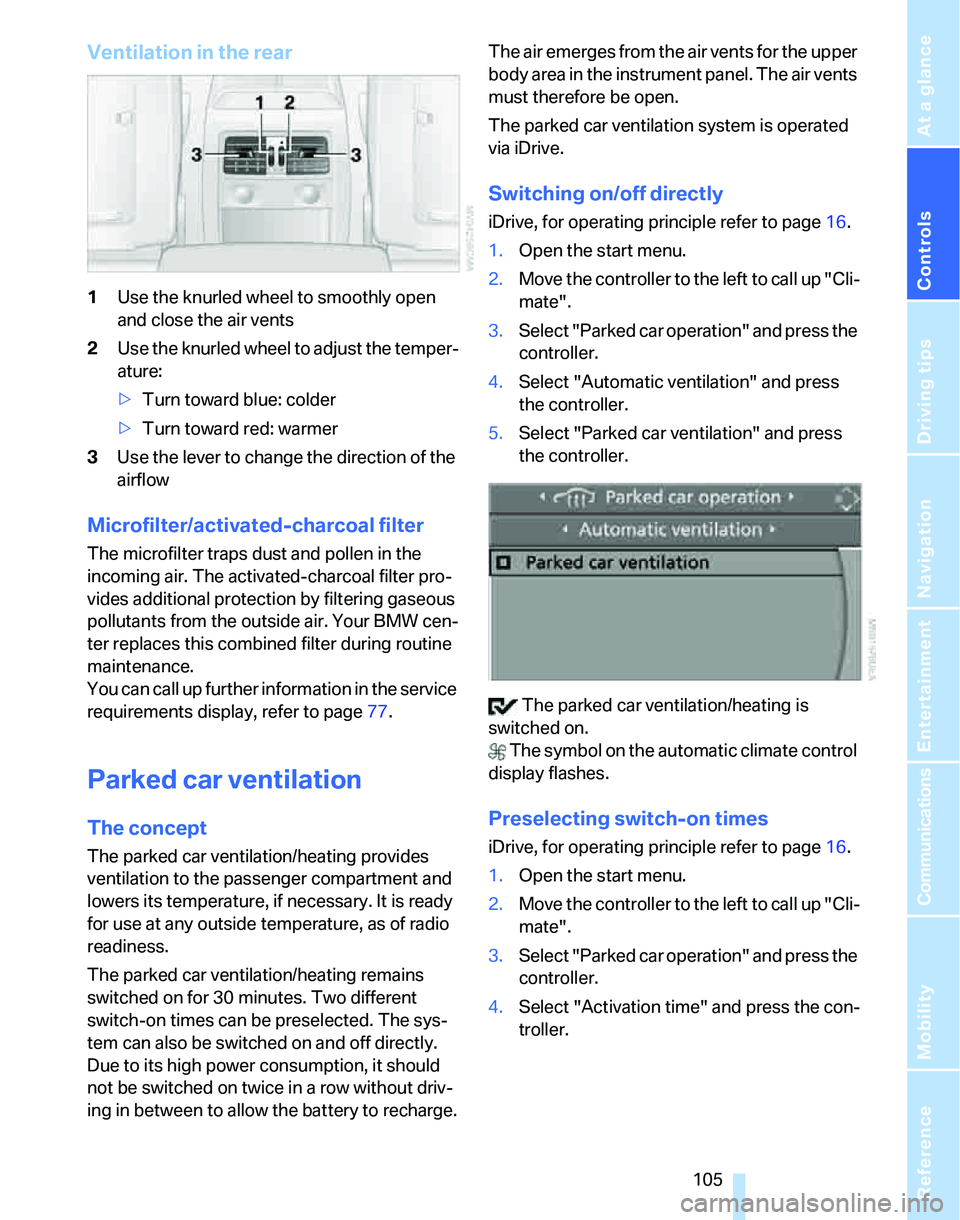
Ventilation in the rear
1Use the knurled wheel to smoothly open
and close the air vents
2Use the knurled wheel to adjust the temper-
ature:
>Turn toward blue: colder
>Turn toward red: warmer
3Use the lever to change the direction of the
airflow
Microfilter/activated-charcoal filter
The microfilter traps dust and pollen in the
incoming air. The activated-charcoal filter pro-
vides additional protection by filtering gaseous
pollutants from the outside air. Your BMW cen-
ter replaces this combined filter during routine
maintenance.
You can call up further information in the service
requirements display, refer to page77.
Parked car ventilation
The concept
The parked car ventilation/heating provides
ventilation to the passenger compartment and
lowers its temperature, if necessary. It is ready
for use at any outside temperature, as of radio
readiness.
The parked car ventilation/heating remains
switched on for 30 minutes. Two different
switch-on times can be preselected. The sys-
tem can also be switched on and off directly.
Due to its high power consumption, it should
not be switched on twice in a row without driv-
ing in between to allow the battery to recharge.The air emerges from the air vents for the upper
body area in the instrument panel. The air vents
must therefore be open.
The parked car ventilation system is operated
via iDrive.
Switching on/off directly
iDrive, for operating principle refer to page16.
1.Open the start menu.
2.Move the controller to the left to call up "Cli-
mate".
3.Select "Parked car operation" and press the
controller.
4.Select "Automatic ventilation" and press
the controller.
5.Select "Parked car ventilation" and press
the controller.
The parked car ventilation/heating is
switched on.
The symbol on the automatic climate control
display flashes.
Preselecting switch-on times
iDrive, for operating principle refer to page16.
1.Open the start menu.
2.Move the controller to the left to call up "Cli-
mate".
3.Select "Parked car operation" and press the
controller.
4.Select "Activation time" and press the con-
troller.
Page 109 of 268
Controls
107Reference
At a glance
Driving tips
Communications
Navigation
Entertainment
Mobility
Practical interior accessories
Integrated universal remote
control*
The concept
The integrated universal remote control can
replace as many as three hand-held transmit-
ters for various remote-controlled devices,
such as door openers and house alarm sys-
tems. The integrated universal remote control
registers and stores signals from the original
hand-held transmitters.
The signal of an original hand-held transmitter
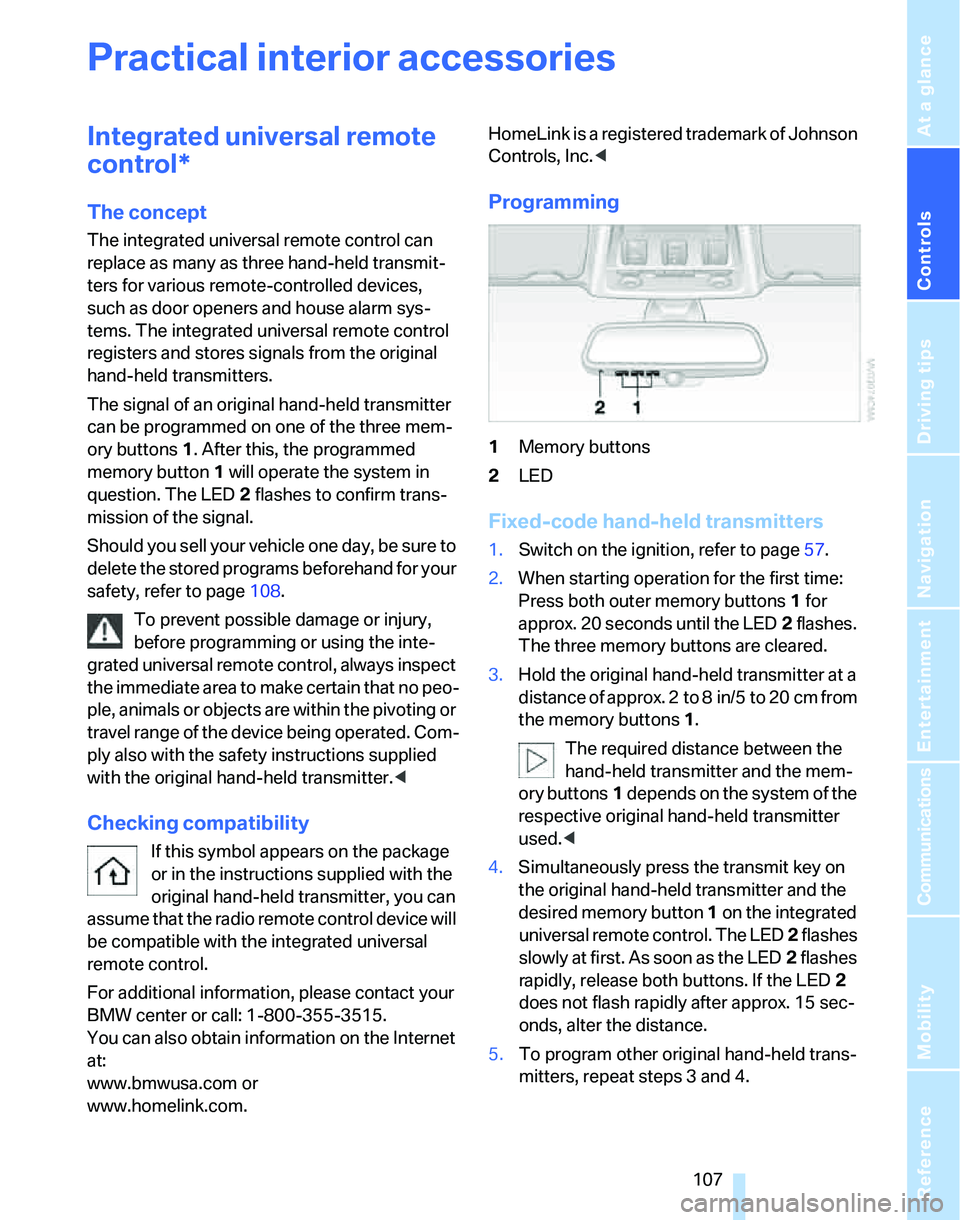
can be programmed on one of the three mem-
ory buttons1. After this, the programmed
memory button1 will operate the system in
question. The LED2 flashes to confirm trans-
mission of the signal.
Should you sell your vehicle one day, be sure to
delete the stored programs beforehand for your
safety, refer to page108.
To prevent possible damage or injury,
before programming or using the inte-
grated universal remote control, always inspect
the immediate area to make certain that no peo-
ple, animals or objects are within the pivoting or
travel range of the device being operated. Com-
ply also with the safety instructions supplied
with the original hand-held transmitter.<
Checking compatibility
If this symbol appears on the package
or in the instructions supplied with the
original hand-held transmitter, you can
assume that the radio remote control device will
be compatible with the integrated universal
remote control.
For additional information, please contact your
BMW center or call: 1-800-355-3515.
You can also obtain information on the Internet
at:
www.bmwusa.com or
www.homelink.com. HomeLink is a registered trademark of Johnson
Controls, Inc.<
Programming
1Memory buttons
2LED
Fixed-code hand-held transmitters
1.Switch on the ignition, refer to page57.
2.When starting operation for the first time:
Press both outer memory buttons1 for
approx. 20 seconds until the LED2 flashes.
The three memory buttons are cleared.
3.Hold the original hand-held transmitter at a
distance of approx. 2to 8in/5to 20cm from
the memory buttons1.
The required distance between the
hand-held transmitter and the mem-
ory buttons1 depends on the system of the
respective original hand-held transmitter
used.<
4.Simultaneously press the transmit key on
the original hand-held transmitter and the
desired memory button 1 on the integrated
universal remote control. The LED 2 flashes
slowly at first. As soon as the LED2 flashes
rapidly, release both buttons. If the LED2
does not flash rapidly after approx. 15 sec-
onds, alter the distance.
5.To program other original hand-held trans-
mitters, repeat steps 3 and 4.
Page 111 of 268
Controls
109Reference
At a glance
Driving tips
Communications
Navigation
Entertainment
Mobility
Setting compass zones
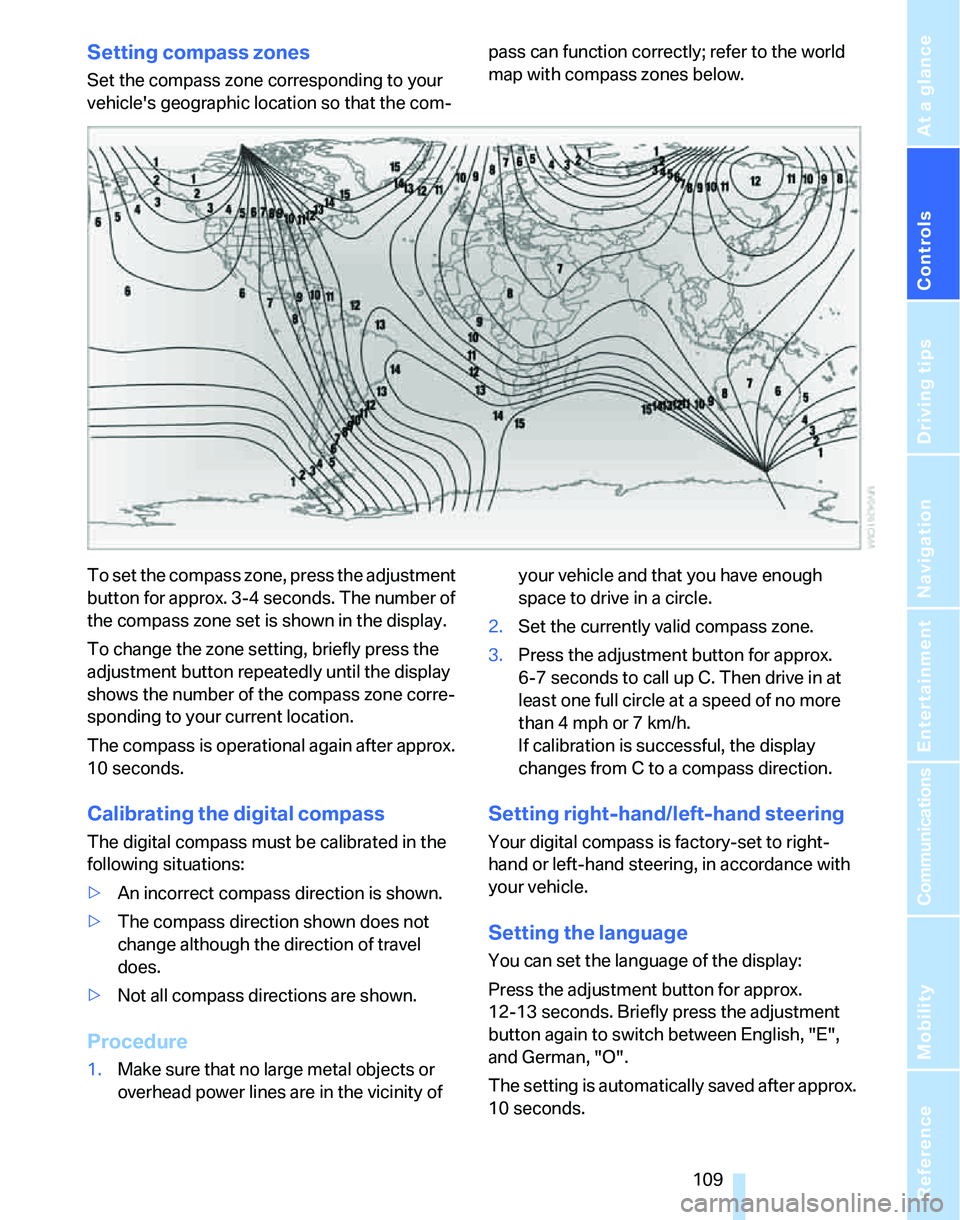
Set the compass zone corresponding to your
vehicle's geographic location so that the com-pass can function correctly; refer to the world
map with compass zones below.
To set the compass zone, press the adjustment
button for approx. 3-4 seconds. The number of
the compass zone set is shown in the display.
To change the zone setting, briefly press the
adjustment button repeatedly until the display
shows the number of the compass zone corre-
sponding to your current location.
The compass is operational again after approx.
10 seconds.
Calibrating the digital compass
The digital compass must be calibrated in the
following situations:
>An incorrect compass direction is shown.
>The compass direction shown does not
change although the direction of travel
does.
>Not all compass directions are shown.
Procedure
1.Make sure that no large metal objects or
overhead power lines are in the vicinity of your vehicle and that you have enough
space to drive in a circle.
2.Set the currently valid compass zone.
3.Press the adjustment button for approx.
6-7 seconds to call up C. Then drive in at
least one full circle at a speed of no more
than 4 mph or 7 km/h.
If calibration is successful, the display
changes from C to a compass direction.
Setting right-hand/left-hand steering
Your digital compass is factory-set to right-
hand or left-hand steering, in accordance with
your vehicle.
Setting the language
You can set the language of the display:
Press the adjustment button for approx.
12-13 seconds. Briefly press the adjustment
button again to switch between English, "E",
and German, "O".
The setting is automatically saved after approx.
10 seconds.
Page 113 of 268
Controls
111Reference
At a glance
Driving tips
Communications
Navigation
Entertainment
Mobility
Ventilated storage compartment
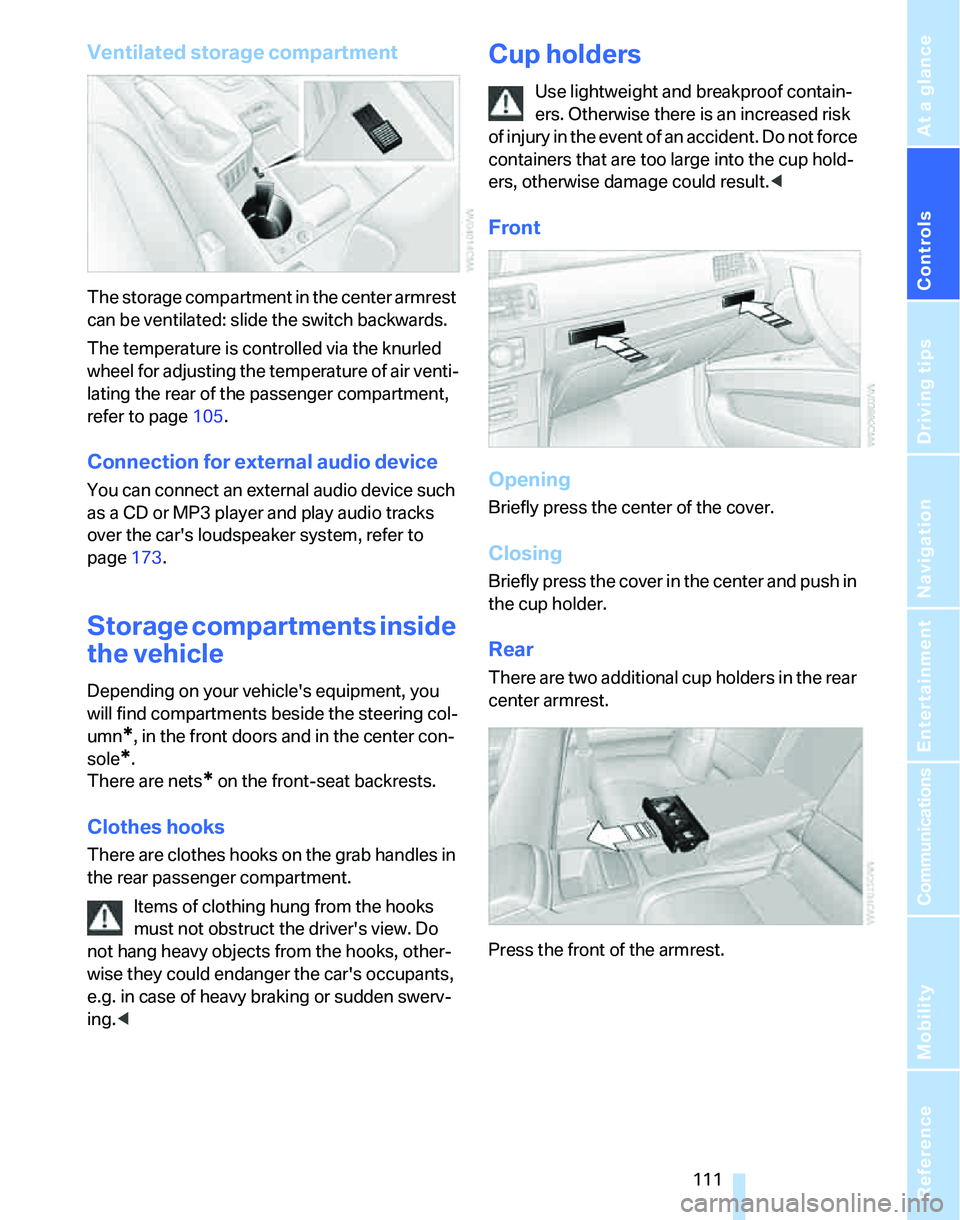
The storage compartment in the center armrest
can be ventilated: slide the switch backwards.
The temperature is controlled via the knurled
wheel for adjusting the temperature of air venti-
lating the rear of the passenger compartment,
refer to page105.
Connection for external audio device
You can connect an external audio device such
as a CD or MP3 player and play audio tracks
over the car's loudspeaker system, refer to
page173.
Storage compartments inside
the vehicle
Depending on your vehicle's equipment, you
will find compartments beside the steering col-
umn
*, in the front doors and in the center con-
sole
*.
There are nets
* on the front-seat backrests.
Clothes hooks
There are clothes hooks on the grab handles in
the rear passenger compartment.
Items of clothing hung from the hooks
must not obstruct the driver's view. Do
not hang heavy objects from the hooks, other-
wise they could endanger the car's occupants,
e.g. in case of heavy braking or sudden swerv-
ing.<
Cup holders
Use lightweight and breakproof contain-
ers. Otherwise there is an increased risk
of injury in the event of an accident. Do not force
containers that are too large into the cup hold-
ers, otherwise damage could result.<
Front
Opening
Briefly press the center of the cover.
Closing
Briefly press the cover in the center and push in
the cup holder.
Rear
There are two additional cup holders in the rear
center armrest.
Press the front of the armrest.
Page 115 of 268
Controls
113Reference
At a glance
Driving tips
Communications
Navigation
Entertainment
Mobility
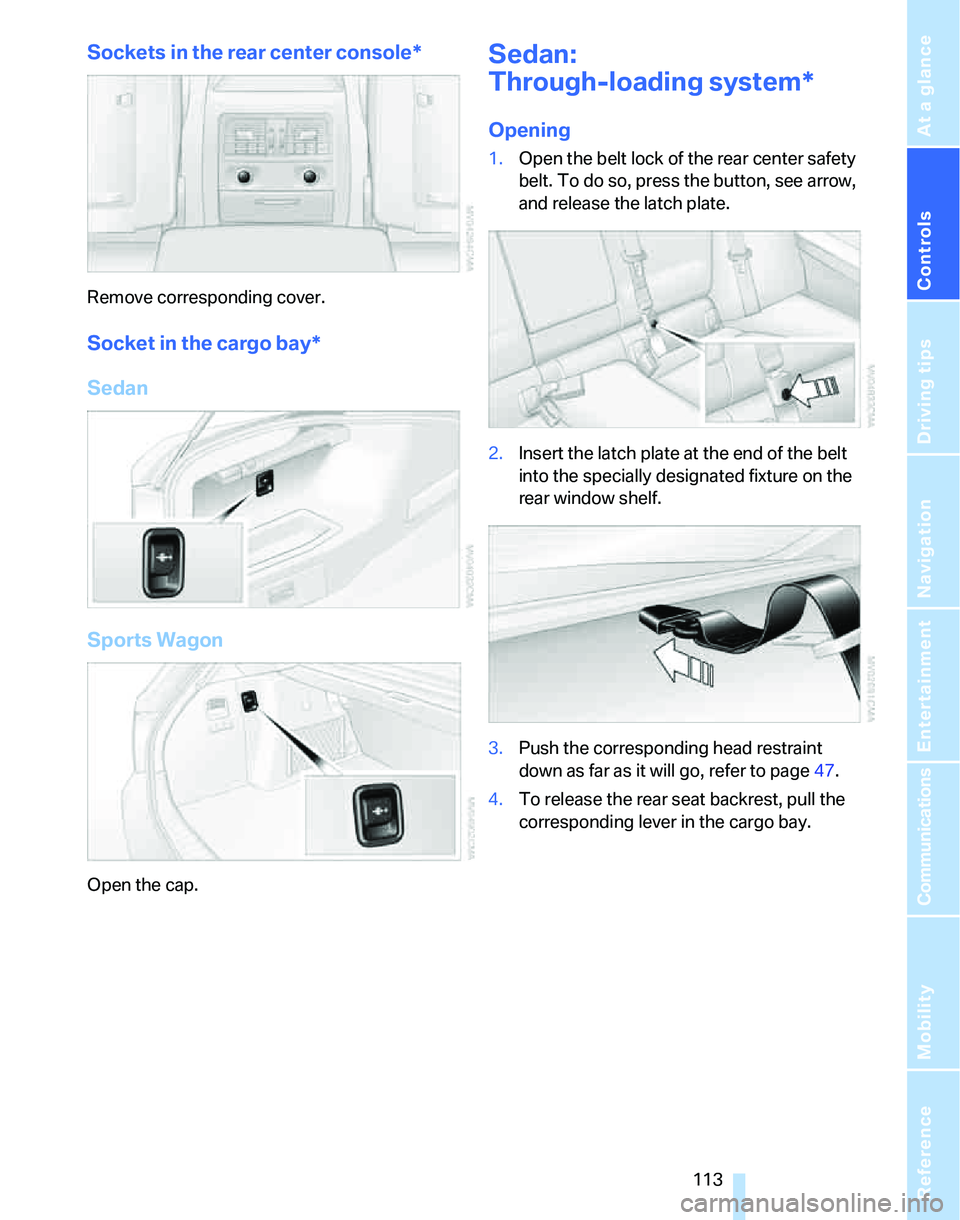
Sockets in the rear center console*
Remove corresponding cover.
Socket in the cargo bay*
Sedan
Sports Wagon
Open the cap.
Sedan:
Through-loading system*
Opening
1.Open the belt lock of the rear center safety
belt. To do so, press the button, see arrow,
and release the latch plate.
2.Insert the latch plate at the end of the belt
into the specially designated fixture on the
rear window shelf.
3.Push the corresponding head restraint
down as far as it will go, refer to page47.
4.To release the rear seat backrest, pull the
corresponding lever in the cargo bay.
Page 117 of 268
Controls
115Reference
At a glance
Driving tips
Communications
Navigation
Entertainment
Mobility
Expanding the cargo bay
The rear seat backrest is divided. You can fold
down either division in order to expand the
cargo bay.
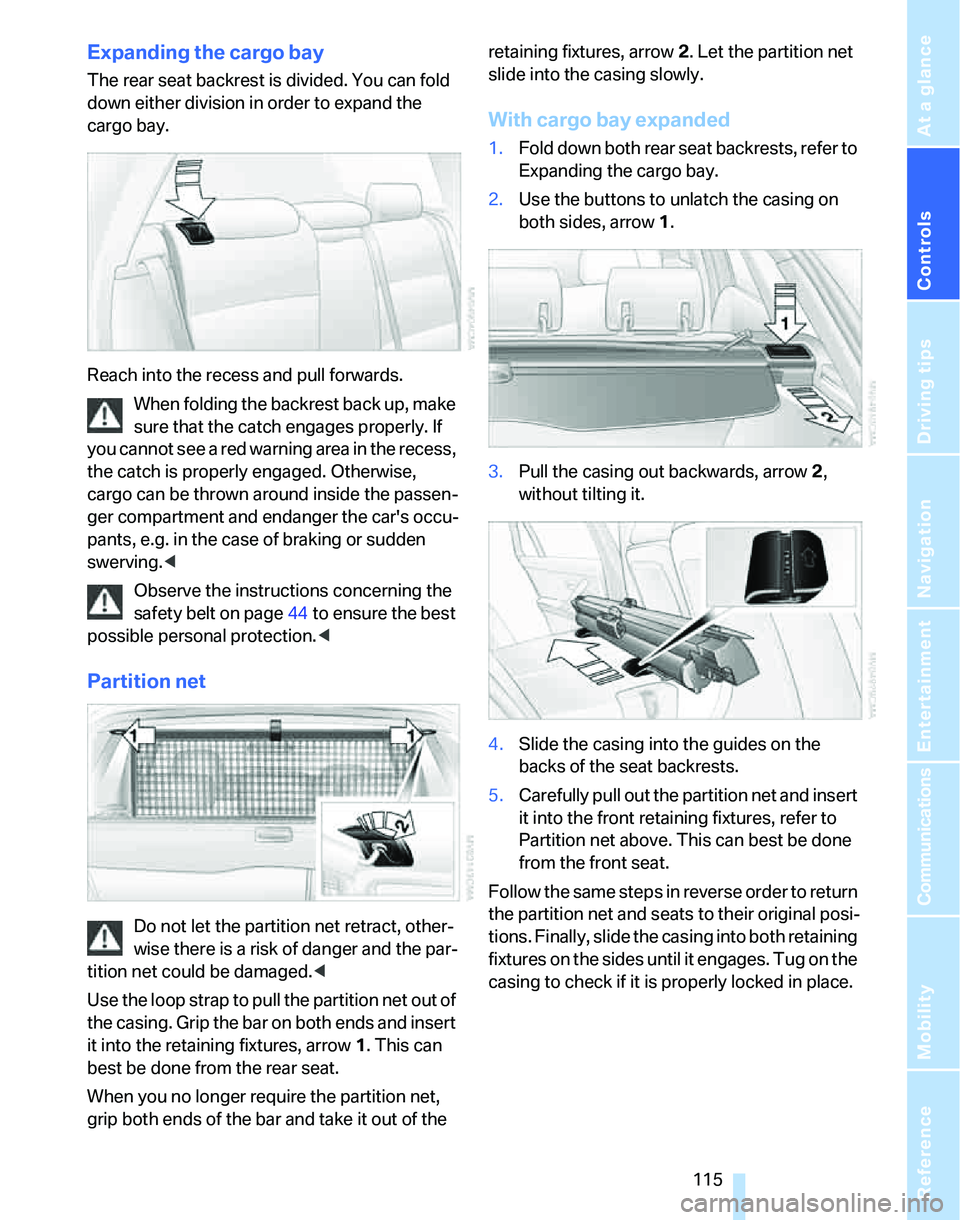
Reach into the recess and pull forwards.
When folding the backrest back up, make
sure that the catch engages properly. If
you cannot see a red warning area in the recess,
the catch is properly engaged. Otherwise,
cargo can be thrown around inside the passen-
ger compartment and endanger the car's occu-
pants, e.g. in the case of braking or sudden
swerving.<
Observe the instructions concerning the
safety belt on page44 to ensure the best
possible personal protection.<
Partition net
Do not let the partition net retract, other-
wise there is a risk of danger and the par-
tition net could be damaged.<
Use the loop strap to pull the partition net out of
the casing. Grip the bar on both ends and insert
it into the retaining fixtures, arrow 1. This can
best be done from the rear seat.
When you no longer require the partition net,
grip both ends of the bar and take it out of the retaining fixtures, arrow 2. Let the partition net
slide into the casing slowly.
With cargo bay expanded
1.Fold down both rear seat backrests, refer to
Expanding the cargo bay.
2.Use the buttons to unlatch the casing on
both sides, arrow 1.
3.Pull the casing out backwards, arrow 2,
without tilting it.
4.Slide the casing into the guides on the
backs of the seat backrests.
5.Carefully pull out the partition net and insert
it into the front retaining fixtures, refer to
Partition net above. This can best be done
from the front seat.
Follow the same steps in reverse order to return
the partition net and seats to their original posi-
tions. Finally, slide the casing into both retaining
fixtures on the sides until it engages. Tug on the
casing to check if it is properly locked in place.
Page 119 of 268
Controls
117Reference
At a glance
Driving tips
Communications
Navigation
Entertainment
Mobility
>Hooks for hanging up shopping bags or tote
bags, for example, on the left and right-hand
sides of the cargo bay
>Net for small objects on the right trim panel
of the cargo bay
>Storage compartment under the floor panel
Depending on your vehicle's equipment, other
storage spaces can be found in the cargo bay:
>Net
* for securing smaller objects, to be
attached to the fixtures on the floor panel
>Net
* on the left side trim of the cargo bay
instead of the rubber strap
>Reversible cargo area floor panel with inte-
grated plastic cover
* for cargo bay or
bumper
>Folding, removable box
* under the floor
panel, e.g. for wet or dirty items
>Insertable dividers
* and removable storage
tray for the storage compartment under the
floor panel
Folding up the floor panel
Do not exceed the maximum permissible
load of 55 lbs/25 kg for the storage com-
partment under the floor panel, otherwise dam-
age could result.<
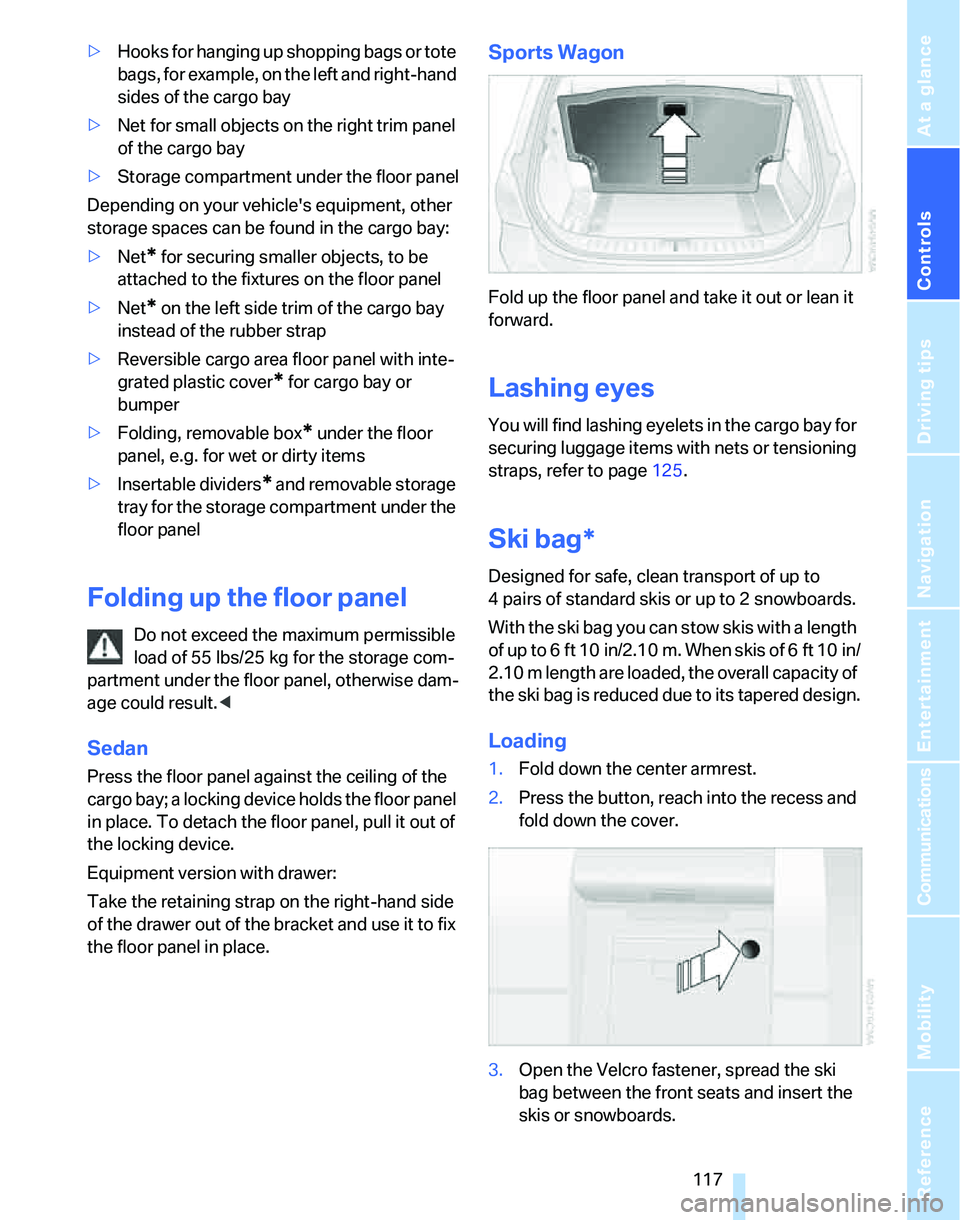
Sedan
Press the floor panel against the ceiling of the
cargo bay; a locking device holds the floor panel
in place. To detach the floor panel, pull it out of
the locking device.
Equipment version with drawer:
Take the retaining strap on the right-hand side
of the drawer out of the bracket and use it to fix
the floor panel in place.
Sports Wagon
Fold up the floor panel and take it out or lean it
forward.
Lashing eyes
You will find lashing eyelets in the cargo bay for
securing luggage items with nets or tensioning
straps, refer to page125.
Ski bag*
Designed for safe, clean transport of up to
4 pairs of standard skis or up to 2 snowboards.
With the ski bag you can stow skis with a length
of up to 6ft 10in/2.10m. When skis of 6ft 10in/
2.10 m length are loaded, the overall capacity of
the ski bag is reduced due to its tapered design.
Loading
1.Fold down the center armrest.
2.Press the button, reach into the recess and
fold down the cover.
3.Open the Velcro fastener, spread the ski
bag between the front seats and insert the
skis or snowboards.
Page 121 of 268

Controls
119Reference
At a glance
Driving tips
Communications
Navigation
Entertainment
Mobility