2007 BMW 328XI navigation
[x] Cancel search: navigationPage 219 of 268
Mobility
217Reference
At a glance
Controls
Driving tips
Communications
Navigation
Entertainment
>"Engine oil level too high"
Too much oil will harm the engine.
Have the vehicle checked without
delay.<
>"Please observe recalculated service inter-
val for engine oil"
Do not add engine oil. You can continue
your journey. Note the newly calculated dis-
tance remaining to the next oil service, refer
to page77. Have the system checked as
soon as possible.
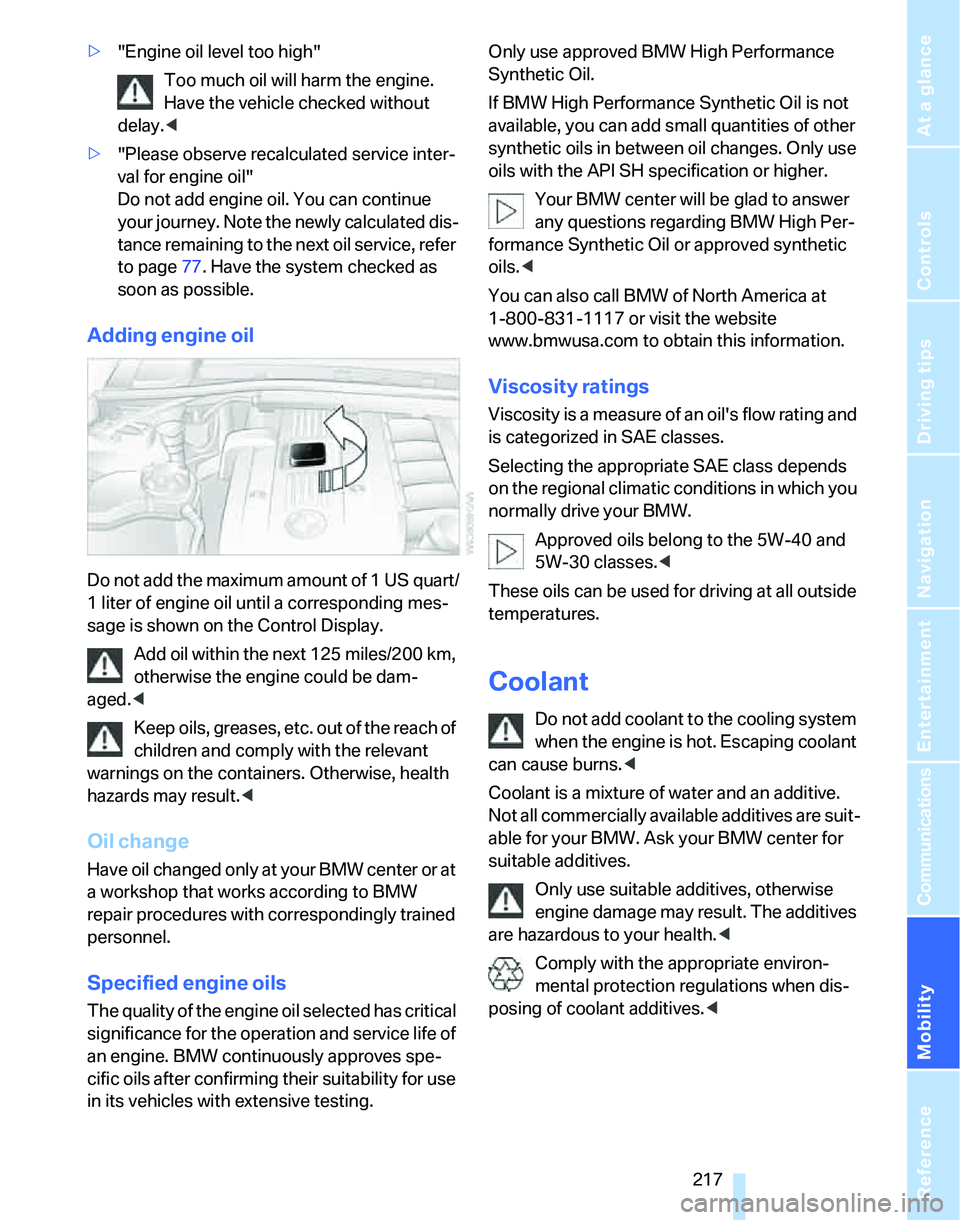
Adding engine oil
Do not add the maximum amount of 1 US quart/
1 liter of engine oil until a corresponding mes-
sage is shown on the Control Display.
Add oil within the next 125 miles/200 km,
otherwise the engine could be dam-
aged.<
Keep oils, greases, etc. out of the reach of
children and comply with the relevant
warnings on the containers. Otherwise, health
hazards may result.<
Oil change
Have oil changed only at your BMW center or at
a workshop that works according to BMW
repair procedures with correspondingly trained
personnel.
Specified engine oils
The quality of the engine oil selected has critical
significance for the operation and service life of
an engine. BMW continuously approves spe-
cific oils after confirming their suitability for use
in its vehicles with extensive testing.Only use approved BMW High Performance
Synthetic Oil.
If BMW High Performance Synthetic Oil is not
available, you can add small quantities of other
synthetic oils in between oil changes. Only use
oils with the API SH specification or higher.
Your BMW center will be glad to answer
any questions regarding BMW High Per-
formance Synthetic Oil or approved synthetic
oils.<
You can also call BMW of North America at
1-800-831-1117 or visit the website
www.bmwusa.com to obtain this information.
Viscosity ratings
Viscosity is a measure of an oil's flow rating and
is categorized in SAE classes.
Selecting the appropriate SAE class depends
on the regional climatic conditions in which you
normally drive your BMW.
Approved oils belong to the 5W-40 and
5W-30 classes.<
These oils can be used for driving at all outside
temperatures.
Coolant
Do not add coolant to the cooling system
when the engine is hot. Escaping coolant
can cause burns.<
Coolant is a mixture of water and an additive.
Not all commercially available additives are suit-
able for your BMW. Ask your BMW center for
suitable additives.
Only use suitable additives, otherwise
engine damage may result. The additives
are hazardous to your health.<
Comply with the appropriate environ-
mental protection regulations when dis-
posing of coolant additives.<
Page 221 of 268

Mobility
219Reference
At a glance
Controls
Driving tips
Communications
Navigation
Entertainment
Maintenance
BMW Maintenance System
The BMW Maintenance System supports the
preservation of the traffic and operating safety
of your BMW. The service schedule also
includes operations related to the vehicle's
comfort and convenience features, such as
replacement of the filters for the inside air. The
objective is to optimize efforts with respect to
minimal vehicle maintenance costs.
If and when you come to sell your BMW, a com-
prehensive record of servicing will prove a sig-
nificant benefit.
CBS Condition Based Service
Sensors and special algorithms take the differ-
ent driving conditions of your BMW into
account. Condition Based Service uses this to
determine the current and future service
requirements. By letting you define a service
and maintenance regimen that reflects your
own individual requirements, the system builds
the basis for trouble-free driving.
On the Control Display, you can have the
remaining times or distances for selected main-
tenance tasks and any legally prescribed dates
displayed, refer to page77:
>Engine oil
>Brake pads: separately for front and rear
>Microfilter/activated-charcoal filter
>Brake fluid
>Spark plugs
>Vehicle check>Legally mandated inspections depending
on local regulations
Service data in the remote control
Your vehicle continuously stores service-
requirement information in the remote control
while you are driving. Your BMW Service Advi-
sor can read out this data from the remote con-
trol unit, and propose an optimized mainte-
nance approach. Whenever you take your car in
for servicing you should therefore hand your
BMW Service Advisor the remote control unit
that you last used.
Make sure that the date is always set cor-
rectly, refer to page81; otherwise the
effectiveness of Condition Based Service CBS
is not assured.<
Service and Warranty Information
Booklet for US models and Warranty
and Service Guide Booklet for
Canadian models
Please consult your Service and Warranty Infor-
mation Booklet for US models and Warranty
and Service Guide Booklet for Canadian models
for additional information on service require-
ments.
BMW recommends that you have service
and repair operations performed at your
BMW center.
Take the time to ensure that these service pro-
cedures are confirmed by entries in your vehi-
cle's Service and Warranty Information Booklet
for US models and Warranty and Service Guide
Booklet for Canadian models. These entries
verify that your vehicle has received the speci-
fied regular maintenance.<
Page 223 of 268
Mobility
221Reference
At a glance
Controls
Driving tips
Communications
Navigation
Entertainment
Replacing components
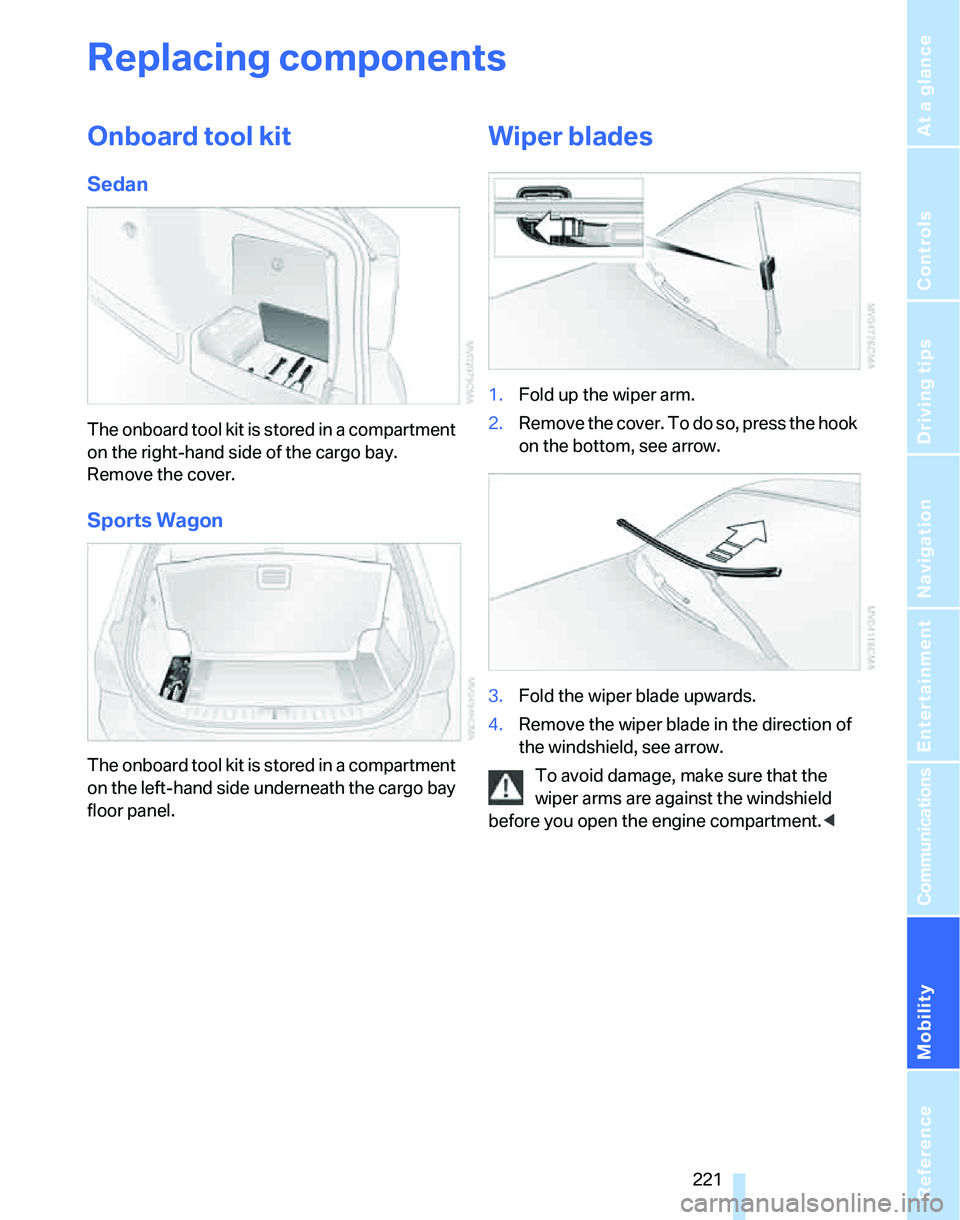
Onboard tool kit
Sedan
The onboard tool kit is stored in a compartment
on the right-hand side of the cargo bay.
Remove the cover.
Sports Wagon
The onboard tool kit is stored in a compartment
on the left-hand side underneath the cargo bay
floor panel.
Wiper blades
1.Fold up the wiper arm.
2.Remove the cover. To do so, press the hook
on the bottom, see arrow.
3.Fold the wiper blade upwards.
4.Remove the wiper blade in the direction of
the windshield, see arrow.
To avoid damage, make sure that the
wiper arms are against the windshield
before you open the engine compartment.<
Page 225 of 268
Mobility
223Reference
At a glance
Controls
Driving tips
Communications
Navigation
Entertainment
pressurized. Otherwise there is a risk of injury if
the bulb is damaged.<
There are separate headlamp covers for low-
beam headlamps and high-beam headlamps.
Be careful when installing the covers, oth-
erwise leaks could occur and cause dam-
age to the headlamp system.<
For checking and adjusting headlamp
aim, please contact your BMW center.<
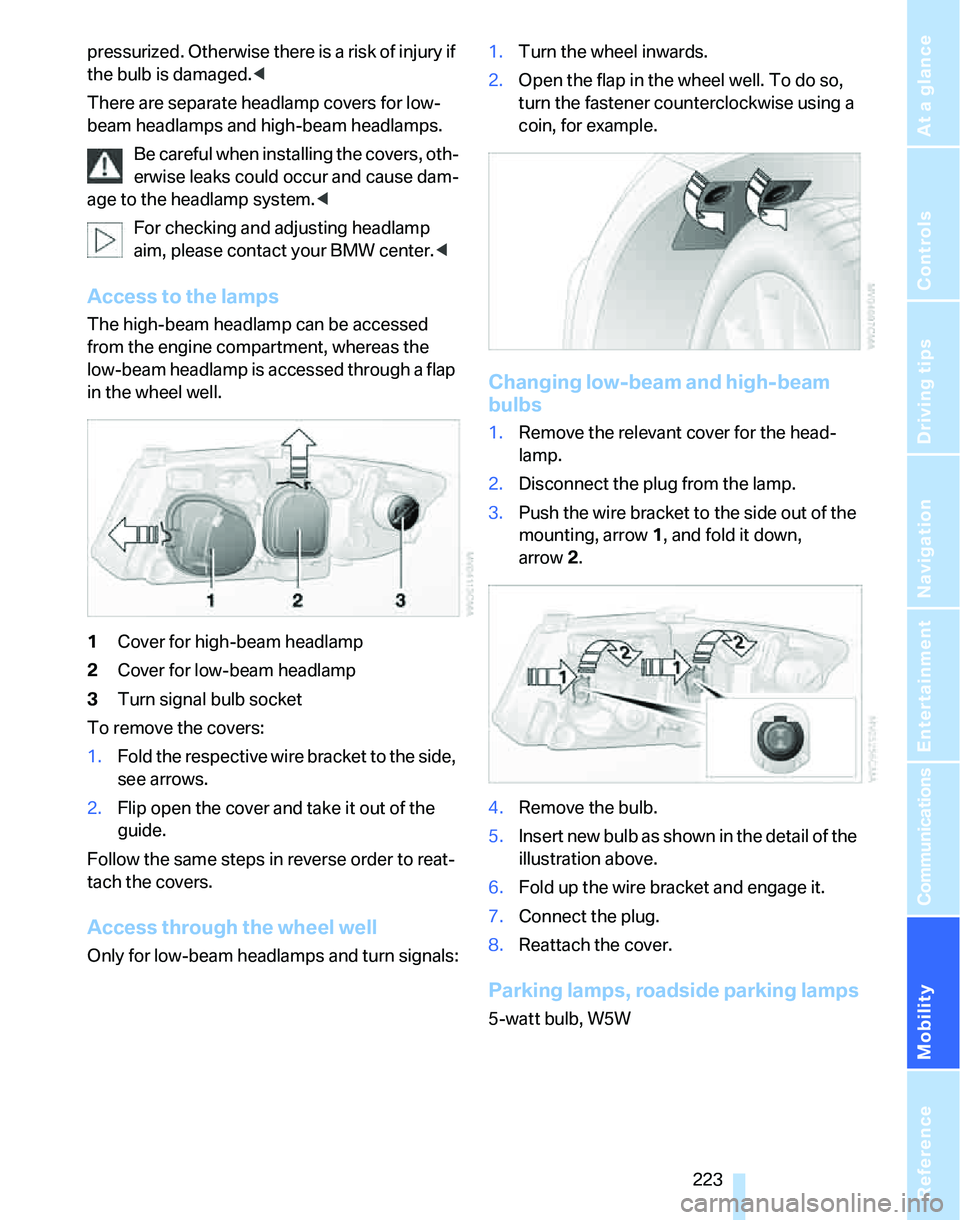
Access to the lamps
The high-beam headlamp can be accessed
from the engine compartment, whereas the
low-beam headlamp is accessed through a flap
in the wheel well.
1Cover for high-beam headlamp
2Cover for low-beam headlamp
3Turn signal bulb socket
To remove the covers:
1.Fold the respective wire bracket to the side,
see arrows.
2.Flip open the cover and take it out of the
guide.
Follow the same steps in reverse order to reat-
tach the covers.
Access through the wheel well
Only for low-beam headlamps and turn signals:1.Turn the wheel inwards.
2.Open the flap in the wheel well. To do so,
turn the fastener counterclockwise using a
coin, for example.
Changing low-beam and high-beam
bulbs
1.Remove the relevant cover for the head-
lamp.
2.Disconnect the plug from the lamp.
3.Push the wire bracket to the side out of the
mounting, arrow1, and fold it down,
arrow2.
4.Remove the bulb.
5.Insert new bulb as shown in the detail of the
illustration above.
6.Fold up the wire bracket and engage it.
7.Connect the plug.
8.Reattach the cover.
Parking lamps, roadside parking lamps
5-watt bulb, W5W
Page 227 of 268
Mobility
225Reference
At a glance
Controls
Driving tips
Communications
Navigation
Entertainment
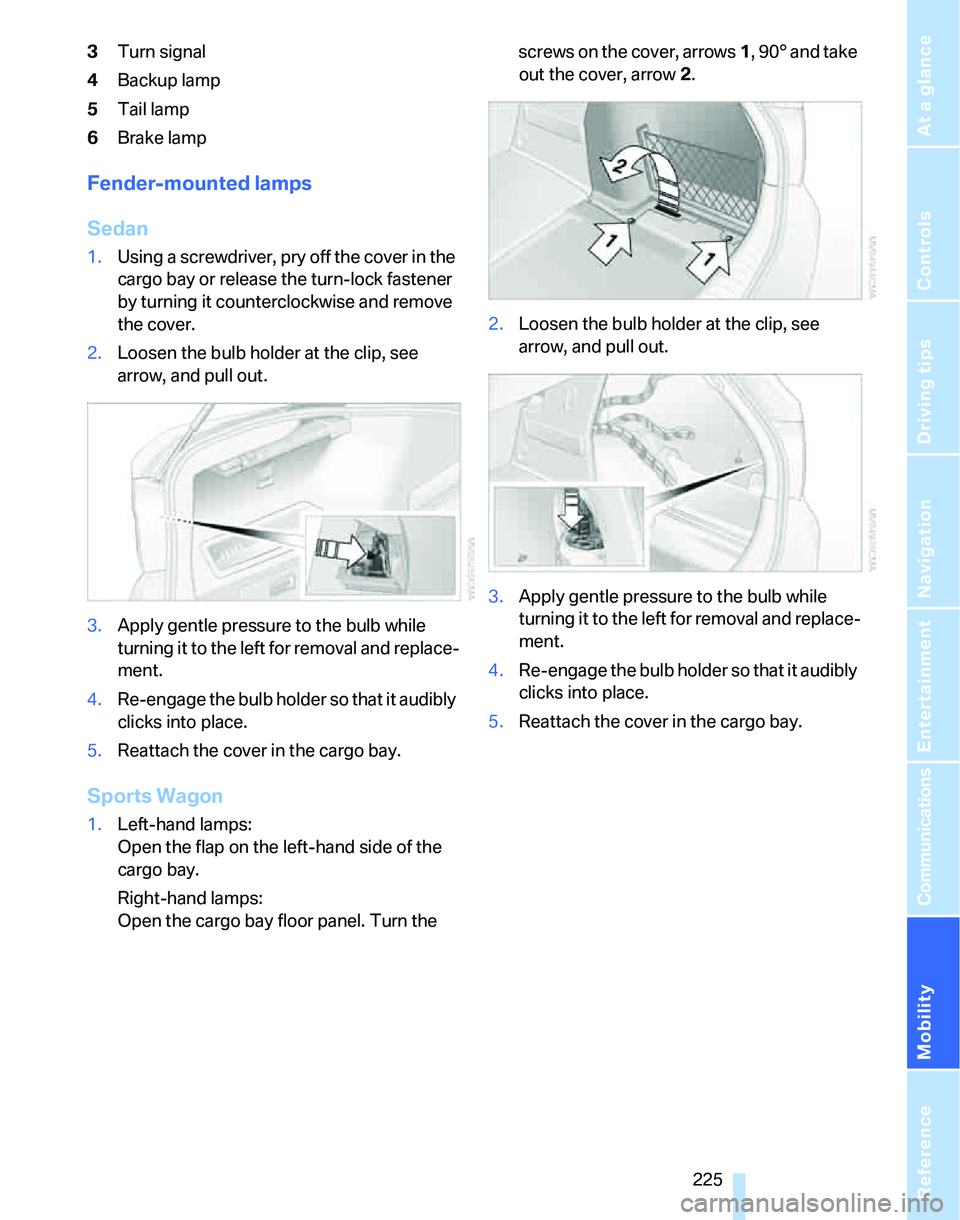
3Turn signal
4Backup lamp
5Tail lamp
6Brake lamp
Fender-mounted lamps
Sedan
1.Using a screwdriver, pry off the cover in the
cargo bay or release the turn-lock fastener
by turning it counterclockwise and remove
the cover.
2.Loosen the bulb holder at the clip, see
arrow, and pull out.
3.Apply gentle pressure to the bulb while
turning it to the left for removal and replace-
ment.
4.Re-engage the bulb holder so that it audibly
clicks into place.
5.Reattach the cover in the cargo bay.
Sports Wagon
1.Left-hand lamps:
Open the flap on the left-hand side of the
cargo bay.
Right-hand lamps:
Open the cargo bay floor panel. Turn the screws on the cover, arrows 1, 90° and take
out the cover, arrow 2.
2.Loosen the bulb holder at the clip, see
arrow, and pull out.
3.Apply gentle pressure to the bulb while
turning it to the left for removal and replace-
ment.
4.Re-engage the bulb holder so that it audibly
clicks into place.
5.Reattach the cover in the cargo bay.
Page 229 of 268

Mobility
227Reference
At a glance
Controls
Driving tips
Communications
Navigation
Entertainment
Changing wheels
Your BMW is equipped with Run-Flat Tires as
standard. This removes the need to change a
wheel immediately in the event of a puncture.
For information on continuing to drive with a
damaged tire, refer to Indication of a flat tire on
page91.
The symbol identifying Run-Flat Tires is a circle
with the letters RSC on the sidewall, refer to
Run-Flat Tires, page212.
When mounting new tires or changing over
from summer to winter tires and vice versa,
mount Run-Flat Tires for your own safety. In the
event of a flat, no spare wheel is available. Your
BMW center will be glad to advise you. Refer
also to New wheels and tires, page212.
The tools for changing wheels are avail-
able as optional accessories from your
BMW center.<
Jack mounting points
The jacking points are at the positions shown in
the illustration.
Vehicle battery
Battery care
The battery is 100 % maintenance-free, the
electrolyte will last for the life of the battery
when the vehicle is operated in a temperate cli-
mate. Your BMW center will be glad to advise in
all matters concerning the battery.
Charging the battery
Only charge the battery in the vehicle via the
terminals in the engine compartment with the
engine off. Connections, refer to Jump starting
on page230.
Disposal
Have old batteries disposed of by your
BMW center or hand them in to a recy-
cling center. Maintain the battery in an upright
position for transport and storage. Always
secure the battery against tipping over during
transport.<
Power failure
After a temporary power loss, the functioning of
some equipment may be limited and require
reinitialization. Individual settings may likewise
have been lost and will have to be programmed:
>Time and date
These values must be updated, refer to
page80.
>Radio
In some cases, stations may have to be
stored again, refer to page162.
>Navigation system
Operability must be waited for, refer to
page130.
>Panorama glass roof
It may only be possible to raise the sunroof,
if applicable. The system must be initialized.
Please contact your BMW center.
>Seat and mirror memory
The positions must be stored again, refer to
page48.
>Inside rearview mirror with digital compass
The system must be calibrated, refer to
page109.
Fuses
Never attempt to repair a blown fuse and
do not replace a defective fuse with a sub-
stitute of another color or amperage rating, oth-
erwise this could lead to a circuit overload, ulti-
mately resulting in a fire in the vehicle.<
Page 231 of 268
Mobility
229Reference
At a glance
Controls
Driving tips
Communications
Navigation
Entertainment
Giving and receiving assistance
Emergency call*
Conditions for an emergency call:
>Equipment version with full mobile phone
preparation package. This equipment
makes it possible to initiate an emergency
call even if no mobile phone is paired with
the vehicle.
>BMW Assist is activated. Activating
BMW Assist, refer to page195.
>Radio readiness is on.
>The BMW Assist system is logged on to a
mobile phone network.
>The emergency calling system is operable.
Once your service contract for BMW Assist
expires, the BMW Assist system can be deacti-
vated by a BMW center without you having to
visit a workshop. Once the BMW Assist system
has been deactivated, emergency calls are not
possible. The BMW Assist system can be reac-
tivated by a BMW center after a new contract
has been signed.
Initiating an Emergency Request call
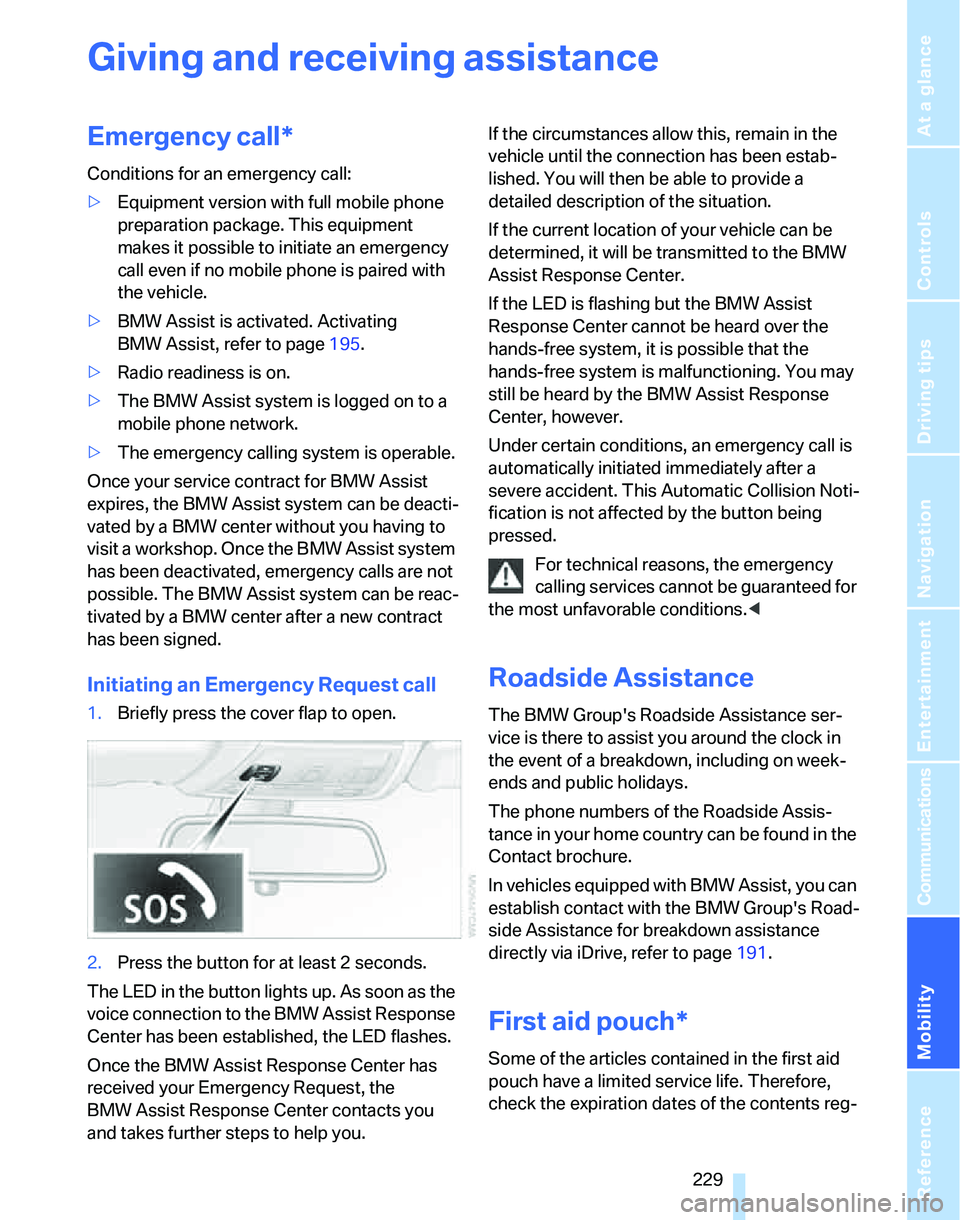
1.Briefly press the cover flap to open.
2.Press the button for at least 2 seconds.
The LED in the button lights up. As soon as the
voice connection to the BMW Assist Response
Center has been established, the LED flashes.
Once the BMW Assist Response Center has
received your Emergency Request, the
BMW Assist Response Center contacts you
and takes further steps to help you.If the circumstances allow this, remain in the
vehicle until the connection has been estab-
lished. You will then be able to provide a
detailed description of the situation.
If the current location of your vehicle can be
determined, it will be transmitted to the BMW
Assist Response Center.
If the LED is flashing but the BMW Assist
Response Center cannot be heard over the
hands-free system, it is possible that the
hands-free system is malfunctioning. You may
still be heard by the BMW Assist Response
Center, however.
Under certain conditions, an emergency call is
automatically initiated immediately after a
severe accident. This Automatic Collision Noti-
fication is not affected by the button being
pressed.
For technical reasons, the emergency
calling services cannot be guaranteed for
the most unfavorable conditions.<
Roadside Assistance
The BMW Group's Roadside Assistance ser-
vice is there to assist you around the clock in
the event of a breakdown, including on week-
ends and public holidays.
The phone numbers of the Roadside Assis-
tance in your home country can be found in the
Contact brochure.
In vehicles equipped with BMW Assist, you can
establish contact with the BMW Group's Road-
side Assistance for breakdown assistance
directly via iDrive, refer to page191.
First aid pouch*
Some of the articles contained in the first aid
pouch have a limited service life. Therefore,
check the expiration dates of the contents reg-
Page 233 of 268
Mobility
231Reference
At a glance
Controls
Driving tips
Communications
Navigation
Entertainment
Connecting jumper cables
Connect the jumper cables in the correct
order, so that no sparks which could
cause injury occur.<
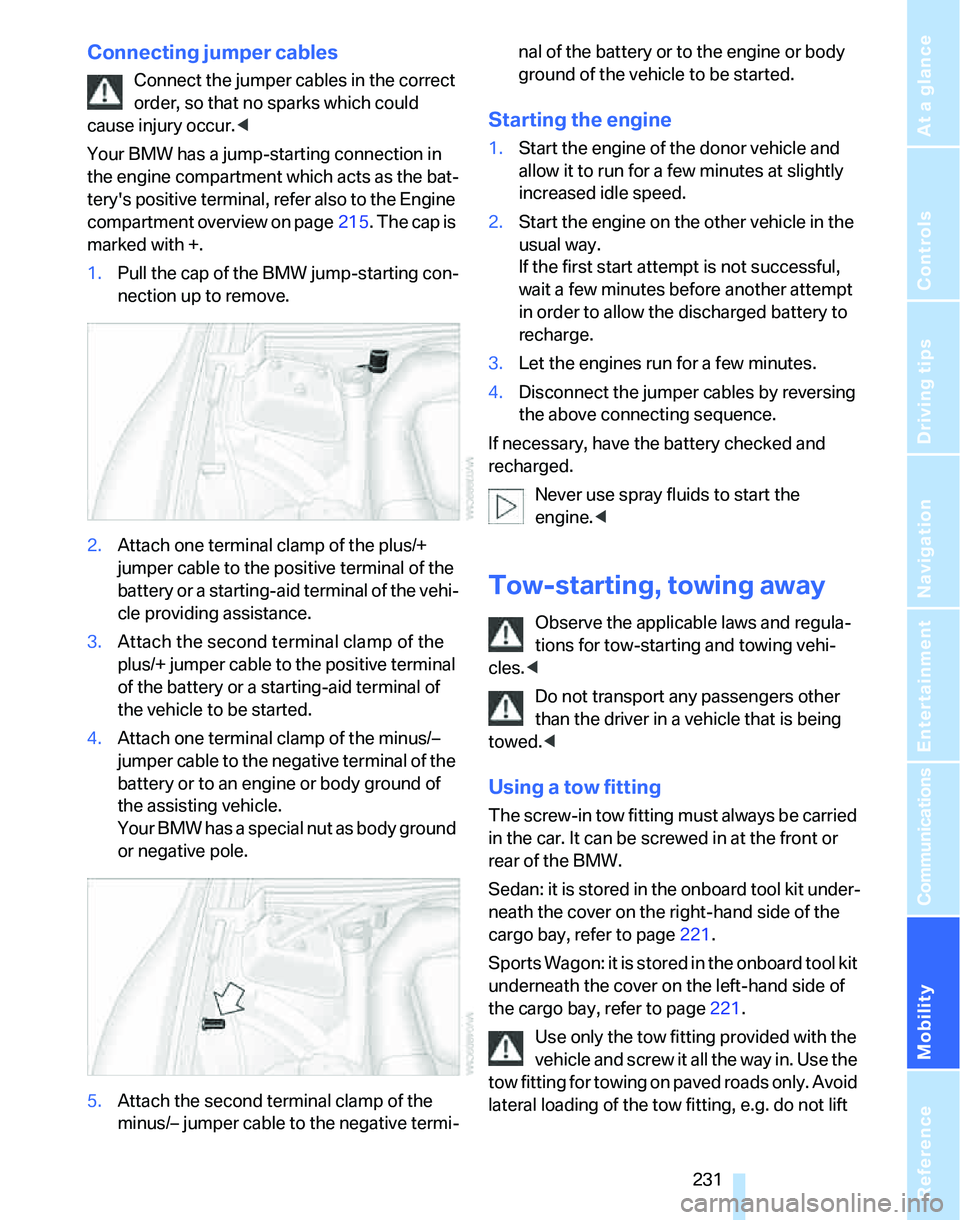
Your BMW has a jump-starting connection in
the engine compartment which acts as the bat-
tery's positive terminal, refer also to the Engine
compartment overview on page215. The cap is
marked with +.
1.Pull the cap of the BMW jump-starting con-
nection up to remove.
2.Attach one terminal clamp of the plus/+
jumper cable to the positive terminal of the
battery or a starting-aid terminal of the vehi-
cle providing assistance.
3.Attach the second terminal clamp of the
plus/+ jumper cable to the positive terminal
of the battery or a starting-aid terminal of
the vehicle to be started.
4.Attach one terminal clamp of the minus/–
jumper cable to the negative terminal of the
battery or to an engine or body ground of
the assisting vehicle.
Your BMW has a special nut as body ground
or negative pole.
5.Attach the second terminal clamp of the
minus/– jumper cable to the negative termi-nal of the battery or to the engine or body
ground of the vehicle to be started.
Starting the engine
1.Start the engine of the donor vehicle and
allow it to run for a few minutes at slightly
increased idle speed.
2.Start the engine on the other vehicle in the
usual way.
If the first start attempt is not successful,
wait a few minutes before another attempt
in order to allow the discharged battery to
recharge.
3.Let the engines run for a few minutes.
4.Disconnect the jumper cables by reversing
the above connecting sequence.
If necessary, have the battery checked and
recharged.
Never use spray fluids to start the
engine.<
Tow-starting, towing away
Observe the applicable laws and regula-
tions for tow-starting and towing vehi-
cles.<
Do not transport any passengers other
than the driver in a vehicle that is being
towed.<
Using a tow fitting
The screw-in tow fitting must always be carried
in the car. It can be screwed in at the front or
rear of the BMW.
Sedan: it is stored in the onboard tool kit under-
neath the cover on the right-hand side of the
cargo bay, refer to page221.
Sports Wagon: it is stored in the onboard tool kit
underneath the cover on the left-hand side of
the cargo bay, refer to page221.
Use only the tow fitting provided with the
vehicle and screw it all the way in. Use the
tow fitting for towing on paved roads only. Avoid
lateral loading of the tow fitting, e.g. do not lift