2007 BMW 328I SEDAN Light symbol
[x] Cancel search: Light symbolPage 20 of 268
iDrive
18
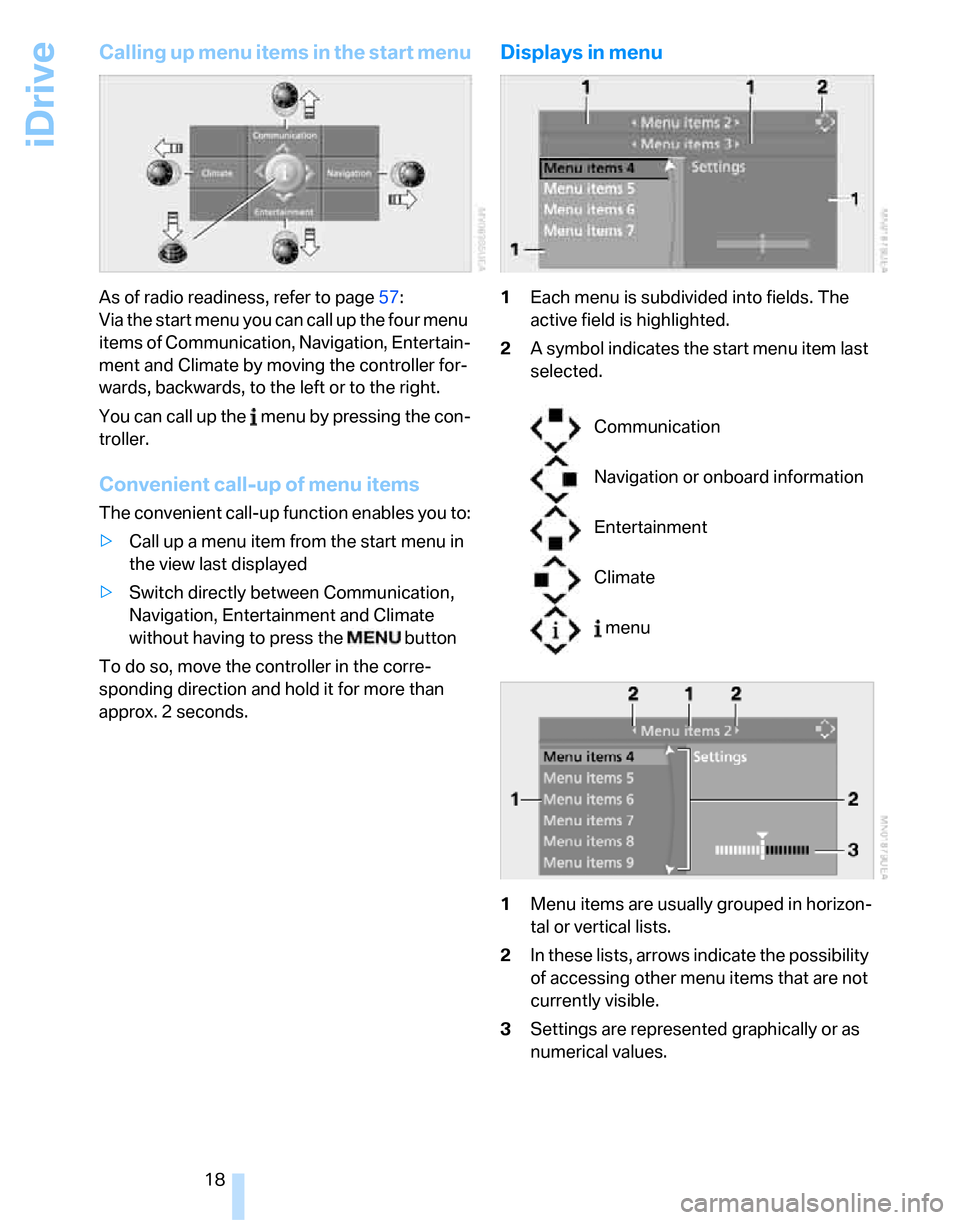
Calling up menu items in the start menu
As of radio readiness, refer to page57:
Via the start menu you can call up the four menu
items of Communication, Navigation, Entertain-
ment and Climate by moving the controller for-
wards, backwards, to the left or to the right.
You can call up the menu by pressing the con-
troller.
Convenient call-up of menu items
The convenient call-up function enables you to:
>Call up a menu item from the start menu in
the view last displayed
>Switch directly between Communication,
Navigation, Entertainment and Climate
without having to press the button
To do so, move the controller in the corre-
sponding direction and hold it for more than
approx. 2 seconds.
Displays in menu
1Each menu is subdivided into fields. The
active field is highlighted.
2A symbol indicates the start menu item last
selected.
1Menu items are usually grouped in horizon-
tal or vertical lists.
2In these lists, arrows indicate the possibility
of accessing other menu items that are not
currently visible.
3Settings are represented graphically or as
numerical values.
Communication
Navigation or onboard information
Entertainment
Climate
menu
Page 79 of 268

Controls
77Reference
At a glance
Driving tips
Communications
Navigation
Entertainment
Mobility
2Button for:
>Confirming selected display or set val-
ues
>Calling up computer information74
3When the lights are on: instrument lighting
brightness1004Calling up Check Control82
5Checking oil level215
6Setting the time80
7Setting the date81
8Viewing service requirement display77
Exiting displays
The outside-temperature reading and the time
reappear when you press button2 or if you
make no entries within approx. 15 seconds. If
required, complete the current setting first.
Units of measure
You can set units of measure. The settings are
stored for the remote control currently in use,
refer also to Personal Profile on page28.
iDrive, for operating principle refer to page16.
1.Open the start menu.
2.Press the controller to open the menu.
3.Select "Settings" and press the controller.
4.Select "Language / Units" and press the
controller.
5.If necessary, move the highlight marker to
the uppermost field. Turn the controller
until "Units" is selected and press the con-
troller.
6.Select the desired menu item and press the
controller.
7.Select the desired measurement unit and
press the controller.
Service requirements
The remaining driving distance and the date of
the next scheduled service are displayed briefly
immediately after you start the engine or switch
on the ignition.
The extent of service work required can
be read out from the remote control by
your BMW Service Advisor.<
For certain maintenance operations, you can
view the respective distance remaining or due
date individually in the instrument cluster.
1.Push button 1 in the turn indicator lever up
or down repeatedly until the appropriate
symbol appears in the display, accompa-
nied by the words "SERVICE-INFO".
2.Press button 2.
3.Use button 1 to scroll through the individual
service items.
Page 81 of 268
Controls
79Reference
At a glance
Driving tips
Communications
Navigation
Entertainment
Mobility
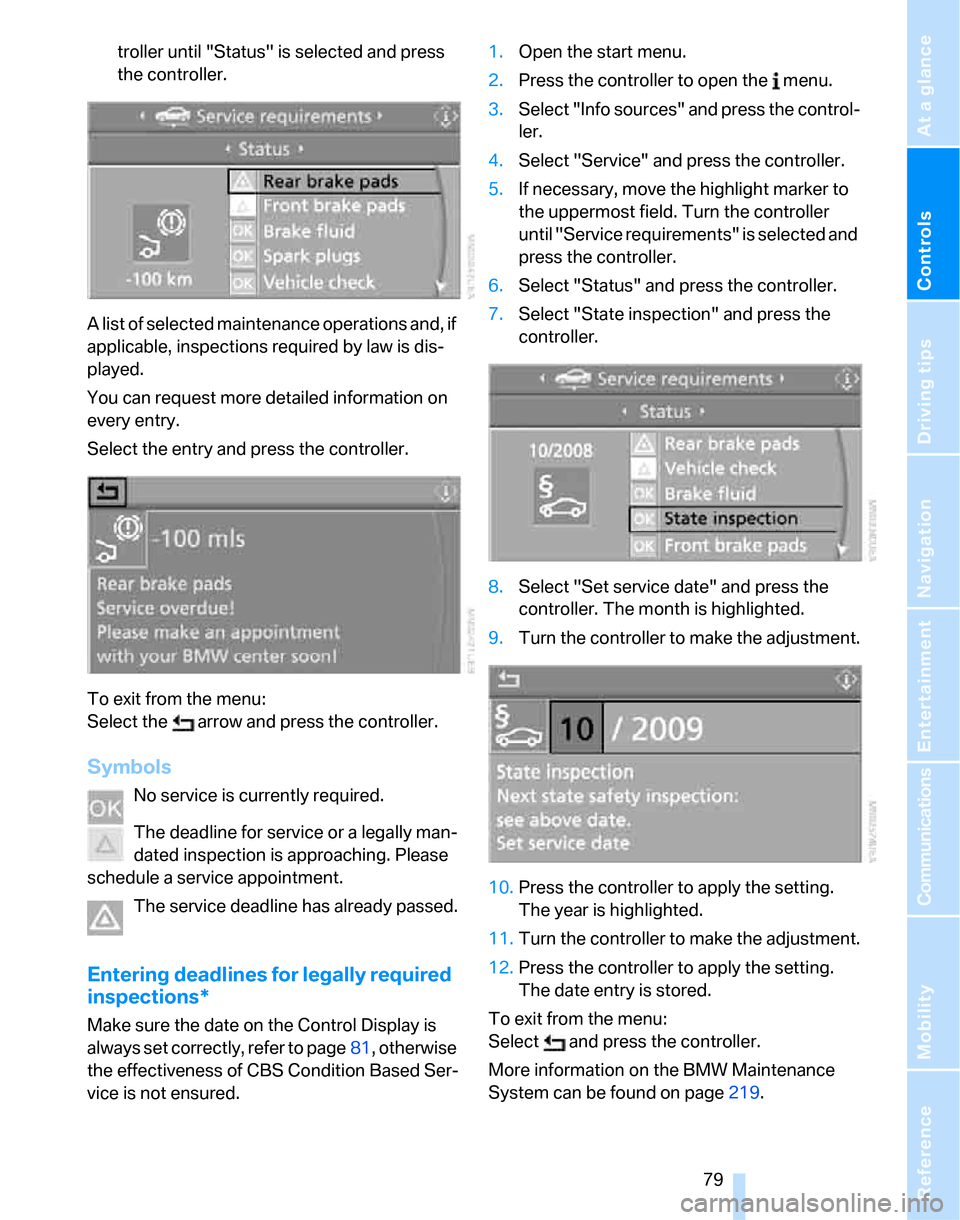
troller until "Status" is selected and press
the controller.
A list of selected maintenance operations and, if
applicable, inspections required by law is dis-
played.
You can request more detailed information on
every entry.
Select the entry and press the controller.
To exit from the menu:
Select the arrow and press the controller.
Symbols
No service is currently required.
The deadline for service or a legally man-
dated inspection is approaching. Please
schedule a service appointment.
The service deadline has already passed.
Entering deadlines for legally required
inspections*
Make sure the date on the Control Display is
always set correctly, refer to page81, otherwise
the effectiveness of CBS Condition Based Ser-
vice is not ensured.1.Open the start menu.
2.Press the controller to open the menu.
3.Select "Info sources" and press the control-
ler.
4.Select "Service" and press the controller.
5.If necessary, move the highlight marker to
the uppermost field. Turn the controller
until "Service requirements" is selected and
press the controller.
6.Select "Status" and press the controller.
7.Select "State inspection" and press the
controller.
8.Select "Set service date" and press the
controller. The month is highlighted.
9.Turn the controller to make the adjustment.
10.Press the controller to apply the setting.
The year is highlighted.
11.Turn the controller to make the adjustment.
12.Press the controller to apply the setting.
The date entry is stored.
To exit from the menu:
Select and press the controller.
More information on the BMW Maintenance
System can be found on page219.
Page 83 of 268
Controls
81Reference
At a glance
Driving tips
Communications
Navigation
Entertainment
Mobility
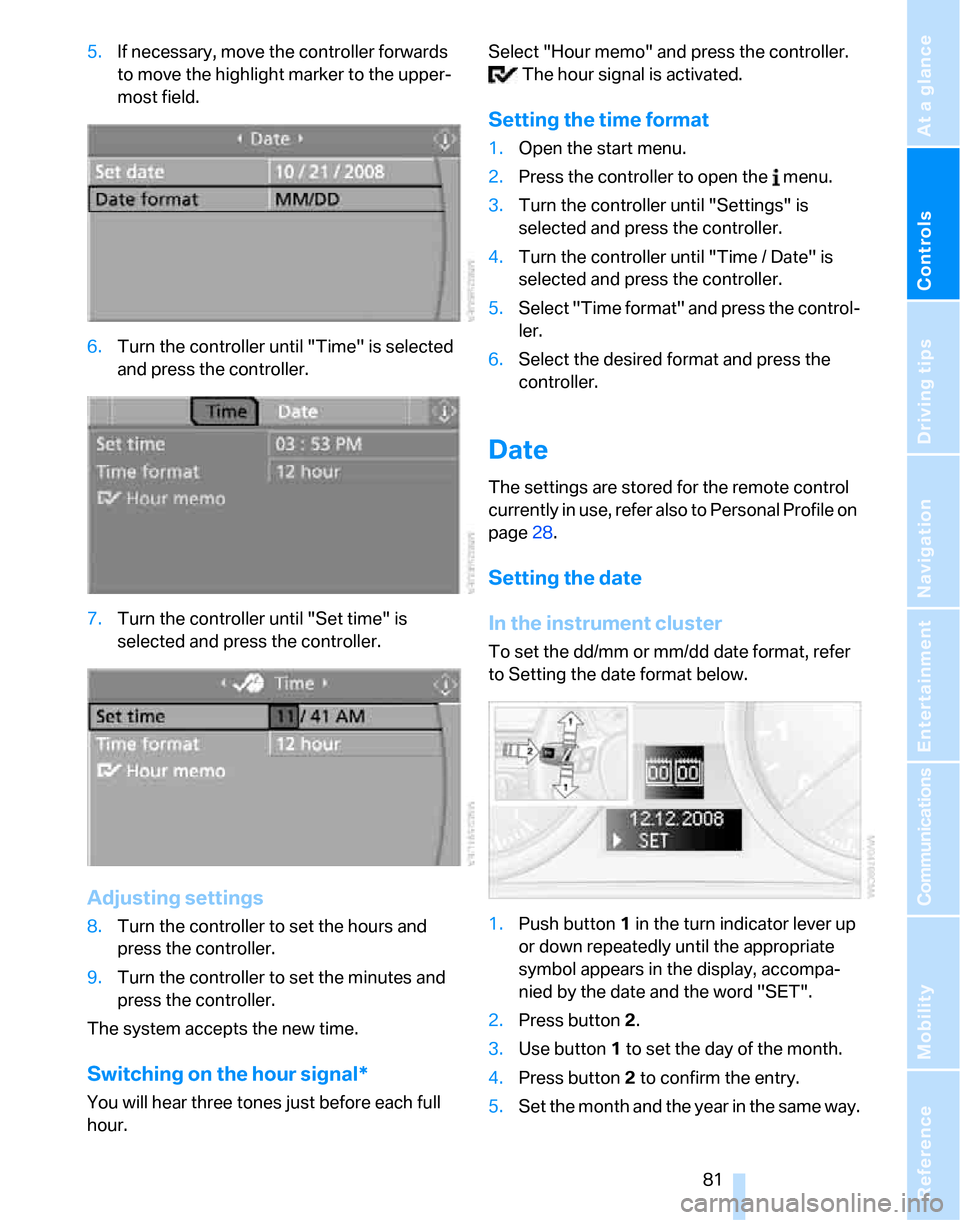
5.If necessary, move the controller forwards
to move the highlight marker to the upper-
most field.
6.Turn the controller until "Time" is selected
and press the controller.
7.Turn the controller until "Set time" is
selected and press the controller.
Adjusting settings
8.Turn the controller to set the hours and
press the controller.
9.Turn the controller to set the minutes and
press the controller.
The system accepts the new time.
Switching on the hour signal*
You will hear three tones just before each full
hour.Select "Hour memo" and press the controller.
The hour signal is activated.
Setting the time format
1.Open the start menu.
2.Press the controller to open the menu.
3.Turn the controller until "Settings" is
selected and press the controller.
4.Turn the controller until "Time / Date" is
selected and press the controller.
5.Select "Time format" and press the control-
ler.
6.Select the desired format and press the
controller.
Date
The settings are stored for the remote control
currently in use, refer also to Personal Profile on
page28.
Setting the date
In the instrument cluster
To set the dd/mm or mm/dd date format, refer
to Setting the date format below.
1.Push button 1 in the turn indicator lever up
or down repeatedly until the appropriate
symbol appears in the display, accompa-
nied by the date and the word "SET".
2.Press button 2.
3.Use button 1 to set the day of the month.
4.Press button 2 to confirm the entry.
5.Set the month and the year in the same way.
Page 99 of 268

Controls
97Reference
At a glance
Driving tips
Communications
Navigation
Entertainment
Mobility
Lamps
Parking lamps/low beams
0Lamps off and daytime running lamps
1Parking lamps and daytime running lamps
2Low beams
3Automatic headlamp control
*, daytime run-
ning lamps and Adaptive Head Light
*
Parking lamps
In switch position1, the front, rear and side
vehicle lighting is switched on. You can use the
parking lamps for parking.
The parking lamps will discharge the bat-
tery. Therefore, do not leave them on for
unduly long periods of time, otherwise the bat-
tery might not have enough power to start the
engine. It is preferable to switch on the left-
hand or right-hand roadside parking lamps,
refer to page99.<
Low beams
The low beams light up when the light switch is
in position 2 and the ignition is on.
If the light switch remains in position 2, the
exterior lamps are switched off automatically
when the driver's door is opened while the igni-
tion is off.
If necessary, switch on the parking lamps as
described in the section about parking lamps.
Automatic headlamp control*
When the switch is in position3, the low beams
are switched on and off automatically depend-ing on ambient light conditions, e.g. in a tunnel,
in twilight, or if there is precipitation. The LED
next to the symbol is illuminated when the low
beams are on.
When driving into tunnels with bright overhead
lights, there may be a delay before the head-
lamps come on.
The headlamps may also come on when the
sun is sitting low on a blue sky.
The low beams remain switched on inde-
pendent of the ambient lighting condi-
tions when you switch on the fog lamps
*.<
If desired, the light switch can remain in position
3. The exterior lamps are automatically
switched off after the vehicle is parked.
The automatic headlamp control cannot
serve as a substitute for your personal
judgment in determining when the lamps
should be switched on in response to ambient
lighting conditions. For example, the system
cannot detect fog or hazy weather. To avoid
safety risks, you should always switch on the
low-beam headlamps manually under these
conditions.<
Adjusting sensitivity
You can program how sensitively the system
reacts to ambient light.
iDrive, for operating principle refer to page16.
1.Press the button.
This opens the start menu.
2.Press the controller to open the menu.
3.Select "Settings" and press the controller.
4.Select "Vehicle / Tires" and press the con-
troller.
Page 101 of 268

Controls
99Reference
At a glance
Driving tips
Communications
Navigation
Entertainment
Mobility
The daytime running lamps are
switched on.
Adaptive Head Light*
The concept
Adaptive Head Light is a variable headlamp
control system that enables better illumination
of the road surface. Depending on the steering
angle and other parameters, the light from the
headlamp follows the course of the road.
Activating Adaptive Head Light
With the ignition switched on, turn the light
switch to the automatic headlamp control posi-
tion, refer to page97.
To avoid dazzling the drivers of oncoming vehi-
cles, Adaptive Head Light is not active when the
car is driven in reverse, and directs the light to
the front passenger's side when the vehicle is at
a standstill.
Malfunction
The LED next to the symbol for automatic head-
lamp control flashes. Adaptive Head Light is
malfunctioning or has failed. Have the system
checked as soon as possible.
High beams/roadside parking
lamps
1High beams
2Headlamp flasher
3Roadside parking lamps
*
Roadside parking lamps, left or right*
There is an additional option of switching on the
lamps on the side of the car facing the road
when parked.
Switching on
After parking the vehicle, press the lever up or
down beyond the pressure point, arrow 3.
The roadside parking lamps drain the bat-
tery. Therefore, do not leave them on for
unduly long periods of time, otherwise the bat-
tery might not have enough power to start the
engine.<
Switching off
Briefly press the lever in the opposite direction
to the pressure point, arrow 3.
Fog lamps*
The parking lamps or low beams must
be switched on for the fog lamps to
operate. The green indicator lamp in
the instrument cluster lights up whenever the
fog lamps are on.
Depending on your vehicle's equipment ver-
sion, the fog lamps are switched off when you
activate the headlamp flasher or switch on the
high beams
*.
If the automatic headlamp control is acti-
vated, the low beams will come on auto-
matically when you switch on the fog lamps.<
Page 102 of 268
Lamps
100
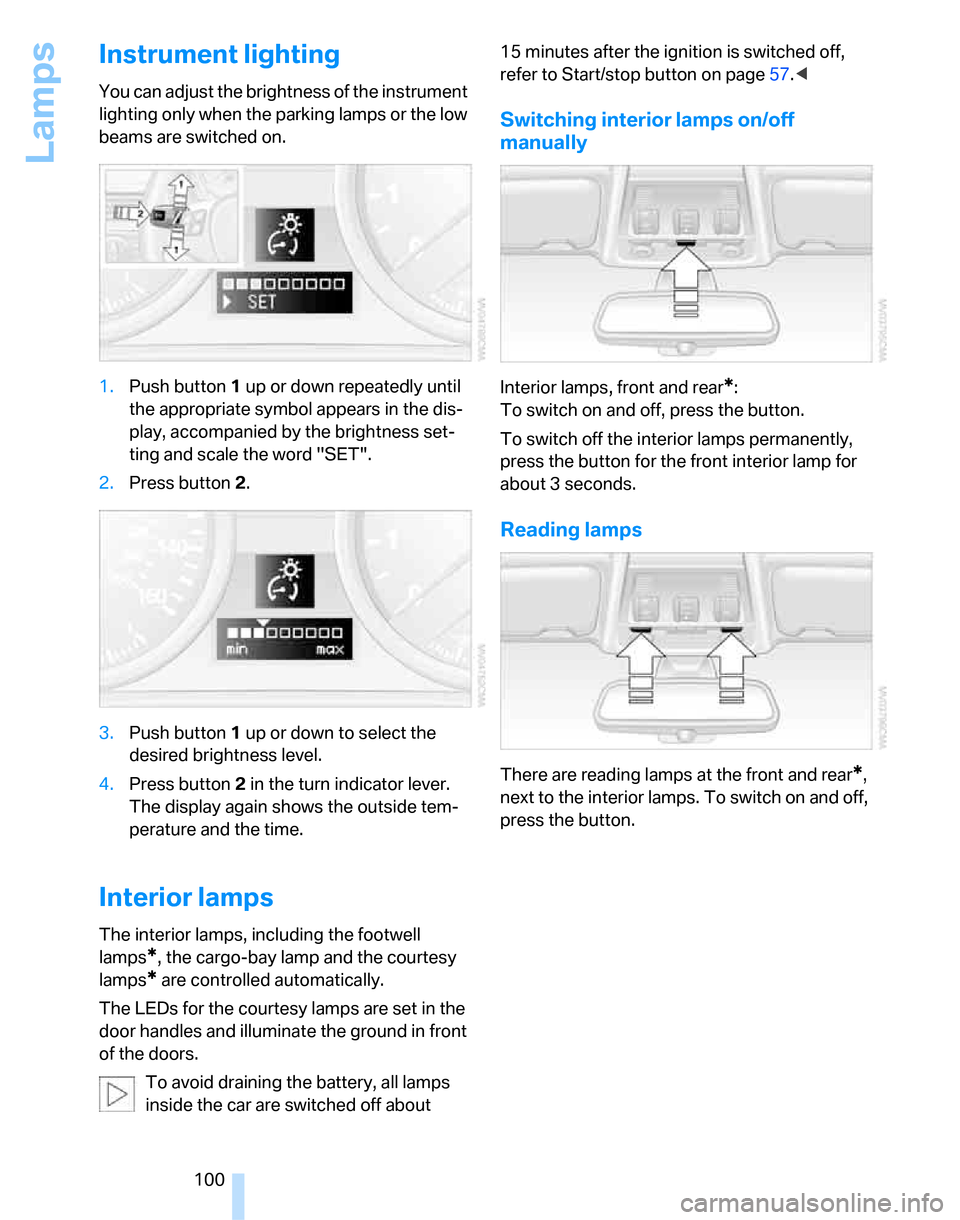
Instrument lighting
You can adjust the brightness of the instrument
lighting only when the parking lamps or the low
beams are switched on.
1.Push button 1 up or down repeatedly until
the appropriate symbol appears in the dis-
play, accompanied by the brightness set-
ting and scale the word "SET".
2.Press button 2.
3.Push button 1 up or down to select the
desired brightness level.
4.Press button 2 in the turn indicator lever.
The display again shows the outside tem-
perature and the time.
Interior lamps
The interior lamps, including the footwell
lamps
*, the cargo-bay lamp and the courtesy
lamps
* are controlled automatically.
The LEDs for the courtesy lamps
are set in the
door handles and illuminate the ground in front
of the doors.
To avoid draining the battery, all lamps
inside the car are switched off about 15 minutes after the ignition is switched off,
refer to Start/stop button on page57.<
Switching interior lamps on/off
manually
Interior lamps, front and rear*:
To switch on and off, press the button.
To switch off the interior lamps permanently,
press the button for the front interior lamp for
about 3 seconds.
Reading lamps
There are reading lamps at the front and rear*,
next to the interior lamps. To switch on and off,
press the button.
Page 108 of 268
Climate
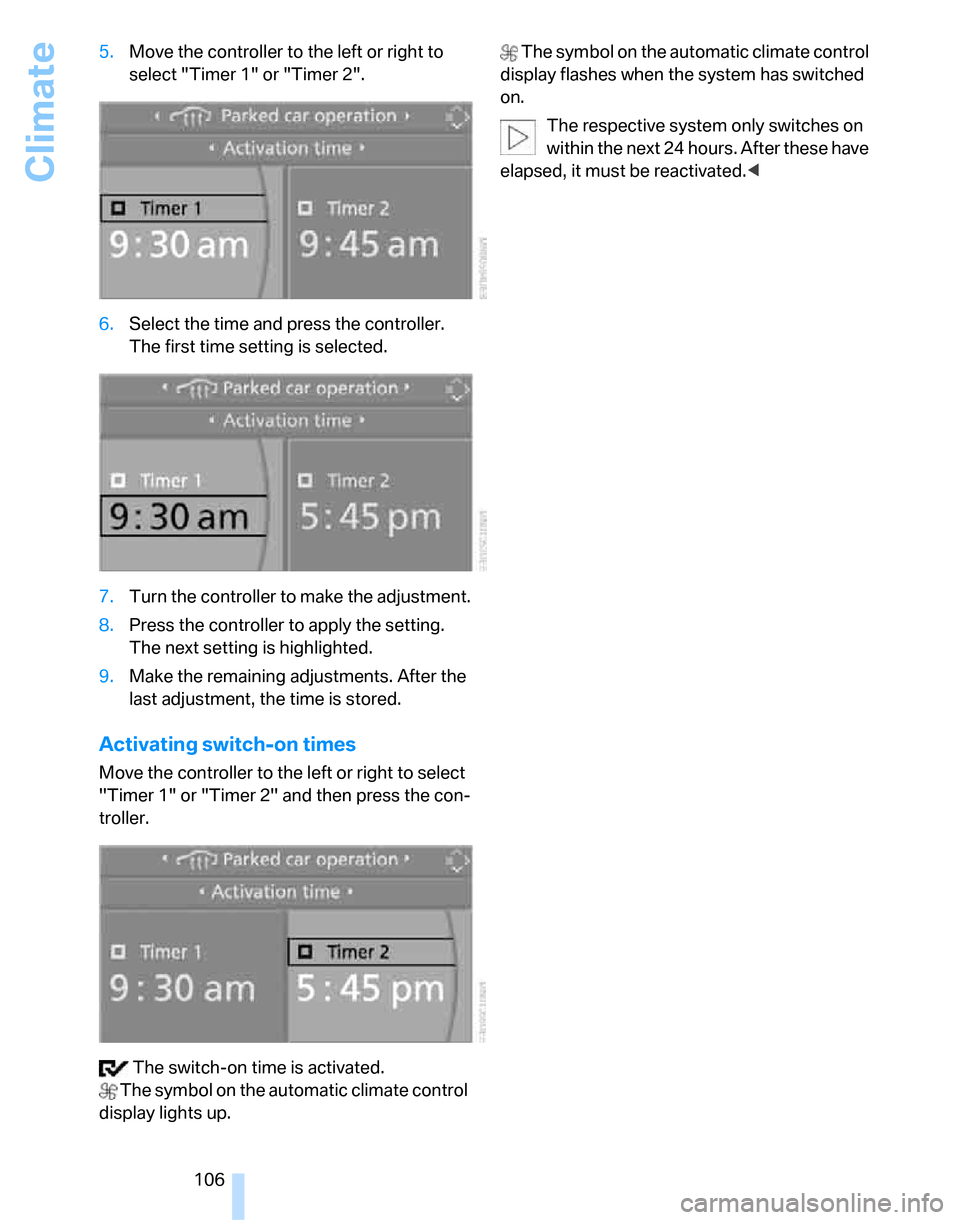
106 5.Move the controller to the left or right to
select "Timer 1" or "Timer 2".
6.Select the time and press the controller.
The first time setting is selected.
7.Turn the controller to make the adjustment.
8.Press the controller to apply the setting.
The next setting is highlighted.
9.Make the remaining adjustments. After the
last adjustment, the time is stored.
Activating switch-on times
Move the controller to the left or right to select
"Timer 1" or "Timer 2" and then press the con-
troller.
The switch-on time is activated.
The symbol on the automatic climate control
display lights up. The symbol on the automatic climate control
display flashes when the system has switched
on.
The respective system only switches on
within the next 24 hours. After these have
elapsed, it must be reactivated.<