2007 BMW 328I rear entertainment
[x] Cancel search: rear entertainmentPage 55 of 268
Controls
53Reference
At a glance
Driving tips
Communications
Navigation
Entertainment
Mobility
Transporting children safely
The right place for children
Do not leave children unattended in the
vehicle, otherwise they could endanger
themselves and/or other persons by opening
the doors, for example.<
The rear center seat is not suitable for installing
universal child-restraint systems for all age
groups, approved for the age group in question.
Children always in the rear
Accident research has shown that the safest
place for children is on the rear seat.
Children under the age of 13 or smaller
than 5 ft/150 cm may be transported only
in the rear in suitable child-restraint systems
appropriate for their age, weight and size. Oth-
erwise there is an increased risk of injury in the
event of an accident.<
Children 13 years of age or older must be buck-
led in with a safety belt as soon as there no
longer is any child-restraint system that is
appropriate for their age, size and weight.
The rear seats in your vehicle meet the recom-
mendations of the SAE J1819 standard for
safely mounting child-restraint systems in
motor vehicles.
Exception for front passenger seat
Should it be necessary to use a child-
restraint system on the front passenger
seat, the front and side airbags for the front pas-
senger must be deactivated. Otherwise, a child
traveling on that seat will face a significant risk
of injury if the airbags are triggered off, even
with a child-restraint system. Your BMW center
will be glad to advise you.<
For more information on automatic deactivation
of the front passenger airbags refer to page95.
Installing child-restraint
systems
Observe the child-restraint system man-
ufacturer's instructions when selecting,
installing and using child-restraint systems.
Otherwise the protective effect may be dimin-
ished.<
Standard child-restraint systems are designed
to be secured with a lap belt or with the lap-belt
section of a lap-and-shoulder belt. Incorrectly
or improperly installed child-restraint systems
can increase the risk of injury to children.
Always follow the installation instructions for
the system with the greatest care.
On the front passenger's seat
Before installing a child-restraint system
on the front passenger's seat, make sure
that the front and side airbags for the front pas-
senger are deactivated, otherwise there is an
increased risk of injury if the airbags deploy.<
Backrest width*
The backrest width of the front passen-
ger's seat must be at its widest possible
setting. Do not change the setting after install-
ing the child seat. Otherwise the child seat's
stability on the front passenger's seat is lim-
ited.<
1.Adjust the backrest width to its widest set-
ting, refer to page46.
2.Install the child seat.
Page 57 of 268
Controls
55Reference
At a glance
Driving tips
Communications
Navigation
Entertainment
Mobility
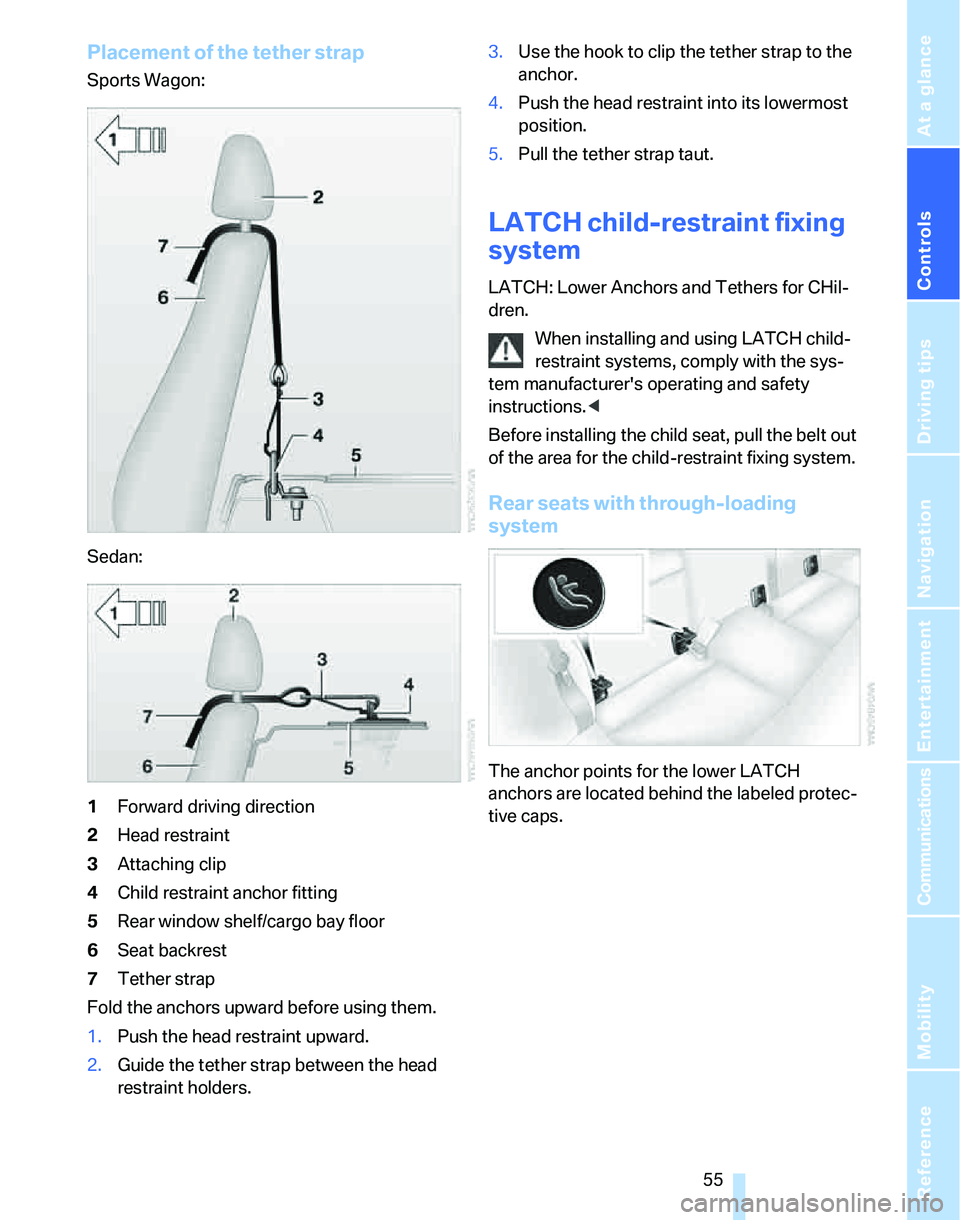
Placement of the tether strap
Sports Wagon:
Sedan:
1Forward driving direction
2Head restraint
3Attaching clip
4Child restraint anchor fitting
5Rear window shelf/cargo bay floor
6Seat backrest
7Tether strap
Fold the anchors upward before using them.
1.Push the head restraint upward.
2.Guide the tether strap between the head
restraint holders.3.Use the hook to clip the tether strap to the
anchor.
4.Push the head restraint into its lowermost
position.
5.Pull the tether strap taut.
LATCH child-restraint fixing
system
LATCH: Lower Anchors and Tethers for CHil-
dren.
When installing and using LATCH child-
restraint systems, comply with the sys-
tem manufacturer's operating and safety
instructions.<
Before installing the child seat, pull the belt out
of the area for the child-restraint fixing system.
Rear seats with through-loading
system
The anchor points for the lower LATCH
anchors are located behind the labeled protec-
tive caps.
Page 61 of 268
Controls
59Reference
At a glance
Driving tips
Communications
Navigation
Entertainment
Mobility
Parking brake
The parking brake is primarily intended to pre-
vent the vehicle from rolling while parked; it
brakes the rear wheels.
Indicator lamp
The indicator lamp is lit, and when you
drive off an acoustic signal sounds in
addition. The parking brake is still
applied.
Indicator lamp for Canadian models.
Applying
The lever locks in position automatically.
Releasing
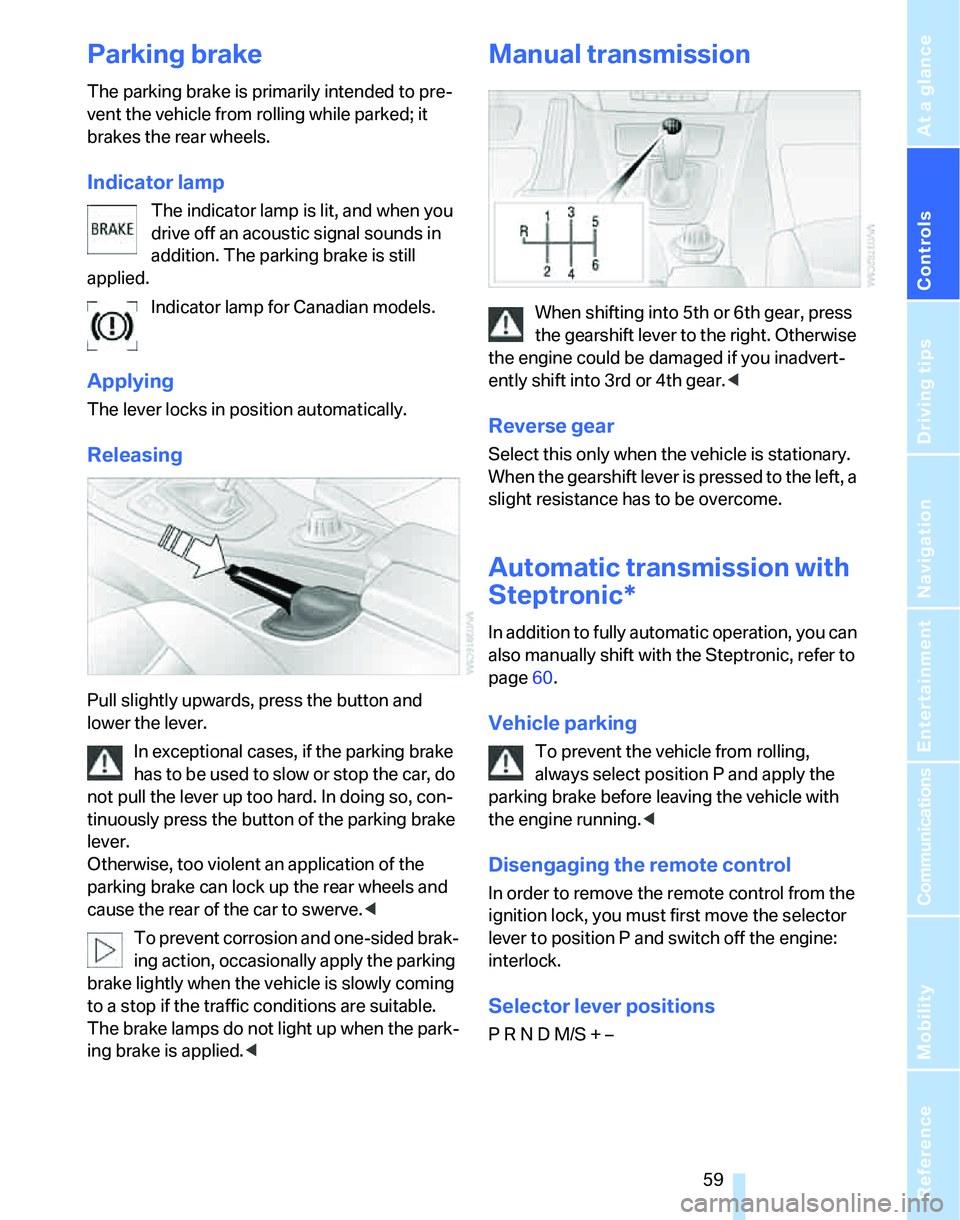
Pull slightly upwards, press the button and
lower the lever.
In exceptional cases, if the parking brake
has to be used to slow or stop the car, do
not pull the lever up too hard. In doing so, con-
tinuously press the button of the parking brake
lever.
Otherwise, too violent an application of the
parking brake can lock up the rear wheels and
cause the rear of the car to swerve.<
To prevent corrosion and one-sided brak-
ing action, occasionally apply the parking
brake lightly when the vehicle is slowly coming
to a stop if the traffic conditions are suitable.
The brake lamps do not light up when the park-
ing brake is applied.<
Manual transmission
When shifting into 5th or 6th gear, press
the gearshift lever to the right. Otherwise
the engine could be damaged if you inadvert-
ently shift into 3rd or 4th gear.<
Reverse gear
Select this only when the vehicle is stationary.
When the gearshift lever is pressed to the left, a
slight resistance has to be overcome.
Automatic transmission with
Steptronic*
In addition to fully automatic operation, you can
also manually shift with the Steptronic, refer to
page60.
Vehicle parking
To prevent the vehicle from rolling,
always select position P and apply the
parking brake before leaving the vehicle with
the engine running.<
Disengaging the remote control
In order to remove the remote control from the
ignition lock, you must first move the selector
lever to position P and switch off the engine:
interlock.
Selector lever positions
P R N D M/S + –
Page 65 of 268
Controls
63Reference
At a glance
Driving tips
Communications
Navigation
Entertainment
Mobility
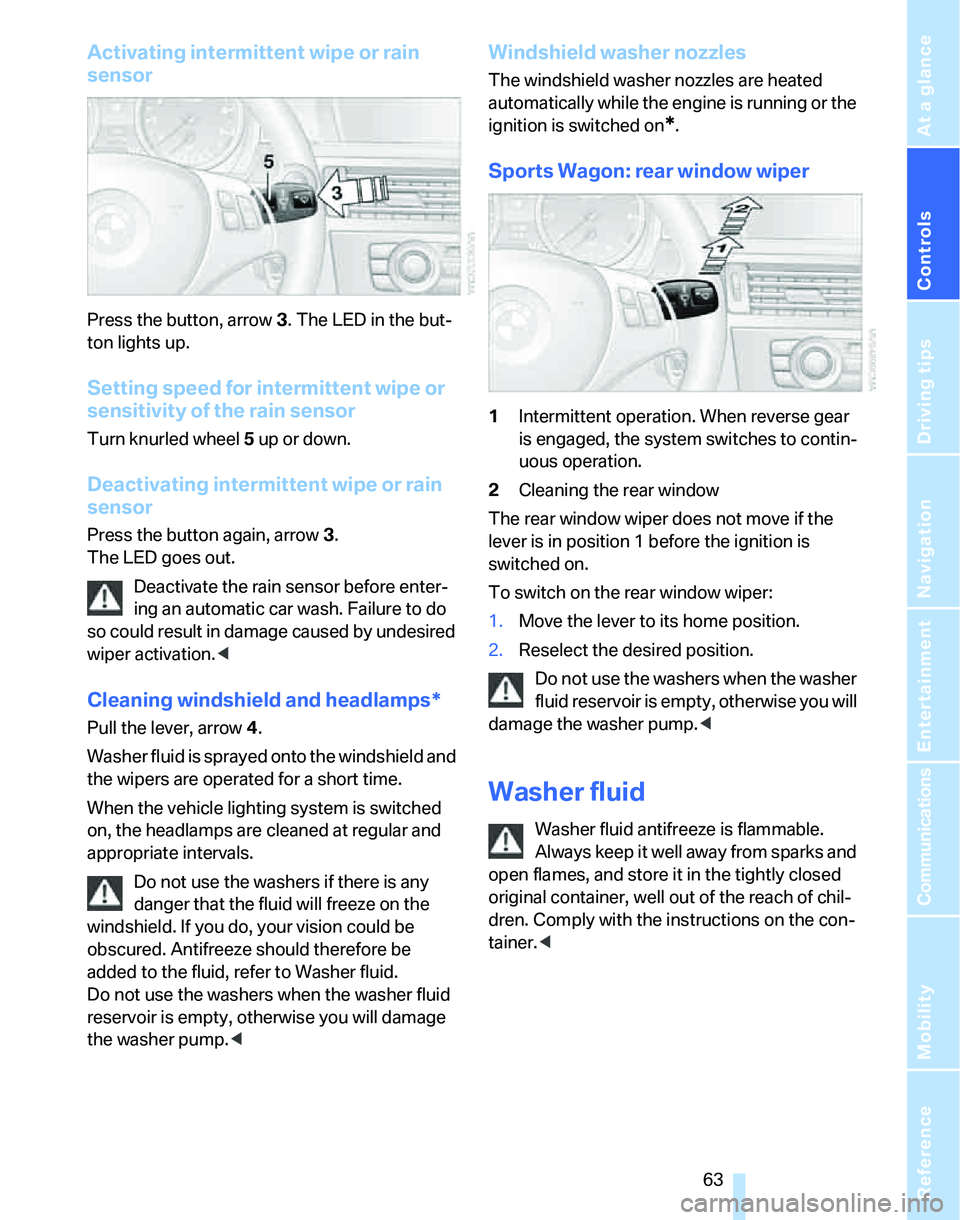
Activating intermittent wipe or rain
sensor
Press the button, arrow3. The LED in the but-
ton lights up.
Setting speed for intermittent wipe or
sensitivity of the rain sensor
Turn knurled wheel5 up or down.
Deactivating intermittent wipe or rain
sensor
Press the button again, arrow3.
The LED goes out.
Deactivate the rain sensor before enter-
ing an automatic car wash. Failure to do
so could result in damage caused by undesired
wiper activation.<
Cleaning windshield and headlamps*
Pull the lever, arrow 4.
Washer fluid is sprayed onto the windshield and
the wipers are operated for a short time.
When the vehicle lighting system is switched
on, the headlamps are cleaned at regular and
appropriate intervals.
Do not use the washers if there is any
danger that the fluid will freeze on the
windshield. If you do, your vision could be
obscured. Antifreeze should therefore be
added to the fluid, refer to Washer fluid.
Do not use the washers when the washer fluid
reservoir is empty, otherwise you will damage
the washer pump.<
Windshield washer nozzles
The windshield washer nozzles are heated
automatically while the engine is running or the
ignition is switched on
*.
Sports Wagon: rear window wiper
1Intermittent operation. When reverse gear
is engaged, the system switches to contin-
uous operation.
2Cleaning the rear window
The rear window wiper does not move if the
lever is in position 1 before the ignition is
switched on.
To switch on the rear window wiper:
1.Move the lever to its home position.
2.Reselect the desired position.
Do not use the washers when the washer
fluid reservoir is empty, otherwise you will
damage the washer pump.<
Washer fluid
Washer fluid antifreeze is flammable.
Always keep it well away from sparks and
open flames, and store it in the tightly closed
original container, well out of the reach of chil-
dren. Comply with the instructions on the con-
tainer.<
Page 89 of 268
Controls
87Reference
At a glance
Driving tips
Communications
Navigation
Entertainment
Mobility
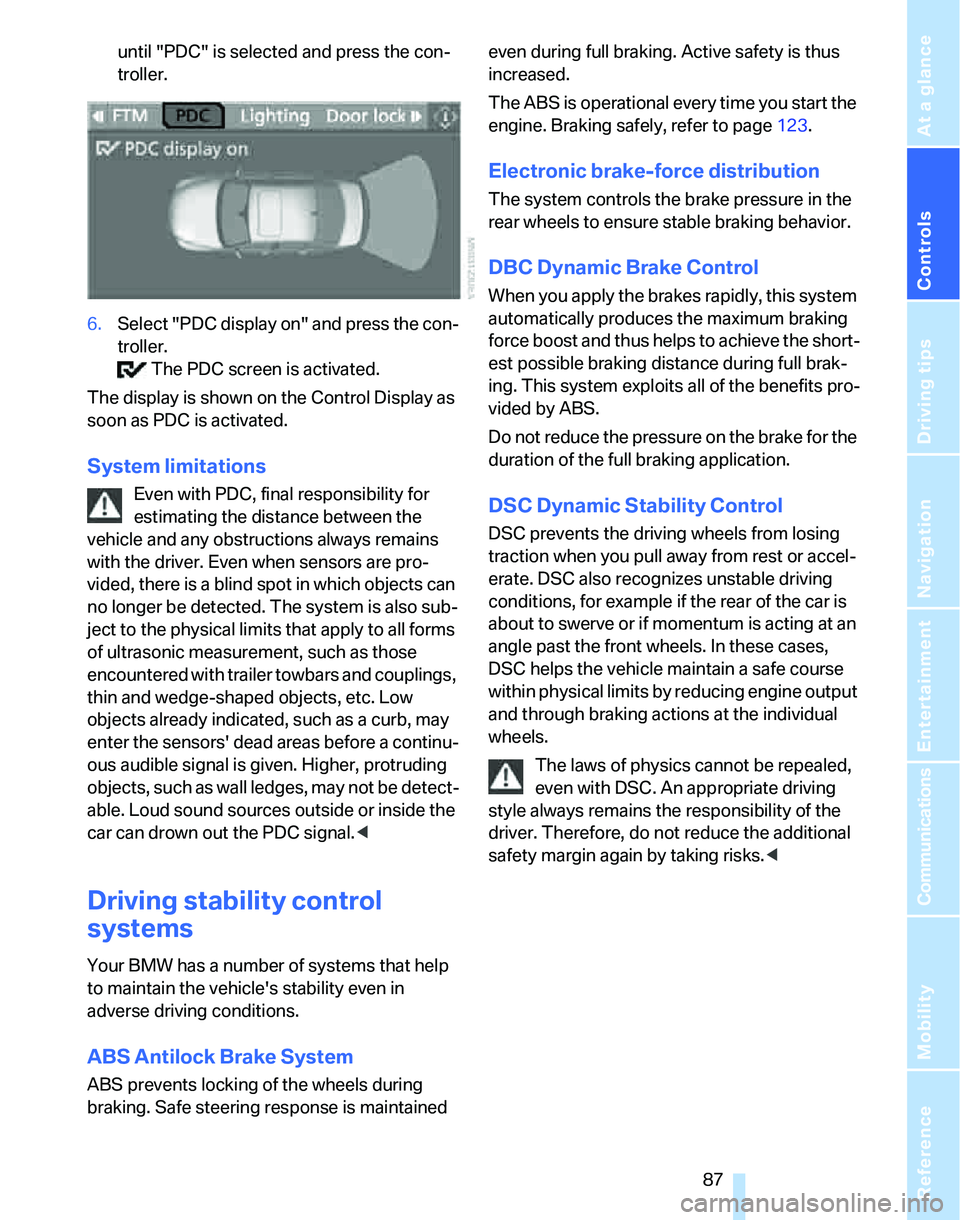
until "PDC" is selected and press the con-
troller.
6.Select "PDC display on" and press the con-
troller.
The PDC screen is activated.
The display is shown on the Control Display as
soon as PDC is activated.
System limitations
Even with PDC, final responsibility for
estimating the distance between the
vehicle and any obstructions always remains
with the driver. Even when sensors are pro-
vided, there is a blind spot in which objects can
no longer be detected. The system is also sub-
ject to the physical limits that apply to all forms
of ultrasonic measurement, such as those
encountered with trailer towbars and couplings,
thin and wedge-shaped objects, etc. Low
objects already indicated, such as a curb, may
enter the sensors' dead areas before a continu-
ous audible signal is given. Higher, protruding
objects, such as wall ledges, may not be detect-
able. Loud sound sources outside or inside the
car can drown out the PDC signal.<
Driving stability control
systems
Your BMW has a number of systems that help
to maintain the vehicle's stability even in
adverse driving conditions.
ABS Antilock Brake System
ABS prevents locking of the wheels during
braking. Safe steering response is maintained even during full braking. Active safety is thus
increased.
The ABS is operational every time you start the
engine. Braking safely, refer to page123.
Electronic brake-force distribution
The system controls the brake pressure in the
rear wheels to ensure stable braking behavior.
DBC Dynamic Brake Control
When you apply the brakes rapidly, this system
automatically produces the maximum braking
force boost and thus helps to achieve the short-
est possible braking distance during full brak-
ing. This system exploits all of the benefits pro-
vided by ABS.
Do not reduce the pressure on the brake for the
duration of the full braking application.
DSC Dynamic Stability Control
DSC prevents the driving wheels from losing
traction when you pull away from rest or accel-
erate. DSC also recognizes unstable driving
conditions, for example if the rear of the car is
about to swerve or if momentum is acting at an
angle past the front wheels. In these cases,
DSC helps the vehicle maintain a safe course
within physical limits by reducing engine output
and through braking actions at the individual
wheels.
The laws of physics cannot be repealed,
even with DSC. An appropriate driving
style always remains the responsibility of the
driver. Therefore, do not reduce the additional
safety margin again by taking risks.<
Page 97 of 268
Controls
95Reference
At a glance
Driving tips
Communications
Navigation
Entertainment
Mobility
Airbags
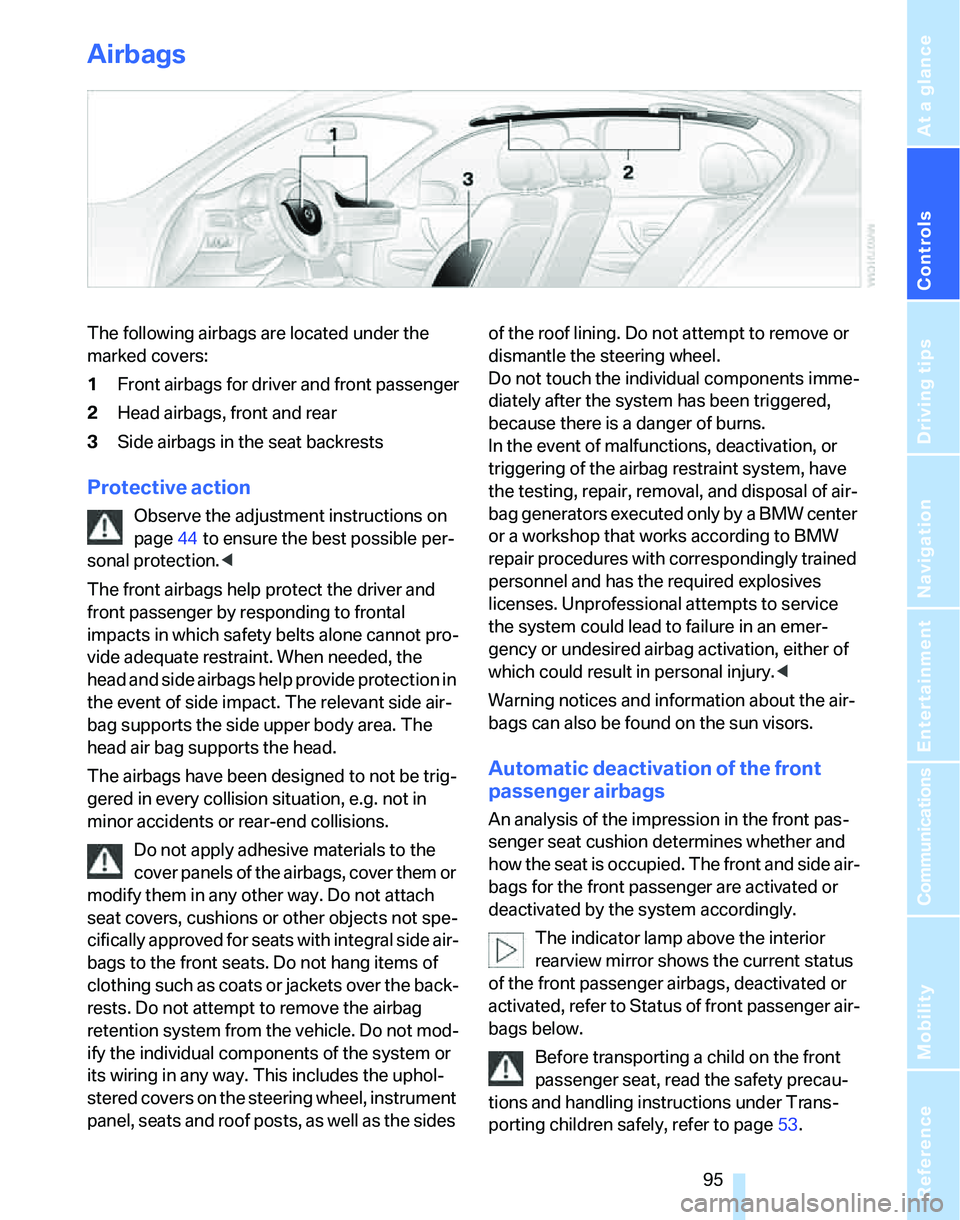
The following airbags are located under the
marked covers:
1Front airbags for driver and front passenger
2Head airbags, front and rear
3Side airbags in the seat backrests
Protective action
Observe the adjustment instructions on
page44 to ensure the best possible per-
sonal protection.<
The front airbags help protect the driver and
front passenger by responding to frontal
impacts in which safety belts alone cannot pro-
vide adequate restraint. When needed, the
head and side airbags help provide protection in
the event of side impact. The relevant side air-
bag supports the side upper body area. The
head air bag supports the head.
The airbags have been designed to not be trig-
gered in every collision situation, e.g. not in
minor accidents or rear-end collisions.
Do not apply adhesive materials to the
cover panels of the airbags, cover them or
modify them in any other way. Do not attach
seat covers, cushions or other objects not spe-
cifically approved for seats with integral side air-
bags to the front seats. Do not hang items of
clothing such as coats or jackets over the back-
rests. Do not attempt to remove the airbag
retention system from the vehicle. Do not mod-
ify the individual components of the system or
its wiring in any way. This includes the uphol-
stered covers on the steering wheel, instrument
panel, seats and roof posts, as well as the sides of the roof lining. Do not attempt to remove or
dismantle the steering wheel.
Do not touch the individual components imme-
diately after the system has been triggered,
because there is a danger of burns.
In the event of malfunctions, deactivation, or
triggering of the airbag restraint system, have
the testing, repair, removal, and disposal of air-
bag generators executed only by a BMW center
or a workshop that works according to BMW
repair procedures with correspondingly trained
personnel and has the required explosives
licenses. Unprofessional attempts to service
the system could lead to failure in an emer-
gency or undesired airbag activation, either of
which could result in personal injury.<
Warning notices and information about the air-
bags can also be found on the sun visors.
Automatic deactivation of the front
passenger airbags
An analysis of the impression in the front pas-
senger seat cushion determines whether and
how the seat is occupied. The front and side air-
bags for the front passenger are activated or
deactivated by the system accordingly.
The indicator lamp above the interior
rearview mirror shows the current status
of the front passenger airbags, deactivated or
activated, refer to Status of front passenger air-
bags below.
Before transporting a child on the front
passenger seat, read the safety precau-
tions and handling instructions under Trans-
porting children safely, refer to page53.
Page 99 of 268
Controls
97Reference
At a glance
Driving tips
Communications
Navigation
Entertainment
Mobility
Lamps
Parking lamps/low beams
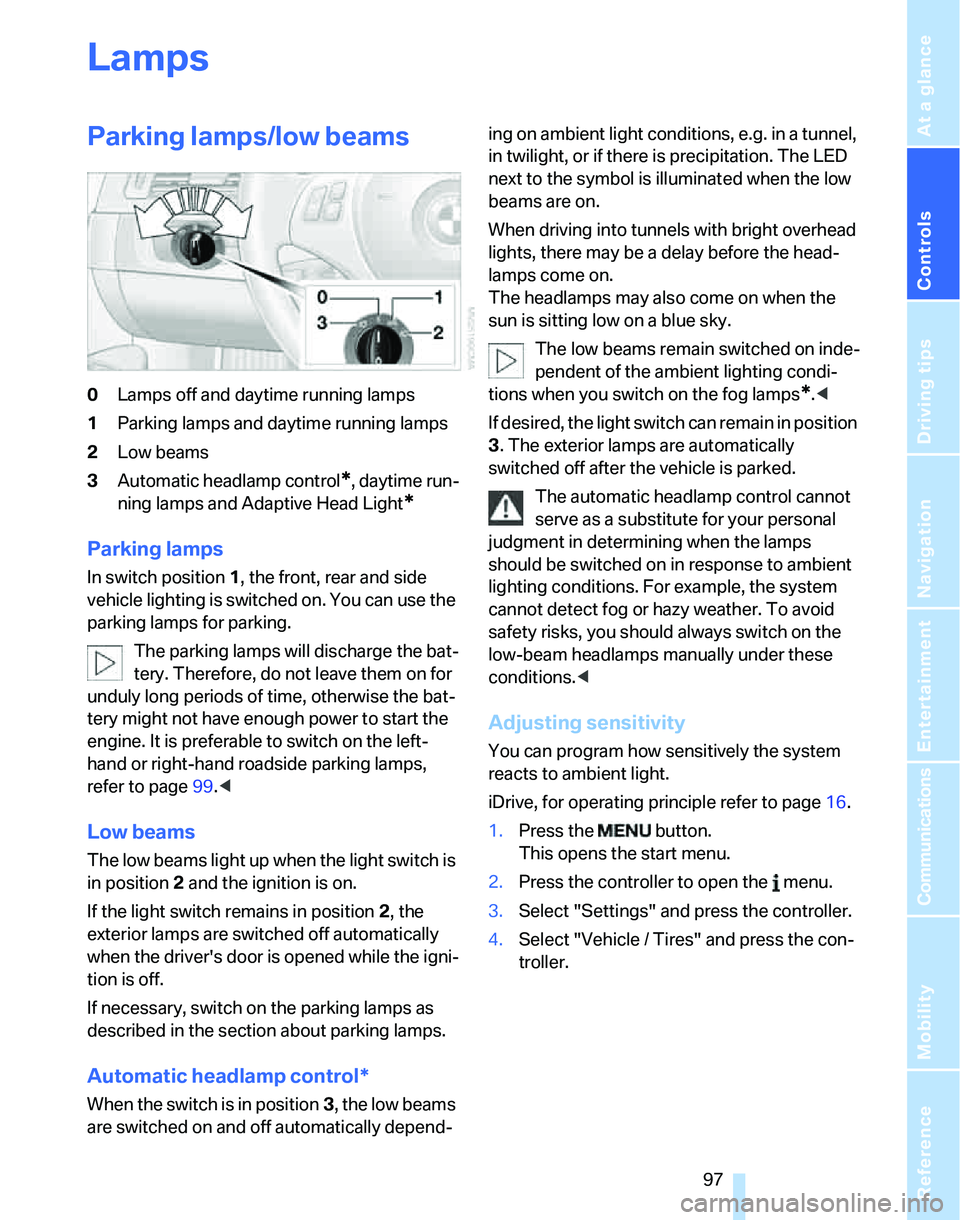
0Lamps off and daytime running lamps
1Parking lamps and daytime running lamps
2Low beams
3Automatic headlamp control
*, daytime run-
ning lamps and Adaptive Head Light
*
Parking lamps
In switch position1, the front, rear and side
vehicle lighting is switched on. You can use the
parking lamps for parking.
The parking lamps will discharge the bat-
tery. Therefore, do not leave them on for
unduly long periods of time, otherwise the bat-
tery might not have enough power to start the
engine. It is preferable to switch on the left-
hand or right-hand roadside parking lamps,
refer to page99.<
Low beams
The low beams light up when the light switch is
in position 2 and the ignition is on.
If the light switch remains in position 2, the
exterior lamps are switched off automatically
when the driver's door is opened while the igni-
tion is off.
If necessary, switch on the parking lamps as
described in the section about parking lamps.
Automatic headlamp control*
When the switch is in position3, the low beams
are switched on and off automatically depend-ing on ambient light conditions, e.g. in a tunnel,
in twilight, or if there is precipitation. The LED
next to the symbol is illuminated when the low
beams are on.
When driving into tunnels with bright overhead
lights, there may be a delay before the head-
lamps come on.
The headlamps may also come on when the
sun is sitting low on a blue sky.
The low beams remain switched on inde-
pendent of the ambient lighting condi-
tions when you switch on the fog lamps
*.<
If desired, the light switch can remain in position
3. The exterior lamps are automatically
switched off after the vehicle is parked.
The automatic headlamp control cannot
serve as a substitute for your personal
judgment in determining when the lamps
should be switched on in response to ambient
lighting conditions. For example, the system
cannot detect fog or hazy weather. To avoid
safety risks, you should always switch on the
low-beam headlamps manually under these
conditions.<
Adjusting sensitivity
You can program how sensitively the system
reacts to ambient light.
iDrive, for operating principle refer to page16.
1.Press the button.
This opens the start menu.
2.Press the controller to open the menu.
3.Select "Settings" and press the controller.
4.Select "Vehicle / Tires" and press the con-
troller.
Page 103 of 268
Controls
101Reference
At a glance
Driving tips
Communications
Navigation
Entertainment
Mobility
Climate
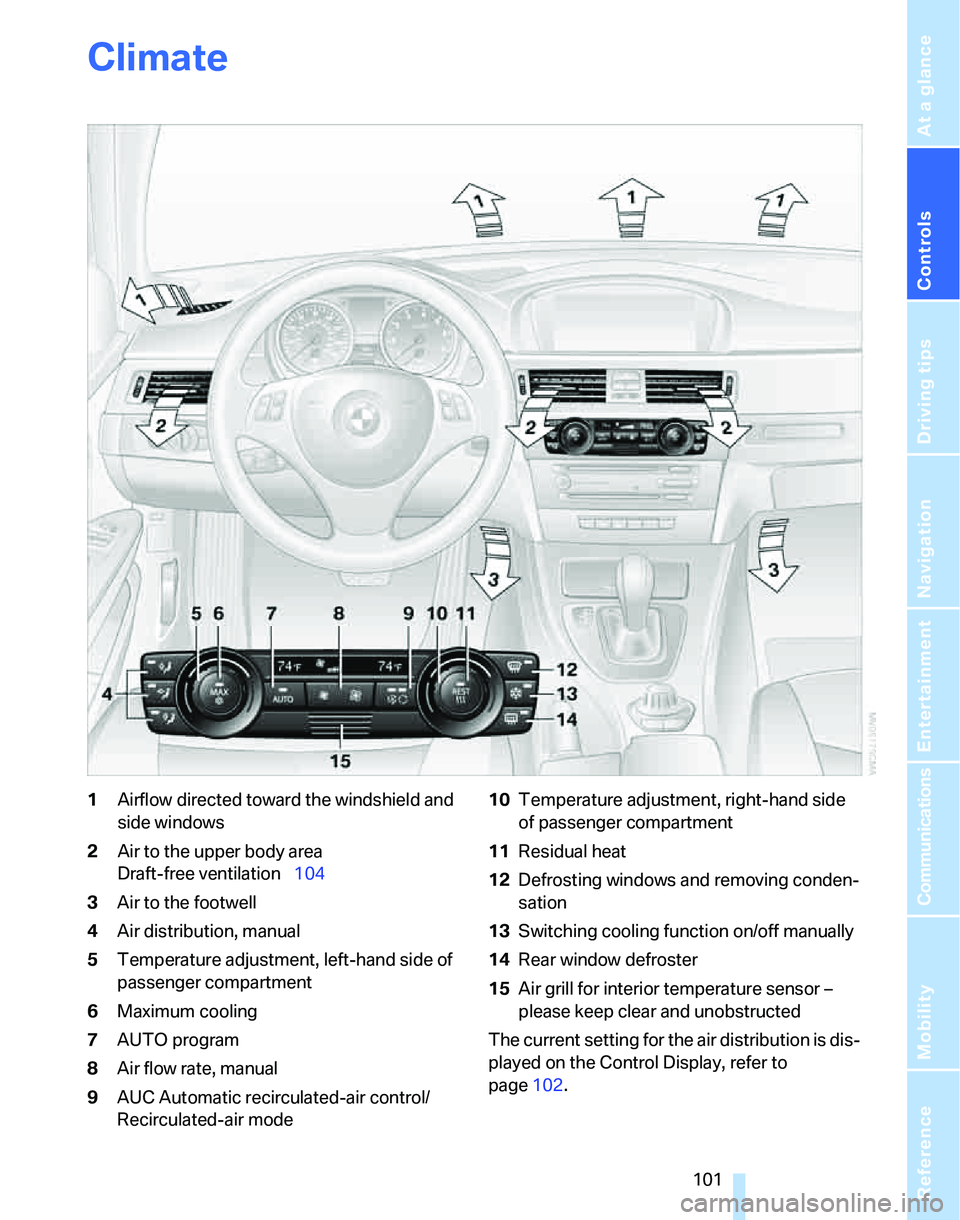
1Airflow directed toward the windshield and
side windows
2Air to the upper body area
Draft-free ventilation104
3Air to the footwell
4Air distribution, manual
5Temperature adjustment, left-hand side of
passenger compartment
6Maximum cooling
7AUTO program
8Air flow rate, manual
9AUC Automatic recirculated-air control/
Recirculated-air mode10Temperature adjustment, right-hand side
of passenger compartment
11Residual heat
12Defrosting windows and removing conden-
sation
13Switching cooling function on/off manually
14Rear window defroster
15Air grill for interior temperature sensor –
please keep clear and unobstructed
The current setting for the air distribution is dis-
played on the Control Display, refer to
page102.